
开始使用
探索面向科研人员的新一代智能工作流。
简介:化繁为简的科研全链路
传统的科研工作往往是割裂的:在不同数据库间检索、使用文献管理软件整理、切换到各类 AI 工具辅助阅读,最后还要打开排版软件制作报告。SciencePro 将这些支离破碎的步骤整合为一个单一、无缝且深度智能的工作环境。
它不仅是一个对话助手,更是一个集文献调研、学术写作、数据检索和成果可视化于一体的科研工作站。借助 SciencePro,您可以在此推进从"寻找灵感"到"成果展示"的整个学术价值链。
这种一站式的科研范式意味着您可以:
- 全景式文献调研:一键直连中科院文献情报中心、arXiv 及全球学术资源,或基于您的个人文献库,让智能体为您梳理研究脉络和引文图谱。
- 深度阅读与批注:告别泛泛而读,对单篇或多篇海量文献进行精读解析,自动提取核心观点、研究方法及局限性。
- 沉浸式推演研究:独创的深度深度研究,通过单智能体闭环架构(AgentLoop),实时透视 AI 拆解问题、收集信源到生成答案的完整思考过程。
- 学术级内容生成:仅需提供自然语言指令或上传源文件,即可自动生成数万字的文献综述、符合学术规范的 PPT 汇报、专业海报及配图。
- 全链路资产管理:您的每一次推演记录、过程文件及个人研值资产,都由系统安全、有序地统一归档。
SciencePro 消除了在繁杂工具间切换的摩擦力,让您将核心精力重新聚焦于「研究」本身。
快速上手:开启您的第一次智能研究
使用 SciencePro 开展研究是一个极其自然的过程。无论您是需要解答一个细微的学术疑问,还是要完成一篇宏大的综述,都可以遵循以下核心步骤快速启动。
1. 确立研究意图并抛出问题
一切从首页的对话框开始。根据您的任务复杂度,选择最适合的模式,并用自然语言描述您的需求:
- 日常释疑:默认的「极速模式」可以瞬间解答您的学科疑问。
- 深度挖掘:切换至「深度研究」,告诉它:"帮我调研近三年关于固态电池能量密度提升的前沿方案,并对比各方法的优劣。" 描述越详细,智能体规划的路径越精准。
2. 构建或接入专属知识库
如果您已有特定的研究范围,在提问前可点击「设置」或进入「文献库」模块。您可以上传本地文献,构建您的专属知识库。您不仅可以限定智能体只在您的库中寻找答案,还能让它结合全网 1.7 亿篇科技论文交叉验证,确保结果的权威性。
3. 见证智能体的深度思考
当您在「深度研究」下提交任务后,SciencePro 将在左侧过程区向您展露它的「思考全过程」。您将实时看到它如何拆解任务、调用网络搜索或查阅文献库、提取信息。而在右侧的工作区,所有被引用的信息源、图表和阶段性文件都会清晰列出。每一个结论都真实可溯源。
4. 一键转化科研成果
研究有了结论,接下来是展示。您无需离开平台,直接在对话框底部切换至转化工具:
- 需要汇报?点击「学术 PPT」或「学术海报」,上传您的文档,系统将自动解析结构、生成大纲,并排版出符合学术审美的可视化文件(支持中英双语及主题色切换)。
- 需要插图?唤起「科研配图」,描述您需要的实验流程图或分子结构,系统即刻生成专业配图。
登入系统
首次使用 SciencePro 需要注册并登入您的个人账号。
1.1 访问门户
SciencePro官方地址:https://www.scienceone.ai,推荐使用Google Chrome浏览器或Microsoft Edge浏览器。
1.2 注册账号
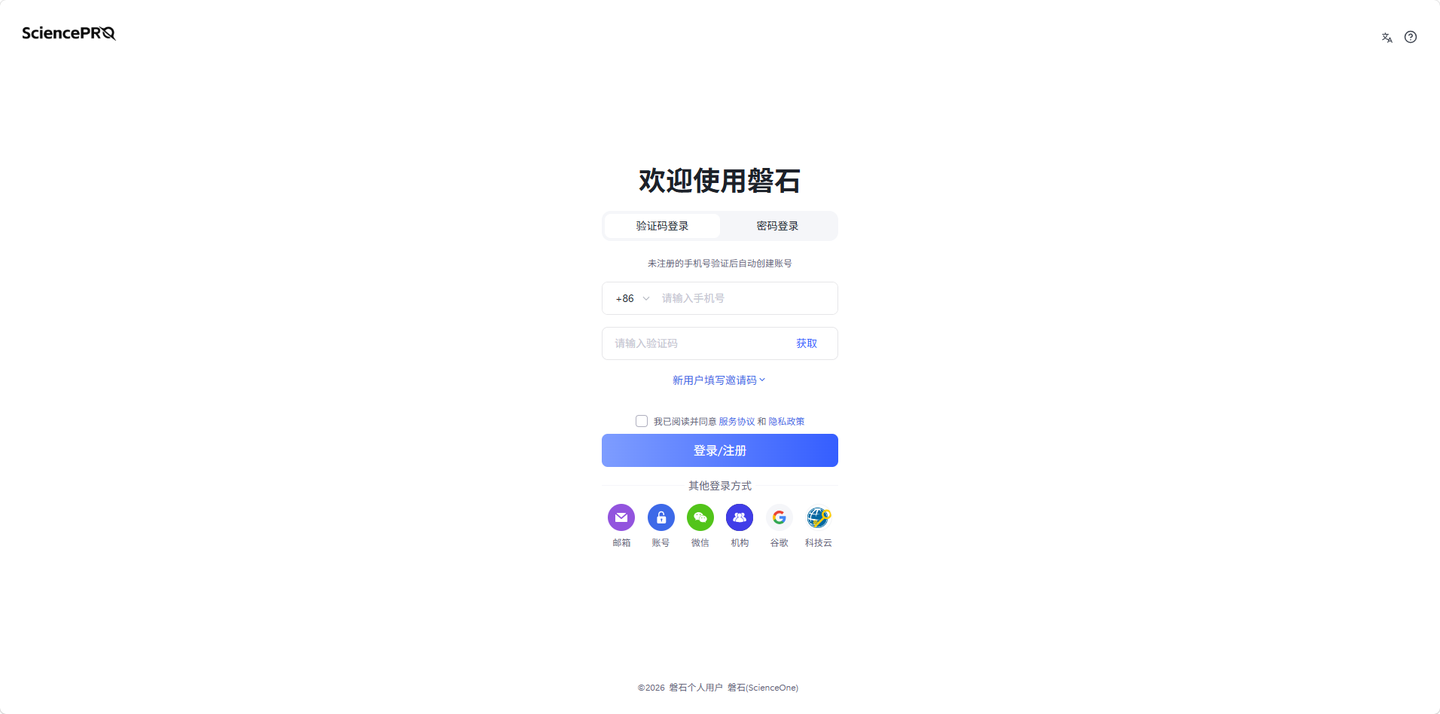
首次进入“磐石”时,需要您注册账号。
系统为个人用户提供手机号、邮箱注册功能,首次进入页面会显示手机号注册,点击页面底部邮箱即可切换至邮箱注册。
在输入框输入手机号或邮箱地址,并点击"获取"按钮,即可获取验证码,输入正确匹配的验证码,即可完成注册,并自动创建账号。
1.3 登录账号
支持以下两种主要登录方式:
验证码登录:输入手机号,点击「获取」收取验证码后登录。未注册的手机号验证后自动创建账号。
密码登录:输入手机号及账号密码登录。
此外,还支持通过邮箱、账号、机构三种方式登录,可在页面底部选择。
1.3.1 账号密码登录
如果您已有完成注册的账号及其密码,可点击账号和密码登录,正确输入账号密码后即可登入系统。
1.3.2 验证码登录
如果您有已注册成功的手机号或邮箱,可点击验证码登录,正确输入手机号/邮箱地址及验证码后即可登入系统。
1.3.3 机构登录
如果您所在机构已接入SciencePro,点击机构登录,选择您所在的机构,通过机构登录成功后即可登入系统。
科学对话
2.1 对话模式
科学对话面向文献调研、学科问题解答、研究报告撰写、可视化报告生成、文献综述等场景,提供多种使用模式。
深度研究:更全,适用于调研、报告、挖掘研究思路等场景,整合海量信息,全方位支撑科研决策。
文献综述:更透,专用于超长文献综述场景,深度解析万篇文献,全面梳理研究脉络。
创新评价:更优,适用于投稿前项目和论文的自查与辅助审稿,精准剖析可优化之处,让评审材料精益求精。
学术 PPT:更专,适用于开题报告、学术会议汇报、研究成果展示等场景,上传文献一键生成,图片图表真实可溯源。
科研配图:更精,适用于论文图表绘制、报告插图设计、学术汇报可视化素材制作等场景,精准匹配研究内容。
学术海报:更直观,适用于学术交流、成果展示等场景,上传文献一键生成,视觉化展现研究亮点。
材料创制计算:聚焦材料表征解析、结构与性能分析,辅助物相判定、性能解读与材料规律预测。
化学分子评估 :覆盖分子结构、理化、毒理与代谢数据挖掘,支撑药物筛选、化合物评估与分子知识发现。
分子性能模拟:适配热力学计算、分子 / 蛋白结构模拟与参数拟合,完成稳定性筛选与计算结果智能解读。
生命科学研究:适配测序、基因编辑、细胞与合成生物实验,一站式完成实验方案设计、组学数据处理与结果分析。
2.1.1 深度研究
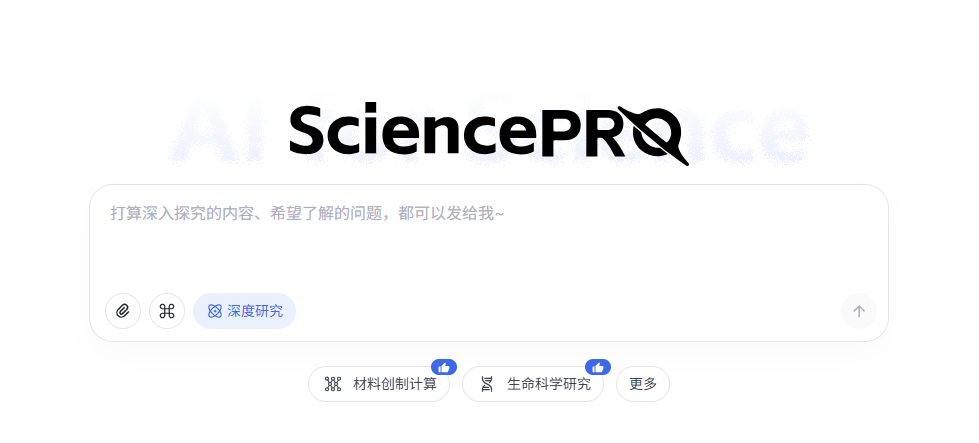
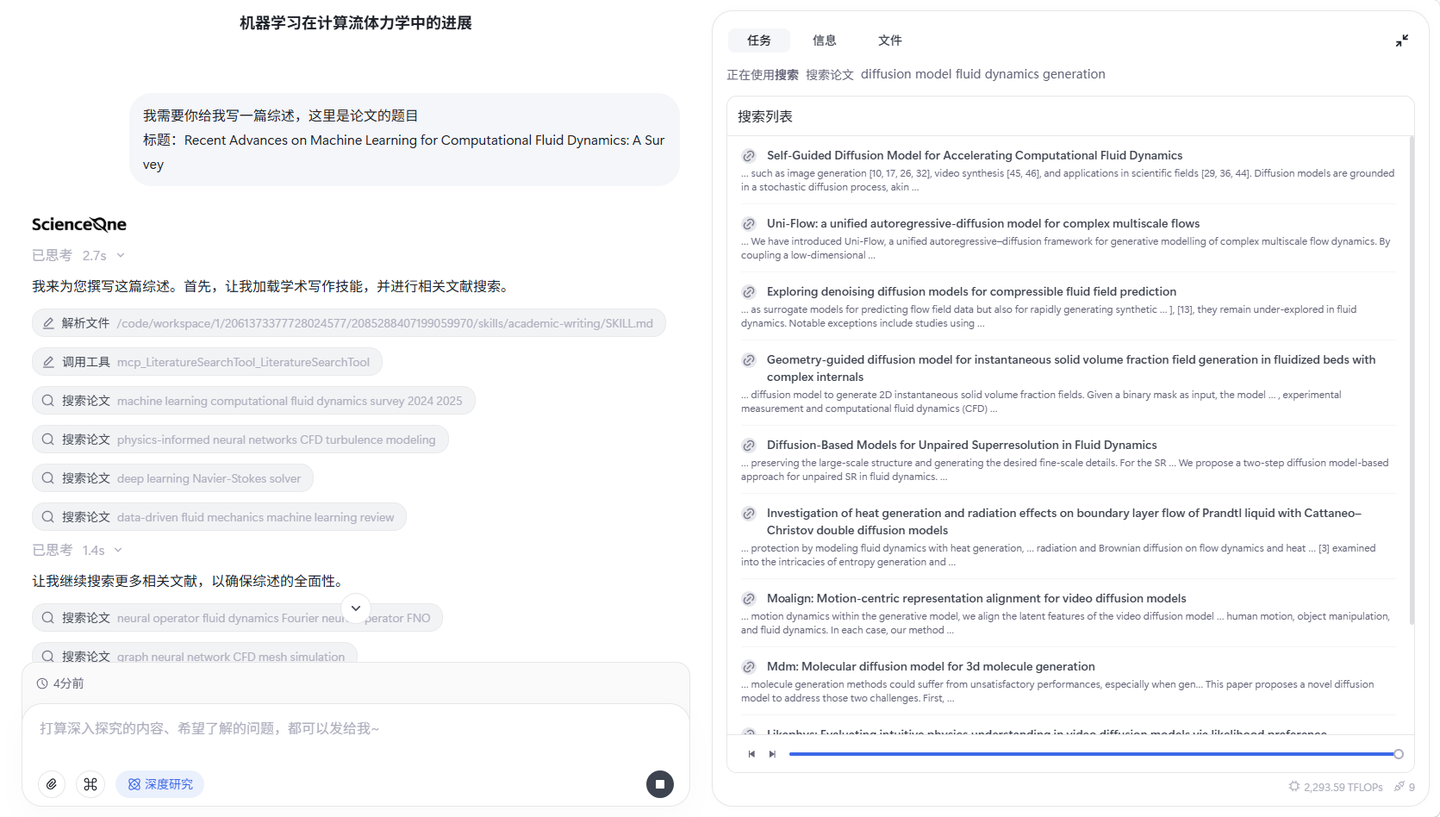
目前对话默认为深度研究,在该模式下,采用单智能体闭环运行(AgentLoop)架构,智能体会思考您的问题,并输出回答。
系统分为两部分:过程区(左侧)、工作区(右侧)。左侧过程区展示当前执行过程,包括思考过程、执行细节及最终生成的结果。右侧工作区包含三部分:"任务"部分展示智能体执行步骤的输出结果;"信息"部分汇总展示通过技能、网络信源、文献库收集的信息;"文件"部分展示当前任务生成的所有文件列表。
2.1.2 文献综述
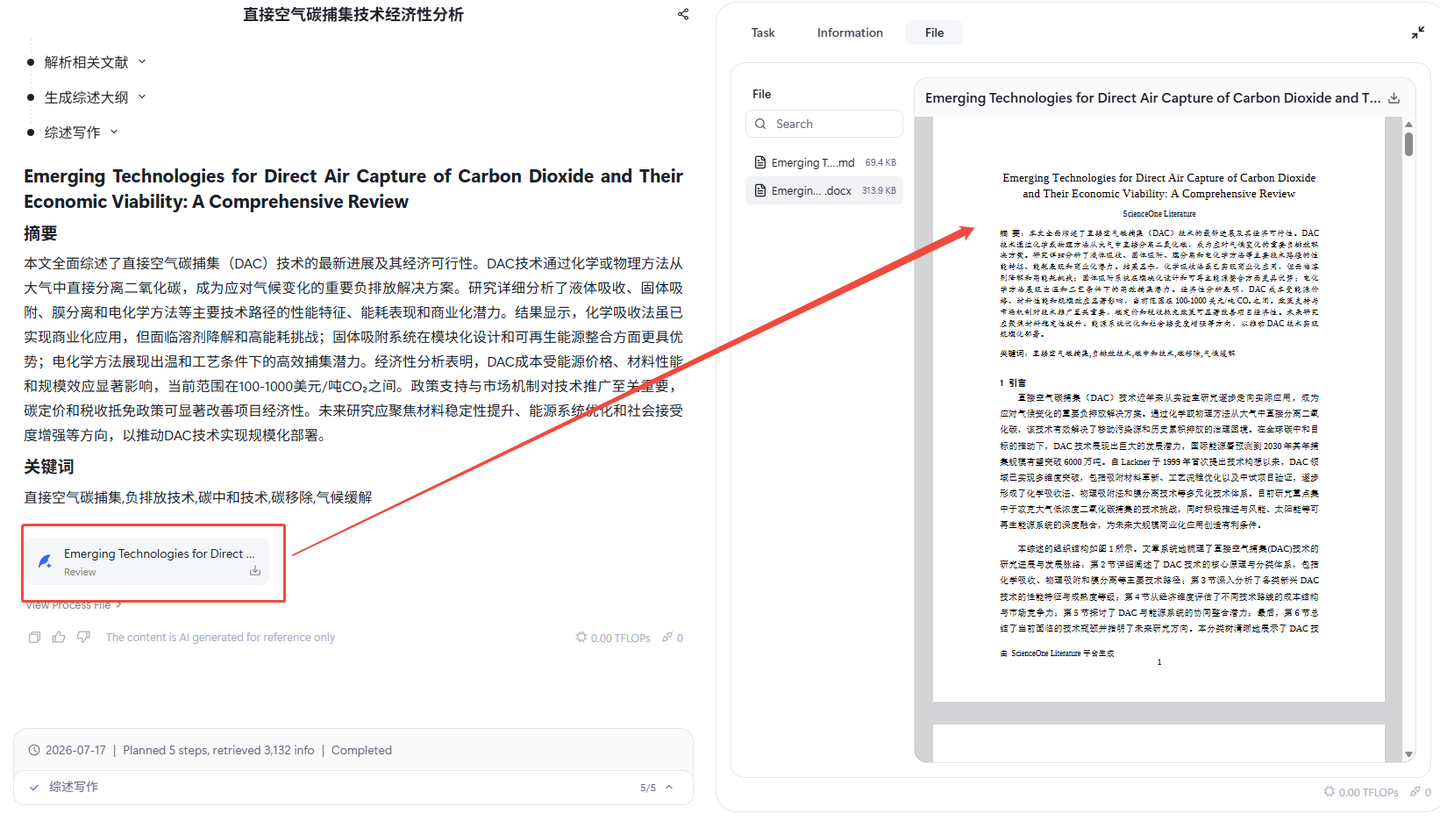
在首页对话框下方选中“文献综述”按钮即可使用文献综述模式。
在综述模式下,支持输入您的研究问题,获取数万字专业综述,在任务开始前可以选择文献库、网络信源和目标语言。

任务开始后,智能体对综述的标题、关键词等详细信息进行提取,并生成支持您修改的综述大纲,等待您的确认后再继续执行。
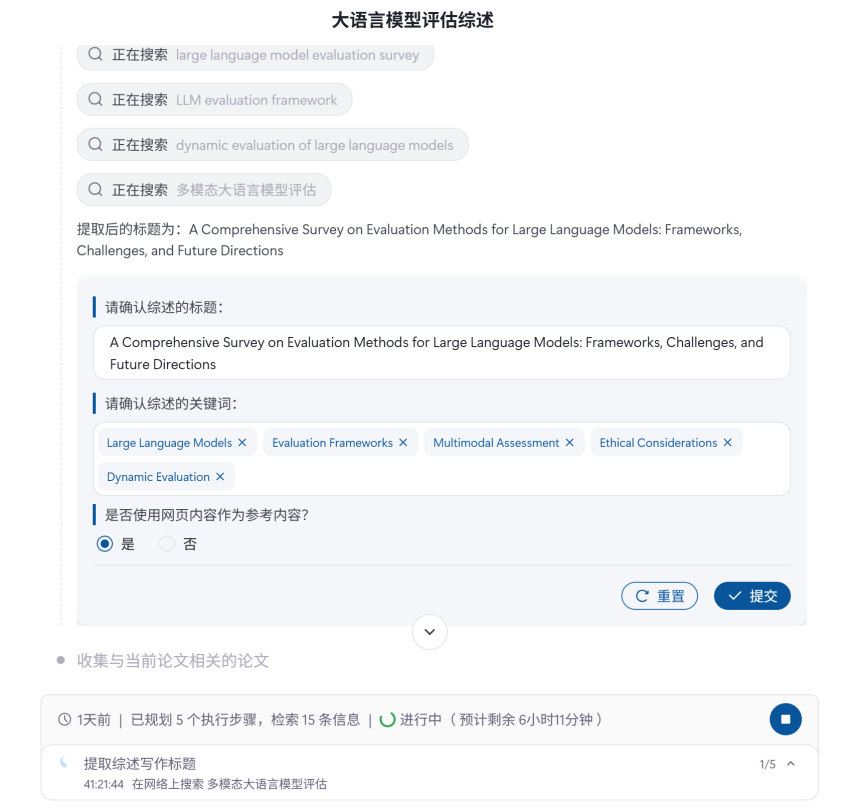
任务执行完毕后,系统会展示完整的综述报告,包括摘要、正文、参考文献等,点击【下载】即可下载pdf、word或md文件格式的报告全文。
2.1.4 创新评价
在首页对话框下方选中"创新评价"按钮即可进入评价报告生成模式。支持点击上传区域调起本地文件选择,或直接拖拽本地文件进行上传。系统支持上传1份PDF、Word或Excel格式的待评审材料,文件大小需在20M以内。
任务开始前,可自行选择相应的评审指南或评价标准,并按需开启或关闭信源。系统将根据所选标准与信源配置,对上传材料进行解析、匹配和评价,生成对应的评审结果与报告。
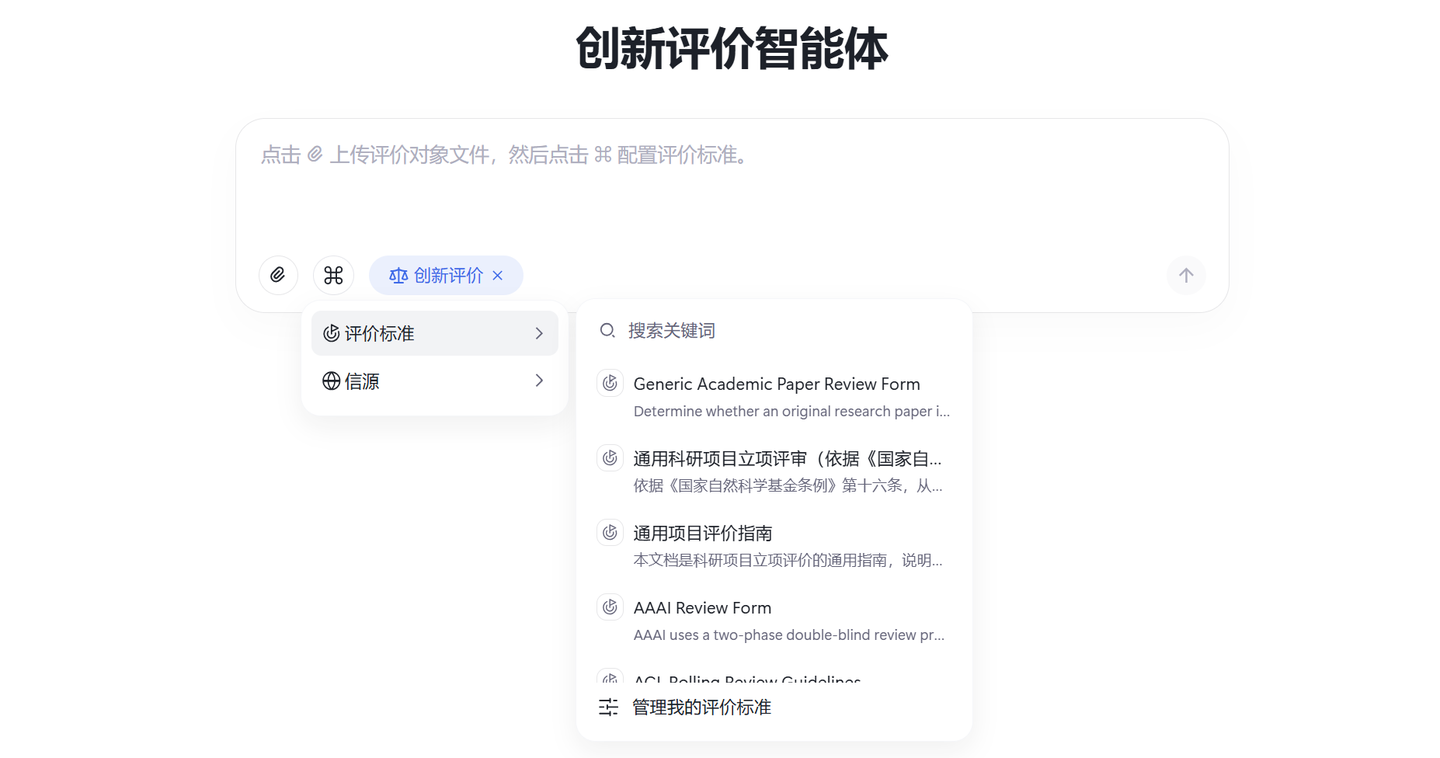
用户完成材料上传并选定评审指南或标准后,系统会对待评审材料及所选标准进行解析,识别评审对象的核心信息、评价维度和判断依据。在此基础上,系统结合待评审主题与评审标准,自动规划搜索任务,补充构建与当前评审任务相关的领域知识。
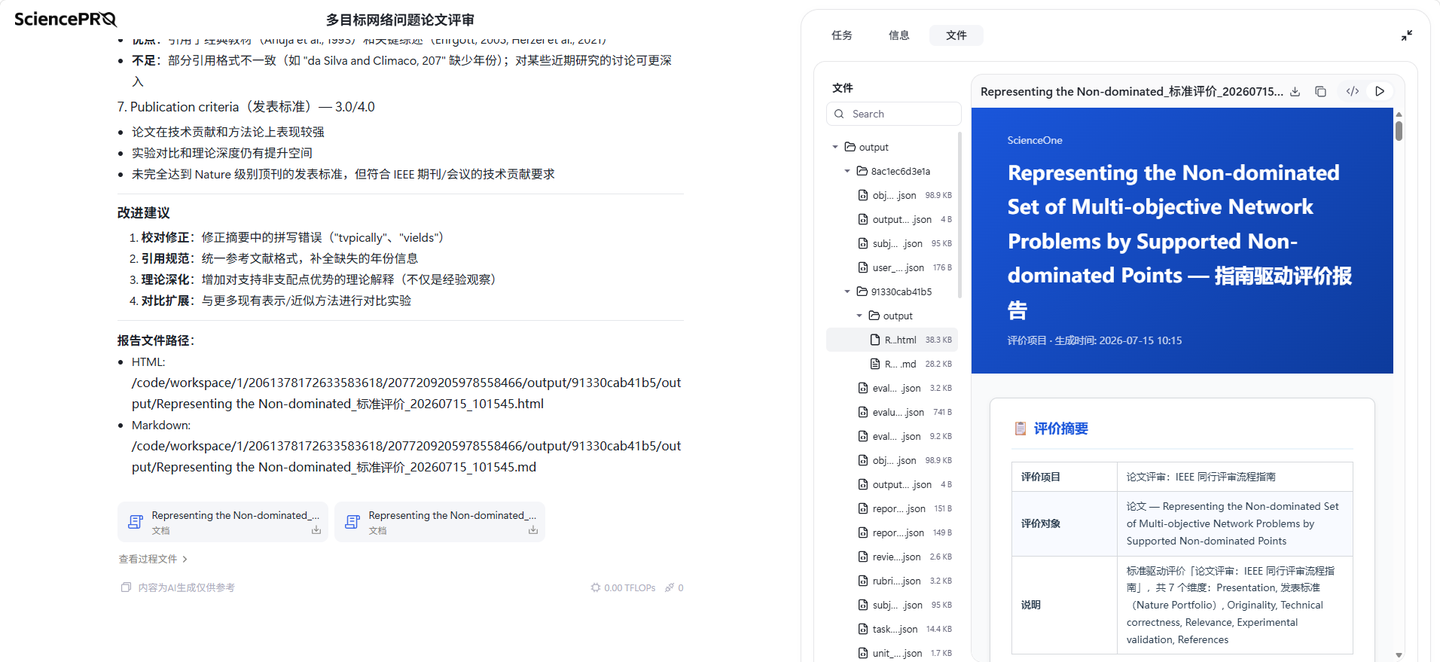
在领域知识构建过程中,系统会对搜索获得的信息进行相关性过滤、关键信息提取和多轮核验,以保证引入知识的有效性与可靠性。随后,智能体将待评审内容、评审指南和已构建的领域知识进行联合分析,形成结构化评价结果,并输出包含评价结论、分析依据与引用证据的评审报告。报告支持以 HTML 和 Markdown 两种格式生成,便于展示、归档和后续复核。
2.1.5 学术PPT
在首页对话框下方选中"学术PPT"按钮即可进入学术PPT生成模式。支持点击附件上传1份文件大小在20MB以内的PDF、DOC或DOCX格式的学术文献。上传前可选择输出语言(中文/英文,默认为英文)和主题颜色,系统将基于您选择的配置制作学术PPT。

学术PPT智能体将调用ppt-generator技能,分为四个阶段。首先进行输入文档确认和源文档解析,系统会阅读源文件并解析论文内容及图表信息,解析过程中会在工作区展示详细的处理日志。其次,基于您选择的配置系统会生成推荐的学术PPT产物参数请您确认或修改。第二阶段生成演示大纲,系统会生成完整的PPT大纲结构并展示,您在确认或修改大纲后会进入下一阶段。第三阶段逐页生成PPT内容,右侧工作区会展示逐页的PPT生成进度。最后阶段完成PPT渲染并提供可下载的PPT文档。
整个生成过程中,右侧工作区会实时展示两个主要内容模块。任务模块显示详细的处理日志,包括文件读取、内容解析、大纲生成和PPT制作的全过程记录。文件模块分文件夹展示任务中产生的文件,包括学术文献解析后提取的图表、处理日志的txt和json文件、各生成阶段的markdown结果文件、逐页生成的PPT文件等。
2.1.6 科研配图
在首页对话框下方选中"科研配图"按钮即可进入科研配图模式。科研配图智能体底层模型使用多模态推理模型S1-Omni-Image,遵循 “先思考,后生成” 范式,支持图像生成和编辑两大功能;模型基于数理化生天地六大领域海量科研配图专项训练,适配流程图、架构图、原理图等常见科研配图类型,推流实时可视化完整绘图思考推演过程,一站式完成科研配图生成与精细化编辑。

您可以用自然语言描述需要的科研配图内容,提交配图需求后,系统将自动执行两个关键步骤完成配图生成。首先进行科研配图需求理解与相关性评估,系统会分析您的描述内容,判断是否符合科研配图要求,并评估内容的安全性和合规性。通过评估后,系统将调用S1-Omni-Image模型进行科研配图绘制,基于您的需求生成专业的学术风格图片,并会添加AI生成水印以标识来源。配图生成完成后,系统将展示科研配图生成结果。支持使用点赞/点踩功能对生成结果进行反馈,帮助系统持续优化。
此外,系统支持多轮对话来完善配图效果,您还可以在当前对话中继续提出修改建议或新的配图要求,直到满足您的学术需求。
2.1.7 学术海报
在首页对话框下方选中"学术海报"按钮即可进入学术海报生成模式。支持点击附件上传1份文件大小在20MB以内的PDF、DOC或DOCX格式的学术文献。上传前可选择输出语言(中文/英文,默认为英文)、尺寸和主题颜色,系统将基于您选择的配置制作学术海报。
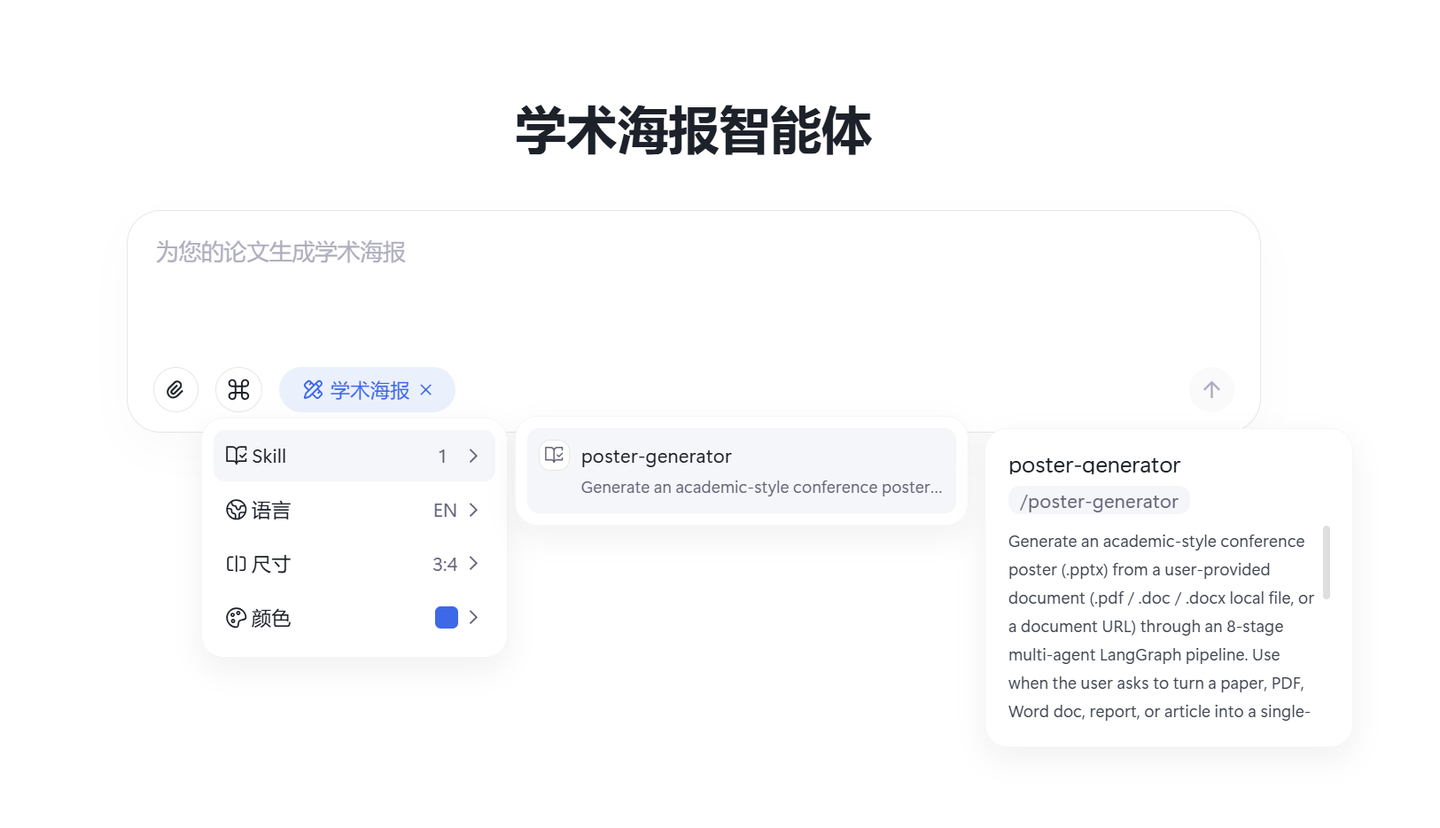
学术海报智能体将调用poster-generator技能,逐步完成学术海报生成任务。经过解析文档->确认参数->内容策展->颜色设计->标题设计->布局优化->字体设计->渲染海报->最终验证八个步骤生成可下载的学术海报。
整个生成过程中,右侧工作区会实时展示两个主要内容模块。任务模块显示详细的处理日志,包括文件读取、内容解析、海报制作的全过程记录。文件模块分文件夹展示任务中产生的文件,包括学术文献解析后提取的图表、处理日志的txt和json文件、八个步骤的markdown结果文件、最终学术海报PPT文件等。
2.1.8 材料创制计算
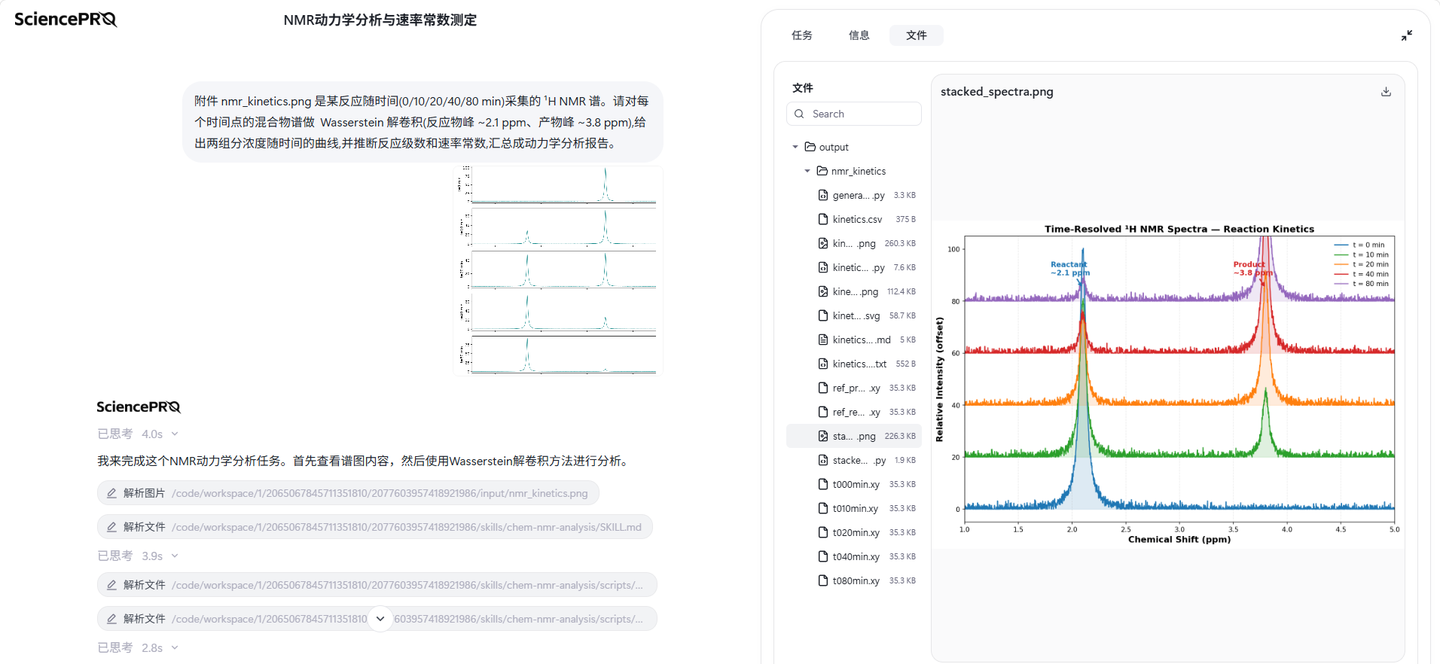
材料创制计算智能体面向 XRD、NMR、Raman 等表征数据的解析与物相鉴定,支持材料结构、电化学性能、稳定性及构效关系分析,辅助材料性能理解与预测。
在首页对话框下方选中“材料创制计算”按钮即可进入材料创制计算智能体。支持点击附件上传10份文件大小在20MB以内的多种格式的文件。任务开始前,可自行选择需要的Skill和MCP,并按需开启或关闭知识库和信源。
2.1.9 化学分子评估
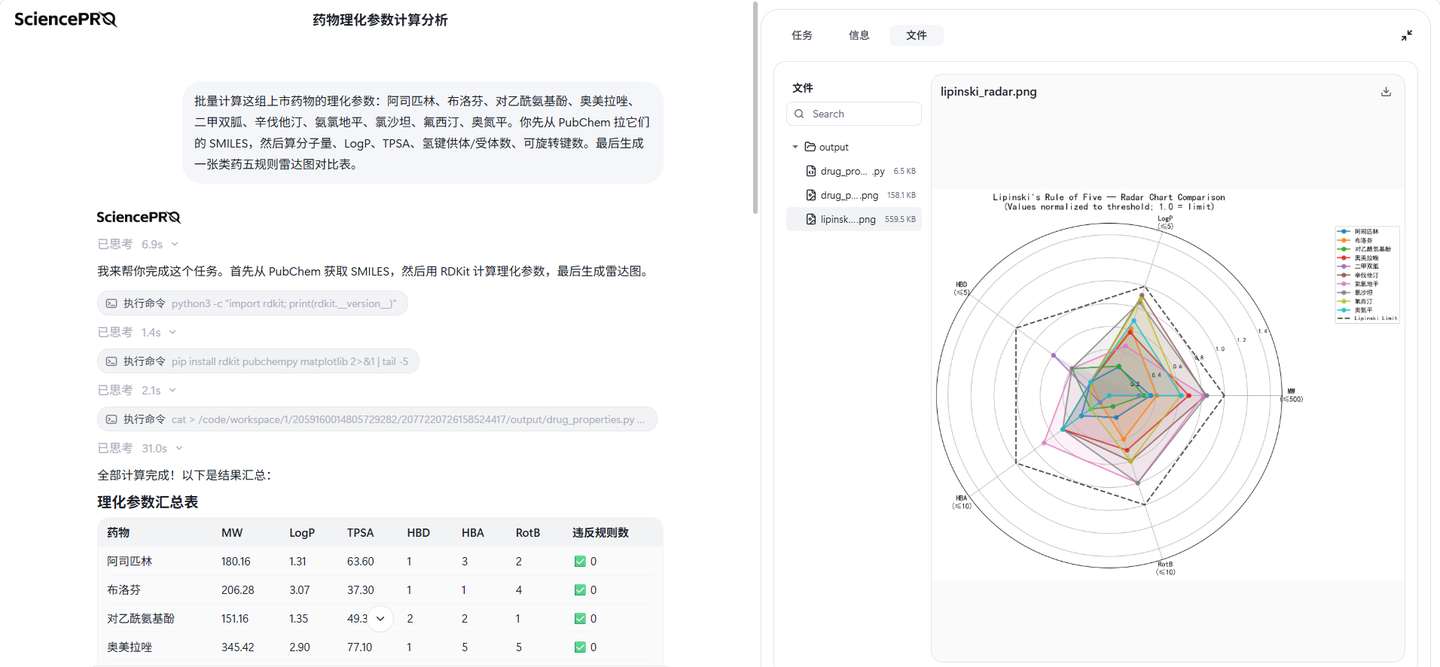
化学分子评估智能体面向分子结构、理化性质、生物活性、ADMET / 毒理预测与代谢组学数据的检索、分析与知识发现,辅助药物研究与化合物评估。
在首页对话框下方选中“化学分子评估”按钮即可进入化学分子评估智能体。支持点击附件上传10份文件大小在20MB以内的多种格式的文件。任务开始前,可自行选择需要的Skill和MCP,并按需开启或关闭知识库和信源。
2.1.10 分子性能模拟
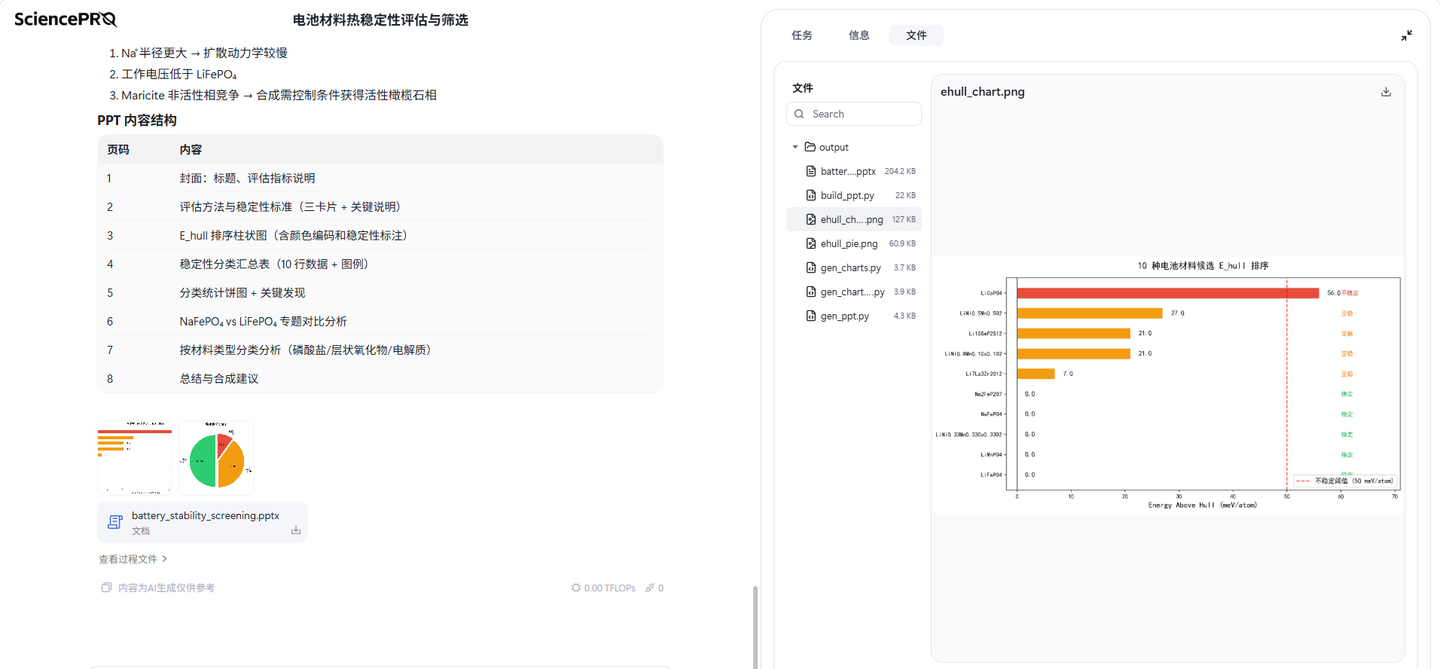
分子性能模拟智能体支持蛋白质组装界面分析、材料热力学稳定性筛选、状态方程拟合及引物 / 结构参数计算,辅助热力学性质分析与计算结果解读。
在首页对话框下方选中“分子性能模拟”按钮即可进入分子性能模拟智能体。支持点击附件上传10份文件大小在20MB以内的多种格式的文件。任务开始前,可自行选择需要的Skill和MCP,并按需开启或关闭知识库和信源。
2.1.11 生命科学研究
生命科学研究智能体面向基因编辑、组学测序、遗传分析、流式细胞术、合成生物学与动物实验等任务,覆盖分子生物学到应用生命科学场景,支持实验方案设计、数据处理与结果解读。
在首页对话框下方选中“生命科学研究”按钮即可进入生命科学研究智能体。支持点击附件上传10份文件大小在20MB以内的多种格式的文件。任务开始前,可自行选择需要的Skill和MCP,并按需开启或关闭知识库和信源。
2.2 附件与设置
2.2.1 上传附件
支持上传附件以补充您的研究信息,最多支持一次上传10个文件,每个不超过20MB。
2.2.2 设置Skill、MCP、文献库与信源
点击"设置"可选择智能体的技能、MCP、信息来源和输出配置要求,其中信息来源包括文献库、网络信源;输出配置根据模式不同,支持不同配置,如在文献综述中,支持配置目标语言;在学术PPT中,支持配置目标语言和主题颜色。
技能:展示支持调用的技能,您可根据具体科研场景自主选择调用的技能
点击对话框处的“Skill”按钮,会显示技能列表,支持点击到对话框中进行调用
点击“管理我的Skill”,在弹窗中可勾选最多 10 个技能供智能体自动调用
勾选开关的技能会自动按需触发
未勾选的技能可点击加载到对话框,以/[技能Slug]形式 100% 强制调用
超出 10 个会提示"自动触发 Skill 已达上限"
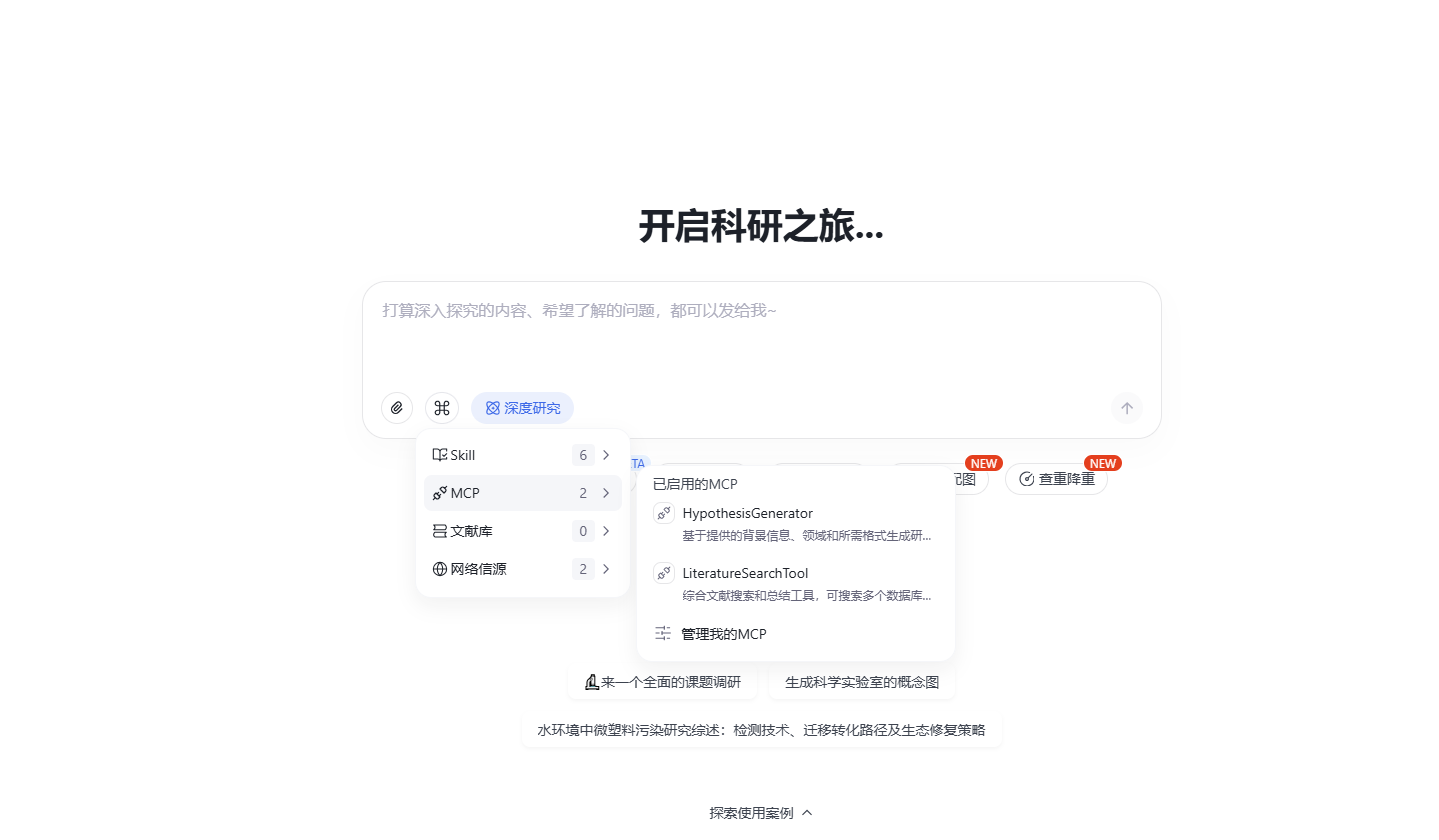
MCP:展示已启用的MCP,您可自主配置外部 MCP,让科研助手具备可持续扩展的工具调度能力。
点击对话框处的“MCP”按钮,会显示已启用的MCP列表
点击“管理我的MCP”,在弹窗中可勾选最多 10 个MCP供 智能体 按需自动调用
首次启用需要填写鉴权凭证,平台会安全加密保存凭证,后续启用同一MCP不再重复填写
在填写鉴权凭证时可点击“测试连接”验证是否正确连接上MCP工具
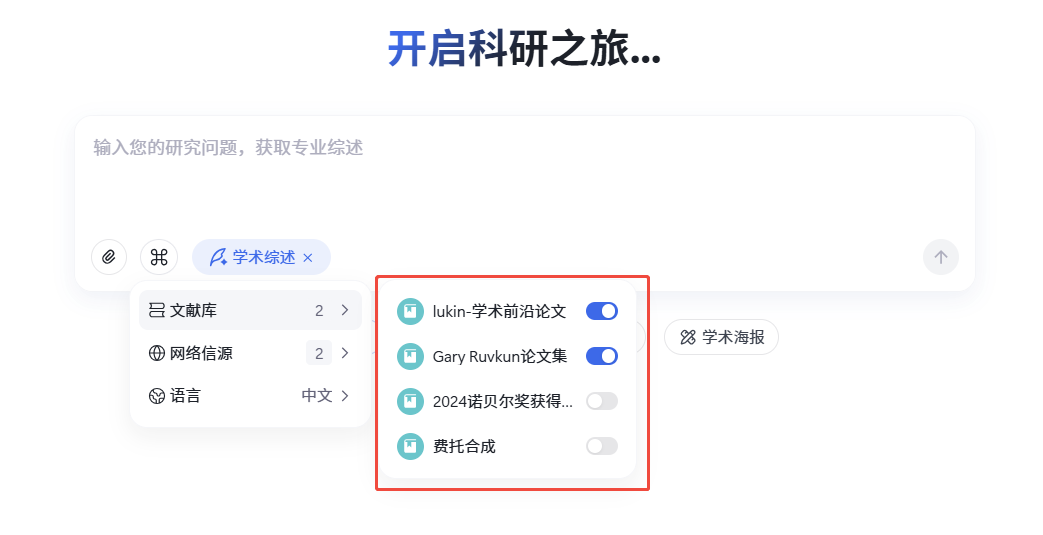
文献库:文献库由您根据研究需要自行创建,用于存储精选论文。您可以选择允许智能体访问的文献库。
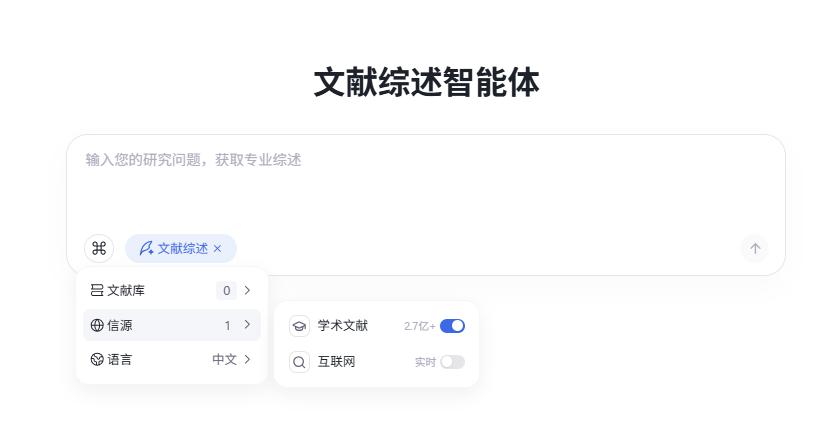
网络信源:网络信源包括学术文献和互联网。启用学术文献后,智能体将连接学术数据库,包括中科院文献情报中心1.7亿科技论文、arXiv 240万预印本论文,以及谷歌学术全球论文资源;启用互联网后,智能体将主动连接互联网搜索相关资料。
2.3 对话终止与新建
2.3.1 对话终止
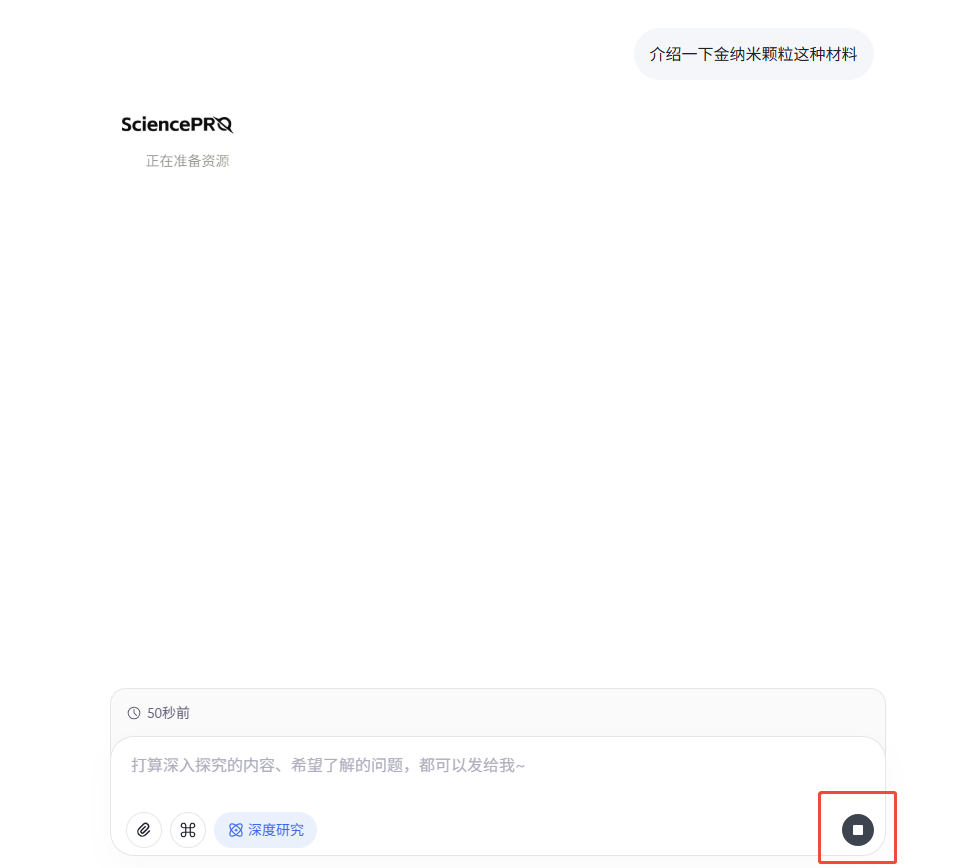
在任对话的进程中,点击终止按钮,进行中的对话将立即终止。
2.3.2 新建对话
当前对话的结束后,点击新建对话,用户将开启新的一轮对话,且新对话不受其他对话上下文影响。
2.4 进度查看
2.4.1 进度区任务查看
在深度研究中,任务会分为多步进行,点击展开可查看全部任务进度。
2.4.2 过程区任务查看
深度研究中,点击过程中每一步右侧的展开按钮,可查看每一步的详细过程。点击具体的执行动作,可在工作区查看该动作的结果。
2.5 工作区
2.5.1 进度跳转
完整的任务进度会以进度条的形式展示,用户可点击【左右】切换按钮切换上下步骤,也可以拖动进度条控制展示步骤。
2.5.2 搜索
工作区-任务中会展示每一步的搜索结果,点击可查看原链接内容。
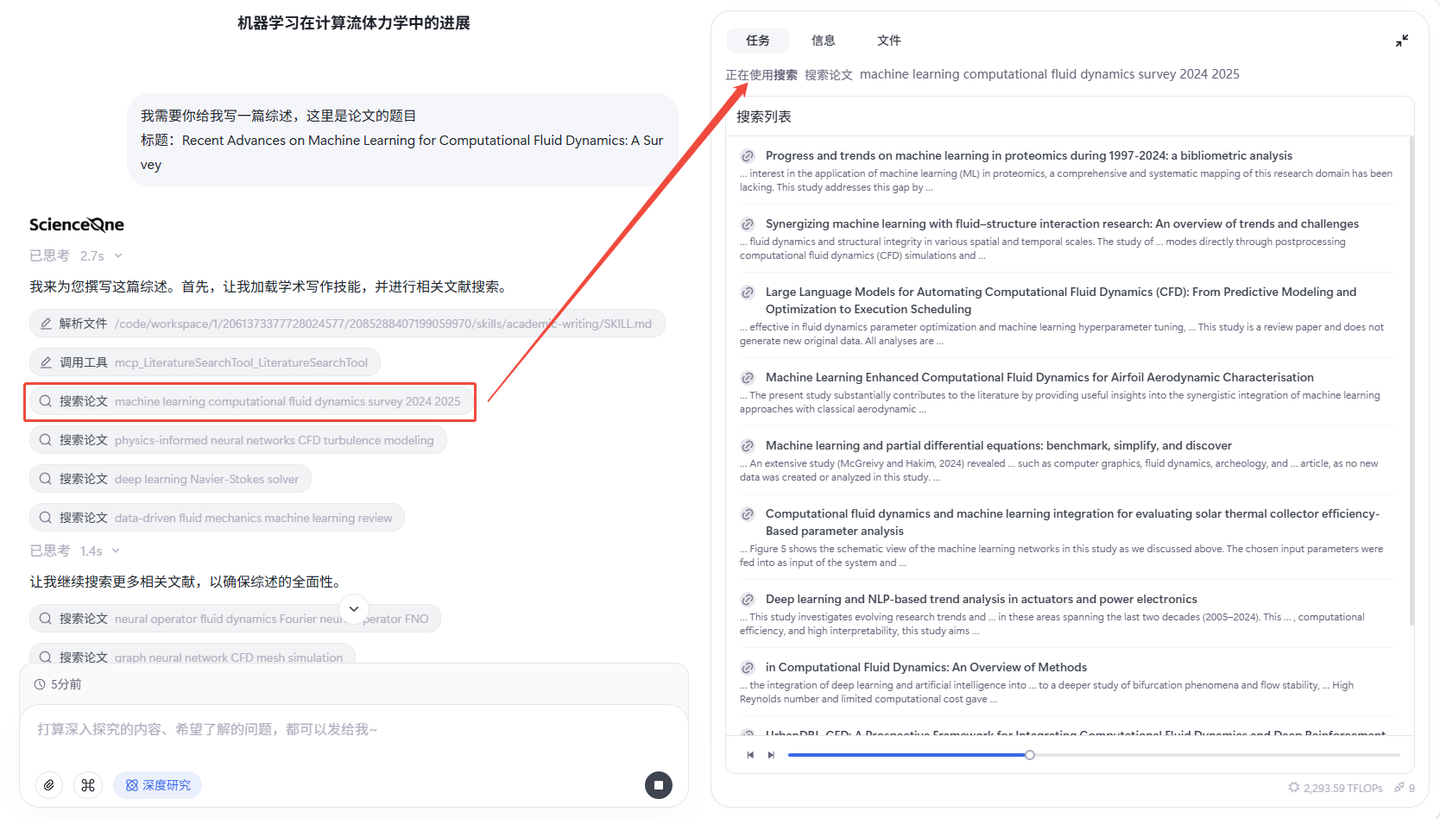
任务的全部的搜索结果可以在工作区中的【信息】中查看。
2.5.3 生成文件
在执行可能会生成分析结果等过程文件,点击执行动作在工作区可查看文件内容,并支持切换源码和预览查看效果。
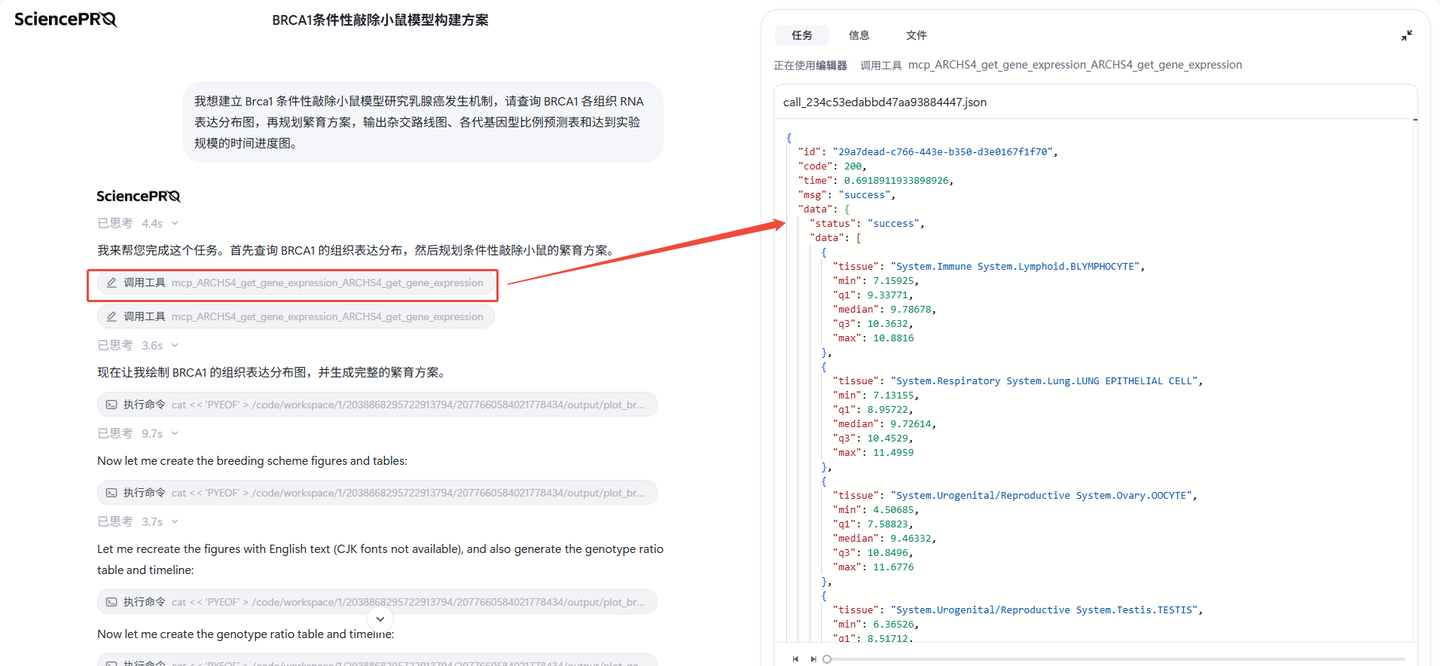
所有任务的过程结果,可以点击【文件】查看。
所有任务的最终结果(如可视化报告、综述等),可以点击任务结束后的报告或在工作区中找到最终结果文件查看。
文献库
文献库模块为科研人员精心挑选的文献提供深度解读服务。将陆续集成Zotero等文献管理工具,进一步便利科研人员的日常研究工作。
3.1 创建文献库
创建文献库时,可根据文献类型选择对应的库类型。系统针对不同文献类型设计了专门的解读逻辑,选择合适的库类型能获得更好的使用效果。
3.2 上传文献
文件上传支持两种方式。
直接上传:在文献库管理页面直接批量上传文献文件,适合初次建库或集中整理文献时使用。
随时添加:在使用文献库进行研究时,可根据需要随时添加新的文献文件,便于及时补充相关资料。两种方式均支持主流文档格式,您可根据具体使用场景选择合适的上传方式。
3.3 查看文献库
您创建的所有文献库默认仅允许您自己查看,确保研究资料的私密性和安全性。
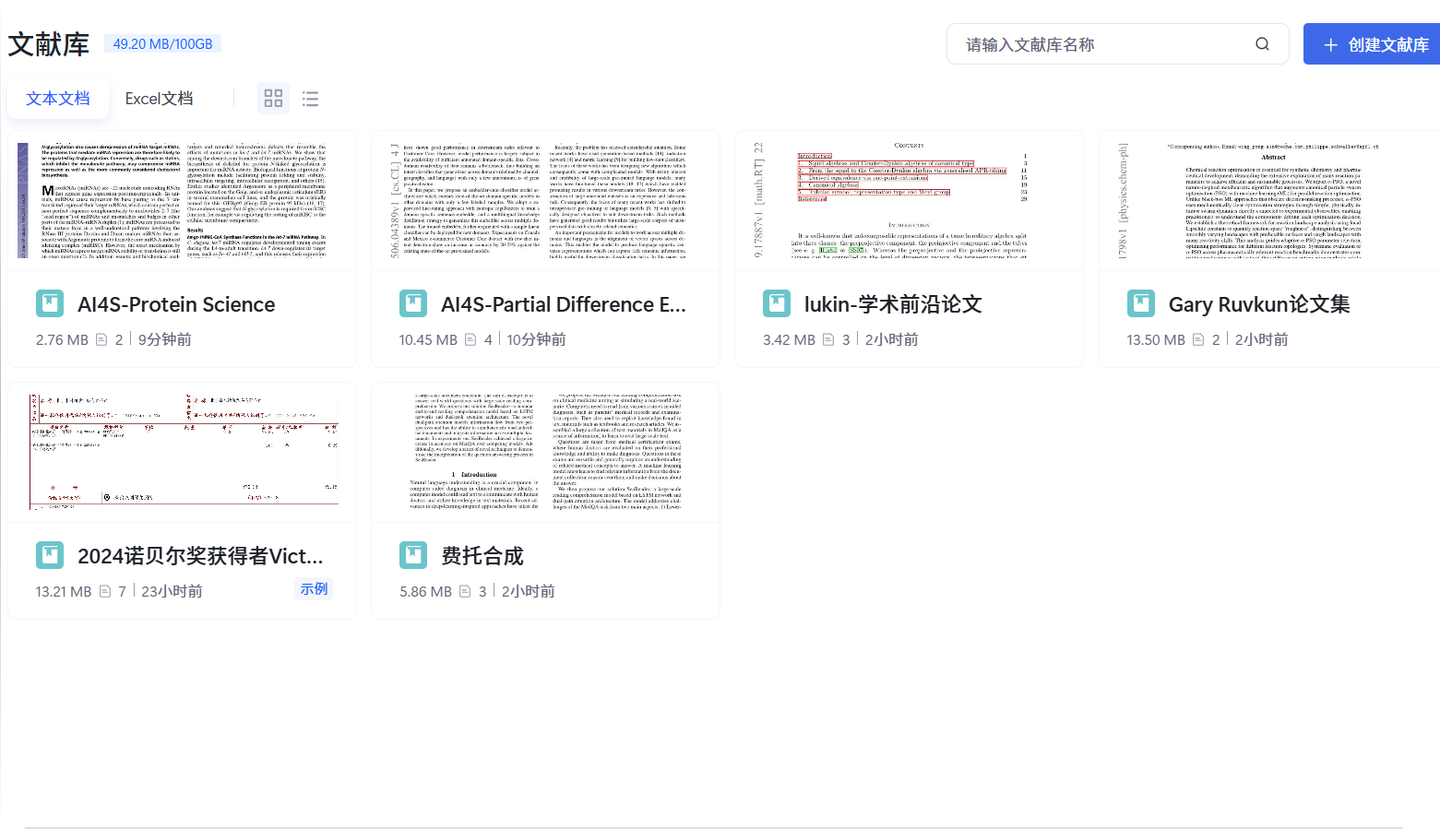
若要与合作伙伴共同研究,可通过"邀请成员"功能添加协作者,并为其设置访问权限。
其中,权限分为三个层级:"管理员"享有完全操作权限;"协作者"可创建目录和上传文献;"成员"仅可查看使用,不可修改内容。
作为文献库创建者,您可以随时调整成员角色或移除成员。确保文献库安全,团队成员管理权限仅限于创建者本人。
3.4 使用文献库
3.4.1 全库对话
您可以与文献库中的所有文献进行对话,也可以选择单篇文献进行精读。
3.4.2 单篇精读
在单篇精读界面中,您可以深度解读选定的文献,也可以随时切换到全库对话模式。
3.4.3 论文导读
论文导读提供单篇论文的核心内容解析,涵盖研究结论、研究目的、研究方法、合理性、局限性、核心观点、论据支持、应用前景和影响等方面。
3.4.4 研究图谱
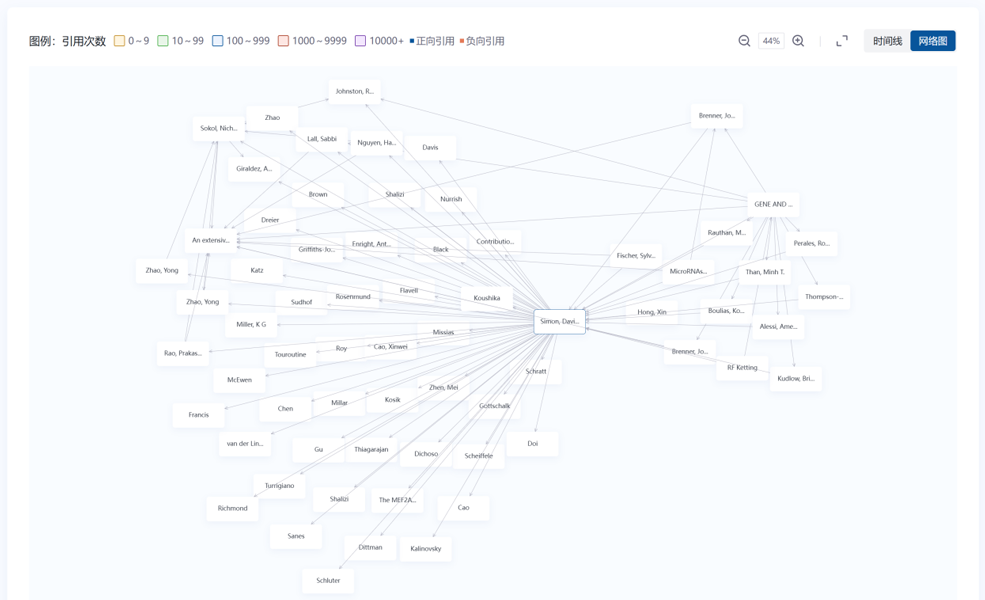
研究图谱提供引文回溯功能,以当前论文为中心,追溯其参考文献,同时探索该论文的被引情况,帮助您了解完整的学术脉络。
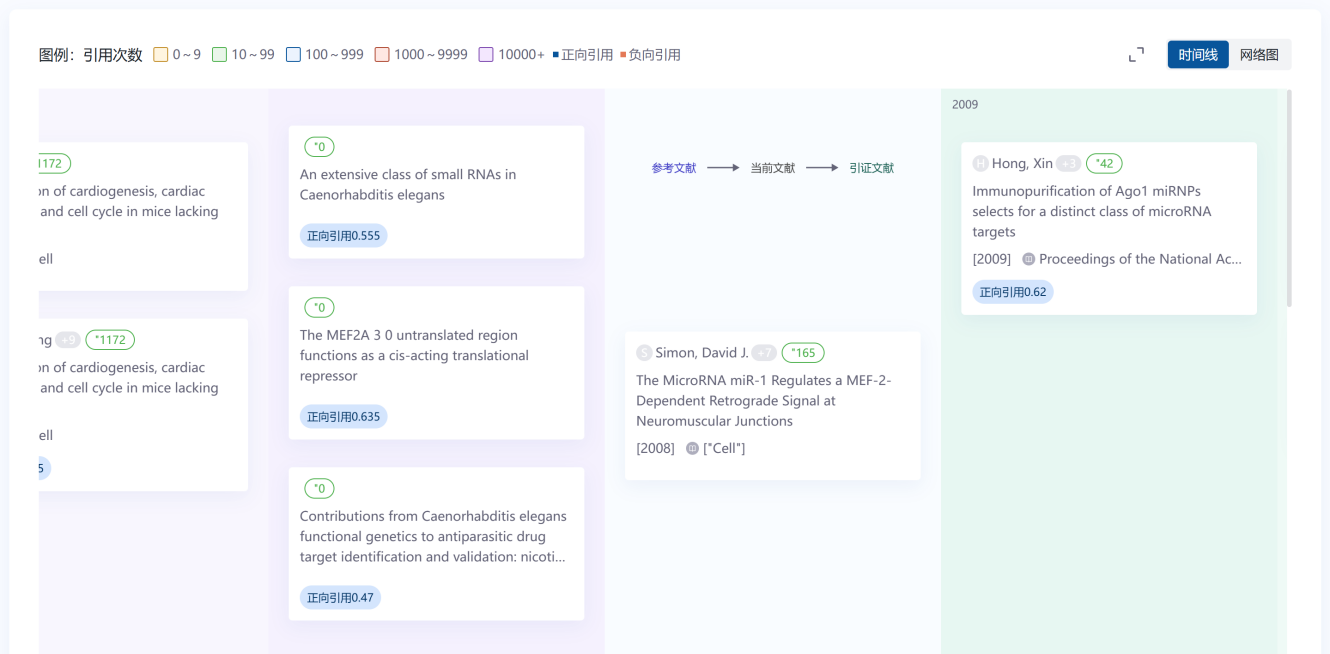
可视化网络视图可直观展示文献间的引用关系,帮助您清晰看到文献间的引用关系,便于快速识别关键研究节点。
3.4.5 文献对话
系统会预先解读每篇文献,生成常见问题并推送到界面,您可直接点击开启对话。
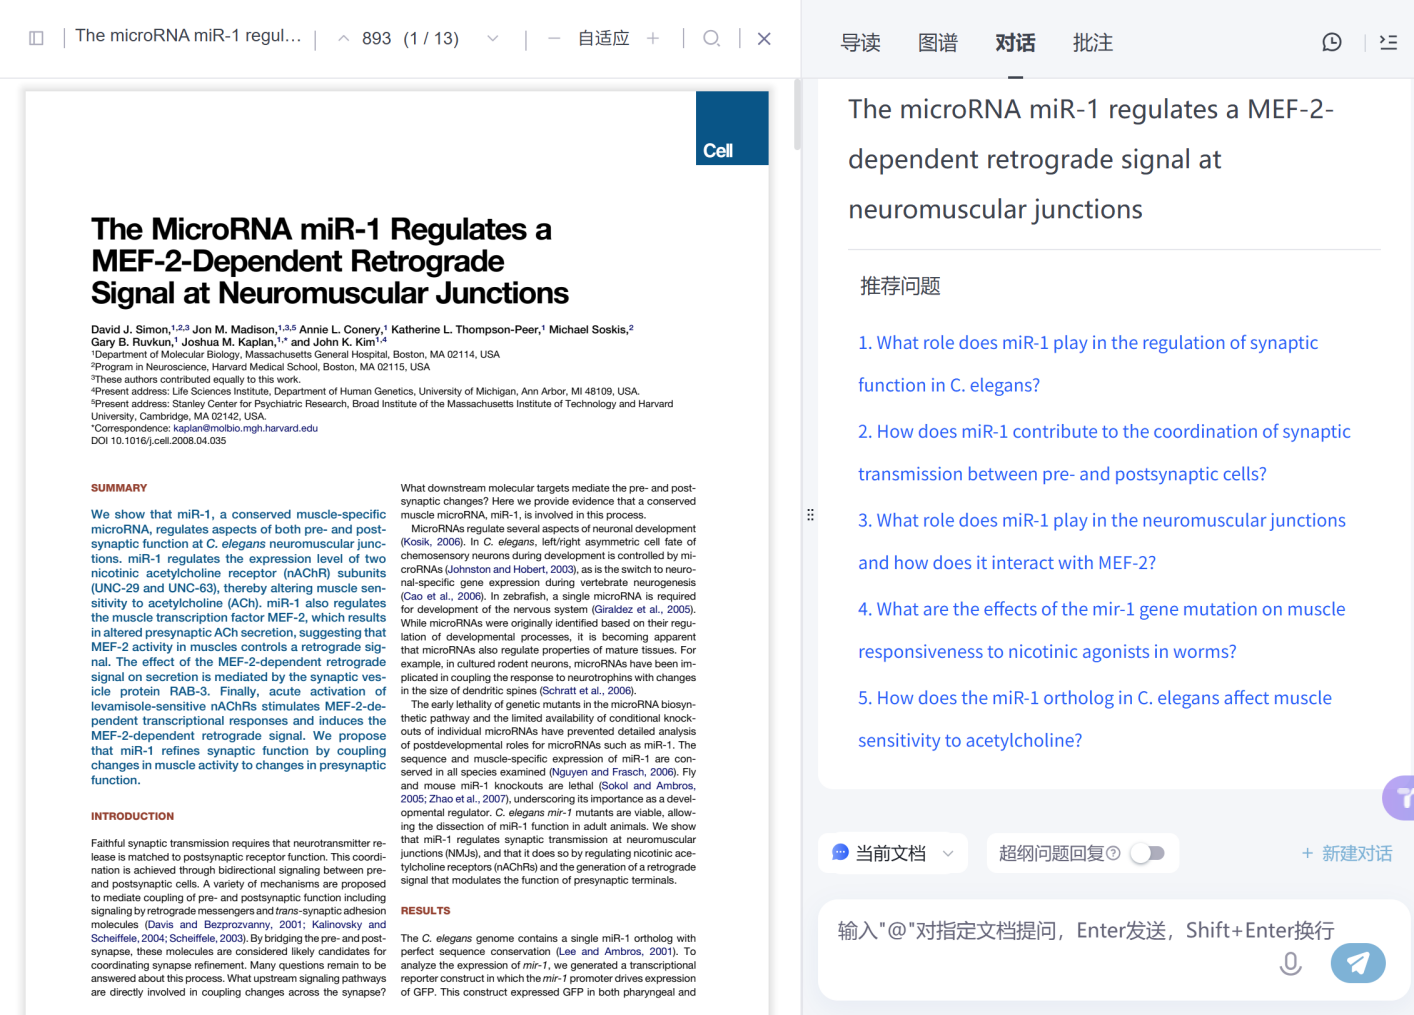
您也可以根据实际需要自主提问,系统将针对性地解读文献并提供参考来源。论文中的图片内容会直接展示在回答中。
3.4.6 精读批注
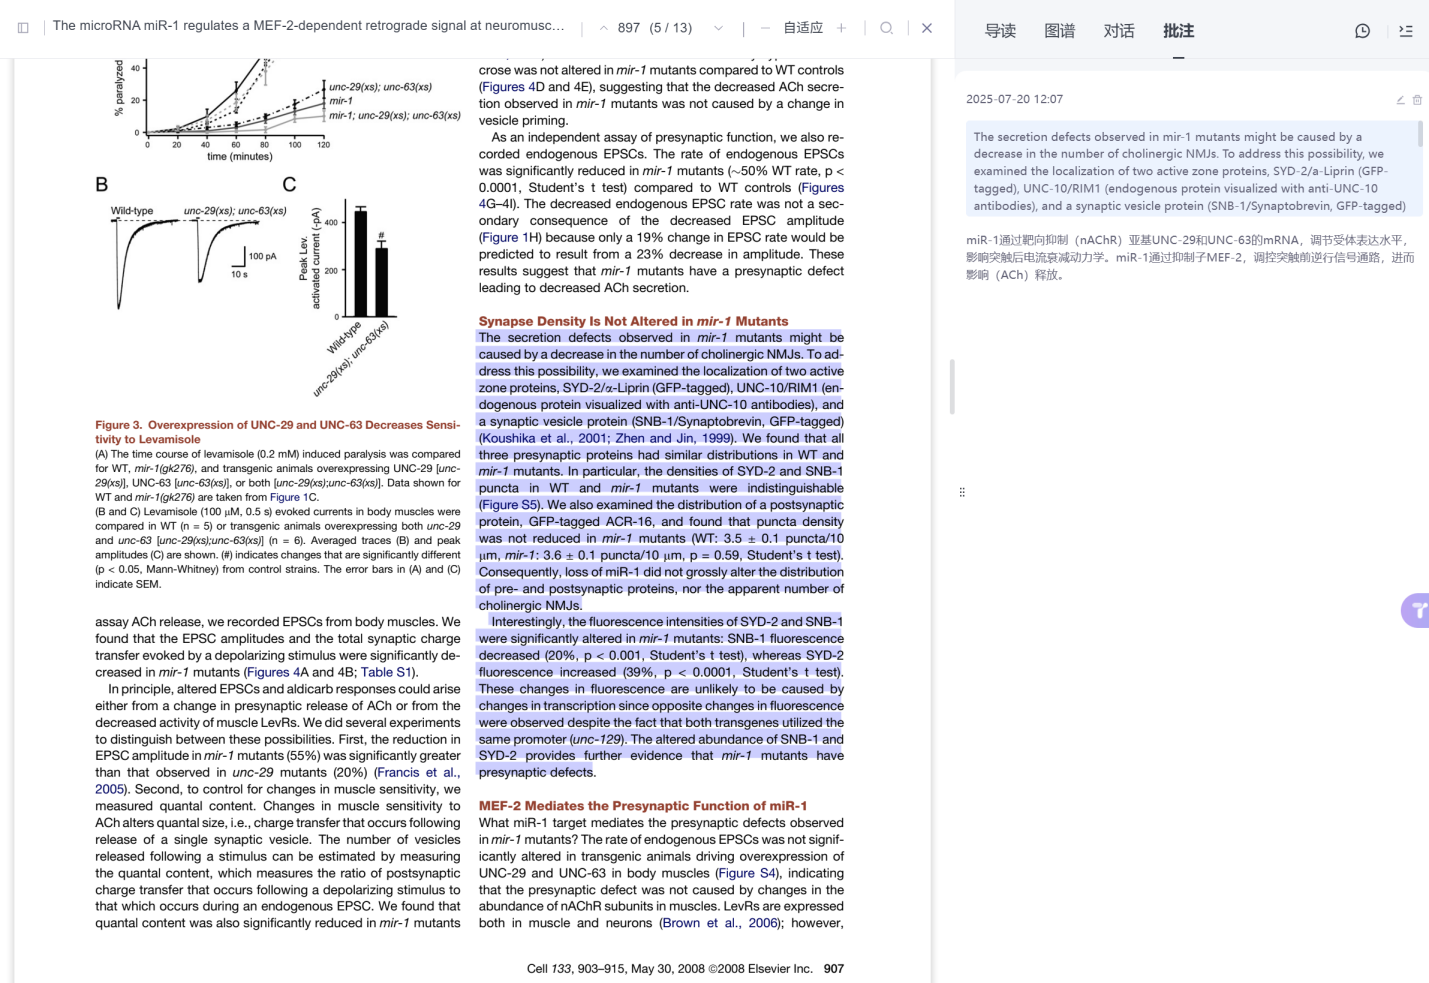
文献库提供批注功能,便于记录阅读笔记。将右侧栏切换到"批注"模块后,在左侧选中文字即可自动创建批注,然后添加您的笔记内容。
科研头条
点击左侧导航栏「科研头条」进入模块。科研头条模块聚合了国内外10亿+家学术信息源,汇聚跨学科论文、新闻等前沿资讯,开放专享专题订阅功能和自动化任务推送科研简报,帮助您高效追踪研究领域的最新进展。
4.1 资讯浏览
科研资讯以卡片形式在推荐界面中瀑布流排列,分为论文、新闻、专题三类卡片,每个卡片包含来源渠道(如"科学网""arXiv")、标题、作者、摘要、发布时间及配图、点击量等关键信息。进入模块后,系统默认展示全部类型的最新资讯,向下滚动即可加载更多内容。
4.1.1 资讯筛选
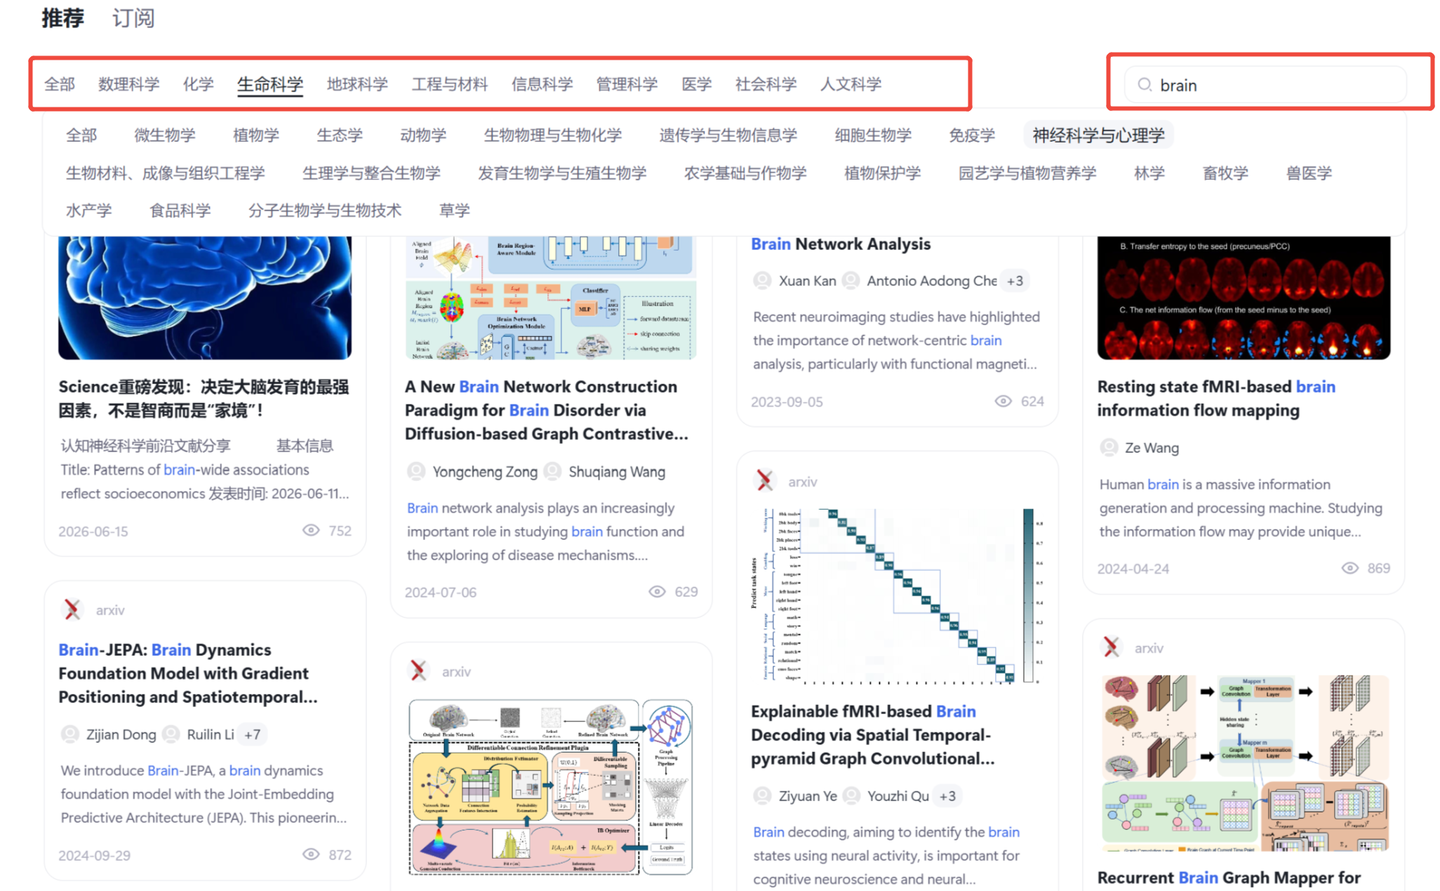
系统提供了学科分类和关键词筛选两种筛选方式,帮助您快速定位所需信息:
学科分类筛选:科研头条目前涵盖数理科学、化学、生命科学、地球科学、工程与材料、信息科学、管理科学、医学、社会科学、人文科学共十大学科的资讯,各学科下设二级学科,您可直接选中您的研究领域学科或其他感兴趣的学科,快速浏览近期科研动态。
关键词筛选:在右上角输入框输入您想定位的资讯关键词,在下方将按照内容相关性呈现科研资讯。
4.1.2 论文
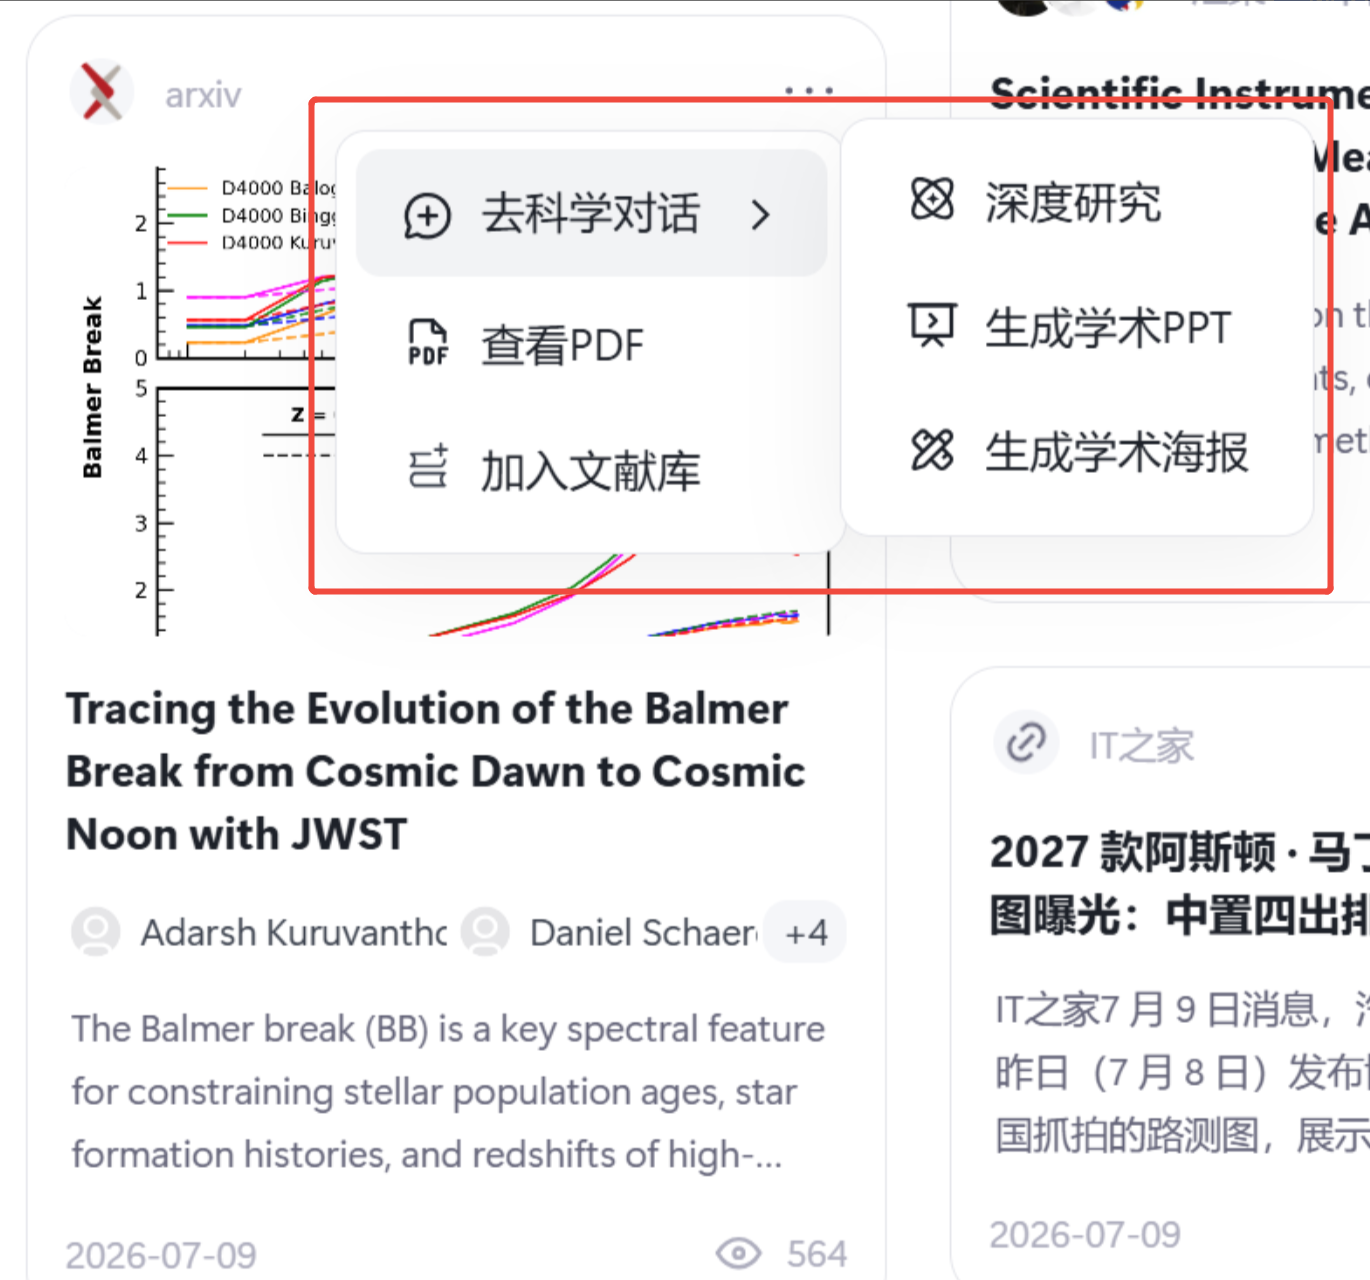
卡片操作区:论文类型的卡片,在卡片右上角可点击打开更多操作菜单,在此可选择[去科学对话]——直达深度研究、学术PPT、学术海报智能体;可选择[查看PDF],直接查看论文原文;选择[加入文件库],将论文PDF保存至个人文献库。
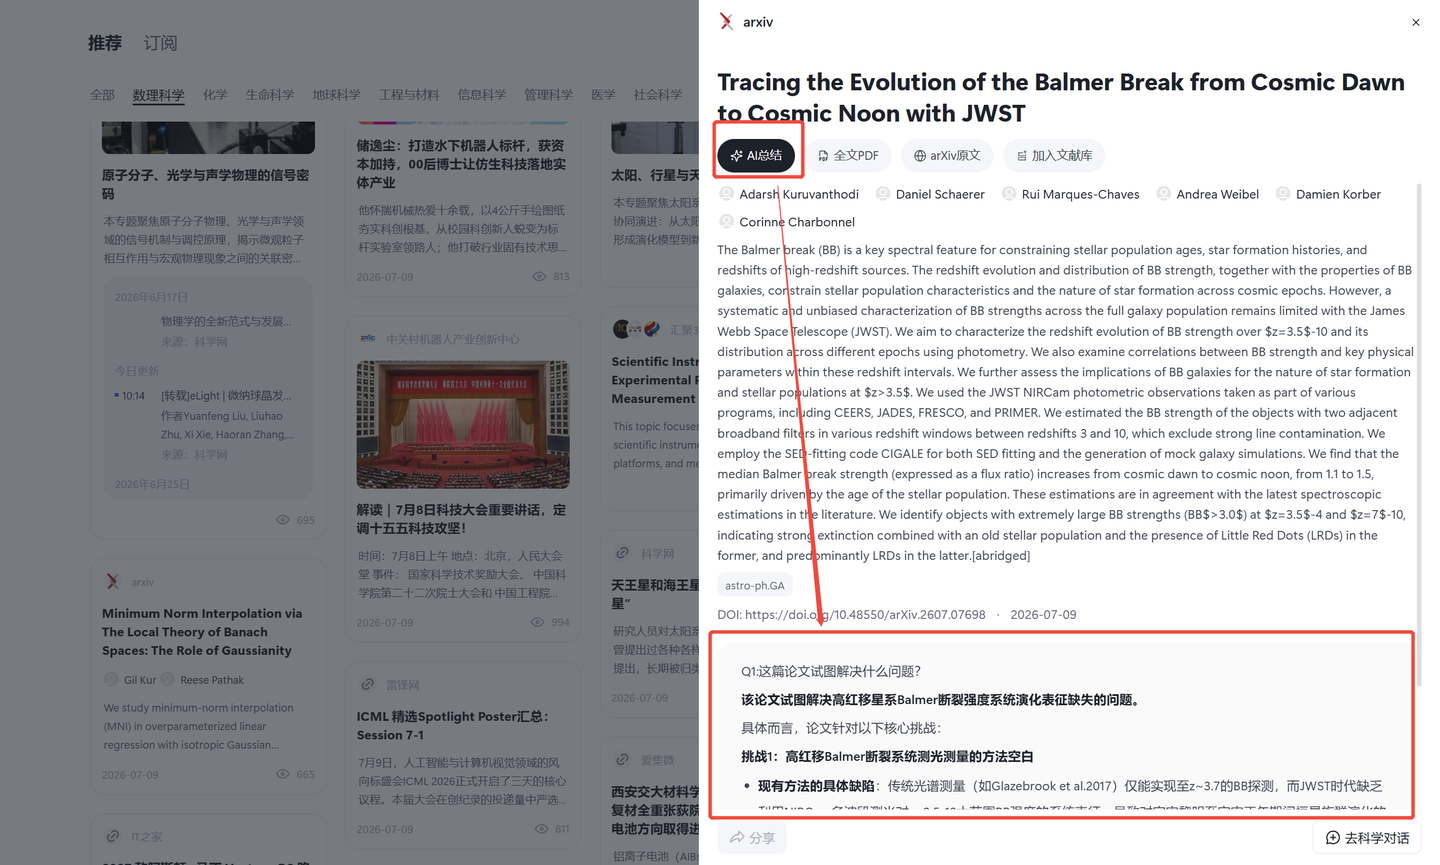
论文详情页:点击论文卡片,即可打开右侧详情抽屉,可以详细查看论文作者、摘要、DOI号、发布日期等关键信息。您可点击【AI总结】按钮,系统将以QA的形式为您解读此论文试图解决的问题、相关研究、主要内容等信息,不同论文亦有专属于该论文问题解答,帮助您无需查看原文即可精准高效知晓该论文的研究内容。
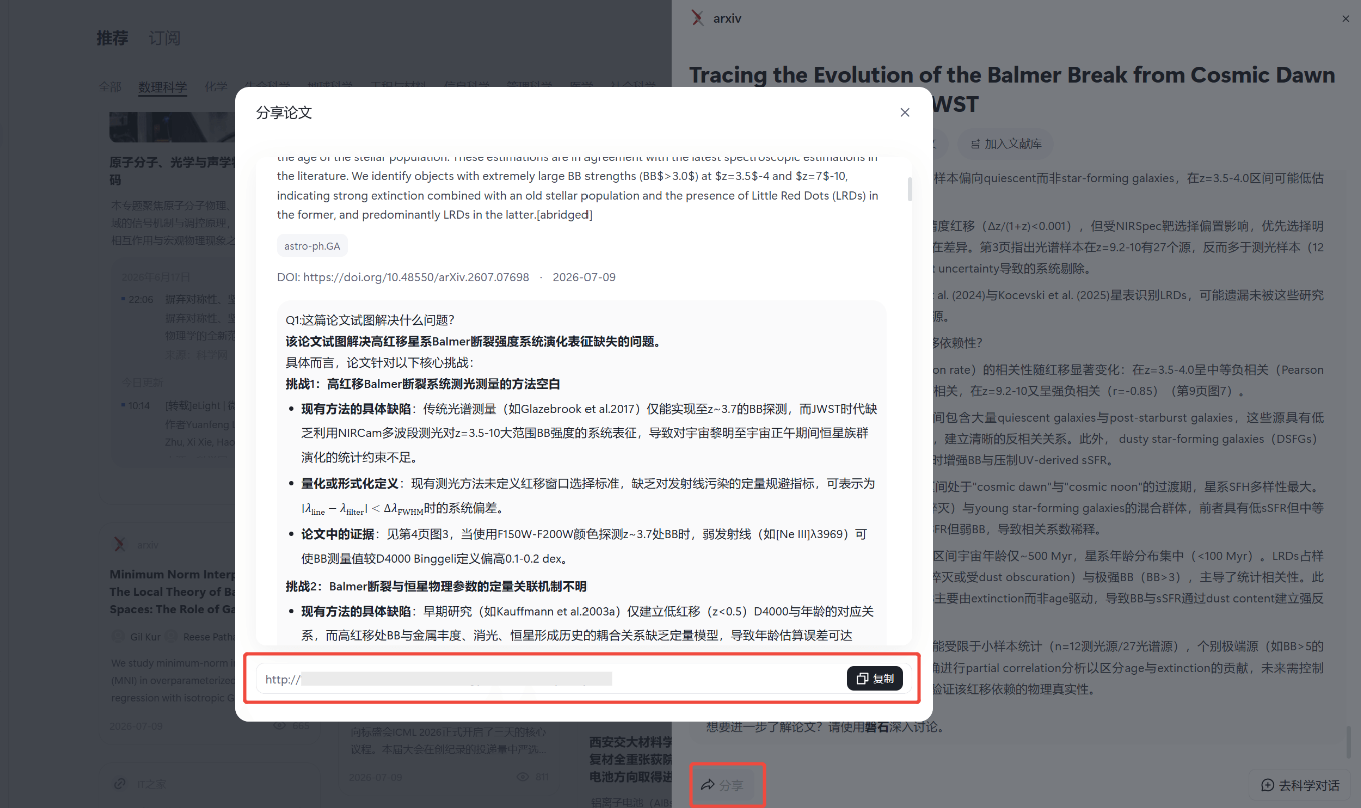
论文分享:点击下方【分享】按钮,将为您生成论文分享海报和链接,您可复制分享链接给您的科研团队共同阅读最新论文,共同讨论AI总结的精华内容,助力科研团队实时追踪科研动向。
4.1.3 新闻
科研头条汇聚多信源新闻,从政府机构、高校研究院实验室到科技公众号、新闻媒体等,您所关注的资讯关注者均能在此找到。点击新闻卡片,快速跳转原网址,微信公众号、网站、视频等多种源,助您掌握最新科研政策、会议信息、重大突破等科研新闻。
4.1.4 专题
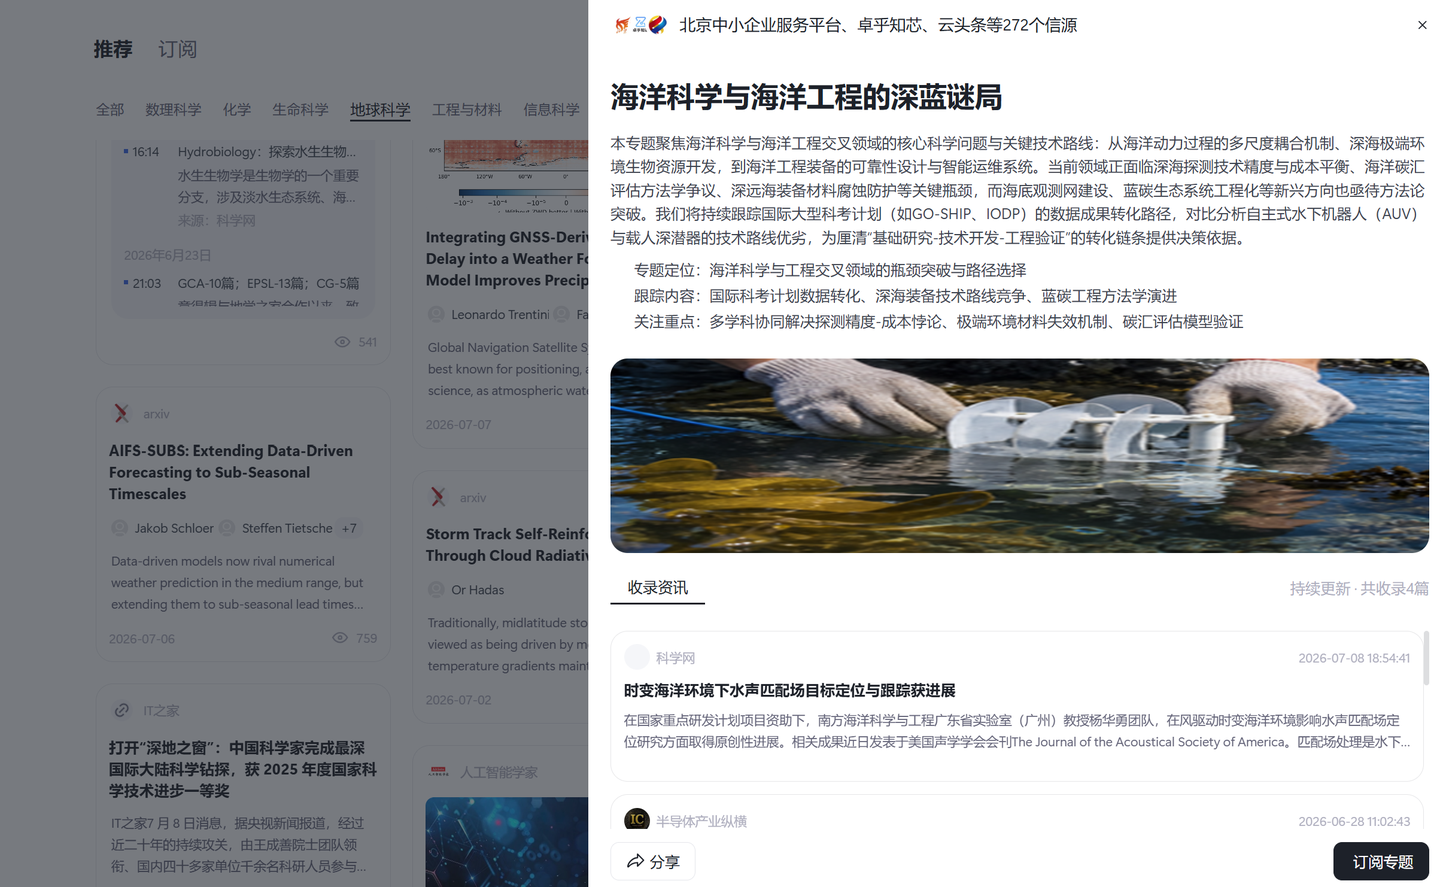
科研头条内置大量官方推荐专题,汇聚高质量新闻信源,持续更新信源下该专题相关的资讯,您可搜索关注的领域方向专题,快速查看该领域方向的资讯,也可以点击【订阅专题】按钮,持续接收此专题的更新资讯。
专题同样支持分享功能,点击下方【分享】按钮,将为您生成专题分享海报和链接,您可复制分享链接给您的科研团队共同阅读专题,帮助科研团队实时接收科研动向。
4.2 专题订阅
订阅板块开放专题订阅功能,订阅列表会收录您订阅的官方专题和自建的订阅专题,专题卡片右上方显示蓝色角标更新数,帮助您直观了解该专题的资讯更新情况,在列表中点击专题即可查看该专题持续更新的收录资讯。
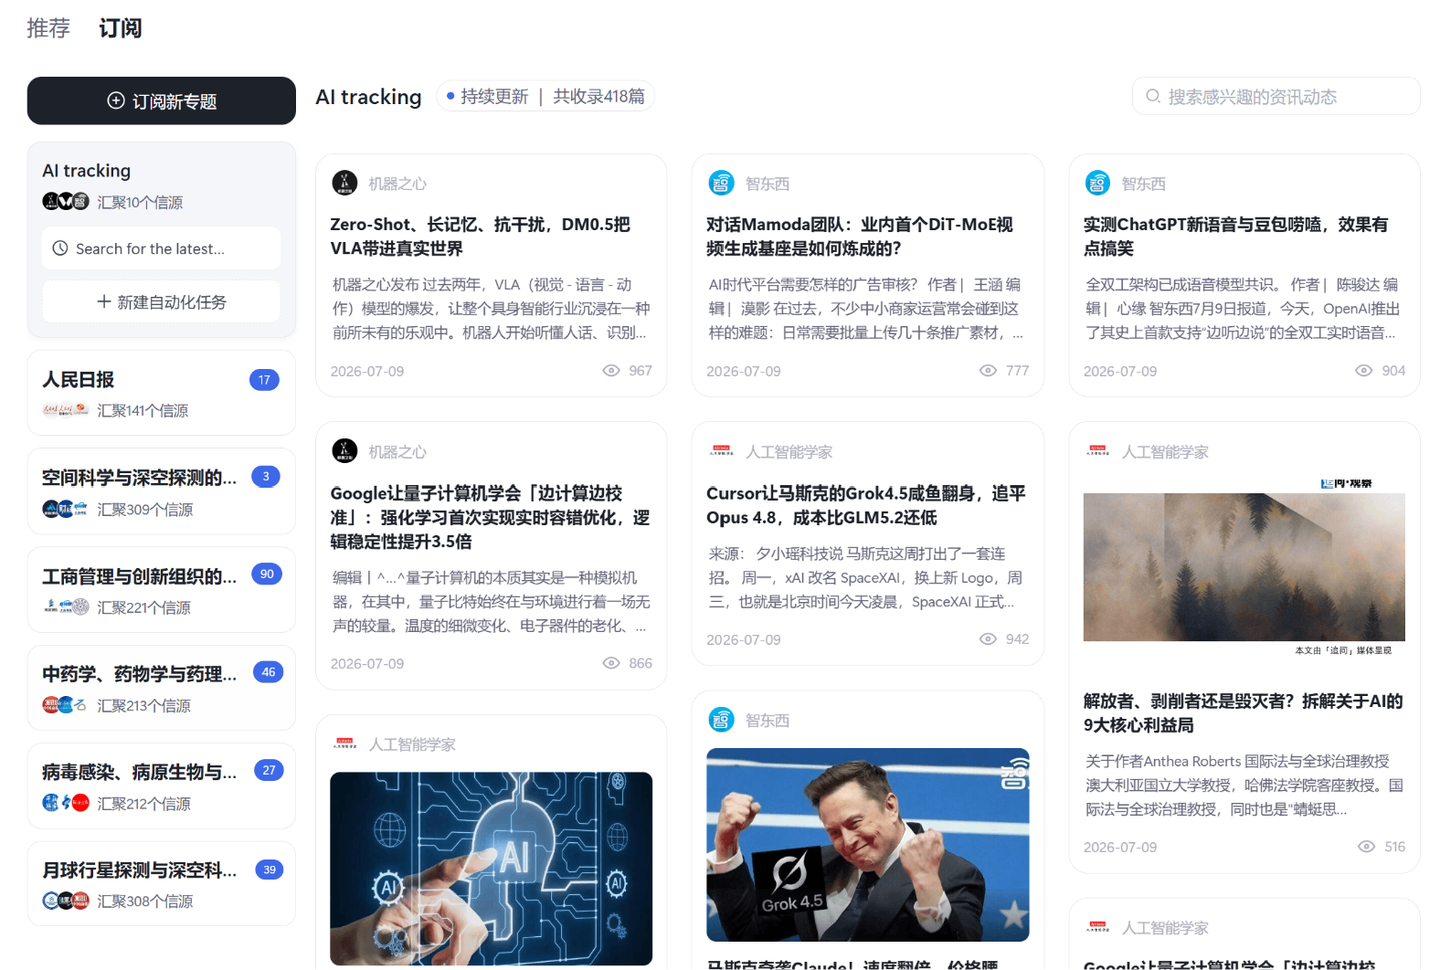
4.2.1 自建专题订阅
创建专题订阅:通过自建订阅专题,实时追踪您更关注的科学前沿资讯。点击【订阅新专题】按钮,输入专题名称、描述,从全网10亿+信源中自定义追踪对象,单个专题最多可订阅50个信源。添加信源支持搜索框输入关键词定向查找+分类标签选择,双重筛选帮助您快速找到优质信源。
编辑专题订阅:已成功订阅的专题支持修改追踪的信源,您可新增信源或删除已添加的信源,点击【确定】进行保存,新的信源设置即刻生效,新添加的信源资讯将在此后更新到该专题详情中。
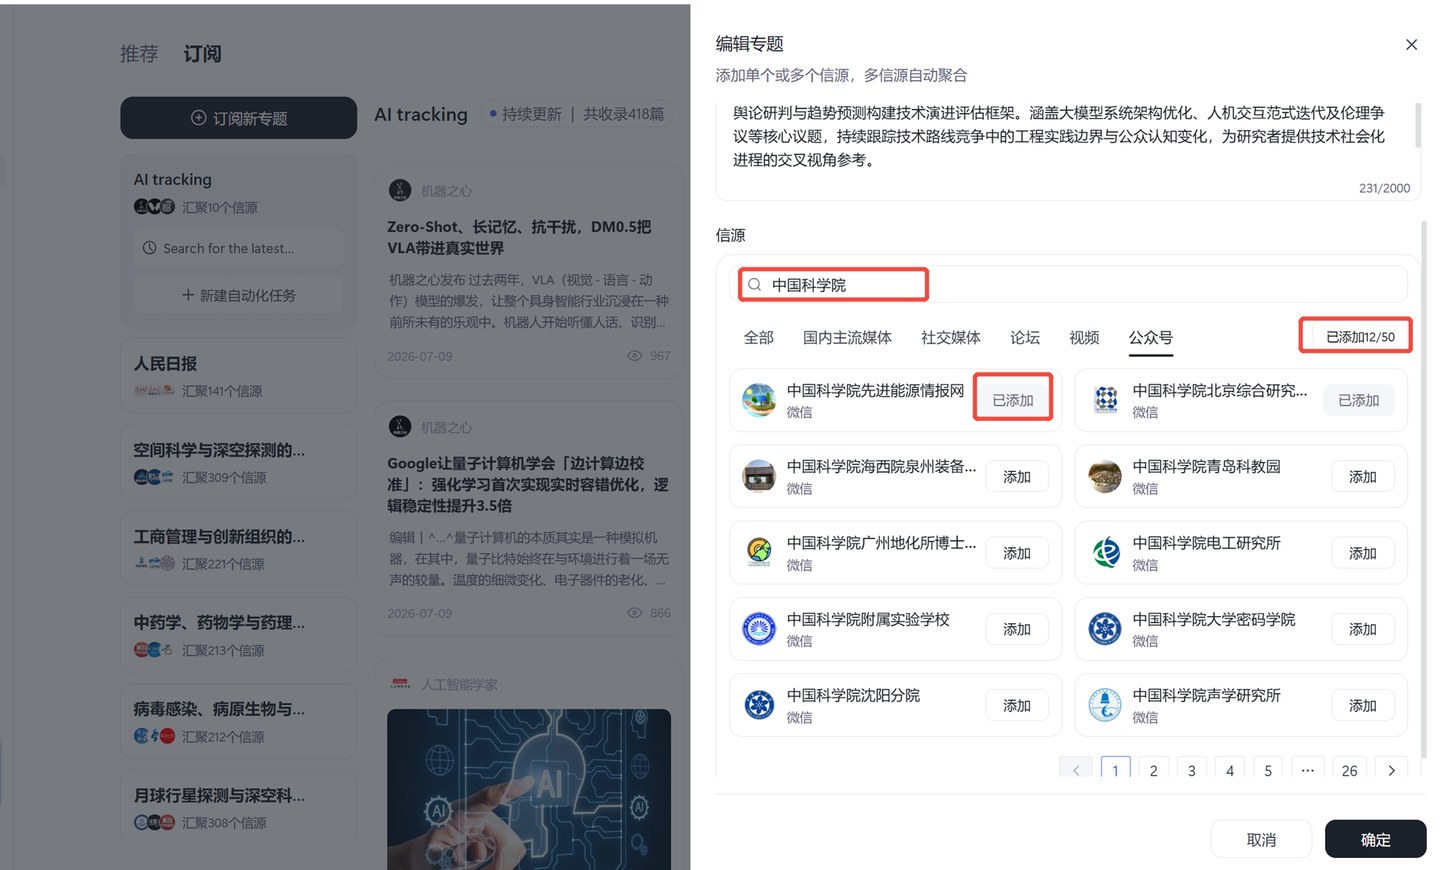
4.2.2 自动化任务
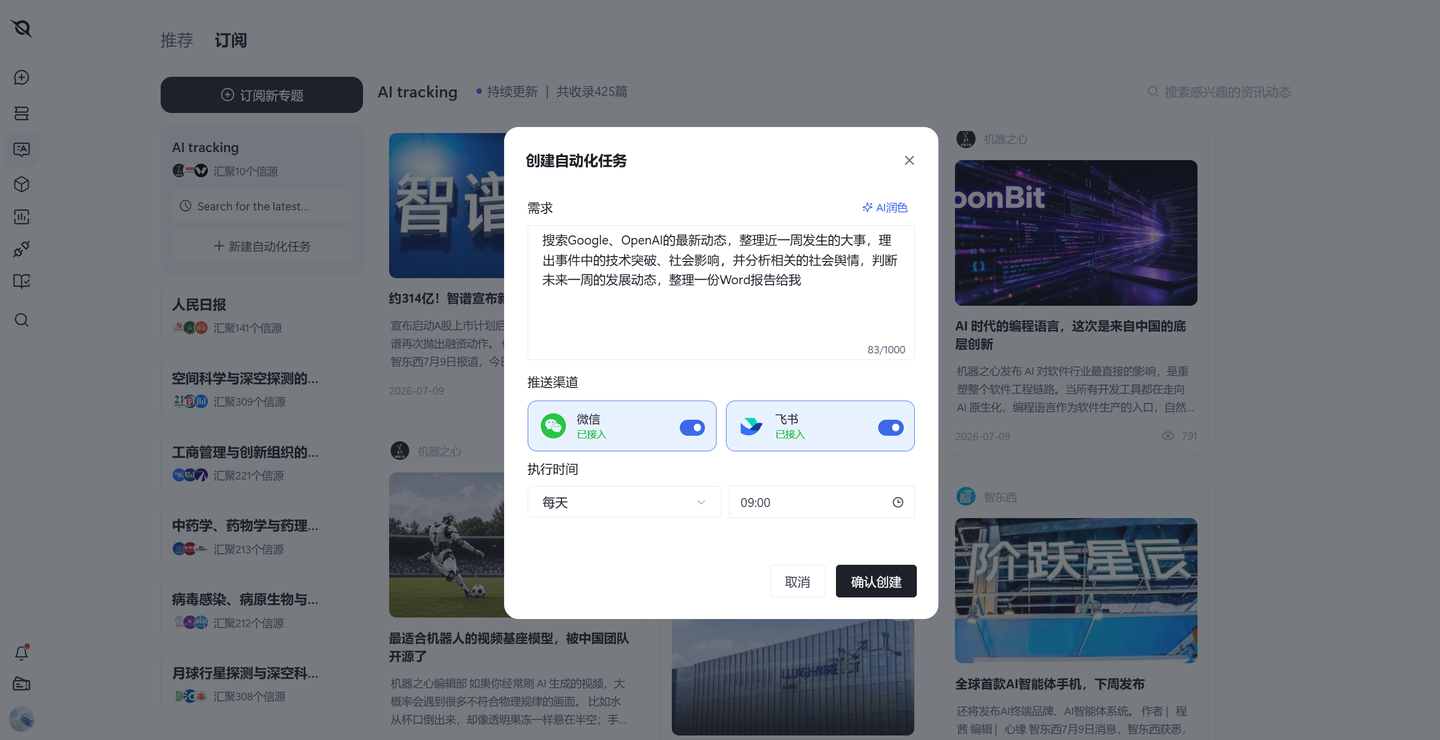
基于专题内容,您可以创建自动化任务,让科研头条Agent帮助您持续追踪,整理科研简报,推送到您的微信、飞书频道,科学前沿资讯主动汇聚给您,把追踪信息的时间还给研究本身。
每项专题可设置的自动化任务没有上限,但建议将多个任务设置在不同时间点,同一时间的任务会引起排队现象,您需要等候科研头条Agent完成一个自动化任务后再开始下一个任务。
创建自动化任务:在订阅专题列表中找到您想追踪的专题,点击该专题,选择【新建自动化任务】,将创建基于此专题更新资讯的自动化任务。输入您的需求,可以是一家企业的最新动态,可以是您关注的细分研究领域如自然语言处理NLP,要求其筛选近期的技术进展、行业进展、媒体讨论、开源代码等一切您感兴趣的某项具体内容,最后可以要求其生成WORD/PDF/HTML/PPT等格式的科研简报,科研头条Agent将遵循您的需求整理科研简报,并在您设定的执行时间开始执行任务,任务完成后将推送至您设定的推送渠道。
频道接入:您可以在用户中心的频道管理处,跟随指引将您的微信、飞书接入到科研头条Agent,在设定自动化任务时,勾选已接入的频道,Agent将会推送科研简报至您指定的接入频道。
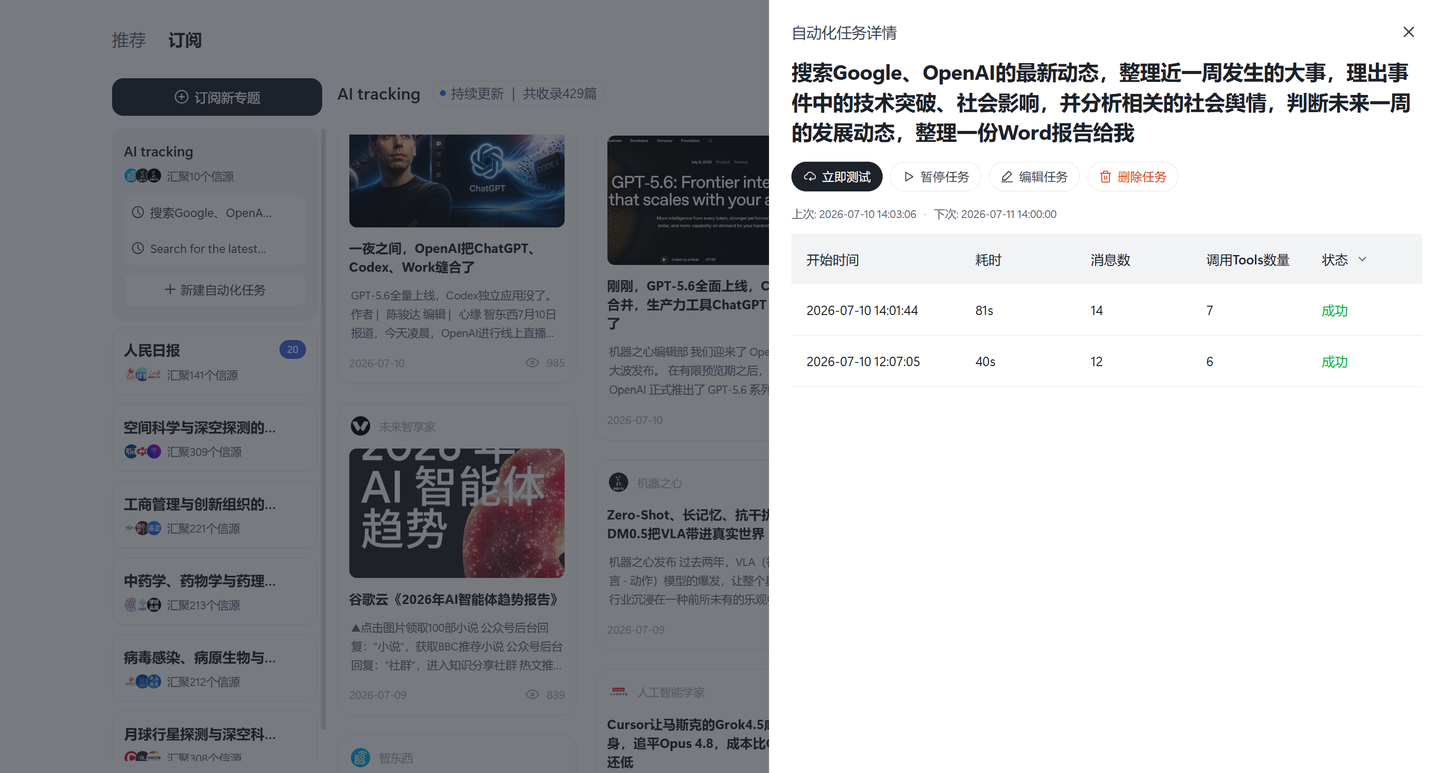
在专题的自动化任务列表中点击已经创建的自动化任务,将在右侧弹出该自动化任务的详情。您可在此立即测试自动化任务是否正常执行、暂停与恢复任务、编辑任务、删除任务、查看运行日志详情。
立即测试:点击【立即测试】按钮,科研头条Agent将立即开始执行该任务,您可在此测试频道接入是否正常、科研简报推送内容是否符合您的预期,及时调整,找到您更满意的科研简报内容。
暂停与恢复任务:若您暂时不想接收该自动化任务的推送,点击【暂停任务】按钮即可暂停;暂停后亦可点击【恢复任务】按钮让自动化任务重新开始执行。
编辑任务:已创建的任务支持重新编辑,确认保存后将在下一次执行任务时生效。
删除任务:您可以删除已创建的任务,需注意任务记录将不会保存,但过往生成的科研简报会留在您的推送频道中。
运行日志查看:下方列表呈现该自动化任务的运行日志详情,记录任务的开始时间、耗时、消息数、调用Tool数量、状态。
由于微信频道的特殊限制,请与他多多互动以成功获取科研简报推送。
ScienceHub
5.1 模型
模型模块面向各领域科研工作者,整合了平台接入的垂直科研大模型与智能体资源,覆盖太阳物理、材料创制、碳核算、粒子物理、临近空间科学等多个前沿研究方向,支持用户查询模型信息与在线体验可用能力。
5.1.1 找到模型入口
在左侧导航栏点击「模型」进入
默认展示「全部」模型页面
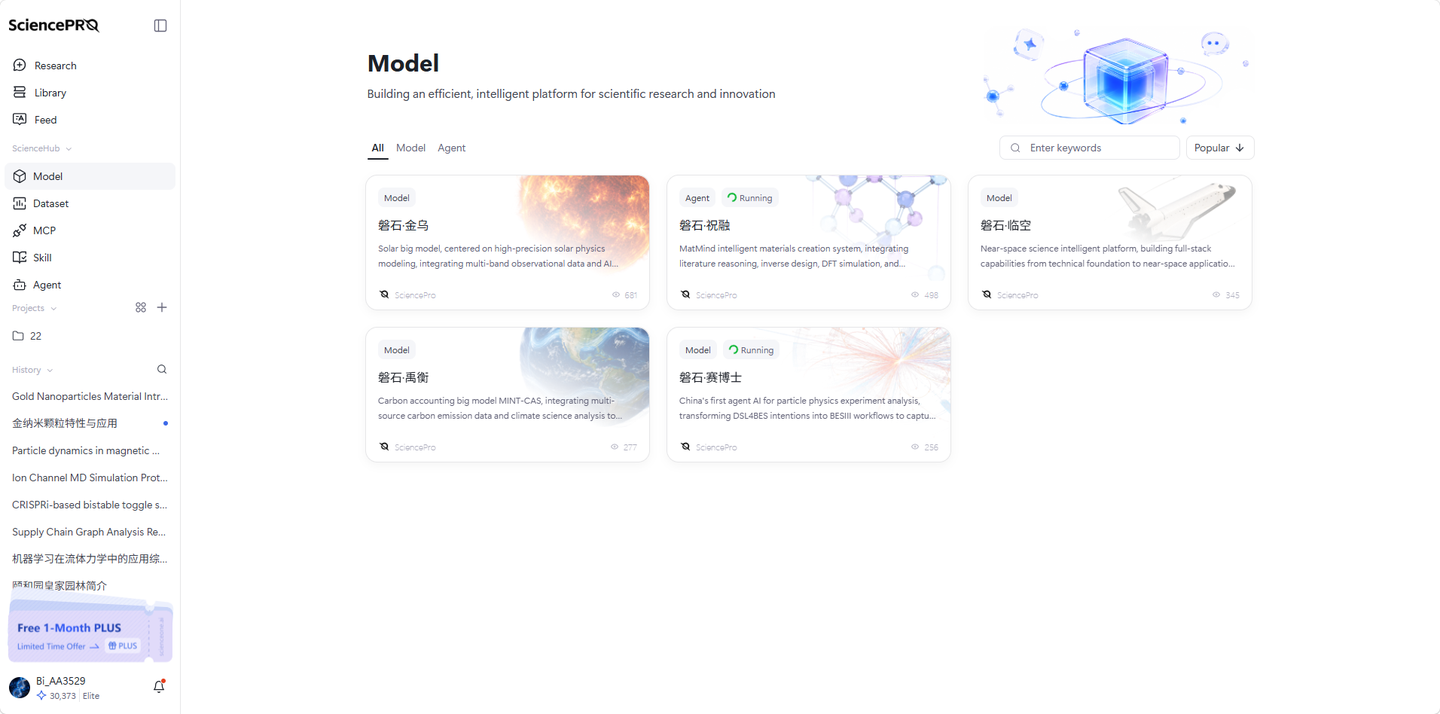
5.1.2 浏览与查找模型
切换分类:顶部有「全部」「Model」「Agent」三个 Tab
「Model」:展示所有Model类型模型
「Agent」:展示所有Agent类型模型
搜索:在搜索框输入关键词(中英文均可),系统会模糊匹配名称和描述
排序:默认按「热门」排序,可点击箭头切换正序/倒序

5.1.3 查看模型详情
点击任意模型卡片进入详情页
详情页可查看:研究背景、核心能力、关键成效等,每个模型展示详情略有不同
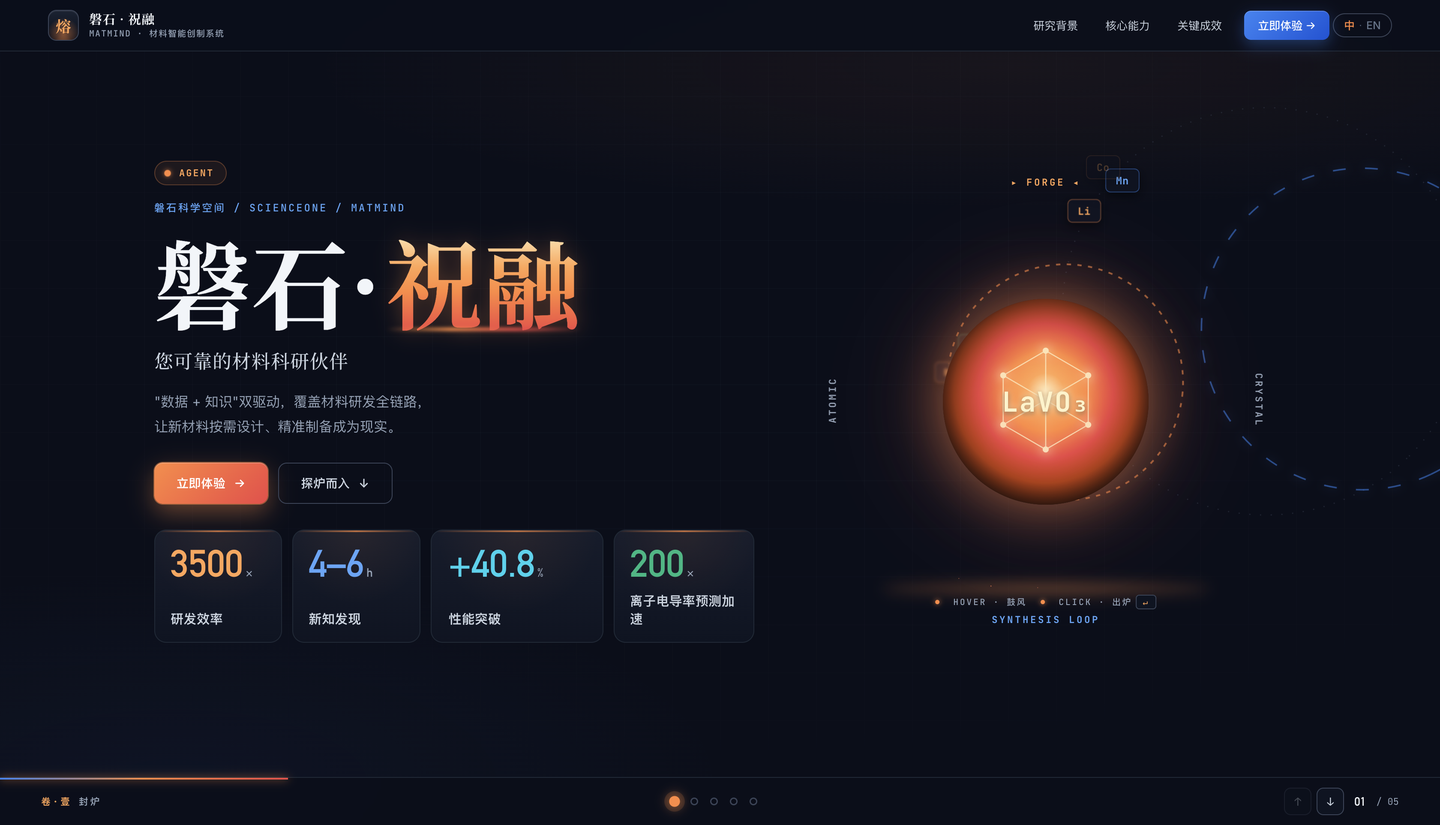
模型示例 - 磐石·祝融:
在模型列表页点击「磐石・祝融」Agent 卡片,即可进入该模型的专属详情介绍页面。
详情页右上角支持中 / 英文语言模式切换,适配不同阅读需求。用户可向下滚动页面逐段浏览内容,也可点击「探炉而入」按钮快速跳转,查看模型的研究背景、核心能力、关键成效等完整介绍。
点击页面中的「立即体验」按钮,将跳转至 MatMind 材料智能创制平台。平台内置多类细分方向的专项智能体,覆盖材料方案生成、材料设计、材料理论计算等功能场景,选择对应智能体即可开始使用。
5.2 数据
数据模块用于浏览与检索权威科研数据集,您也可以一键收藏感兴趣的数据,让科研数据从分散获取走向集中可用。
5.2.1 找到数据入口
在左侧导航栏点击「数据」进入
默认展示「公开数据集」
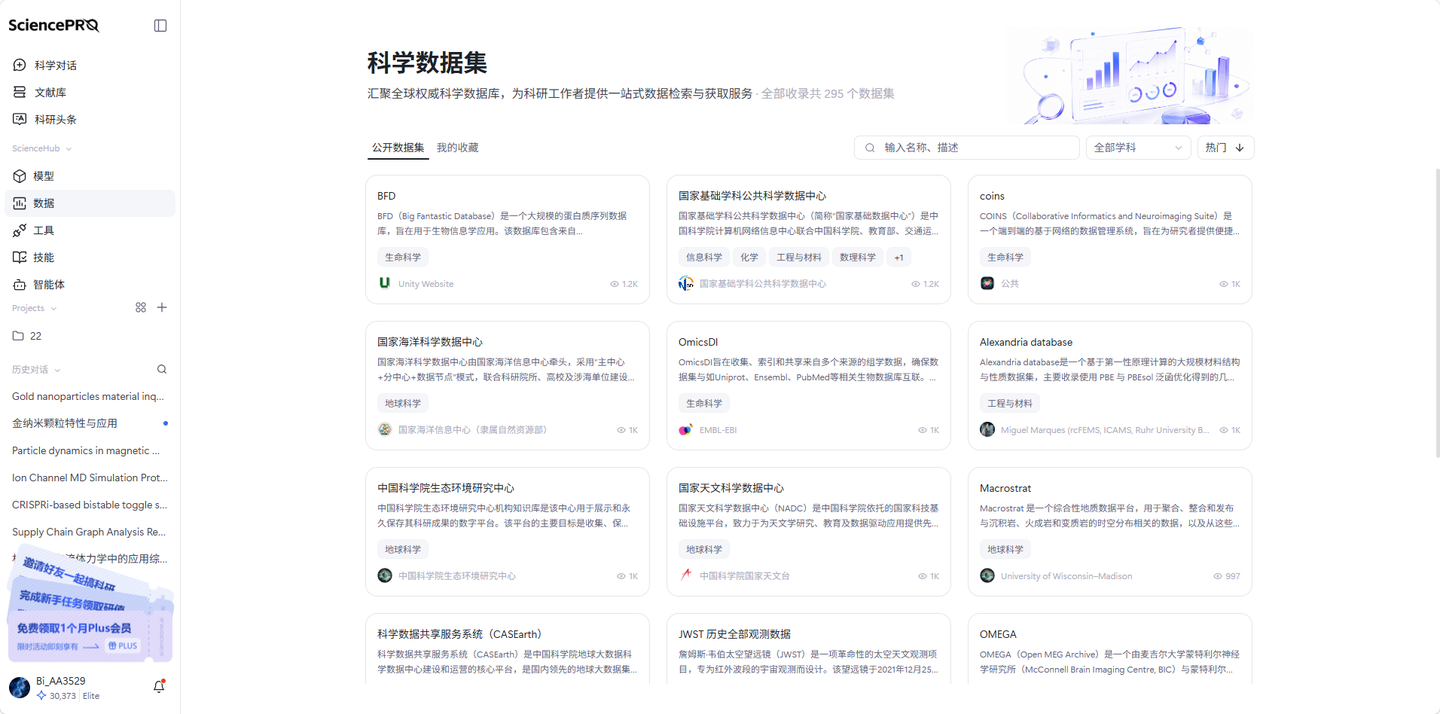
5.2.2 浏览与查找数据
切换分类:顶部有「公开数据集」「我的收藏」两个 Tab
「公开数据集」:展示平台所有数据
「我的收藏」:展示您收藏过的数据
搜索:在搜索框输入关键词(中英文均可),系统会模糊匹配名称和描述
学科筛选:顶部下拉框按学科筛选(如生命科学、医药科学、化学等),默认展示全部学科
排序:默认按「热门」排序,可切换到「名称」排序,并可点击箭头切换正序/倒序
数量:标题区会显示当前可调用的 数据集总数,随所选 Tab 实时更新。
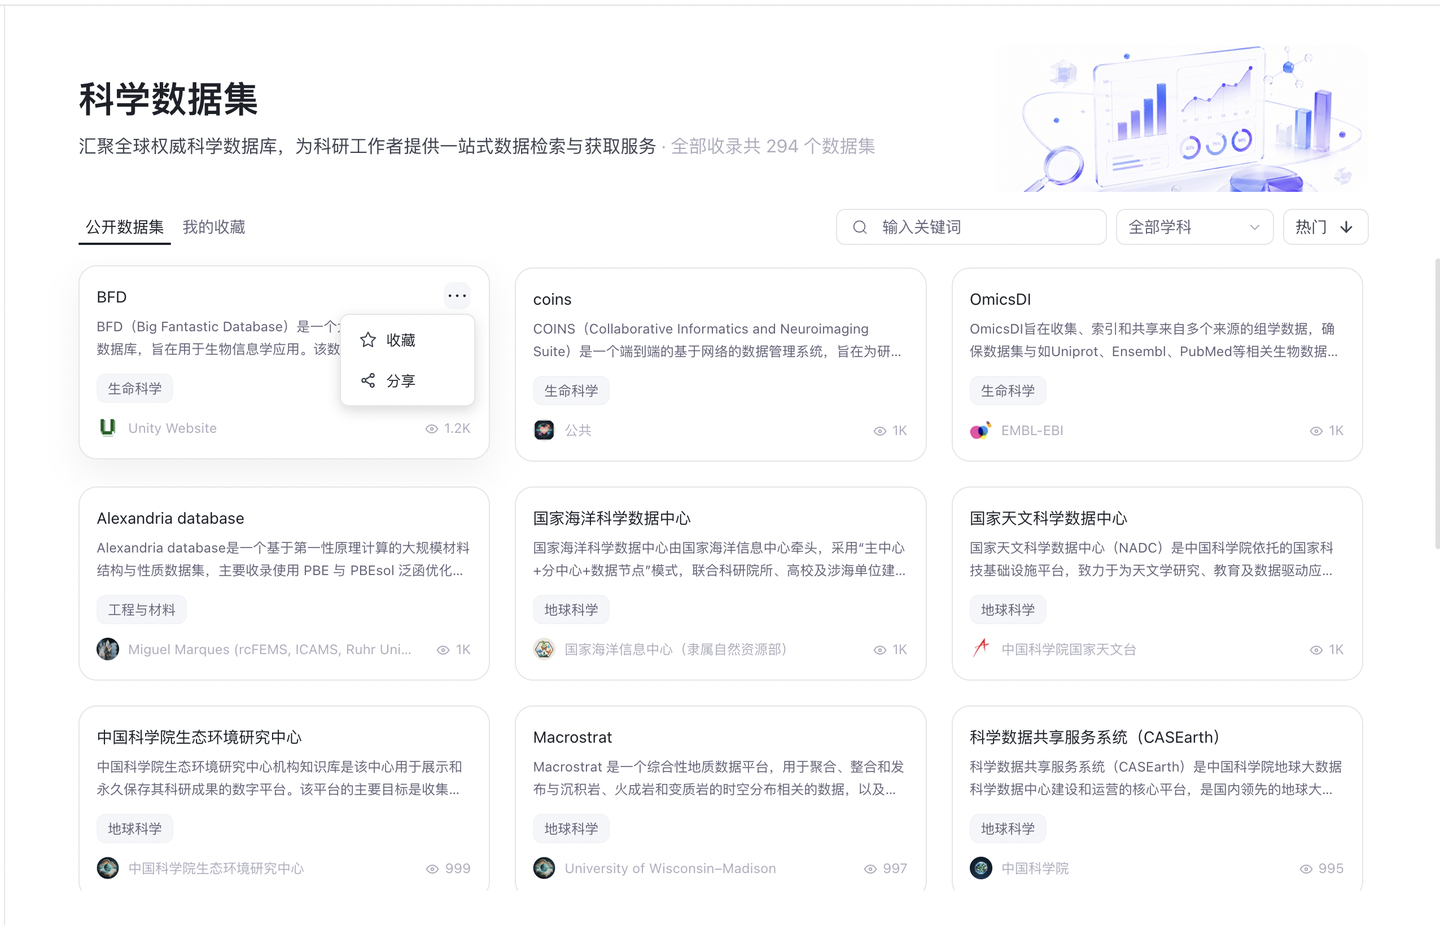
5.2.3 收藏数据
将鼠标悬浮在数据卡片上,卡片会出现「···」更多按钮
点击「···」会展开「收藏」/「已收藏」「分享」按钮
点击「收藏」→ 按钮变为「已收藏」,数据同步进入「我的收藏」
再次点击「已收藏」即可取消收藏
提示:取消收藏后页面不会立即刷新,需要手动刷新页面才会看到变化
5.2.4 查看数据详情
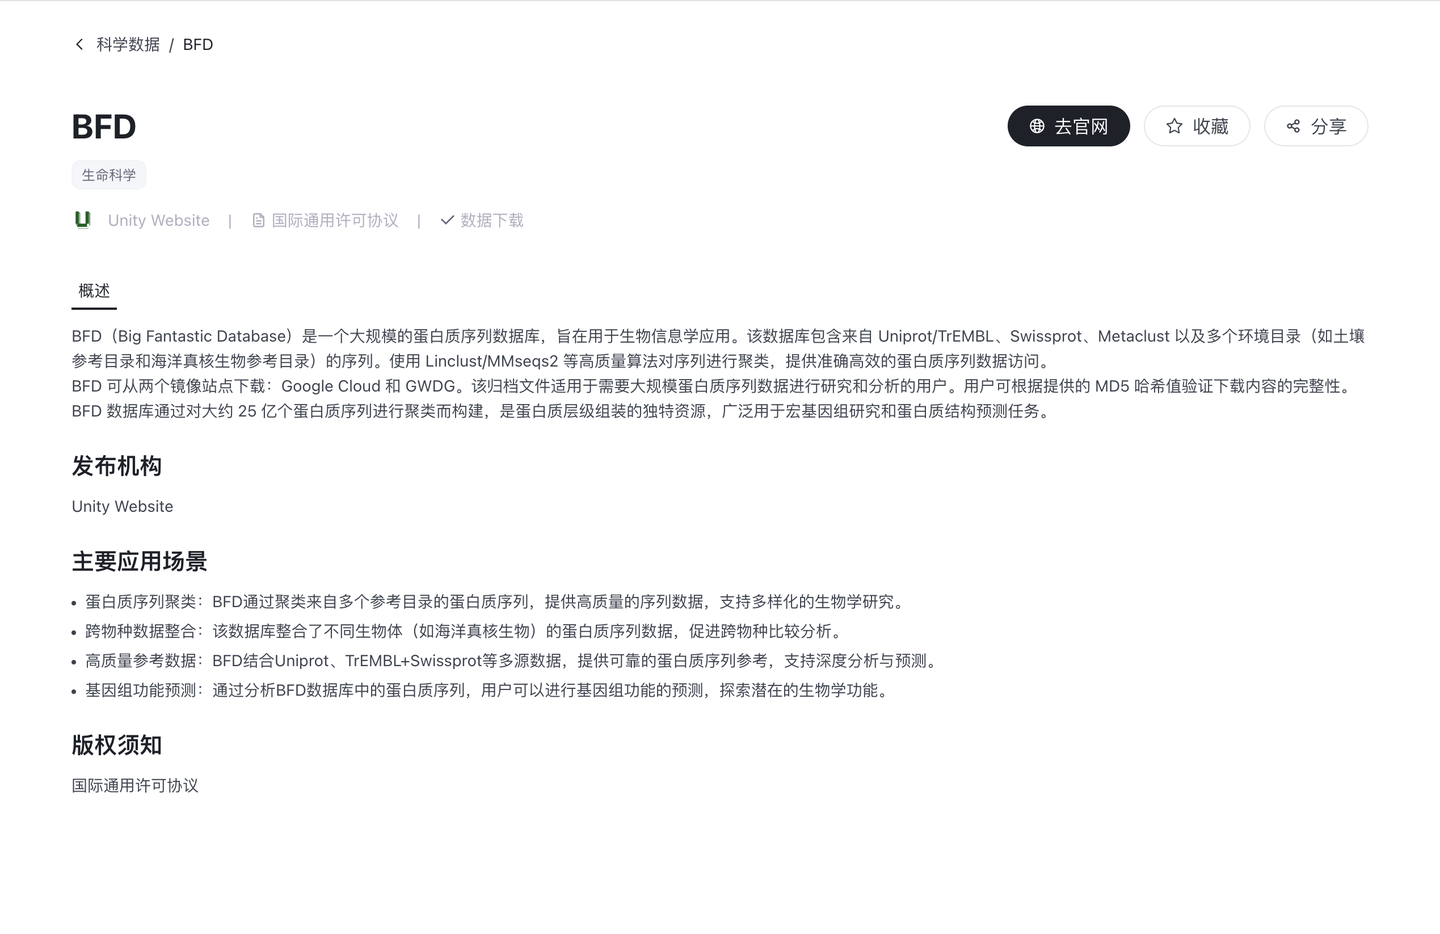
点击任意数据卡片进入详情页
详情页可查看:数据名称、全部学科标签、数据来源、许可协议、访问方式
详情页提供三个操作按钮:
「去官网」:一键跳转至该数据官方来源页面
「收藏」/「已收藏」:收藏或取消收藏
「分享」:复制详情页链接,便于分享好用的数据
详情页下方的「概述」区域会展示该数据的详细说明文档
5.3 工具
工具模块用于接入与管理外部 MCP 工具,科学对话处可按需自动调用,助力科研用户灵活构建专属的智能工具库。
5.3.1 找到工具入口
在左侧导航栏点击「工具」
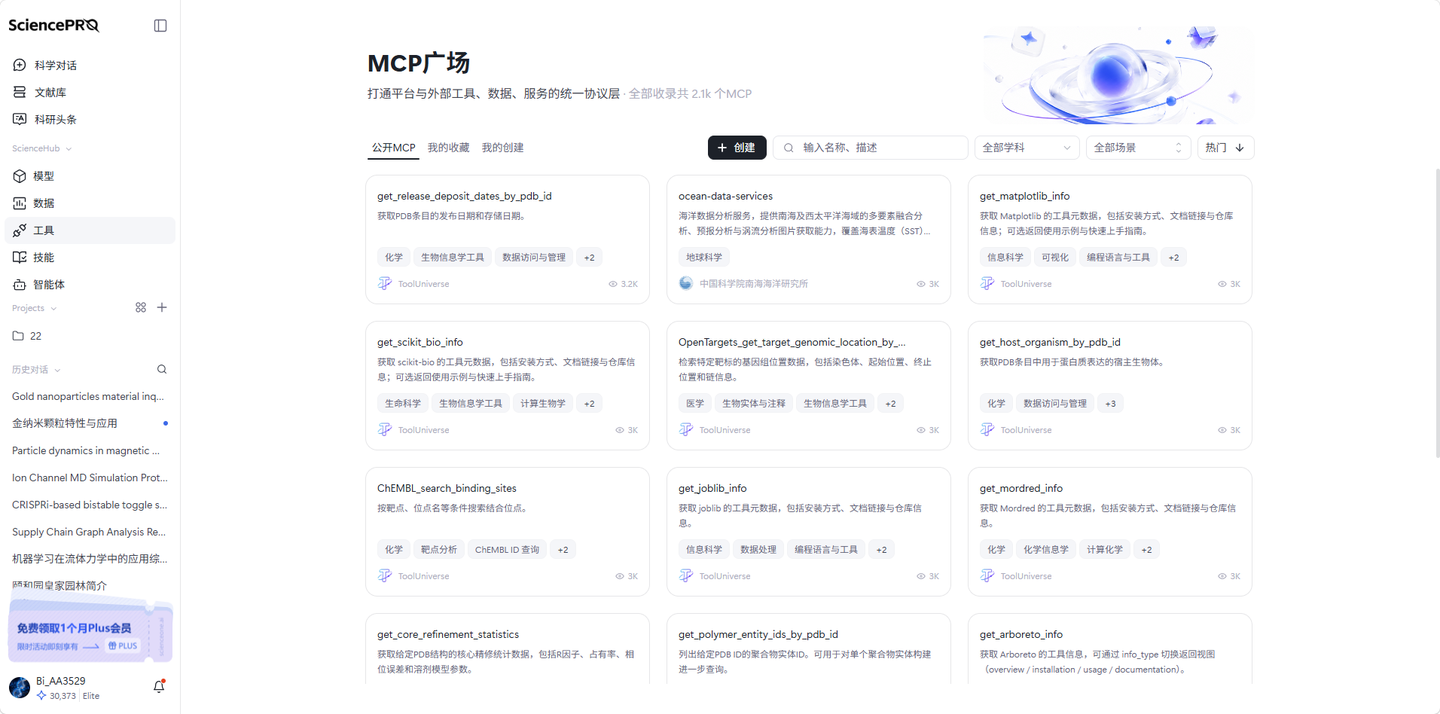
默认展示「公开MCP」
5.3.2 浏览与查找工具
切换分类:顶部有「公开 MCP」「我的收藏」「我的创建」三个 Tab
「公开 MCP」:展示平台所有工具
「我的收藏」:展示你收藏过的工具
「我的创建」:展示你创建的私有工具
搜索:在搜索框输入关键词(中英文均可),系统会模糊匹配名称和描述
学科筛选:顶部下拉框按学科筛选(如生命科学、医药科学、化学等),默认展示全部学科
场景筛选:顶部下拉框按场景标签筛选,默认展示全部场景;点击后可搜索并定位对应标签
排序:默认按「热门」排序,可切换到「时间」「名称」排序,并可点击箭头切换正序/倒序
数量:标题区会显示当前可调用的 MCP 总数,随所选 Tab 实时更新。
5.3.3 收藏工具
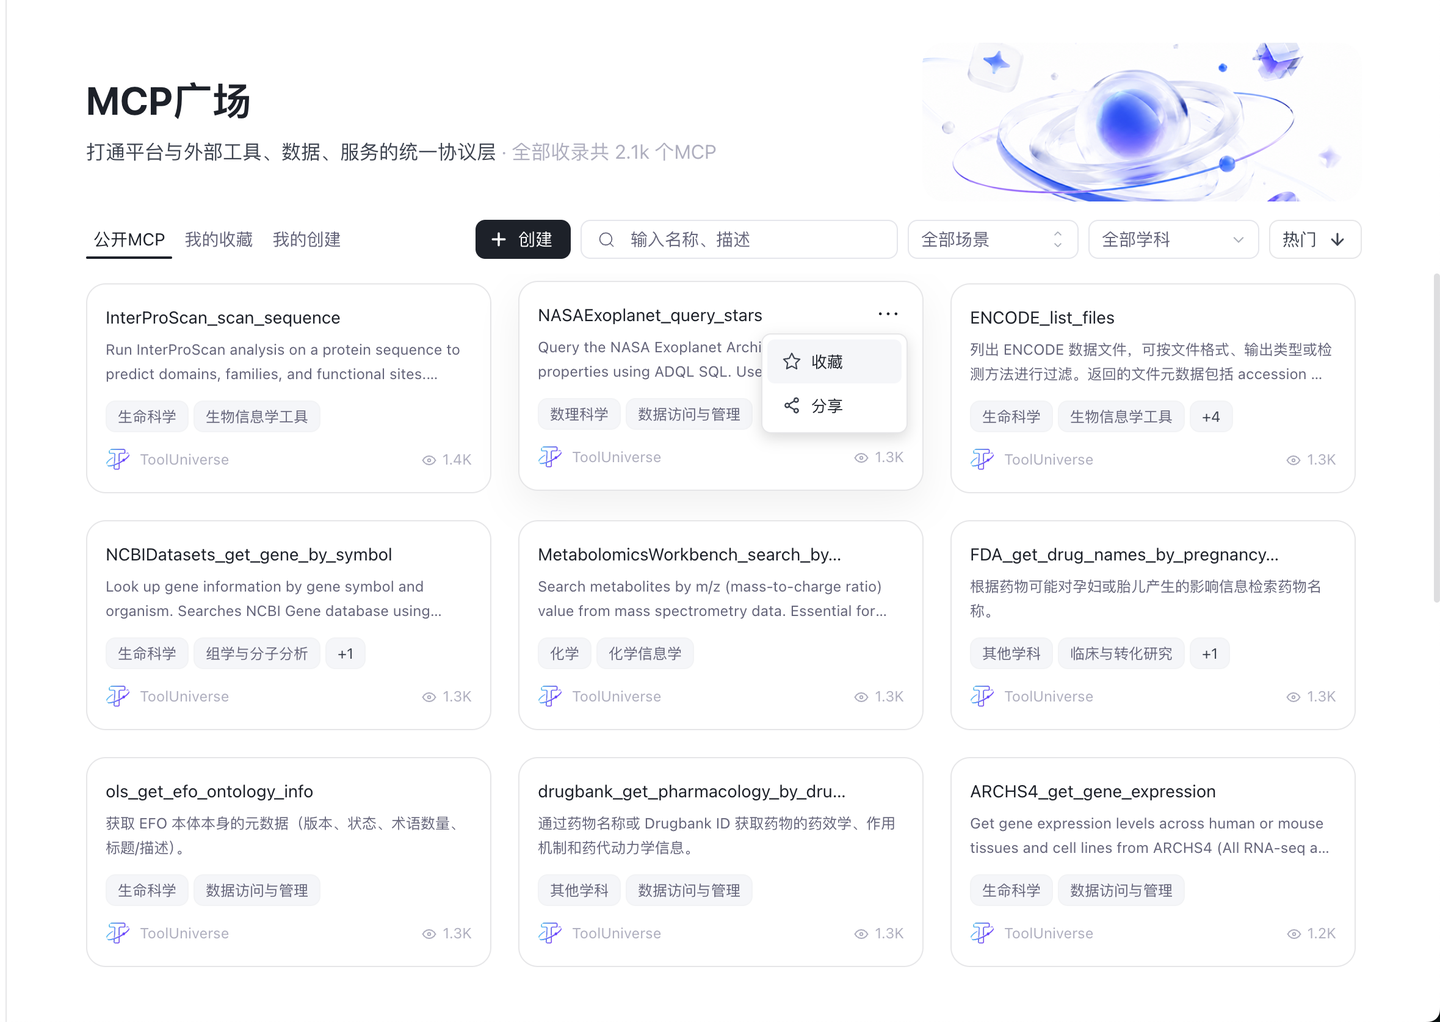
将鼠标悬浮在工具卡片上,卡片出现「···」按钮
点击「···」展开「收藏」/「已收藏」「分享」按钮
在「公开 MCP」下点击「收藏」→ 按钮变为「已收藏」,工具同步进入「我的收藏」
再次点击「已收藏」即可取消收藏
提示:取消收藏后页面不会立即刷新,需要手动刷新页面才会看到变化
5.3.4 查看工具详情
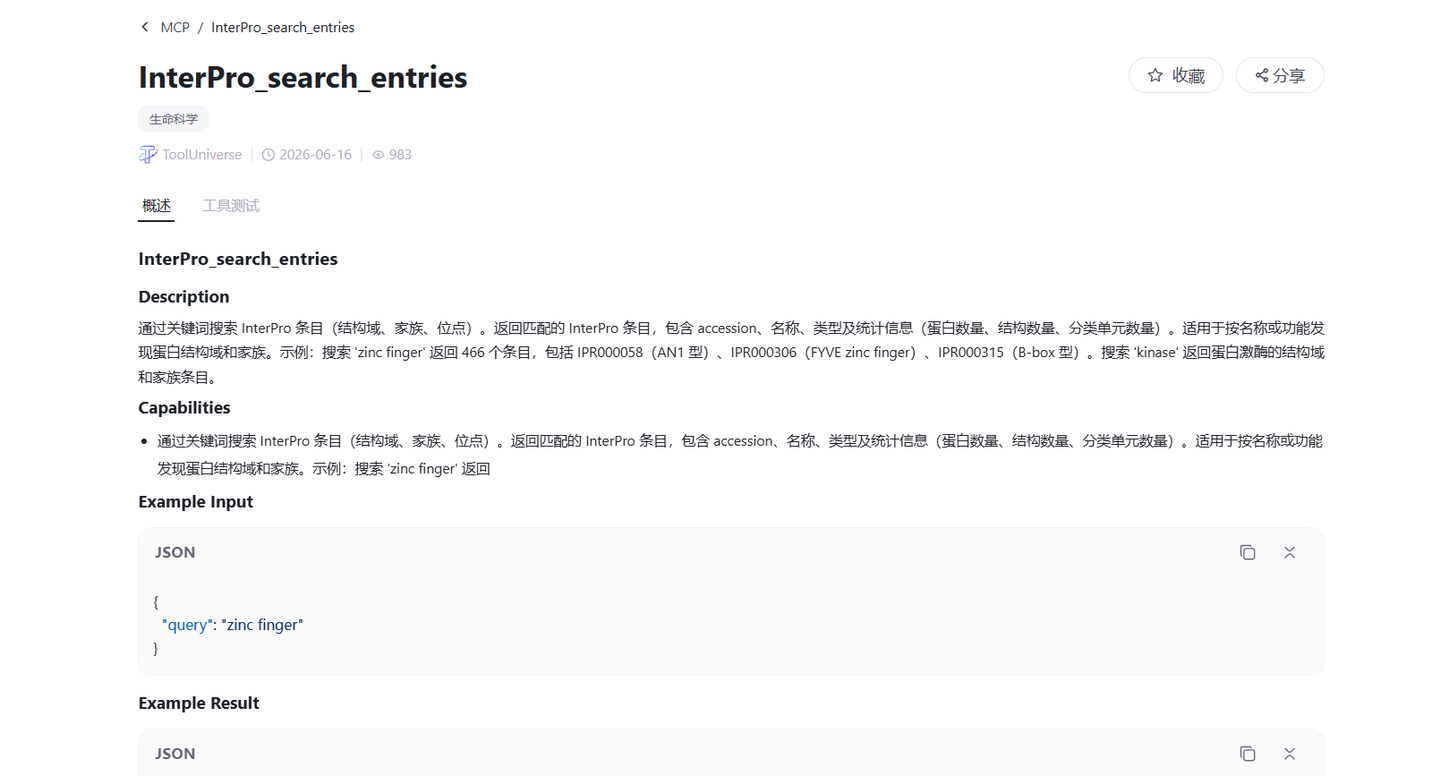
点击任意工具卡片进入详情页
详情页可查看:工具名称、学科标签、开发者、创建时间、热度
详情页操作:
「收藏」/「已收藏」
「分享」:复制详情页链接,直接分享好用的工具
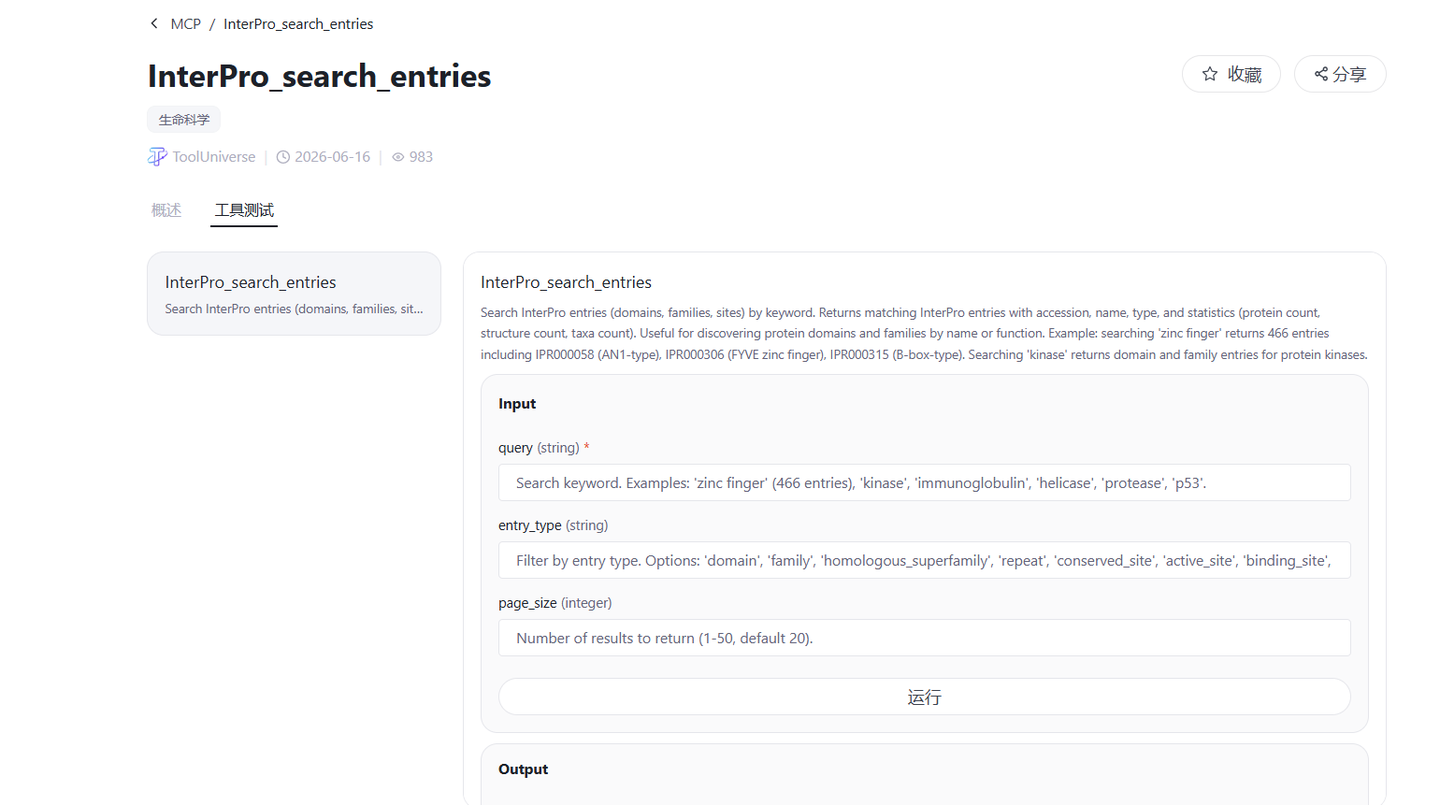
「概述」区域会展示该工具的详细说明文档
「工具测试」区域:可直接调用该工具进行测试,查看返回结果
5.3.5 创建自己的工具
在工具页点击右上角「创建」按钮
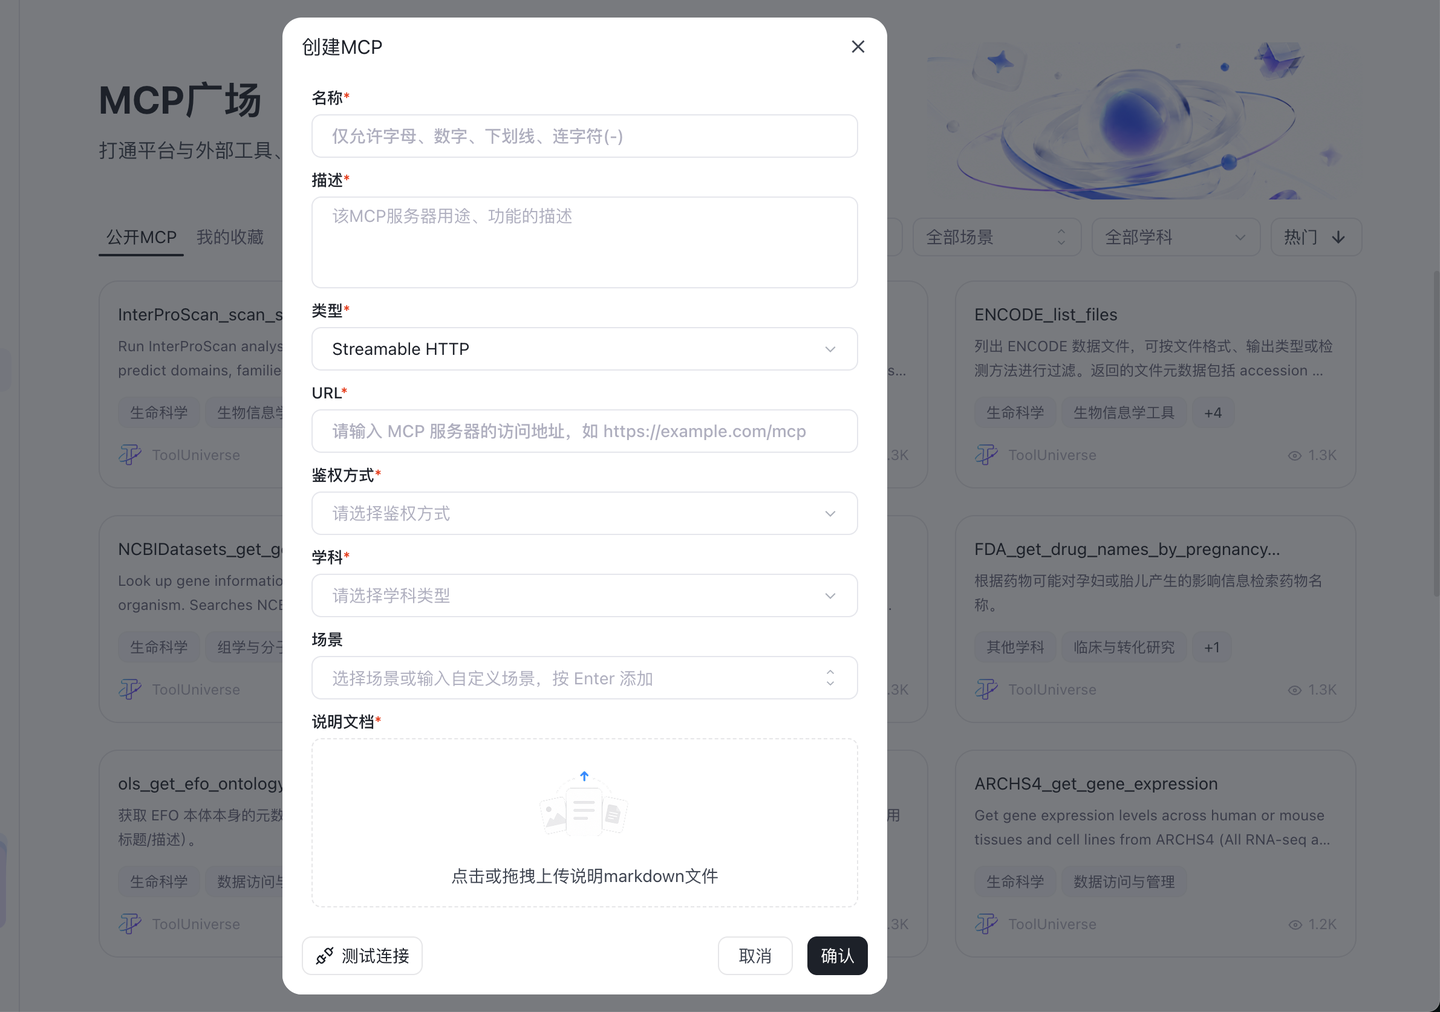
在弹出的表单中填写:
名称(必填)
描述(必填)—— 用一段话说明这个工具的用途
类型:选择 SSE 或 Streamable HTTP
URL:填写工具的访问 URL(以 http:// 或 https:// 开头)
鉴权方式:三选一
无鉴权:直接连接
Bearer 令牌:填写一个访问令牌
自定义请求头:填写键值对
学科:从下拉列表选择学科
场景标签:选择推荐或输入自定义标签,Enter确定,Backspace删除,最多支持三个
说明文档:上传一份 Markdown 格式的说明文档
点击「确认创建」
创建成功后,新工具会出现在「我的创建」列表顶部
也可以选择 「测试连接」,当连接通过后代表该MCP正常可用,再点击「确认创建」
5.3.6 管理我的工具
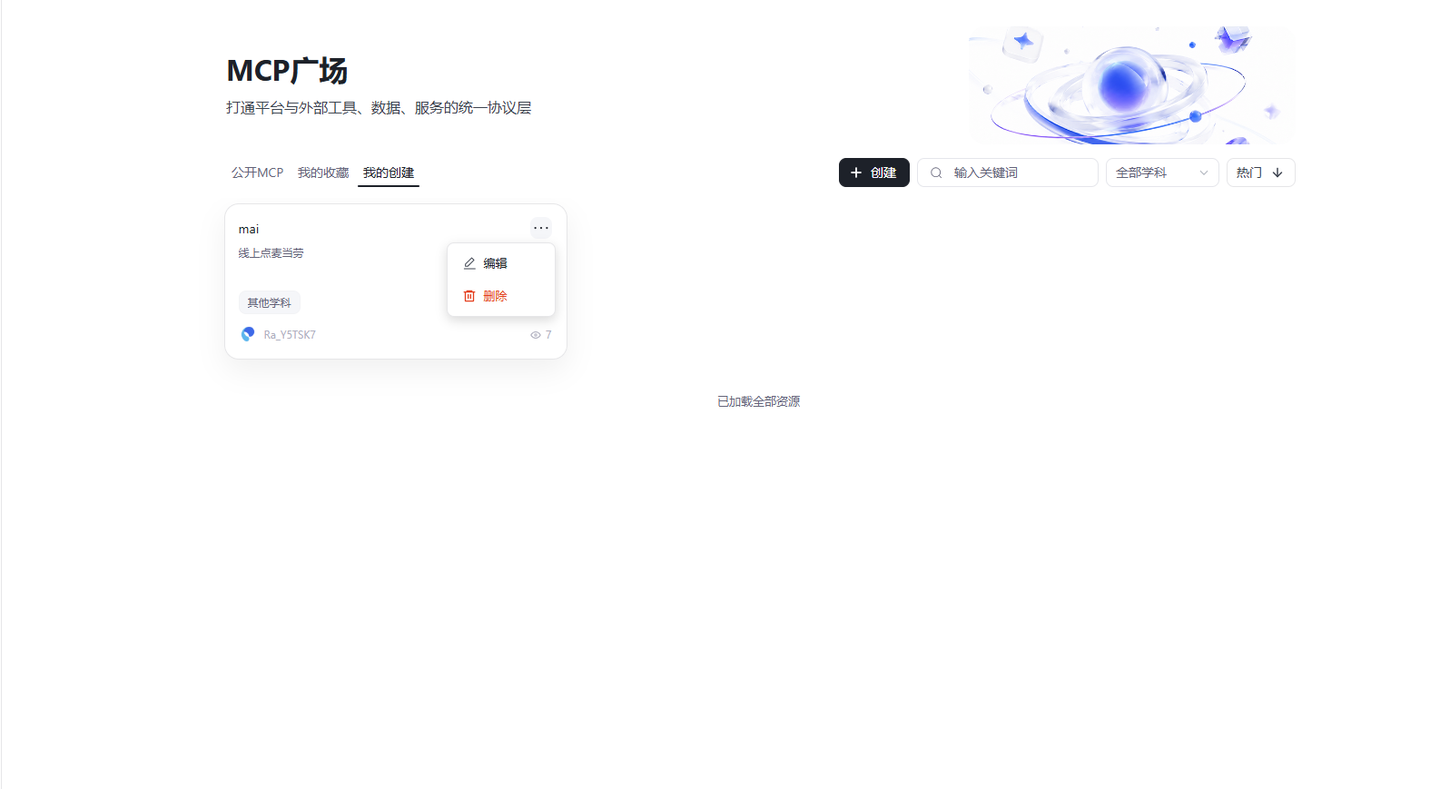
在「我的创建」中,可对工具进行「编辑」和「删除」操作
工具名称一旦创建不可修改,其余字段可编辑
删除需要二次确认
5.4 技能
技能模块用于管理 AI 可调用的方法与流程,内置千余项高质量 Skill,覆盖科研常见任务场景,让用户独有的研究经验沉淀为可复用的资产。
5.4.1 找到技能入口
在左侧导航栏点击「技能」
默认展示「公开Skill」
5.4.2 浏览与查找技能
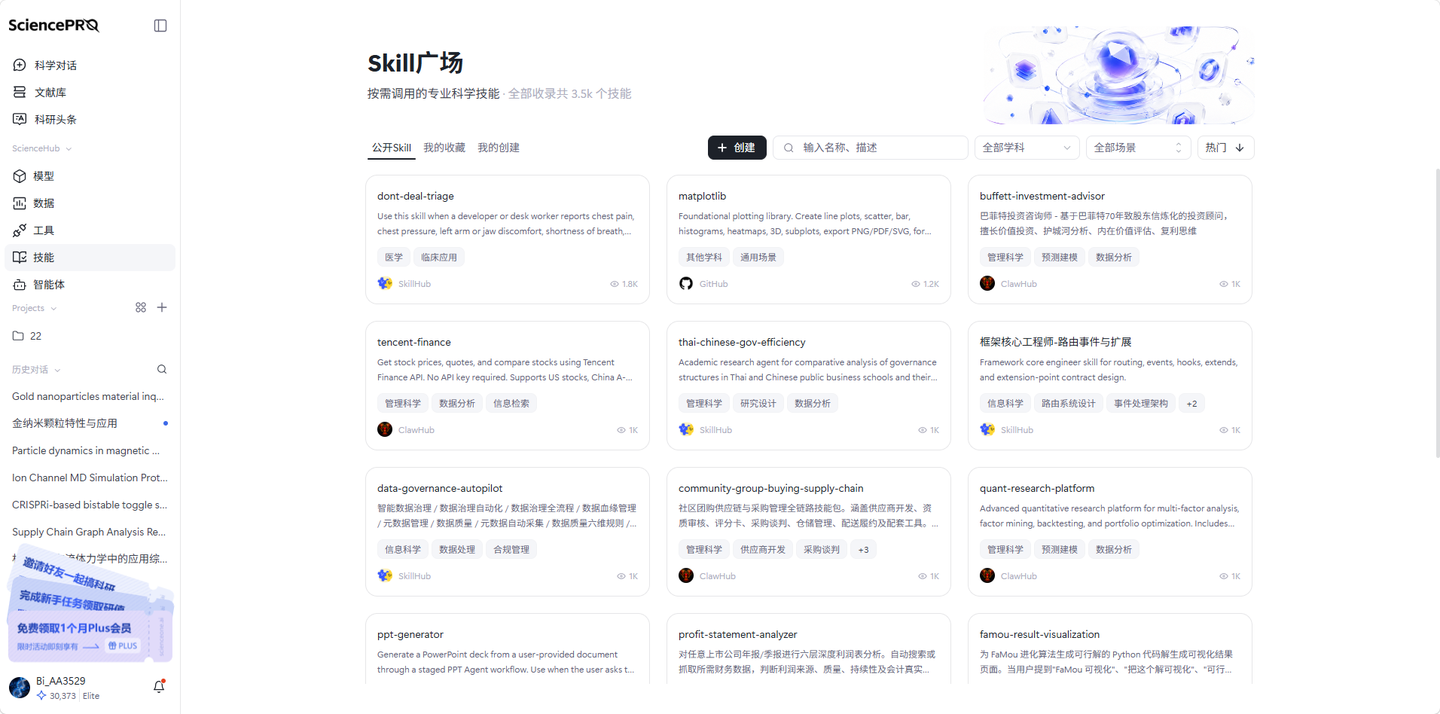
切换分类:顶部有「公开 Skill」「我的收藏」「我的创建」三个 Tab
搜索:在搜索框输入关键词(中英文均可),系统会模糊匹配名称和描述
学科筛选:顶部下拉框按学科筛选(如生命科学、医药科学、化学等),默认展示全部学科
场景筛选:顶部下拉框按场景标签筛选,默认展示全部场景;点击后可搜索并定位对应标签
排序:默认按「热门」排序,可切换到「时间」「名称」排序,并可点击箭头切换正序/倒序
数量:标题区会显示当前可调用的 SKILL 总数,随所选 Tab 实时更新。
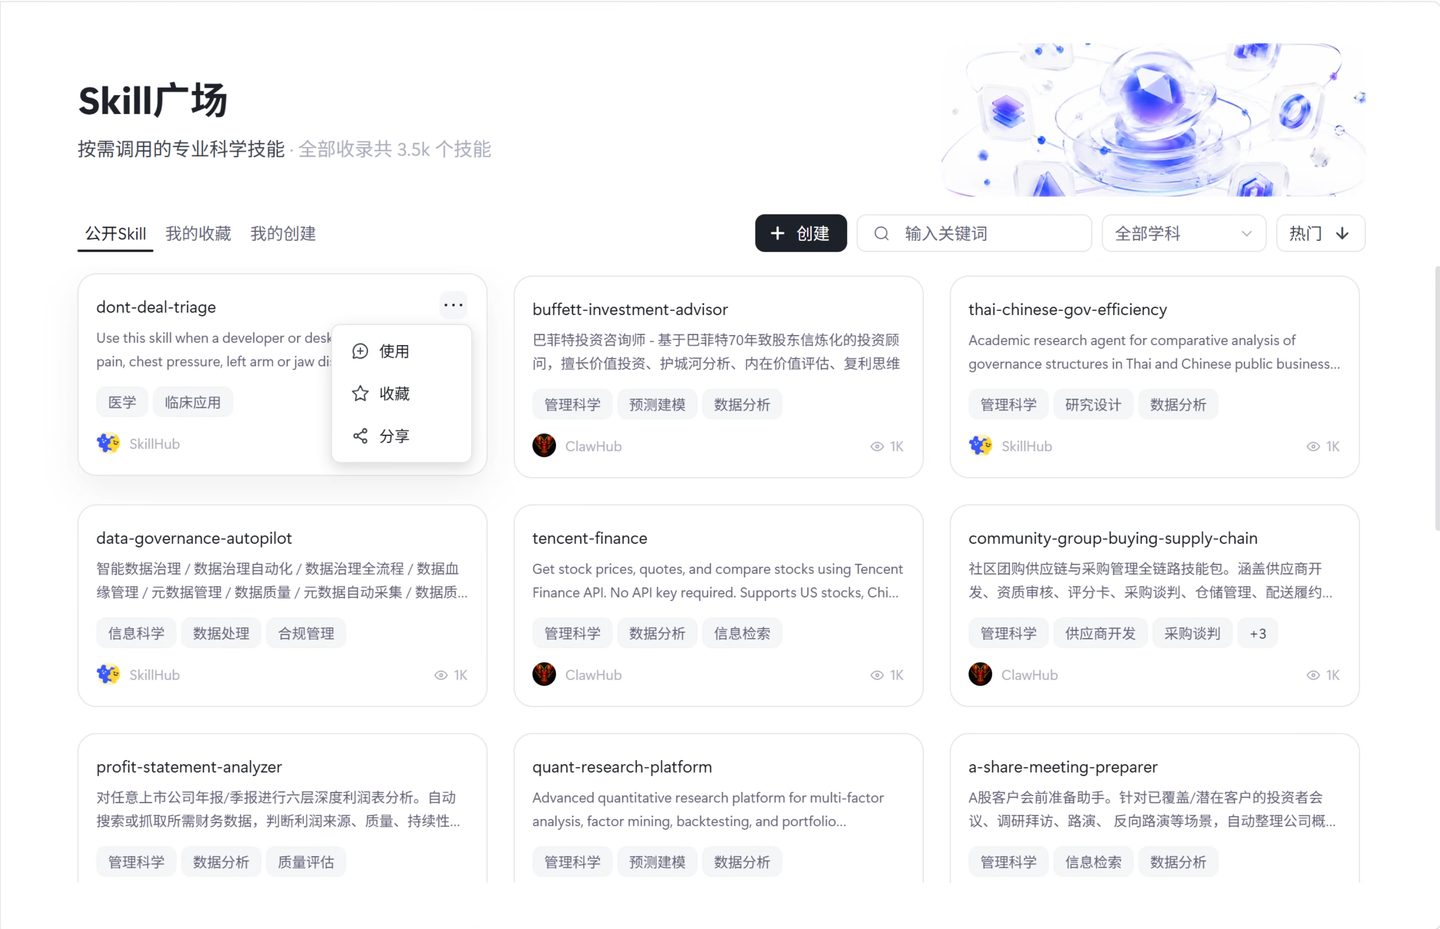
5.4.3 收藏技能
将鼠标悬浮在工具卡片上,卡片出现「···」按钮
点击「···」展开「收藏」/「已收藏」「分享」按钮
在「公开 Skill」下点击「收藏」→ 按钮变为「已收藏」,工具同步进入「我的收藏」
再次点击「已收藏」即可取消收藏
提示:取消收藏后页面不会立即刷新,需要手动刷新页面才会看到变化
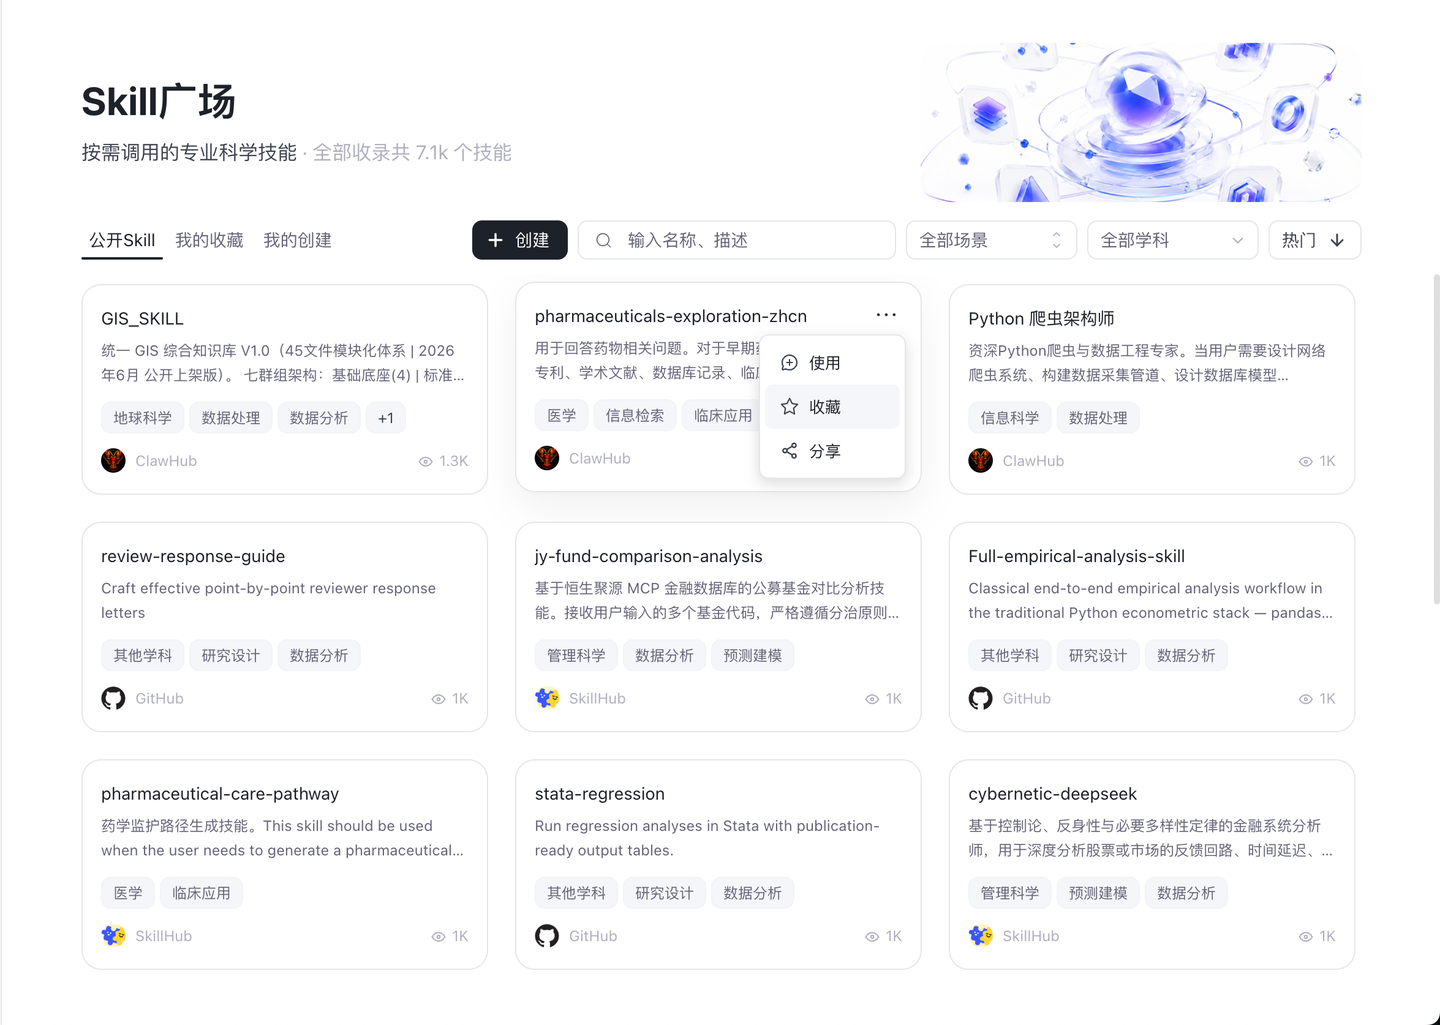
5.4.4 创建自己的技能
方式一:通过科学对话创建
鼠标悬浮在「创建」按钮
出现两个选项,点击「通过科学对话创建」
跳转「科学对话」,自动调用 /skill-creator 技能,依据描述创建技能
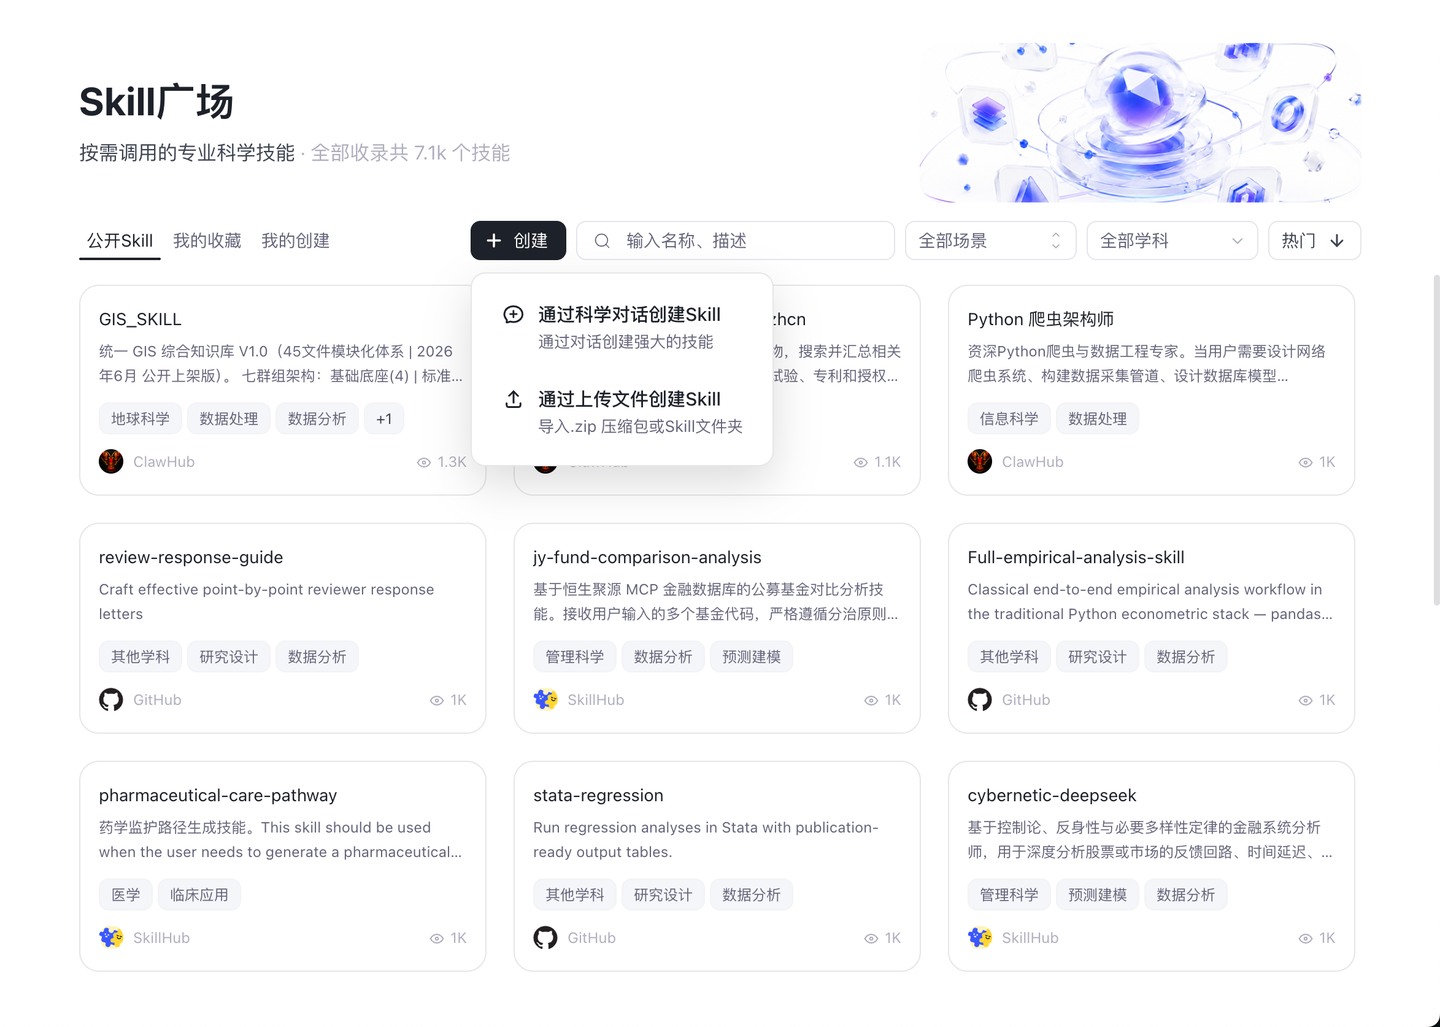
方式二:通过上传文件创建
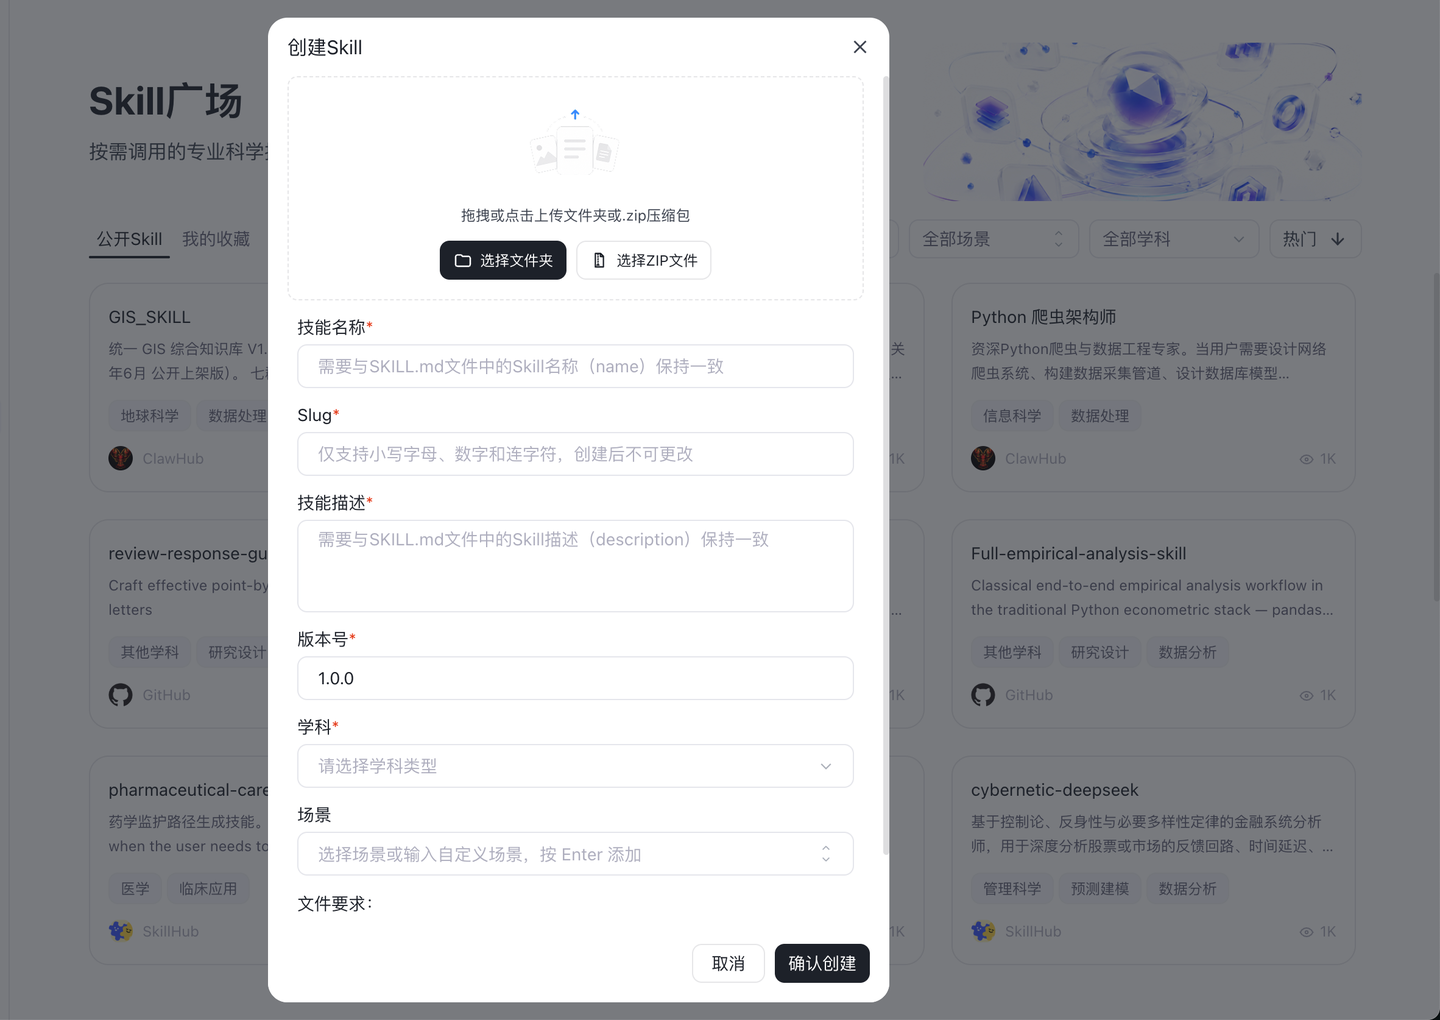
在技能页点击「创建」按钮
拖拽或点击上传技能的文件夹或 .zip 压缩包
系统自动识别并预填:技能名称、描述、版本号(如未填则自动补全 1.0.0)
补充填写唯一标识符(仅允许连字符、数字与小写字母,确定后不可修改)
学科:从下拉列表选择学科
场景标签:选择推荐或输入自定义标签,Enter确定,Backspace删除,最多支持三个
点击「确认创建」,系统自动审核(违规词、文件完整性、代码安全性等)
审核未通过:会显示具体原因(如涉及违规、缺少 SKILL.md 等)
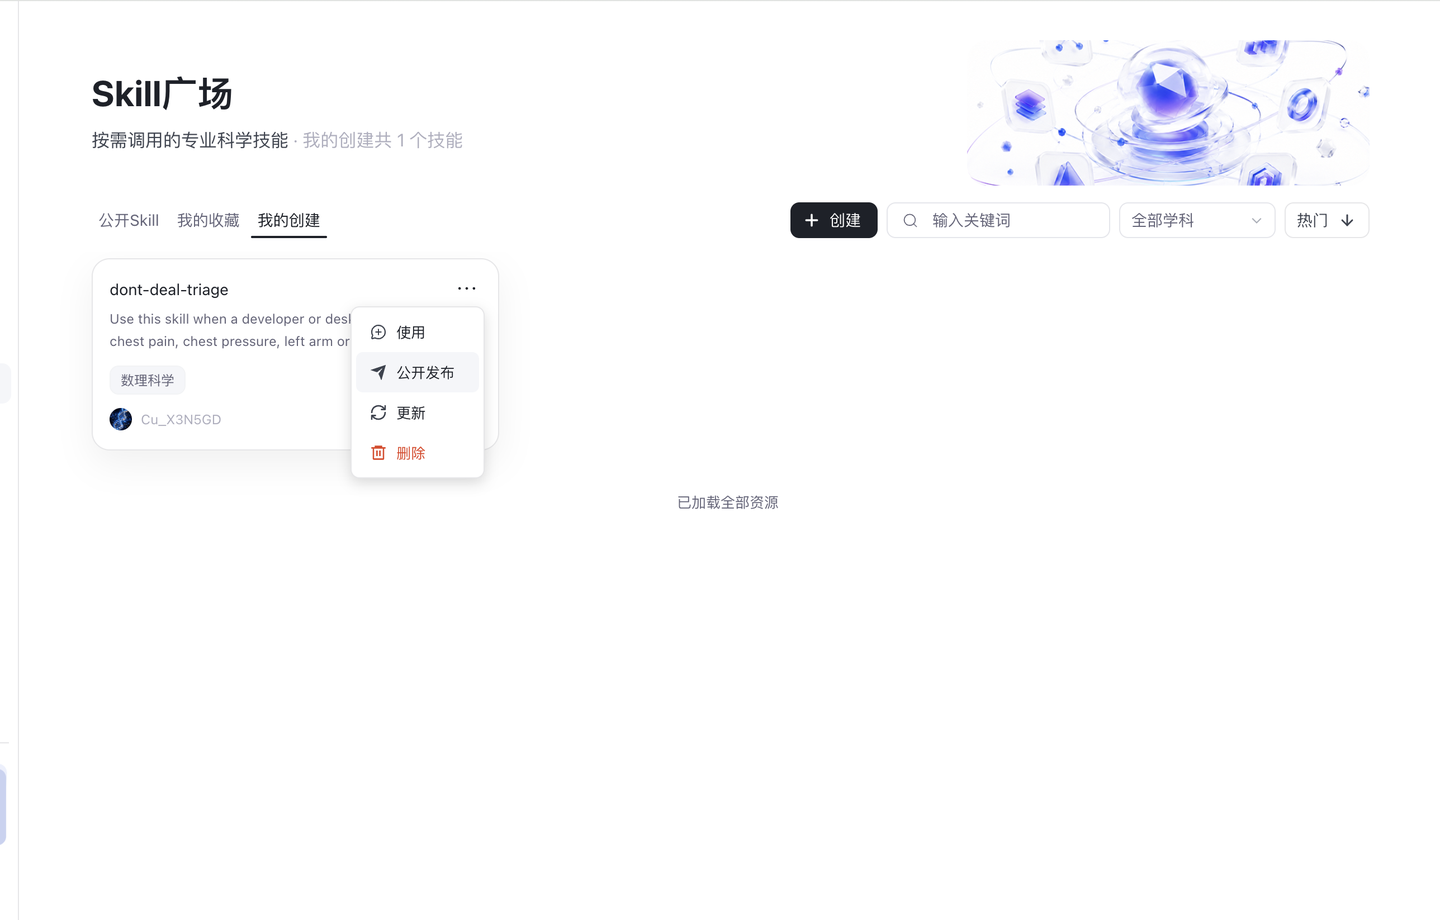
5.4.5 公开发布技能
在「我的创建」中找到要发布的技能
点击「公开发布」按钮
系统弹出二次确认:「Skill 公开发布后无法撤回」
确认后,技能出现在「公开 Skill」中,并标记「已发布」
重要提示:公开发布是永久性操作,请谨慎
发布激励
skill发布及证书获取
证书详情
5.4.6 更新技能
方式一:通过科学对话更新
通过对话更新技能
对话结束后跳出「保存」按钮
点击即可更新当前技能
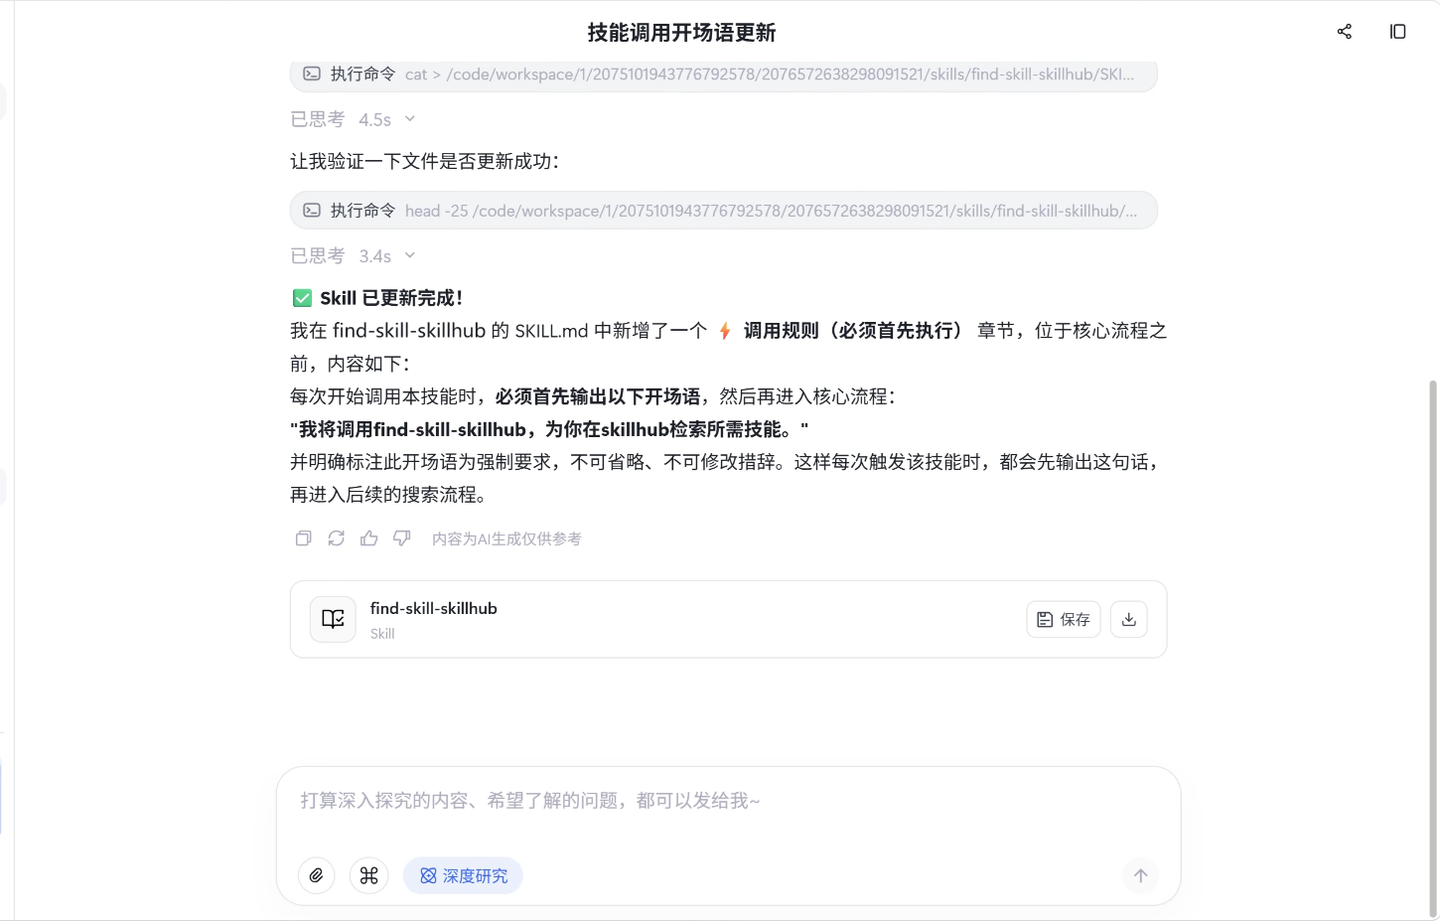
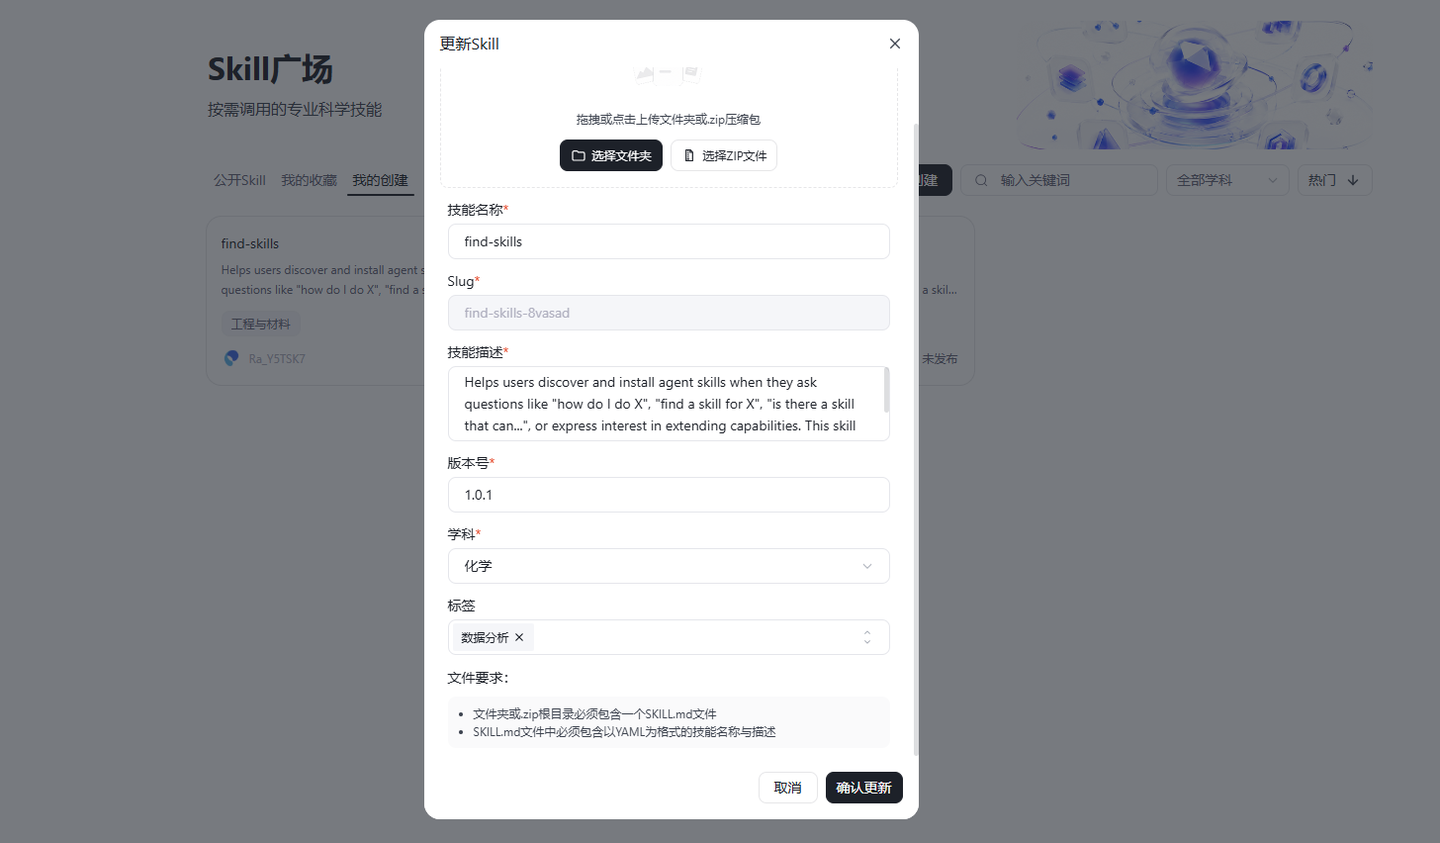
方式二:通过上传文件更新
在「我的创建」中点击「更新」按钮
重新上传技能的文件夹或 .zip 压缩包
可对技能名称、描述、版本号、学科、场景标签等内容进行二次修改,其中版本号必须在原有版本基础上增加
点击「确认更新」,系统重新自动审核(违规词、文件完整性、代码安全性等)
重要提示:唯一标识符(slug)一旦设定不可修改
5.4.7 删除技能
在「我的创建」中点击「删除」按钮 → 二次确认后删除
注意:
未发布的技能删除后完全消失
已发布的技能删除后,「我的创建」中会消失,但「公开 Skill」中仍保留
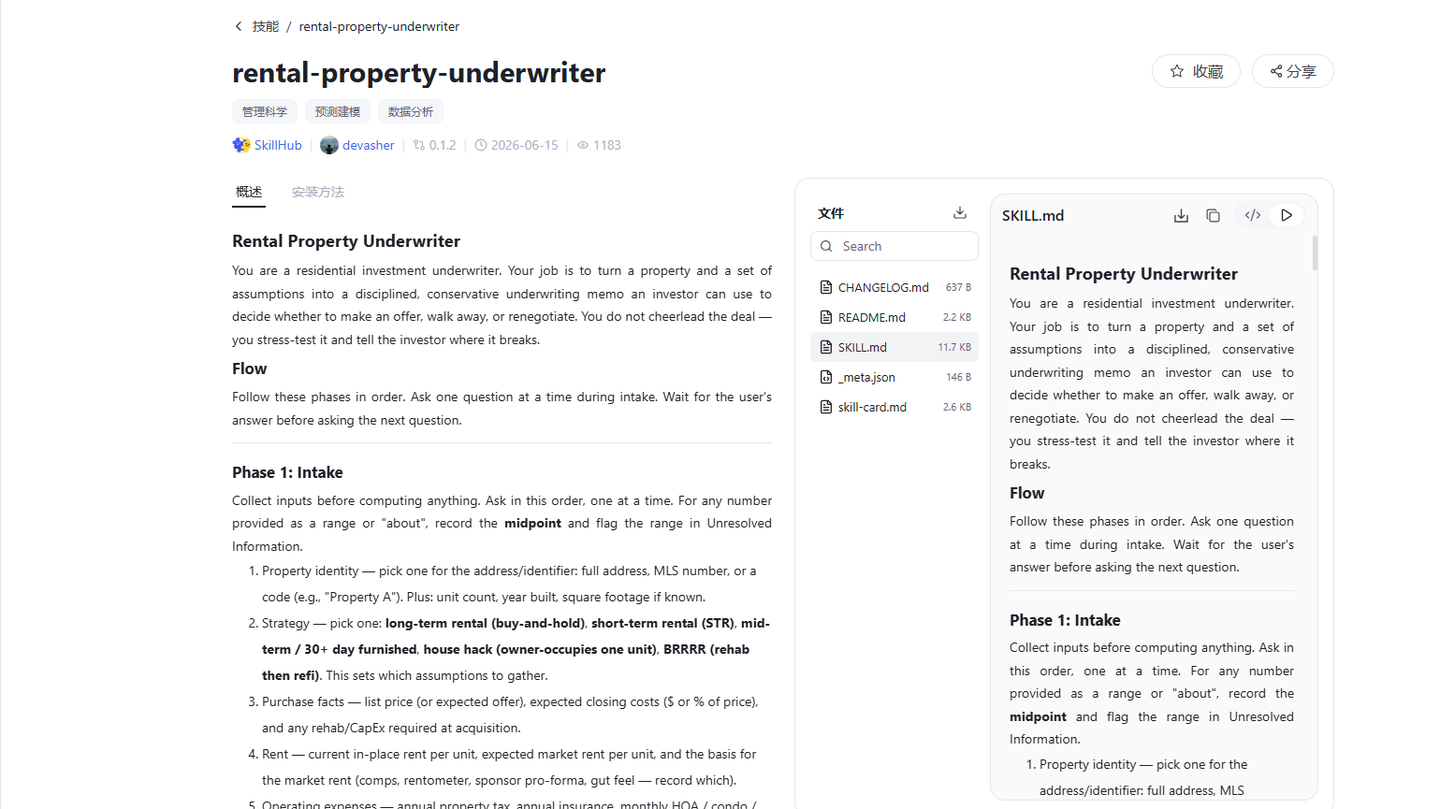
5.4.8 查看技能详情
点击任意技能卡片进入详情页
详情页可查看:技能名称、学科标签、开发者、版本号、创建时间、热度
详情页操作:
「收藏」/「已收藏」
「分享」:复制详情页链接,直接分享好用的工具
「概述」区域会展示该技能的详细说明文档
「安装方法」区域
「评论区」选项卡:查看该技能的评分与用户评论,参与讨论
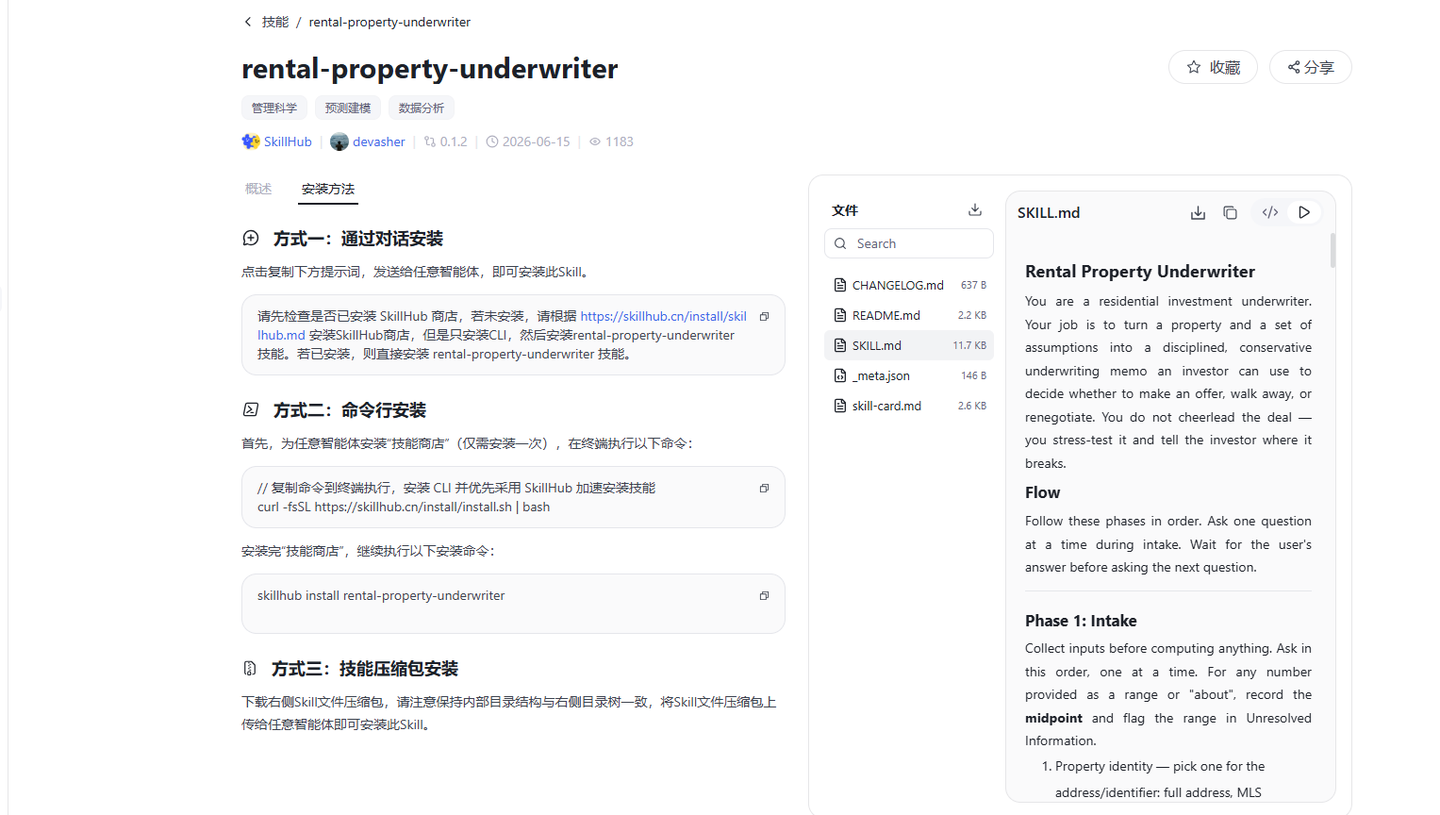
5.4.9 在外部平台使用本平台技能
在技能详情页找到「安装方法」区域
提供三种跨端安装方式:
对话安装:复制提示词发送给任意智能体使用
命令行安装:适用于已支持Skillhub CLI 的智能体
压缩包安装:下载技能压缩包后上传给任意智能体
详情页右侧「Skill 文件区」提供文件树目录,支持搜索、下载压缩包、复制单个文件内容
5.4.10 使用技能
将鼠标悬浮在工具卡片上,卡片出现「···」按钮
点击「···」展开「使用」「收藏」/「已收藏」「分享」按钮
在「公开 Skill」下点击「使用」→ 自动跳转「科学对话」在对话流中展示技能使用方式
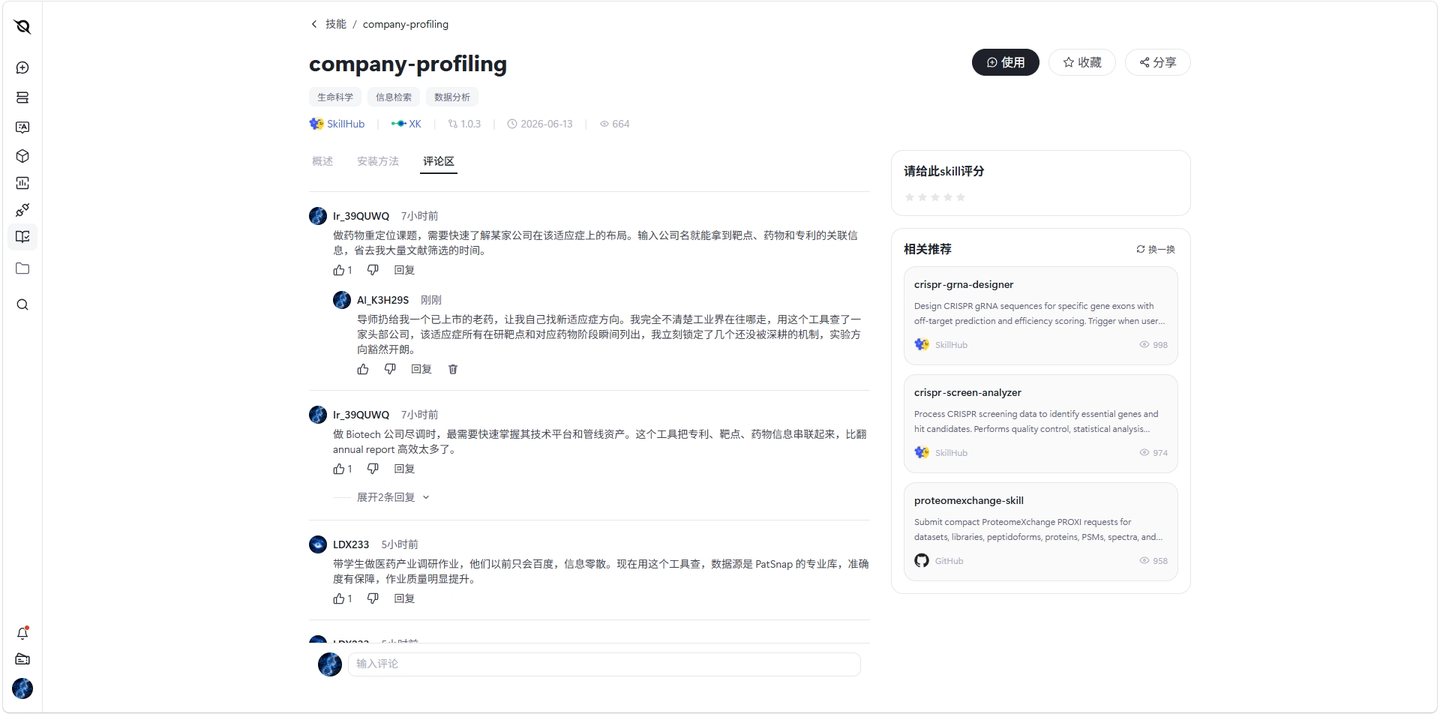
5.4.11 技能评论区
在技能详情页顶部标签栏点击「评论区」选项卡(与「概述」「安装方法」并列),查看其他用户的评分与评论
评分:10 分制,点击星星即可打分,支持半星;提交后可修改
发表评论:在页面底部输入框输入内容,支持 Emoji;发送失败时请根据提示修改后重新发送
回复与点赞:点击评论下方的回复按钮参与讨论,可对评论点赞或取消
删除评论:仅可删除自己发表的评论,需二次确认,删除后不可恢复
5.5 智能体
智能体模块用于发现和使用面向科研任务的专项智能体,支持将 Skill、MCP 等能力自由组合,把个人的研究经验与工作流程沉淀为可复用、可分享的专属智能体。
5.5.1 找到智能体入口
在左侧导航栏 ScienceHub 分组下点击「智能体」
默认展示「公开智能体」
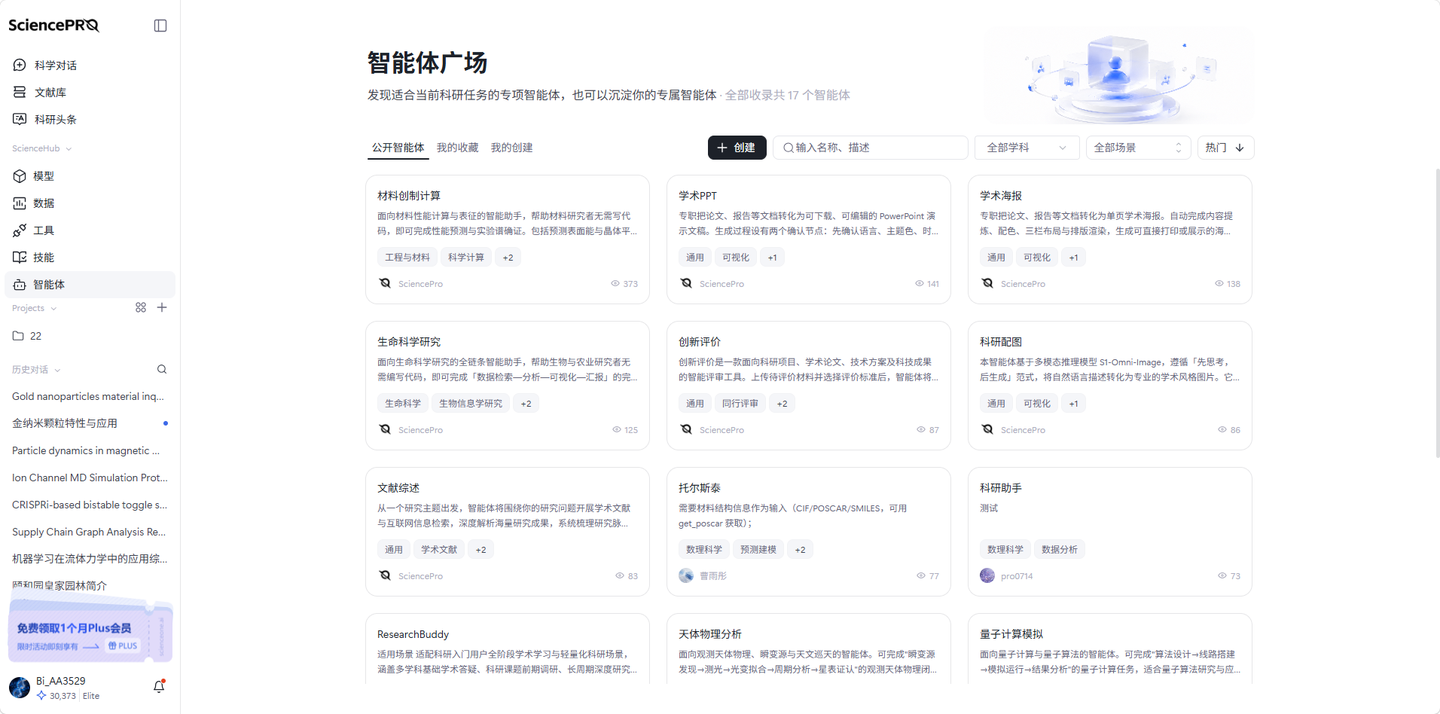
5.5.2 浏览与查找智能体
切换分类:顶部有「公开智能体」「我的收藏」「我的创建」三个 Tab
搜索:在搜索框输入关键词,系统按名称、描述模糊匹配
学科筛选:顶部下拉框按学科筛选,默认展示全部学科
场景筛选:顶部下拉框按场景标签筛选,默认展示全部场景
排序:默认按「热门」排序
数量:标题区显示当前分类的智能体总数(如“全部收录共 N 个智能体”),随所选 Tab 实时更新
卡片信息:每张卡片展示智能体名称、描述、学科/场景标签、开发者与热度
5.5.3 收藏、钉住与分享智能体
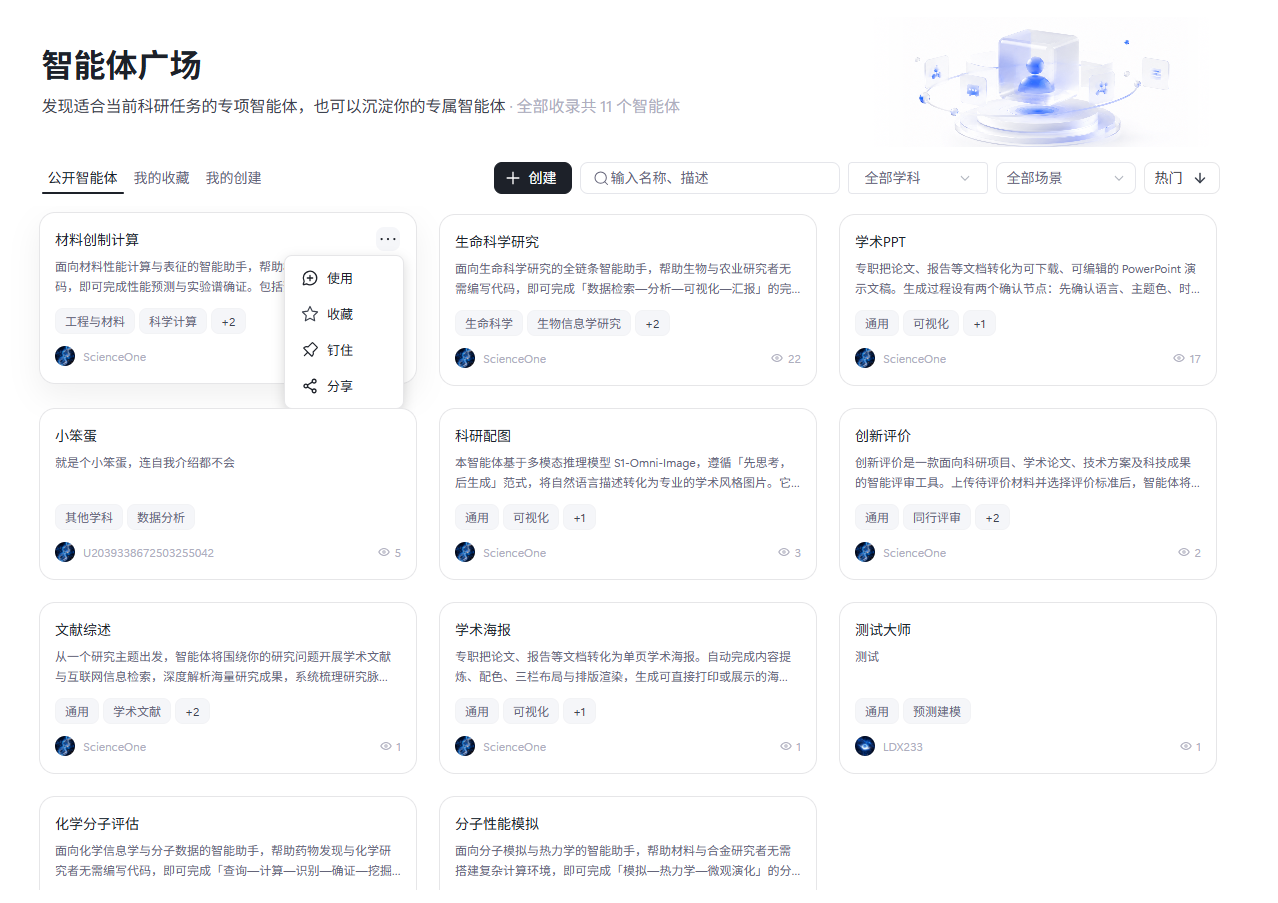
将鼠标悬浮在智能体卡片上,卡片右上角出现「···」按钮
点击「···」展开「使用」「收藏」「钉住」「分享」菜单
点击 「收藏」,智能体同步进入「我的收藏」;再次点击即可取消收藏
点击 「钉住」,智能体固定到「科学对话」输入框下方,对话时可快速调用;再次点击即可取消钉住
点击「分享」,复制智能体链接,直接分享给他人
5.5.4 创建智能体
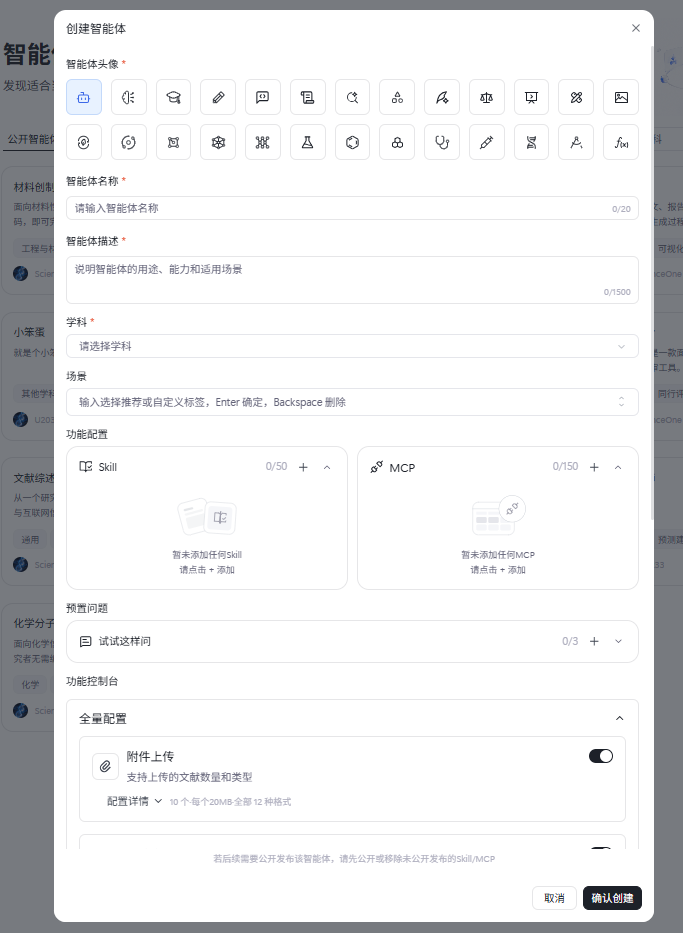
点击页面顶部 「+ 创建」 按钮,弹出「创建智能体」窗口
智能体头像(必填):从预设图标中任选一个
智能体名称(必填):最多 20 字
智能体描述(必填):说明智能体的用途、能力和适用场景,最多 1500 字
学科(必选):从下拉列表选择所属学科
场景(选填):选择场景或输入自定义场景,按 Enter 添加(Backspace 删除)
功能配置(选填):分别点击 Skill、MCP 面板上的「+」添加能力,Skill 最多 50 个,MCP 最多 150 个
预置问题(选填):设置「试试这样问」预置问题,最多 3 条,将展示在对话页帮助使用者快速提问
按需展开「功能控制台」进行全量配置
点击「确认创建」完成创建
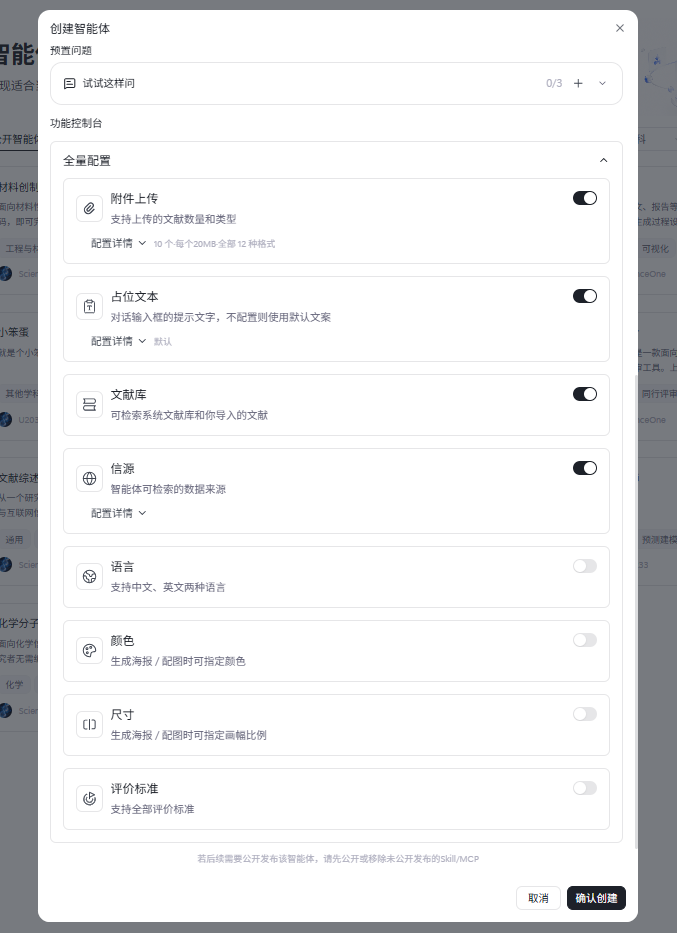
5.5.5 功能控制台(全量配置)
创建或编辑智能体时,展开「功能控制台」→「全量配置」,通过开关逐项启用功能:
附件上传:支持上传的文献数量和类型,可配置数量、单文件大小与格式(默认 10 个·每个 20MB·全部 12 种格式)
占位文本:对话输入框的提示文字,不配置则使用默认文案
文献库:开启后可检索系统文献库和你导入的文献
信源:配置智能体可检索的数据来源
语言:支持中文、英文两种语言
颜色:生成PPT/海报/配图时可指定颜色
尺寸:生成海报/配图时可指定画幅比例
评价标准:支持全部评价标准
提示:附件上传、占位文本、文献库、信源默认开启,其余功能默认关闭,可按需开启。
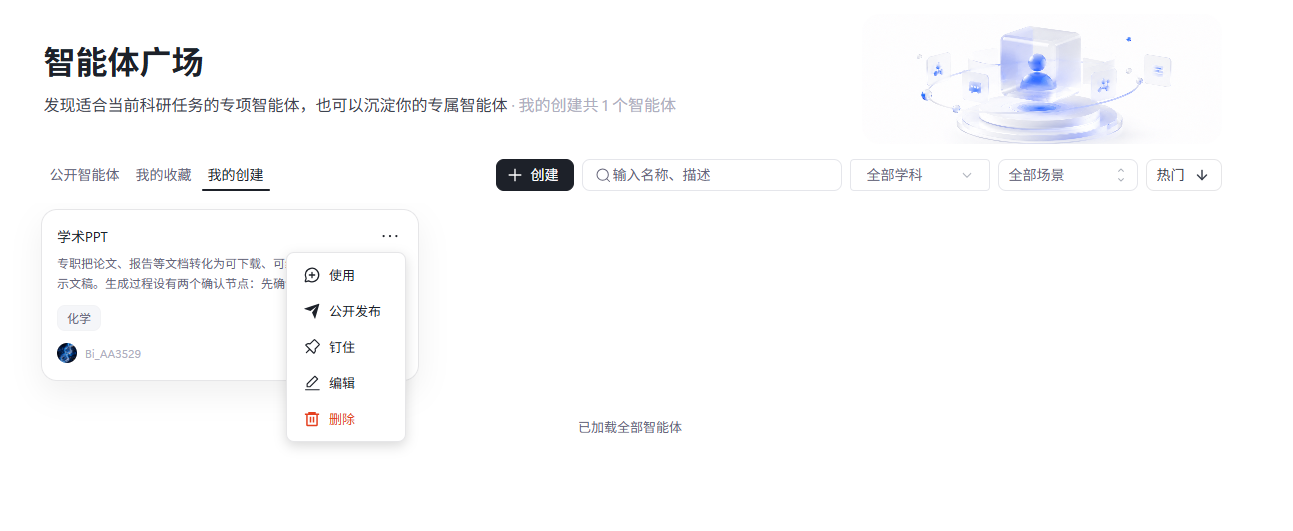
5.5.6 公开发布智能体
在「我的创建」中找到要发布的智能体
点击卡片 「···」→「公开发布」
确认后,智能体出现在「公开智能体」中,供平台其他用户使用
5.5.7 编辑智能体
在「我的创建」中点击卡片「···」→ 「编辑」
可修改头像、名称、描述、学科、场景、功能配置、预置问题及功能控制台配置
修改完成后保存生效
5.5.8 删除智能体
在「我的创建」中点击卡片「···」→ 「删除」(红色按钮)
二次确认后删除
注意:
未发布的智能体删除后完全消失
已发布的智能体删除后,「我的创建」与「公开智能体」中同步消失,不再保留
5.5.9 查看智能体详情
点击任意智能体卡片进入详情页
详情页可查看:智能体名称、学科/场景标签、开发者、创建时间
「概述」区域展示该智能体的详细描述
右侧「Skill」面板展示已配置的技能清单(显示“X/50 个启用”),「MCP」面板展示已配置的 MCP 清单(显示“X/150 个启用”),均可折叠展开
详情页顶部操作:「使用」「收藏」「钉住」「分享」
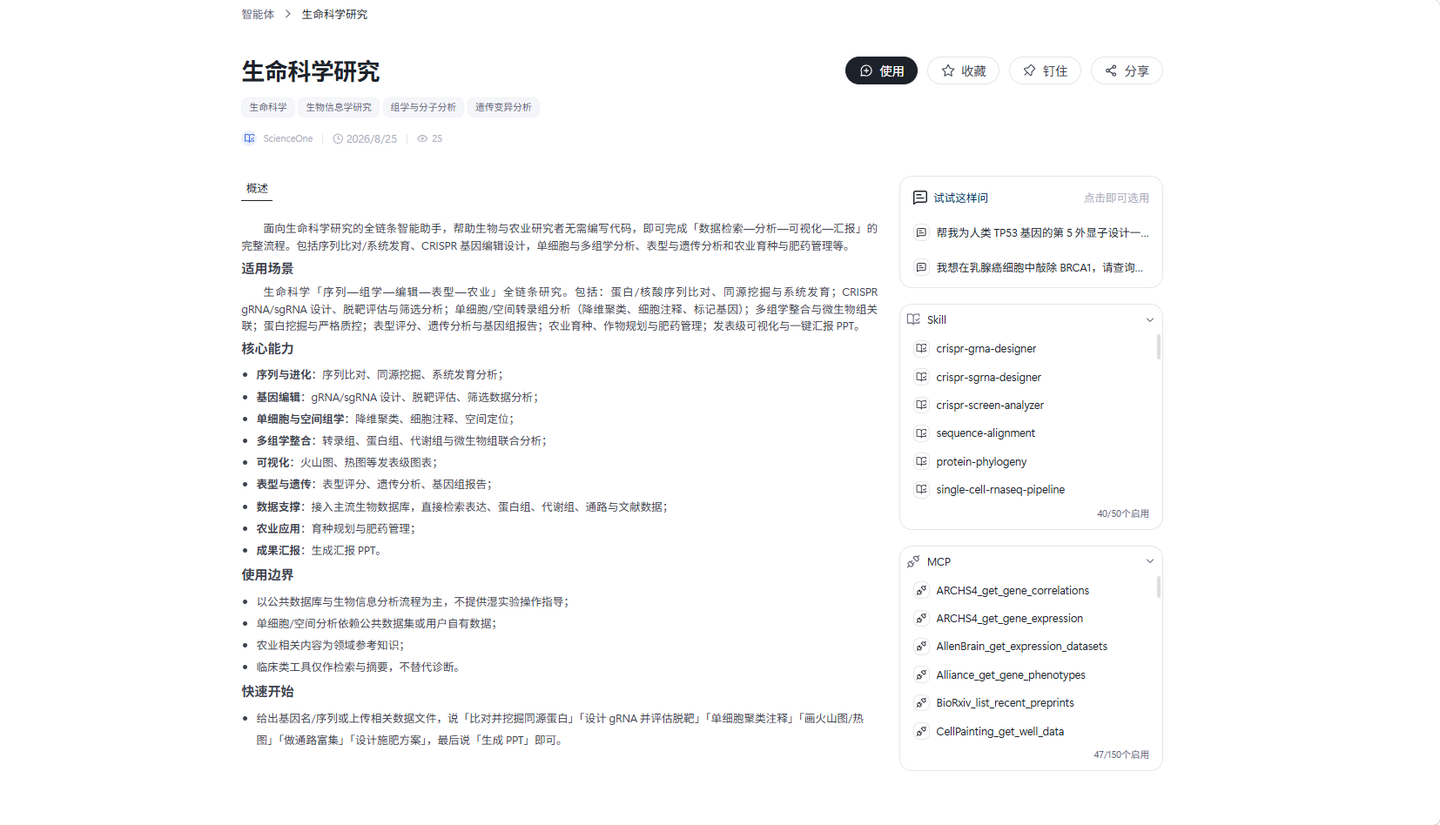
5.5.10 使用智能体
点击卡片进入详情页,点击右上角 「使用」
点击后自动跳转「科学对话」,即可与该智能体对话。
Projects
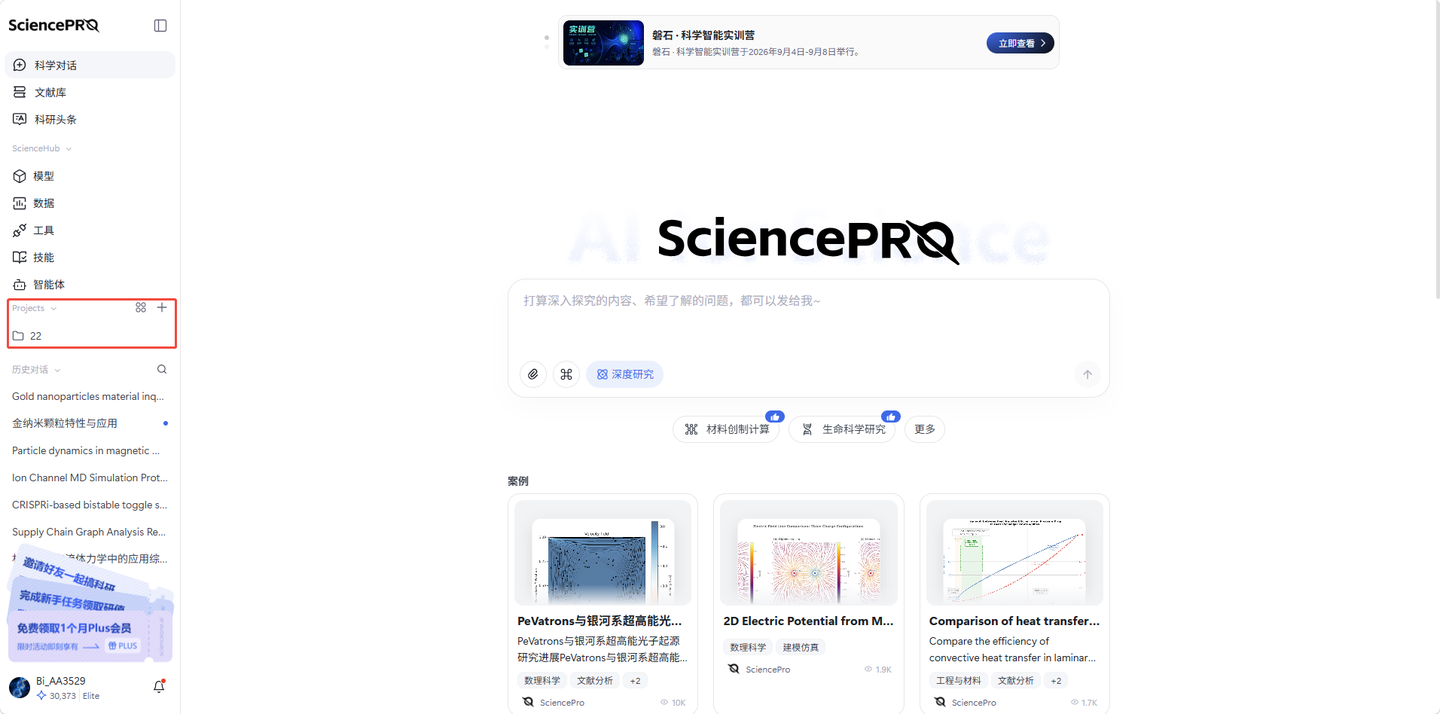
点击左侧导航栏「Projects」(项目)进入本模块。项目模块用于将相关对话集中归档、沉淀长期科研脉络,把散落的对话、文件与工具绑定到同一条科研工作线上,让思考与资料一处可寻,适用于持续进行的科研工作或单纯的内容整理。
提示:项目模块位于左侧边栏「ScienceHub」分组下方,展开后可直接查看、创建与管理项目;点击「查看全部」可进入全部项目页进行集中管理
项目模块位置:
6.1 项目浏览与管理
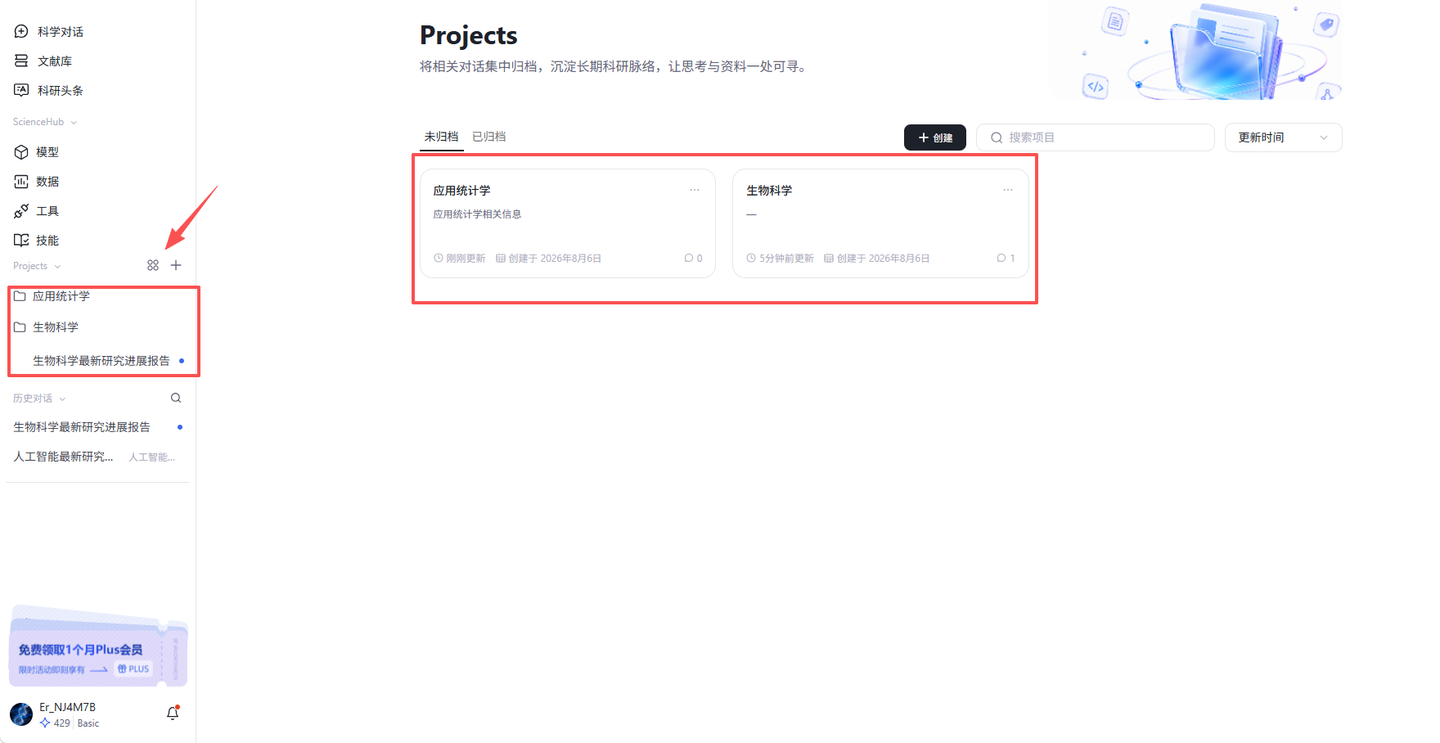
项目以列表和卡片两种形式呈现:左侧边栏 Projects 区提供快捷入口,全部项目页提供集中管理。系统默认展示未归档项目,按活跃时间倒序排列。
6.1.1 侧边栏项目入口
左侧边栏「Projects」区自上而下包含标题、查看全部、创建按钮与项目列表,是日常使用项目的快捷入口:
Projects 标题: 点击可整体折叠 / 展开项目列表,收起后不占用侧边栏空间。
查看全部(⊞ 图标): 点击跳转「全部项目页」,进行搜索、排序、归档等集中管理。
创建(+): 点击打开「新建项目」弹窗,鼠标悬停显示「创建项目」提示。
项目列表: 仅显示未归档项目,最多展示 4 个;超出时列表底部出现「全部项目(N)」入口。置顶项目排在最前(最多 3 个),其余按最近活跃时间倒序。
6.1.2 项目行与对话展开
侧边栏中每个项目行支持展开对话、进入详情及更多操作:
展开 / 收起: 点击项目行左侧箭头,展开该项目下的对话列表,每个项目最多展示 3 条对话,超出显示「+N 条更多对话…」,点击进入项目详情查看全部。
进入项目: 点击项目名称或对话图标(💬),进入项目详情页。
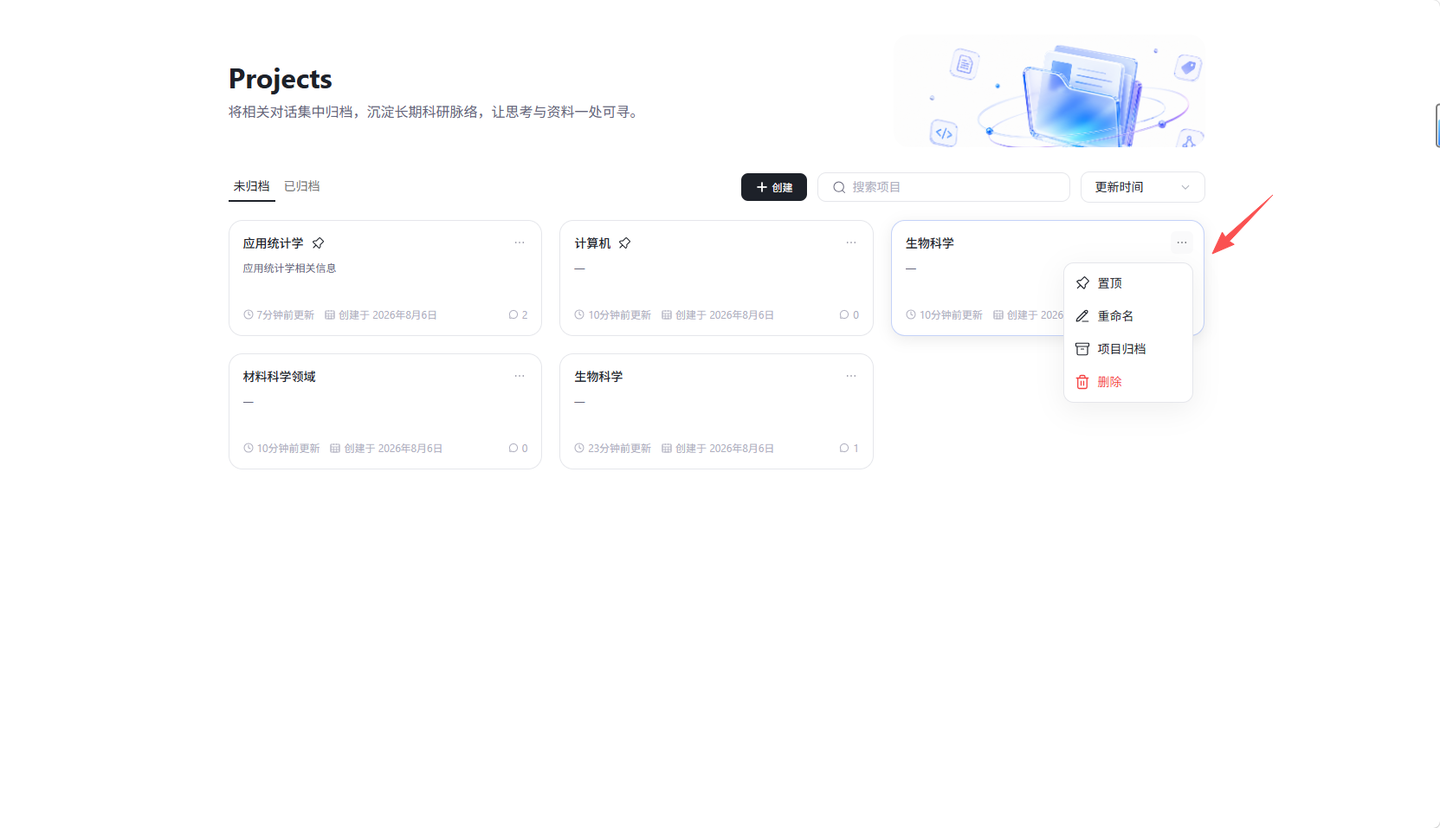
更多操作(⋯): 点击展开下拉菜单,含「置顶 / 取消置顶」「项目归档 / 取消归档」「重命名」「移除项目」。
对话操作(⋯): 展开对话后,每条对话右侧提供「重命名」「从项目中移除」「加入项目」「删除」操作。
6.1.3 全部项目页
点击侧边栏「查看全部」或「全部项目(N)」进入全部项目页,以卡片网格形式集中管理所有项目:
顶部标题区: 展示标题「Projects」与副标题「将相关对话集中归档,沉淀长期科研脉络,让思考与资料一处可寻」及装饰图。
未归档 / 已归档切换: 通过 Tab 切换显示正常项目或已归档项目。
创建项目: 页面工具栏提供「创建项目」按钮,功能同侧边栏创建。
搜索项目: 在搜索框输入关键词,按项目名称实时筛选。
排序: 支持按「创建时间」或「更新时间」排序,默认创建时间。
项目卡片: 点击卡片进入对应项目详情页;已归档项目带归档标识及名称后缀「(n/n)」。
6.2 创建项目
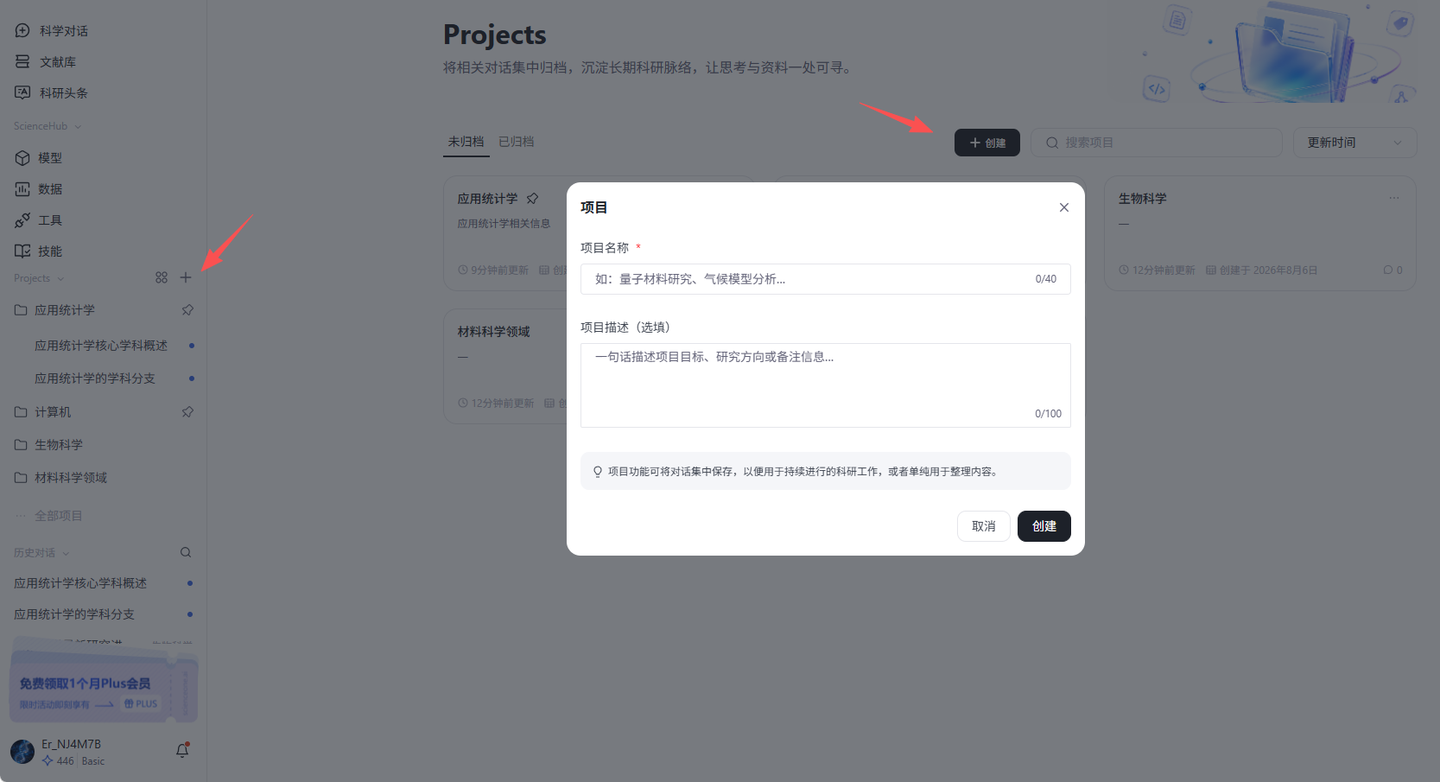
创建项目有多个入口,均打开统一的「新建项目」弹窗。创建成功后自动进入该项目详情页,可立即开始对话。
6.2.1 创建入口
系统提供以下创建入口,方便在不同场景下发起:
侧边栏创建(+): Projects 区标题右侧的「+」按钮。
全部项目页创建: 全部项目页工具栏的「创建项目」按钮。
历史对话加入: 历史对话右键 → 加入项目 → 新项目,创建项目并同时移入该对话。
项目对话加入: 项目内对话右键 → 加入项目 → 新项目,创建项目并把对话从原项目移入。
6.2.2 填写项目信息
在「新建项目」弹窗中填写项目基本信息:
项目名称(必填): 最多 40 字,建议使用具象命名(如「量子材料研究」「气候模型分析」);留空点击创建会标红提示「请输入项目名称」,约 1.8 秒后自动恢复。
项目描述(选填): 最多 80 字,用一句话描述项目目标、研究方向或备注信息,带 n/80 字数计数。
底部提示: 弹窗下方展示灰色说明「项目功能可将对话集中保存,以便用于持续进行的科研工作,或者单纯用于整理内容」。
6.2.3 创建后行为
点击「创建项目」后系统执行以下动作:
自动进入详情页: 创建成功后弹出「✓ 项目"xxx"已创建」提示,并直接进入该项目详情页,输入框闪光并自动聚焦,便于立即开始对话。
携带对话创建: 若来自历史对话 / 项目对话的「新项目」路径,会同时把对应对话移入新项目。
初始状态: 新项目的对话、文件、智能体、Skill、MCP 均为空。
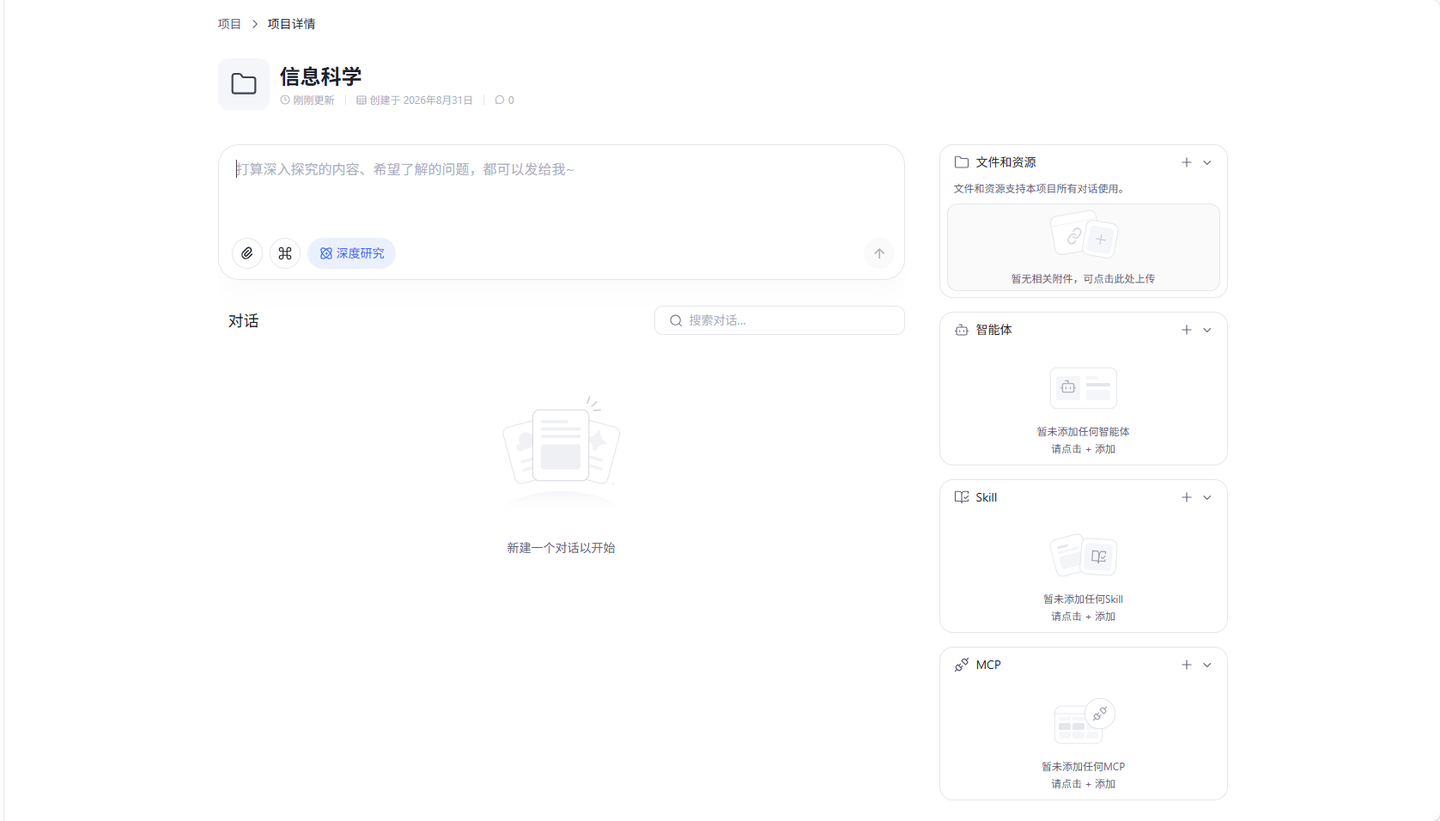
6.3 项目详情页
项目详情页是项目的核心工作台,采用「左侧主内容 + 右侧资源面板」的三栏式布局。左侧用于发起与查看对话,右侧自上而下集中管理项目的文件和资源、智能体、Skill 与 MCP。
6.3.1 项目信息与对话输入
左侧主内容列顶部为项目信息,下方为对话输入区:
项目 Header: 展示返回按钮、文件夹图标、项目名称及副标题(「由你创建 · 创建时间 · 已置顶」)。
对话输入框: 科学对话风格输入区,支持输入问题、添加附件、指令、深度研究模式与智能体选择,点击发送(📤)或回车发送。
快捷智能体: 输入框下方提供快捷智能体行,仅罗列本项目已添加的智能体(最多 10 个,不含下线智能体),新建项目默认无智能体,项目添加智能体后点击选中后本次对话走对应智能体;项目未添加任何智能体时整行隐藏。
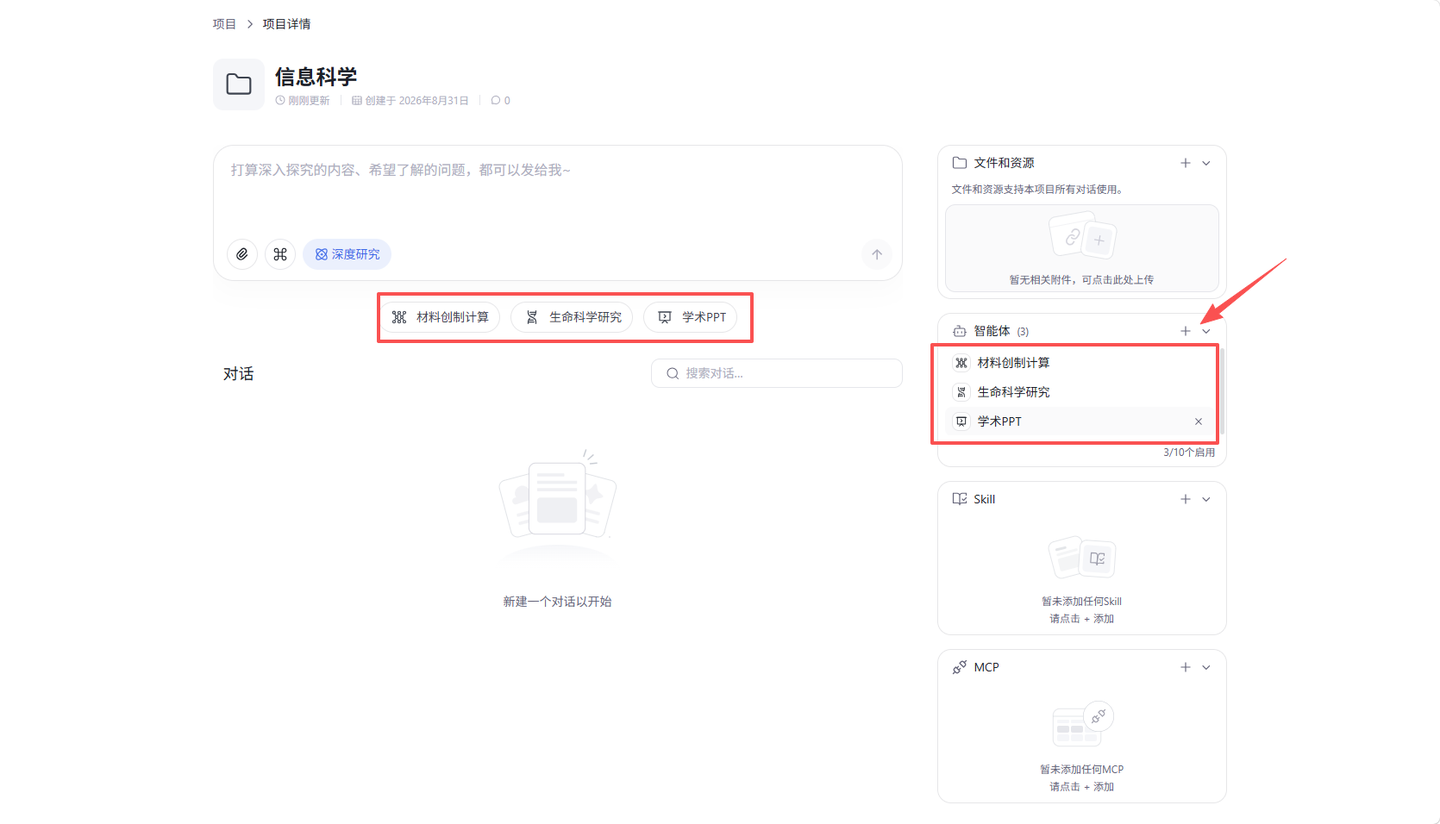
6.3.2 项目对话列表
主内容区下方为项目对话列表,集中展示与管理本项目所有对话:
对话 Tab: 列出该项目全部对话,点击任意对话进入对话回显页查看完整问答。
对话搜索: 右侧搜索框支持按对话标题实时筛选。
对话操作(⋯): 每条对话右侧提供「从项目中移除」(退回历史对话,仍可查看)与「删除」(二次确认后永久删除)。
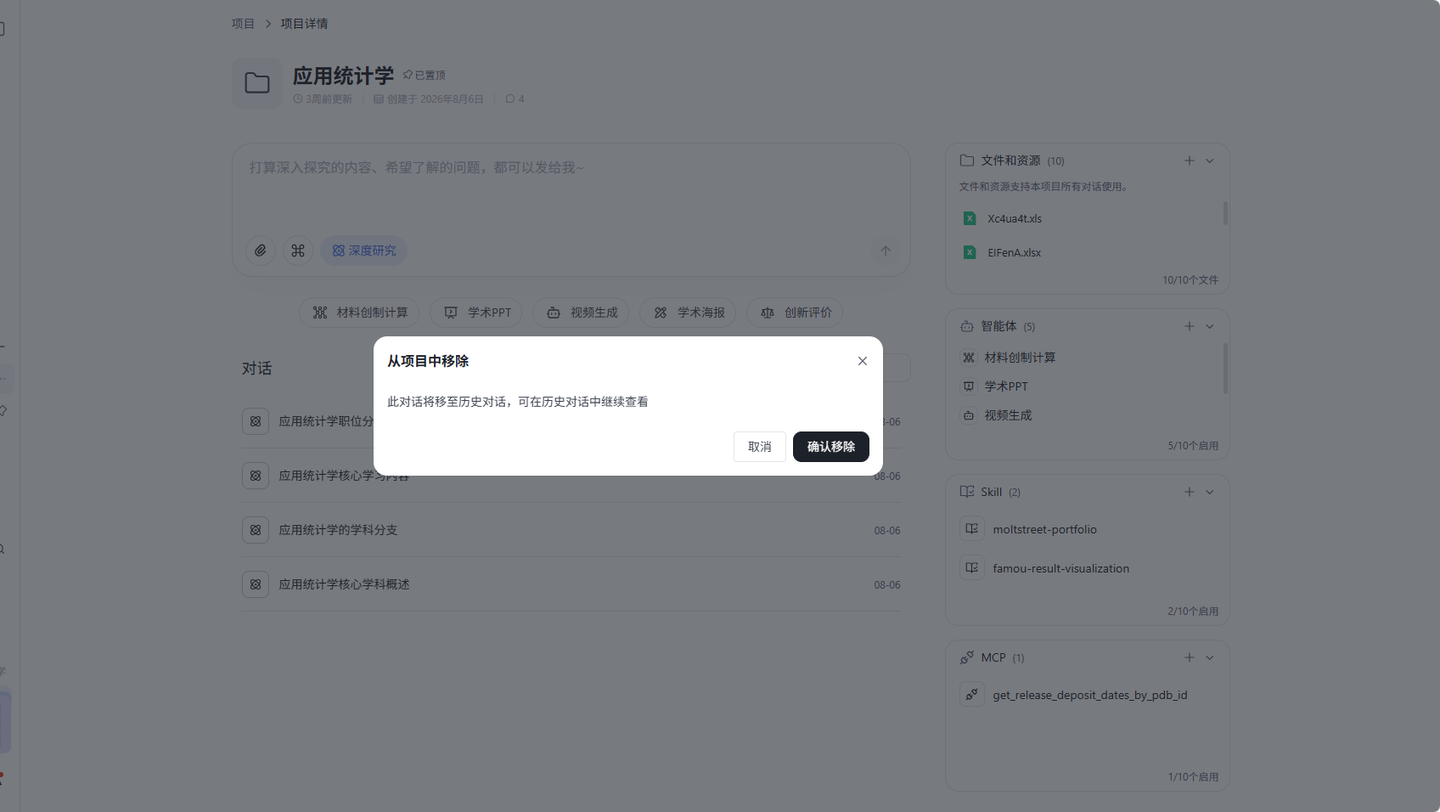
6.3.3 文件和资源
右侧「文件和资源」面板用于管理项目级共享文件,支持本项目所有对话使用:
添加文件入口: 面板右上角「+」→ 弹出「添加本地文件」与「知识库关联」两个选项。
上传方式: 支持拖拽上传或点击上传;上传弹框展示拖拽区、已选文件芯片与保存按钮。
支持格式: rar、zip、7z、jpg、jpeg、png、gif、ppt、pptx、doc、docx、xls、xlsx、csv、pdf、txt、md、py、js、json;暂不支持扫描件阅读。
上传限制: 单文件 ≤ 50MB(超出提示已跳过),每个项目最多 10 个文件(超出提示「最多上传 10 个文件」)。
文件查看: 点击普通文件进入内容查看器(支持下载、全屏等);点击压缩包进入 Zip 目录树查看器,左侧目录树、右侧预览。
删除文件: 文件项右侧「×」删除(已归档项目不显示删除按钮);面板底部显示「已用 / 10 个文件」计数,达上限标红。
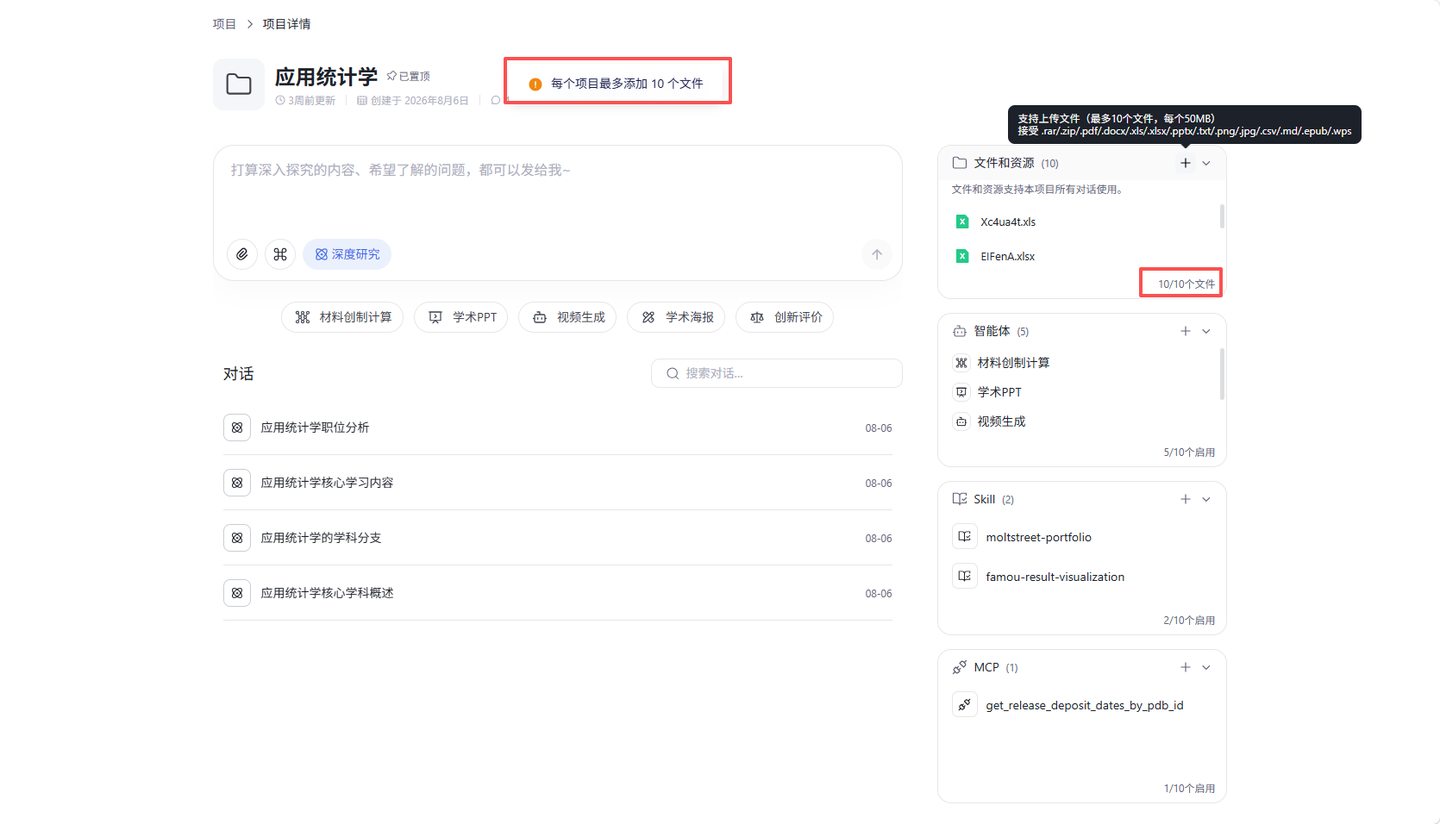
6.3.4 智能体(Agent)
右侧「智能体」面板位于「文件和资源」与「Skill」之间,用于管理加入本项目的专项科研智能体(如系统综述、论文精读、统计建模、学术写作等),配置随项目独立保存,刷新不丢失:
添加入口: 面板右上角「+」→ 打开「智能体广场」弹窗。
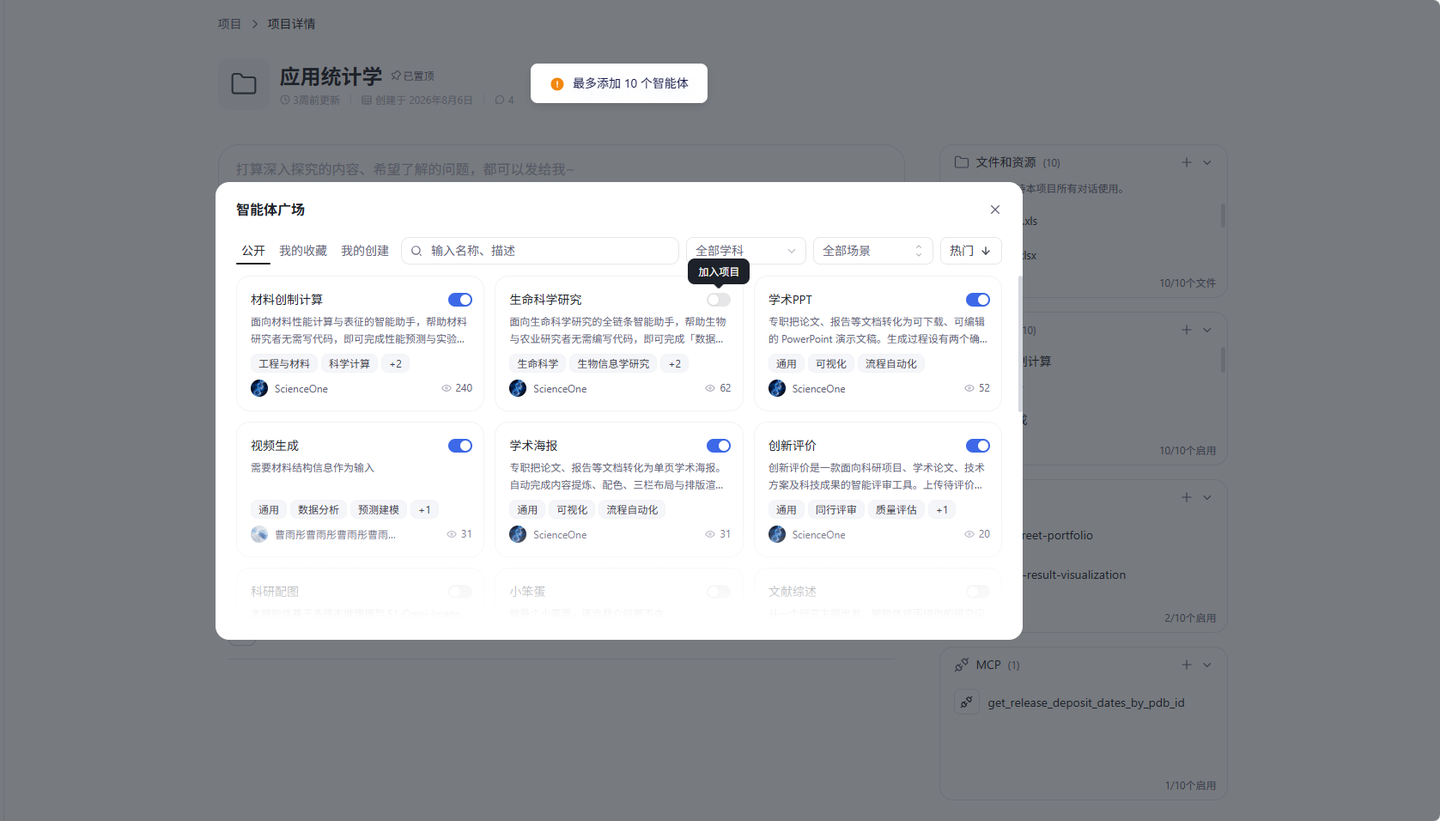
列表项: 每行 = 图标 + 名称 + 「×」;默认最多露出 3 条,超出出现滚动条;面板底部显示「共 N 个」计数。
数量上限: 每个项目最多添加 10 个智能体(与科学对话保持一致),达上限再添加时提示「最多添加 10 个智能体」。
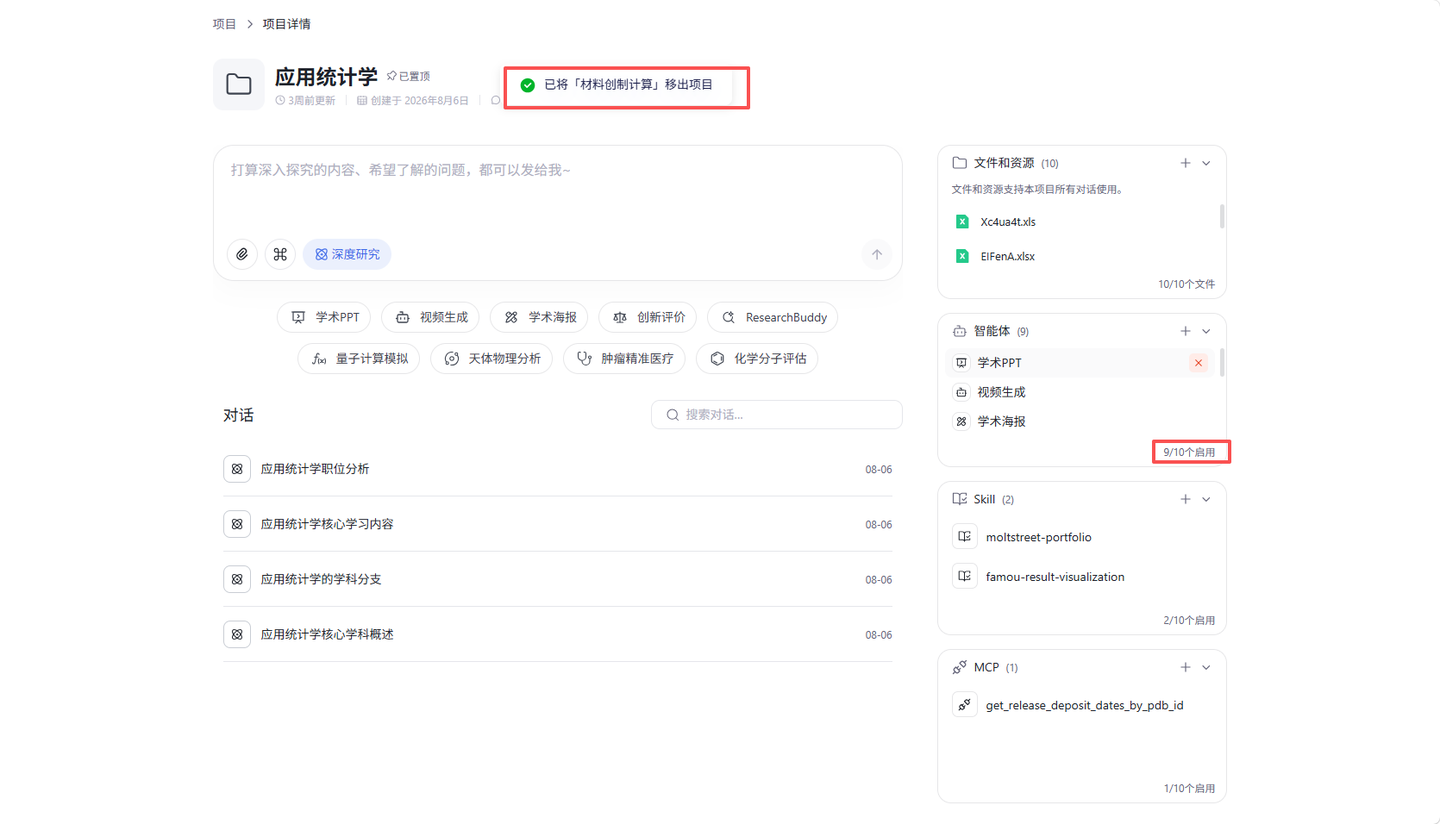
下线状态: 已被平台下线的智能体仍保留在列表中并显示灰色「下线」徽标,可正常添加 / 移出并计入 10 个上限,但不出现在快捷智能体行、不可被选用。
移除: 点击行内「×」移出项目,提示「已将「XX」移出项目」;若该智能体正被项目详情页或对话页选中,会同步取消选中并回到「深度研究」。
空态引导: 未添加任何智能体时显示「暂未添加任何智能体(最多 10 个),点击 + 添加」。
归档项目: 面板只读——「+」置灰不可点,列表项不显示「×」。
在项目对话页与项目详情页,均可在发起对话前选用本项目已添加的智能体:
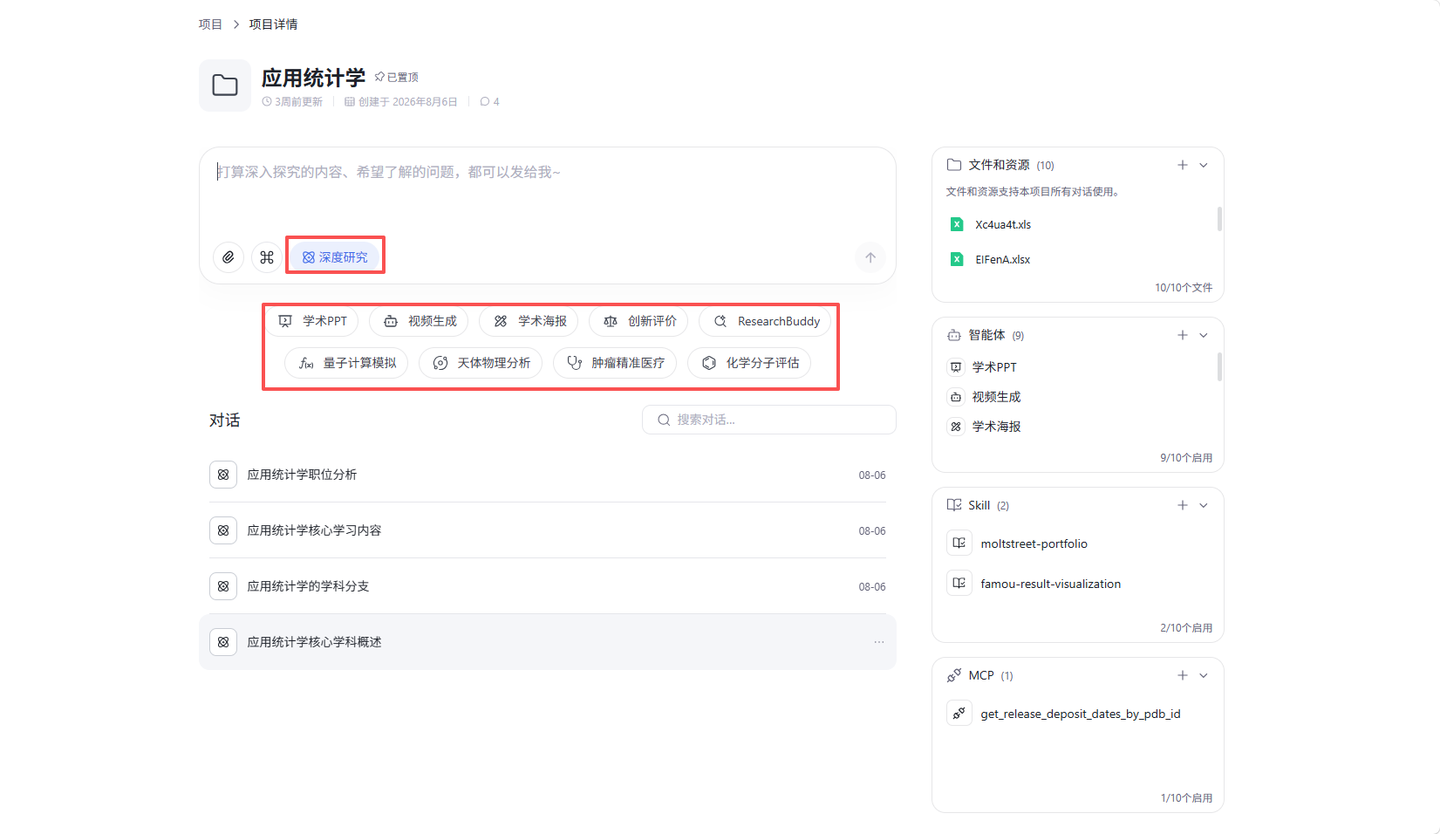
快捷智能体行: 输入框下方罗列本项目已添加的智能体 pill(最多 10 个,不含下线智能体);未添加任何智能体时整行隐藏。
选中: 点击 pill 选中并高亮,输入区「深度研究」模式芯片被替换为智能体芯片(图标 + 名称 + ×),提示「已切换至「XX」智能体」,输入框 placeholder 同步变对应智能体提示。
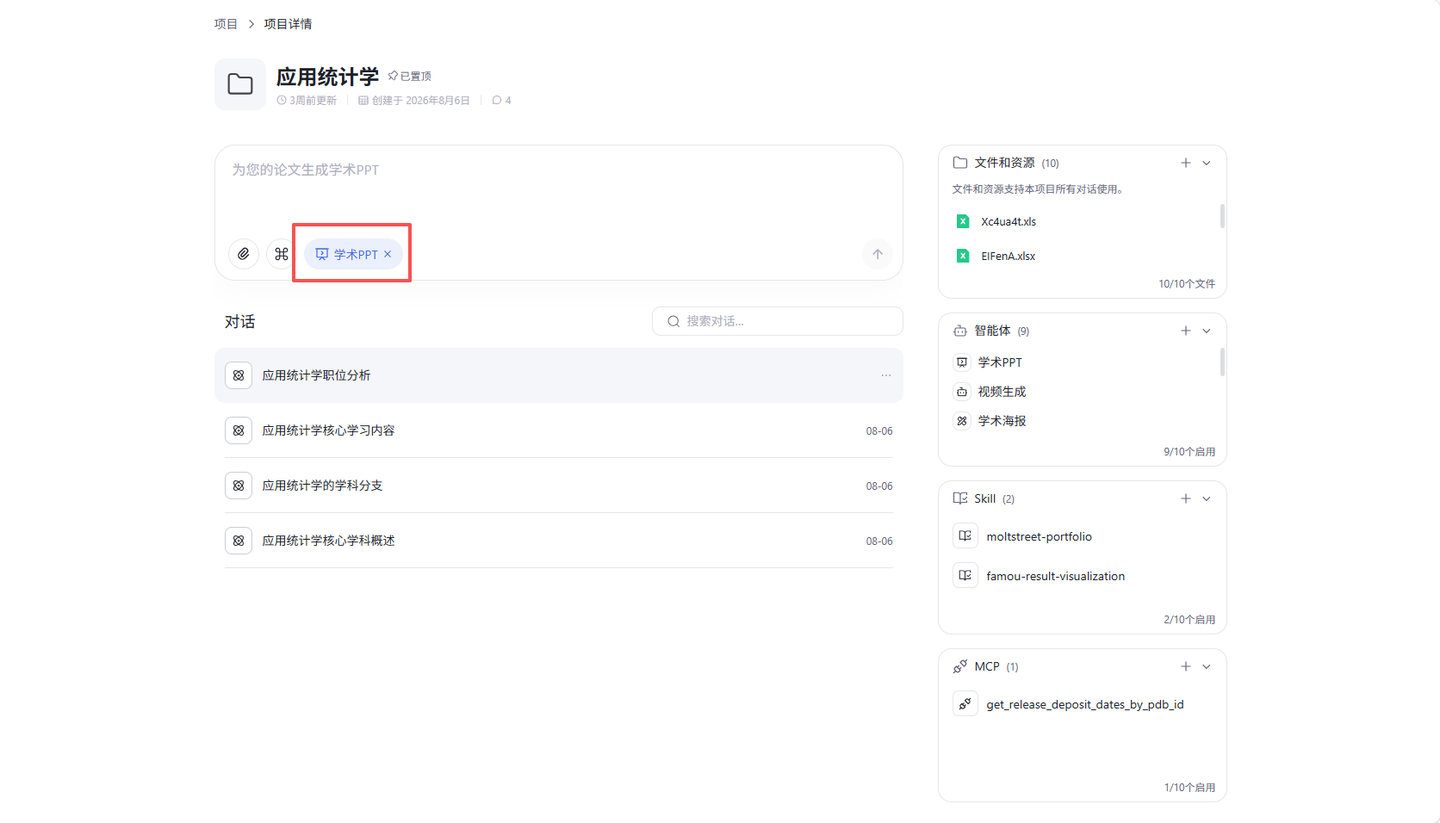
取消: 再次点击同一 pill 或点击芯片右侧「×」,回到「深度研究」默认态。
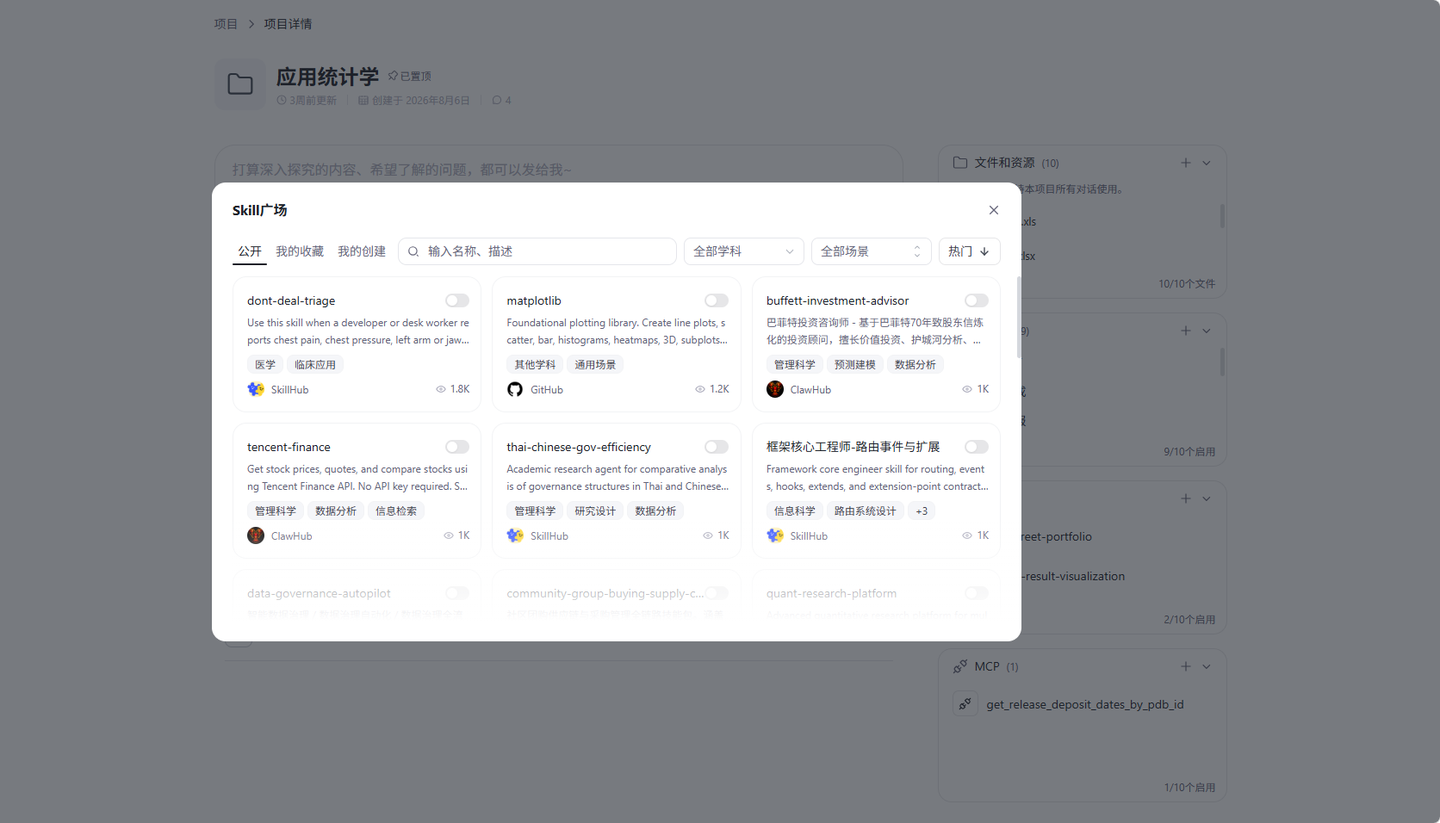
6.3.5 Skill(技能)
右侧「Skill」面板用于管理加入本项目的专业科学技能:
添加入口: 面板右上角「+」→ 弹出「我的 skill」(只读列表,可搜索)与「Skill 广场」两个选项。
Skill 广场: 提供「公开 Skill / 我的收藏 / 我的创建」Tab,支持搜索、学科、场景筛选与排序(热门 / 最新)。
项目级独立: Skill 状态绑定当前项目,进入不同项目加载各自配置;已加入的 Skill 显示在面板内。
6.3.6 MCP(工具)
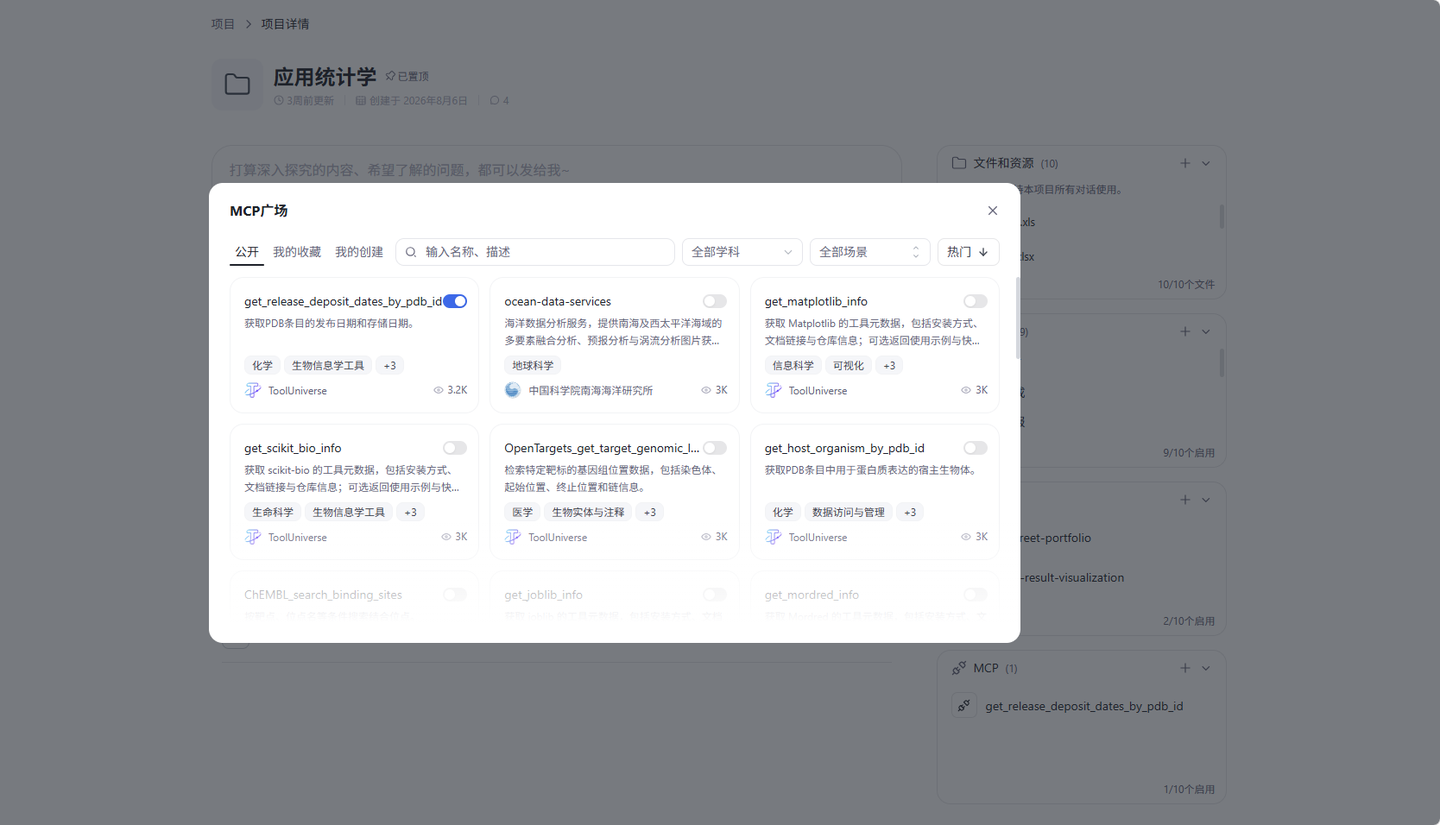
右侧「MCP」面板用于管理加入本项目的外部工具:
添加入口: 面板右上角「+」→ 弹出「我的 MCP」(只读列表,可搜索)与「MCP 广场」两个选项。
MCP 广场: 提供「公开 MCP / 我的收藏 / 我的创建」Tab,支持搜索、学科、场景筛选与排序(热门 / 最新)。
项目级独立: MCP 状态绑定当前项目,与文件、Skill 一样按项目独立维护。
6.4 对话管理
项目内的对话可发起、查看、流转与删除,并与「历史对话」双向联动。
6.4.1 发起与查看对话
在项目中发起对话并进入回显页查看完整问答:
发起对话: 在项目详情页输入框输入内容并发送,系统在对话列表最前新增一条对话,同步到历史对话并标记所属项目,同时更新项目活跃时间。
对话回显页: 展示完整多轮问答,顶部含返回按钮、所属项目名、对话标题、复制链接与工作区开关。
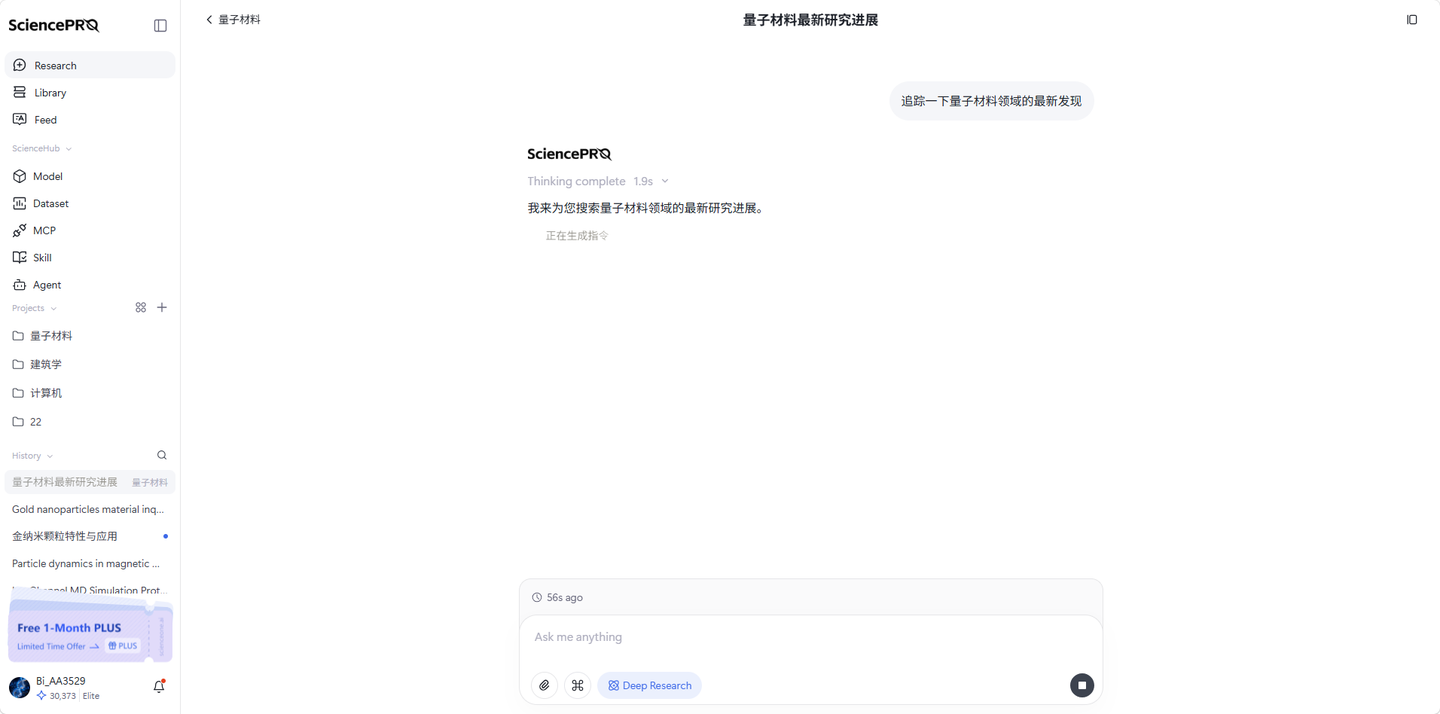
工作区面板: 点击工作区图标展开,含「任务 / 信息 / 文件」三个 Tab,底部带「上一步 / 下一步」步骤播放控件与进度条。
6.4.2 对话流转与删除
对话可在项目与历史对话之间流转,也可彻底删除:
重命名: 修改对话标题。
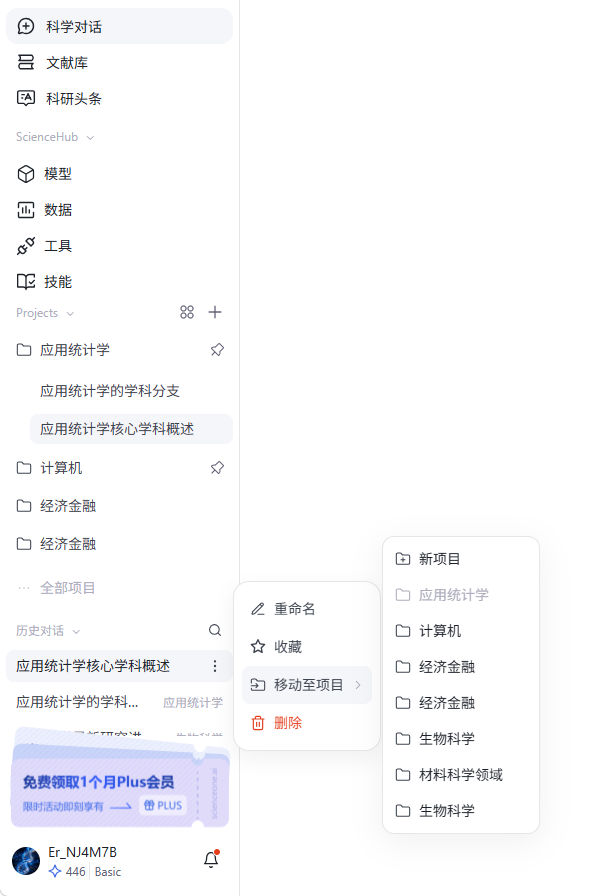
加入项目: 右键 / ⋯ → 加入项目,子菜单含「新项目」与各已有项目(当前项目置灰)。
从项目中移除: 把对话退回历史对话,仍可继续查看(非删除)。
删除: 二次确认「删除后,对话记录将不可恢复」,确认后永久删除。
6.4.3 历史对话联动
侧边栏「历史对话」区展示不属于任何项目的散落对话,可与项目双向流转:
加入项目: 通过右键「加入项目」或直接拖拽历史对话到侧边栏某项目上,即归入该项目;归入后对话带项目名标签。
移出项目: 项目对话「从项目中移除」后回到历史对话,标签消失。
自动同步: 项目内新发起的对话会自动同步到历史对话并标记所属项目。
6.5 置顶与归档
置顶用于固定常用项目,归档用于收起已完成 / 暂停的项目并保留可追溯记录。
6.5.1 项目置顶
将常用项目固定在侧边栏顶部:
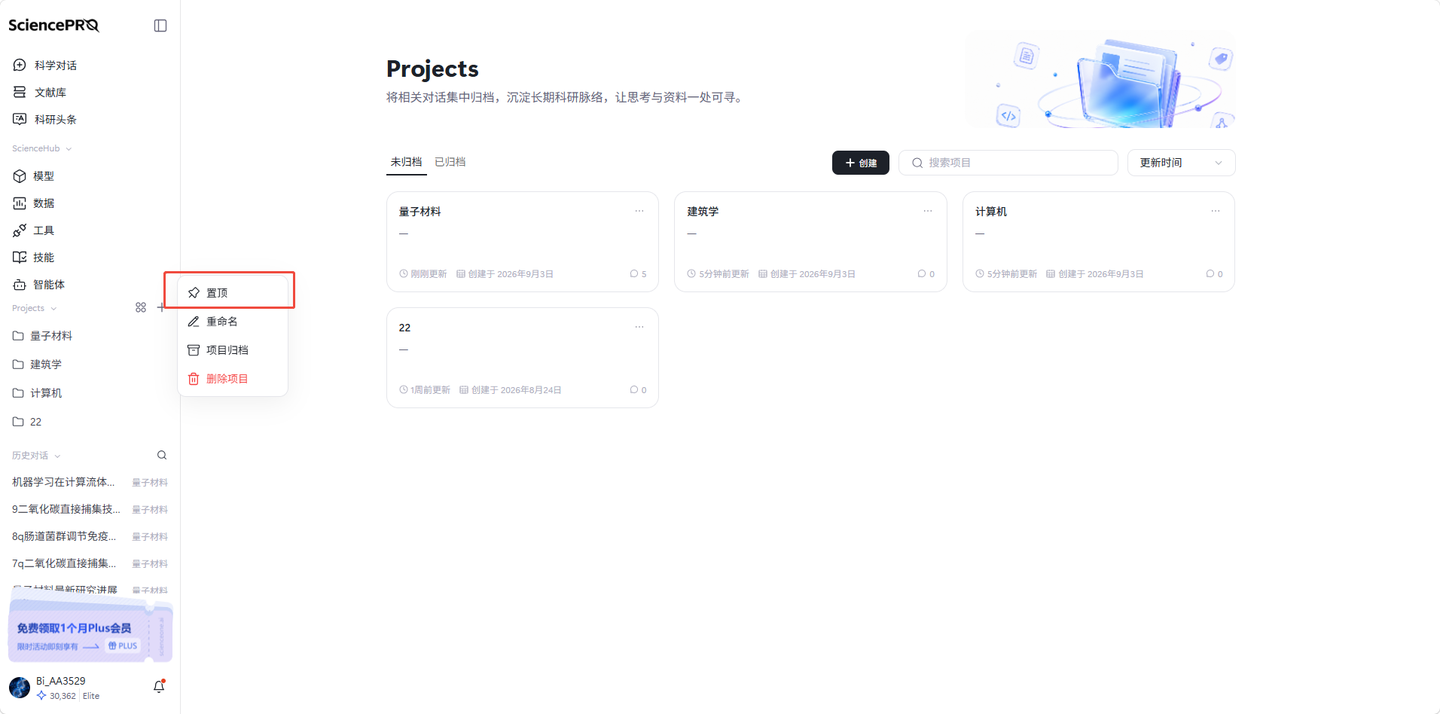
操作方式: 项目 ⋯ 菜单 → 「置顶」,取消则选「取消置顶」。
数量限制: 最多置顶 3 个项目,超出提示「最多只能置顶 3 个项目」。
展示效果: 置顶项目排在侧边栏最前,并显示常驻置顶图标。
6.5.2 项目归档与取消归档
归档用于收起项目并保持主列表清爽:
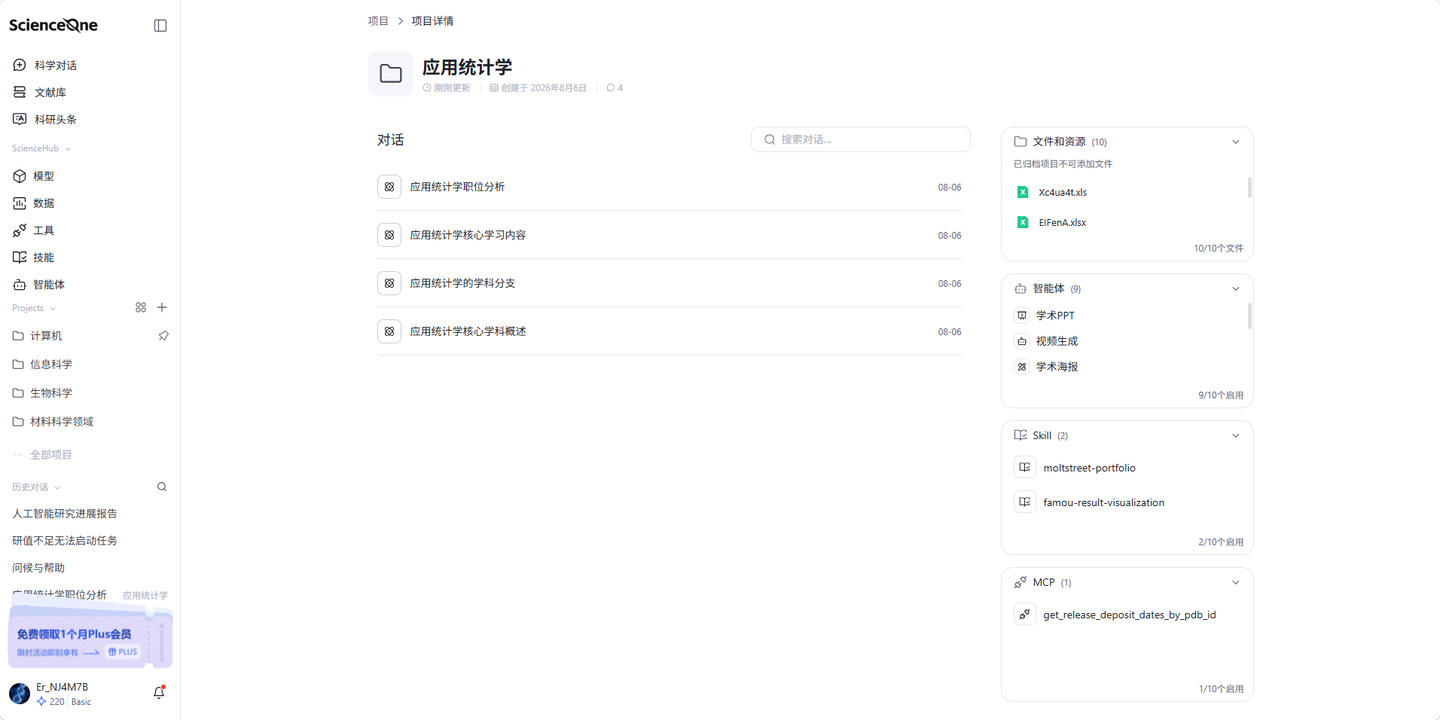
归档操作: 项目 ⋯ 菜单 → 「项目归档」,归档后从侧边栏与「未归档」Tab 移出,仅在全部项目页「已归档」Tab 可见,名称后缀变为「原名(n/n)」。
只读状态: 进入已归档项目详情页为只读——隐藏对话输入框与快捷智能体行,右栏「+ 添加」按钮(文件、智能体、Skill、MCP)置灰,不显示对话与文件的删除 / 移除操作,智能体列表仅只读展示(无「×」)。
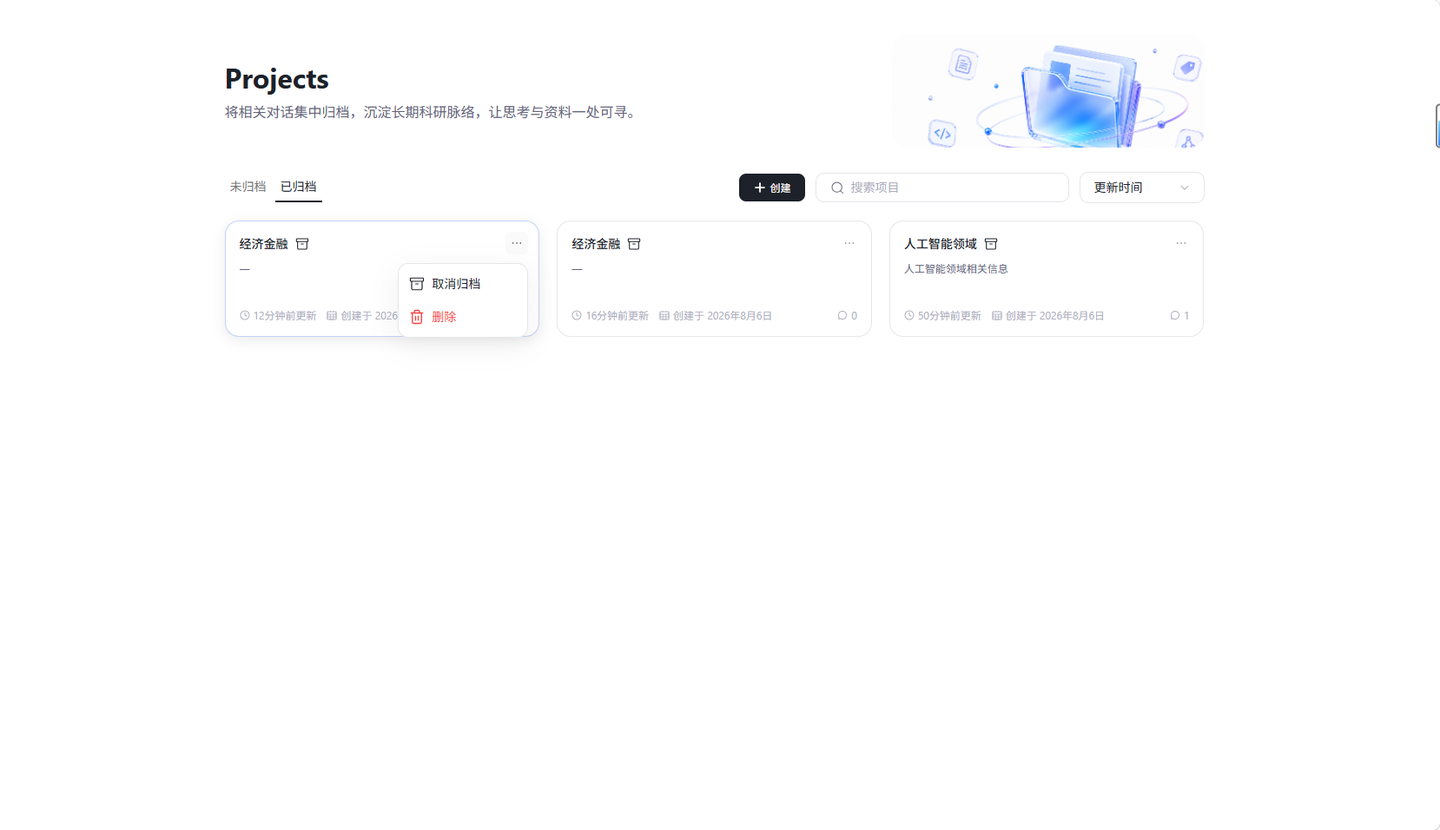
取消归档: 在「已归档」Tab 或项目 ⋯ 菜单选择「取消归档」,项目恢复正常并去掉名称后缀,重新出现在主列表。
6.5.3 重命名与移除项目
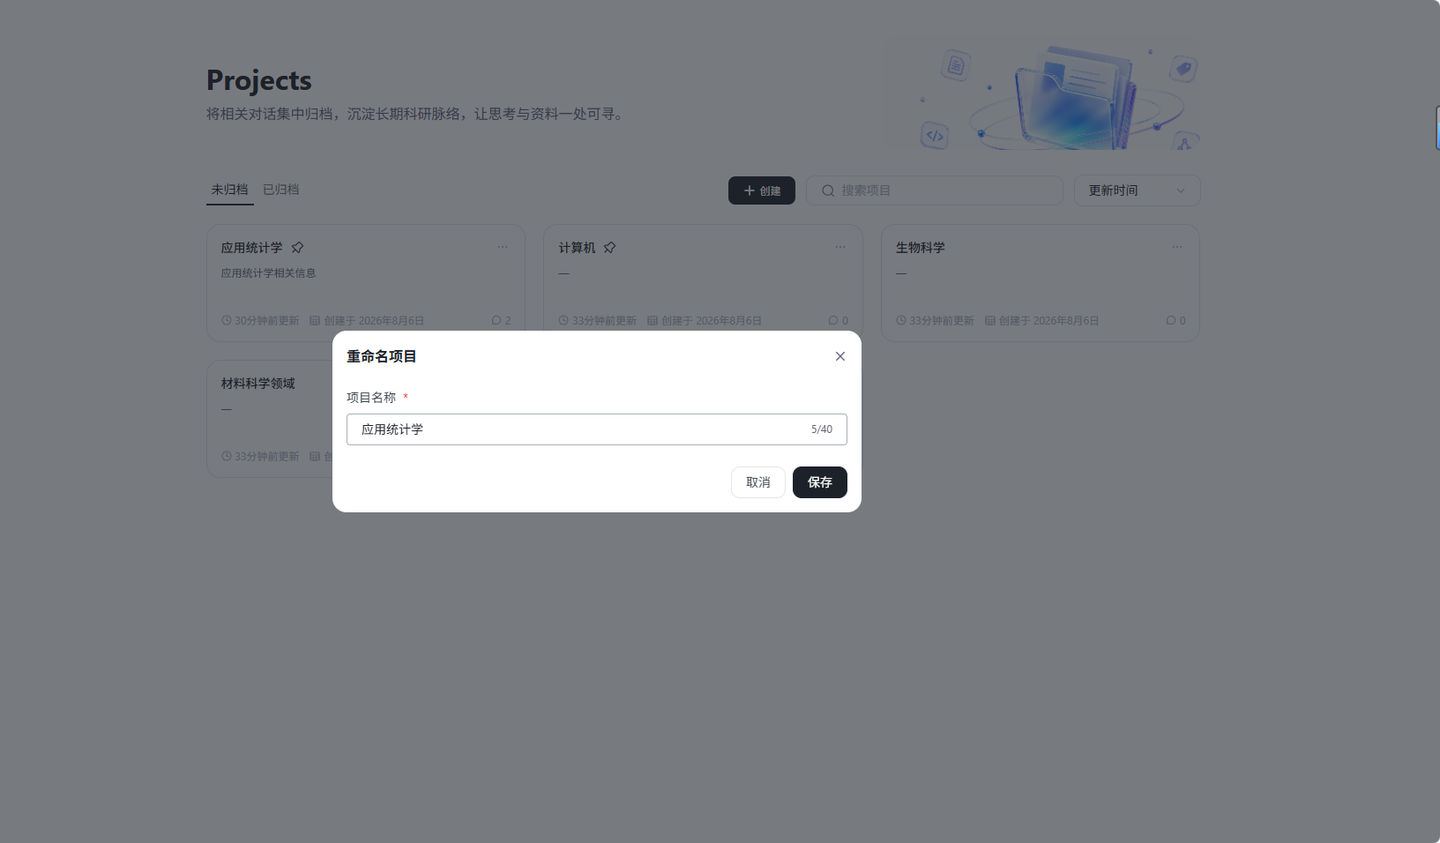
重命名: 项目 ⋯ 菜单 → 「重命名」,最多 40 字,保存后该项目排到列表首位。
移除项目: 项目 ⋯ 菜单 → 「移除项目」→ 红色二次确认弹窗,确认后永久删除项目本体、归档副本及历史对话中属于该项目的全部条目,不可撤销,请谨慎操作。
6.6 使用提示与注意事项
项目级资源: 文件、智能体、Skill、MCP 均为项目级独立维护,不同项目之间互不可见。
归档 vs 删除: 归档为「收起保留、可恢复、只读」;移除项目为「永久清除、不可撤销」,并连带删除该项目下所有对话与历史记录。
移除 vs 删除对话: 「从项目中移除」仅退回历史对话;「删除」为永久删除,不可恢复。
历史记录
历史记录模块记录您在科学对话中的所有研究任务,帮助高效管理和跟踪研究进度。点击任意任务可进入详细界面,查看完整信息和最新进展。支持实时监控任务进行状态,并可点击查看详情。
左侧直接展示近期历史对话记录,支持历史对话重命名、收藏和删除。
点击“搜索对话”,将会展示您所有的历史对话记录。
7.1 对话
清晰显示所有已创建的研究任务,包括任务名称、创建时间、最后更新时间及简要描述。可以筛选不同模式的历史对话任务。
历史记录显示对话当前任务状态(进行中、手动中止、执行失败),可查看不同类型的历史任务。点击任一历史记录,即可进入该对话,查看该对话当前进度和相关数据。
7.2 收藏
展示已标记为收藏的研究任务,通过特殊标识便于您快速识别和访问。
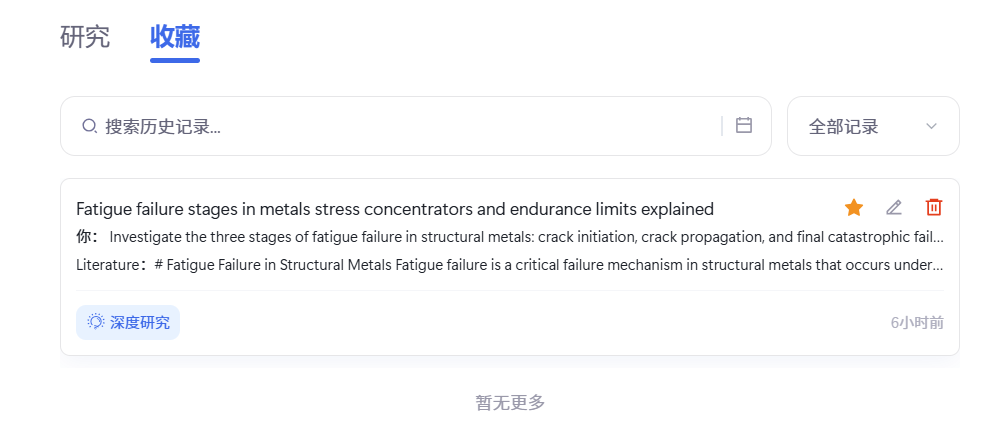
您可随时将任务添加到收藏列表或删除,方便您灵活管理收藏记录。
您可以按收藏时间、任务优先级或完成进度进行排序,并提供关键词搜索功能以快速定位收藏任务。
用户设置
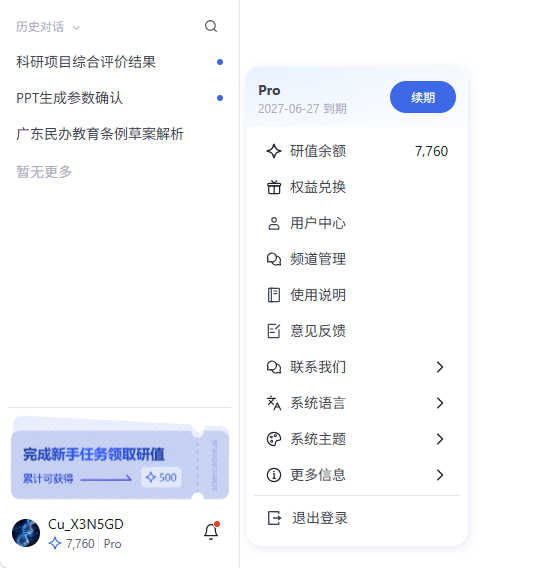
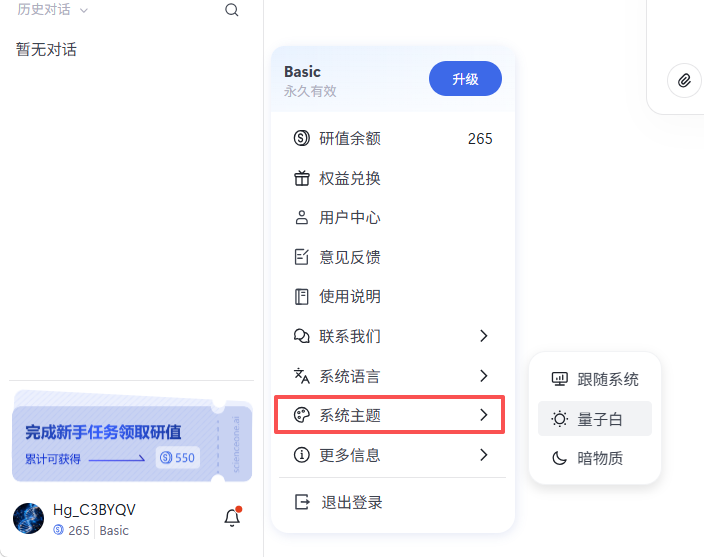
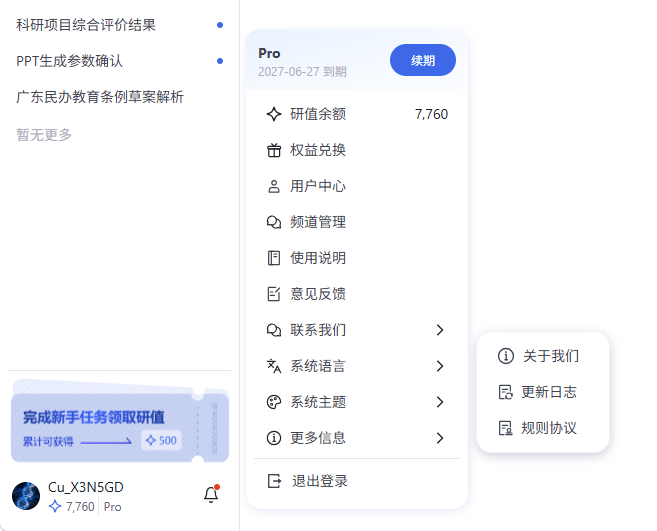
在 SciencePro 平台的主界面左下角区域,支持查看用户信息以及查看系统通知。点击左下角的用户名,弹出用户设置菜单,可以查看研值余额和套餐,并可进行权益兑换、查看用户中心、查看使用说明、进行意见反馈、联系我们、变更系统语言、系统主题设置、退出登录操作,点击更多信息则可以进一步了解平台信息、查看更新日志和规则协议。
8.1 研值余额
点击用户名后,在弹出的菜单中会显示您当前的研值套餐和研值余额。点击研值余额将进入“研值中心”,您可在研值中心查看研值总览和订阅充值的相关信息。
8.2 权益兑换
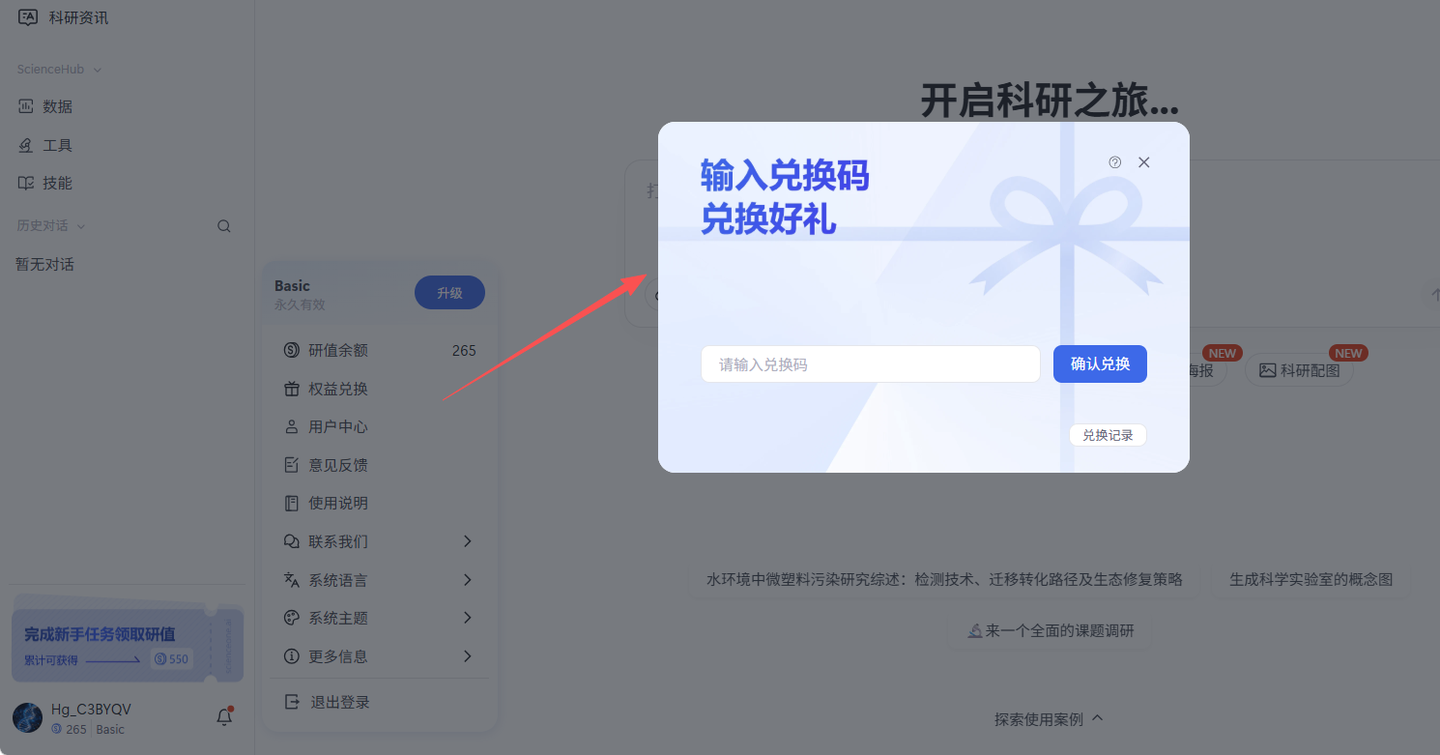
点击“权益兑换”选项,将会弹出兑换权益的界面,输入兑换码即可兑换好礼。在右下角还可查看您的兑换记录。
8.3 用户中心
点击“用户中心”选项,将进入个人中心页面。
“个人中心”包括“账户信息”和“个人主页”两个板块。
8.3.1 账户信息
您可以在此查看和管理您的基础信息。
信息展示:页面会清晰展示您的个人资料,包括头像、用户名、工作单位、账户ID、账号、绑定的手机号、电子邮箱以及注册时间。
信息编辑:对于用户名字段,您可以点击右侧的“编辑”按钮进行修改;对于手机号、电子邮箱字段。您可以点击右侧的“绑定”按钮进行对应联系方式的绑定;对于账号密码字段,则可以点击右侧的“重置”按钮以更新您的账号密码。
账户注销:页面底部提供“注销账户”按钮,用于永久删除您的账户。
8.3.2 个人主页
您可以在此打造您的专属学术名片。
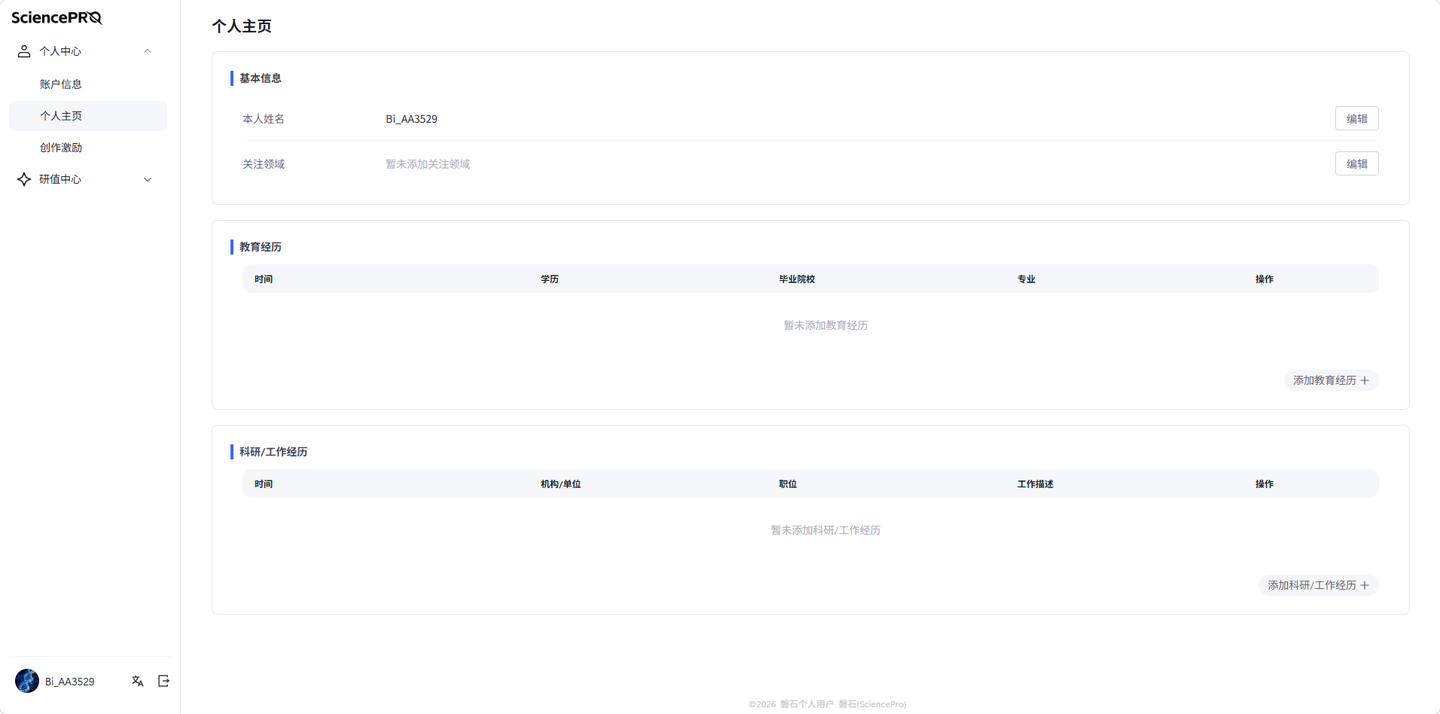
信息展示:页面会展示您的基本信息、教育经历和科研/工作经历。
信息编辑:在基本信息板块,您可以点击“编辑”按钮修改本人姓名和增加减少关注领域;在教育经历模块,您可以点击右下角的“添加教育经历”以添加教育经历;在科研/工作经历模块,您可以点击右下角的“添加科研/工作经历”以添加科研/工作经历,并支持每段经历的“删除”和“编辑”。
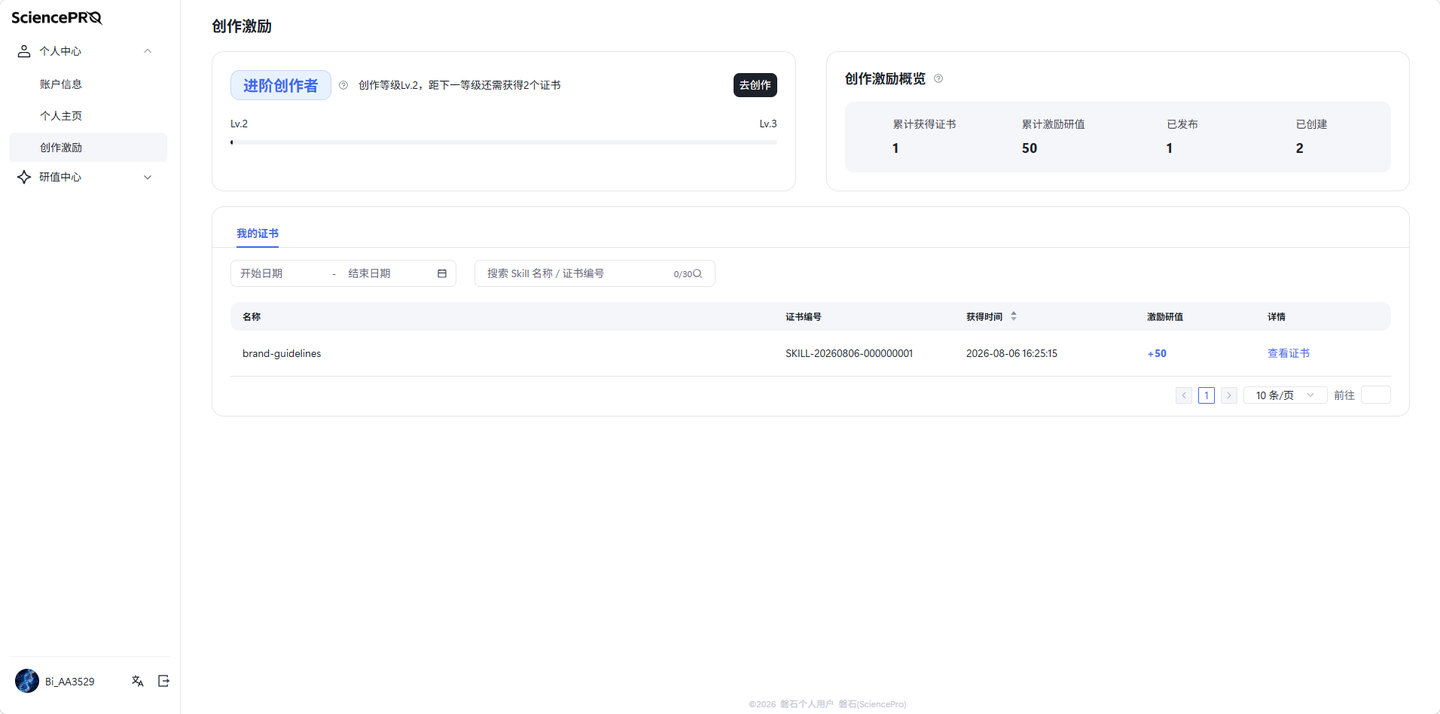
8.3.3 创作激励
您可以在此查看自己的创作等级、创作成果概览以及已获得的 Skill 证书。
创作等级:
页面左上方显示您当前的创作等级,例如“进阶创作者”。等级标签旁的问号图标用于查看等级升级规则。您还可以通过进度条了解当前等级的完成进度,以及距离下一等级还需获得多少个证书。
点击“去创作”,可以进入 Skill 创建页面,继续创建或完善 Skill。
创作激励概览:
页面右上方展示创作成果数据,包括:
累计获得证书: 显示您已获得的证书总数。
累计激励研值: 显示您通过创作激励累计获得的研值。
已发布: 显示您已发布的 Skill 数量。
已创建: 显示您创建过的 Skill 数量。
通过这些数据,您可以快速了解自己的创作成果。
我的证书:
页面下方的“我的证书”区域用于查看已获得的 Skill 证书。
证书列表包含以下信息:
名称: 显示对应的 Skill 名称。点击名称可以进入 Skill 详情页。
证书编号: 显示证书的唯一编号。
获得时间: 显示获得证书的具体时间。
激励研值: 显示该证书对应的激励研值。
详情: 点击“查看证书”,可以打开证书详情或证书预览页面。
证书筛选与搜索:
日期筛选: 选择开始日期和结束日期,可以查看指定时间范围内获得的证书。
搜索框: 输入 Skill 名称或证书编号,可以快速查找对应证书。
获得时间排序: 点击“获得时间”旁的排序图标,可以切换证书的升序或降序排列。
分页: 当证书数量较多时,可以通过页码、上一页和下一页浏览其他证书记录。
8.4 频道管理
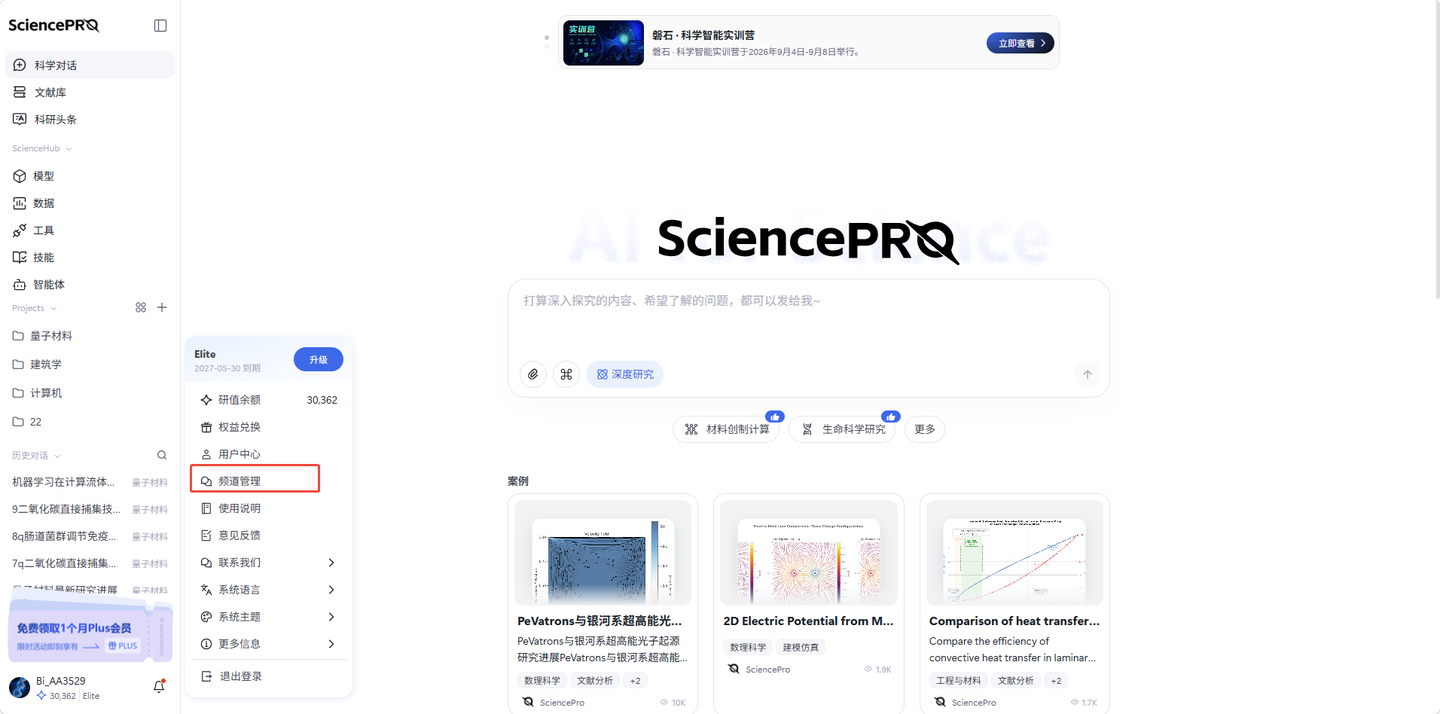
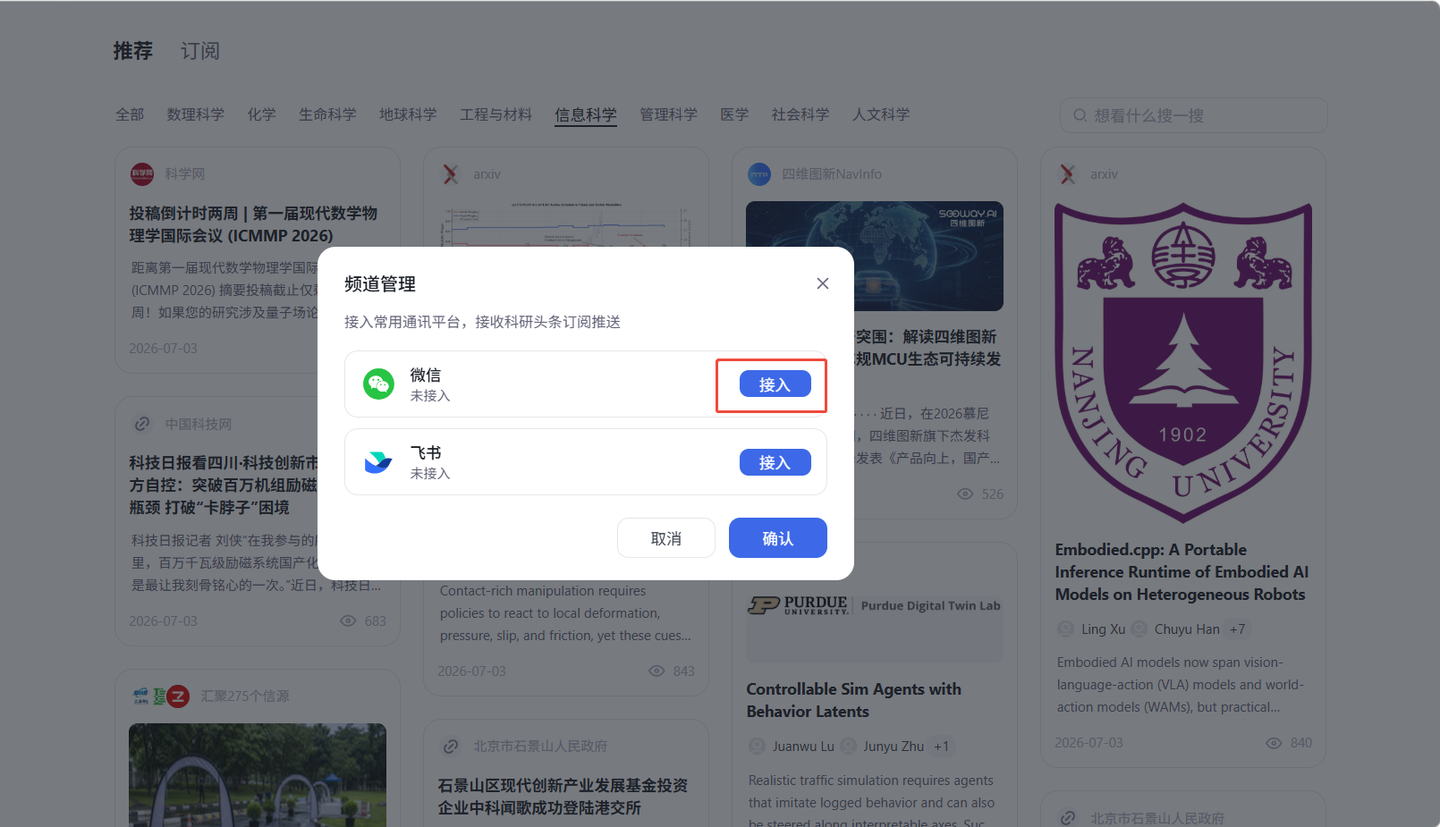
接入常用通讯平台,接收科研头条订阅推送。
点击用户名,在弹出的菜单中点击“频道管理”,选择您想接入的频道进行接入。
8.4.1 微信
点击“微信”接入按钮,使用微信扫描二维码即可完成绑定。
8.4.2 飞书
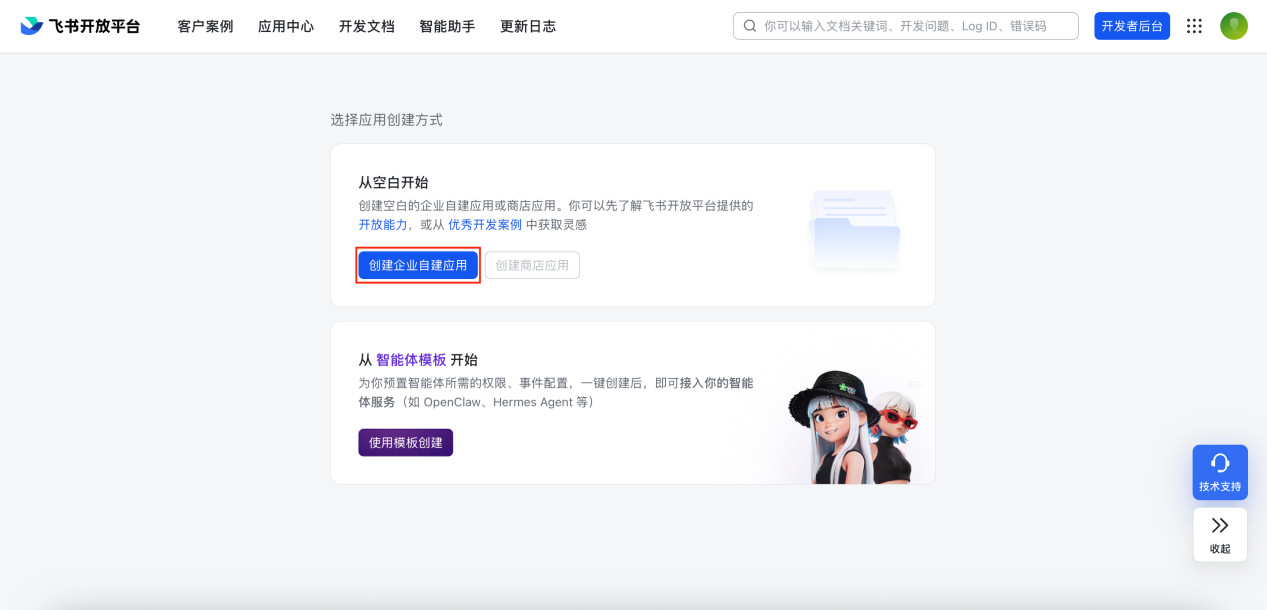
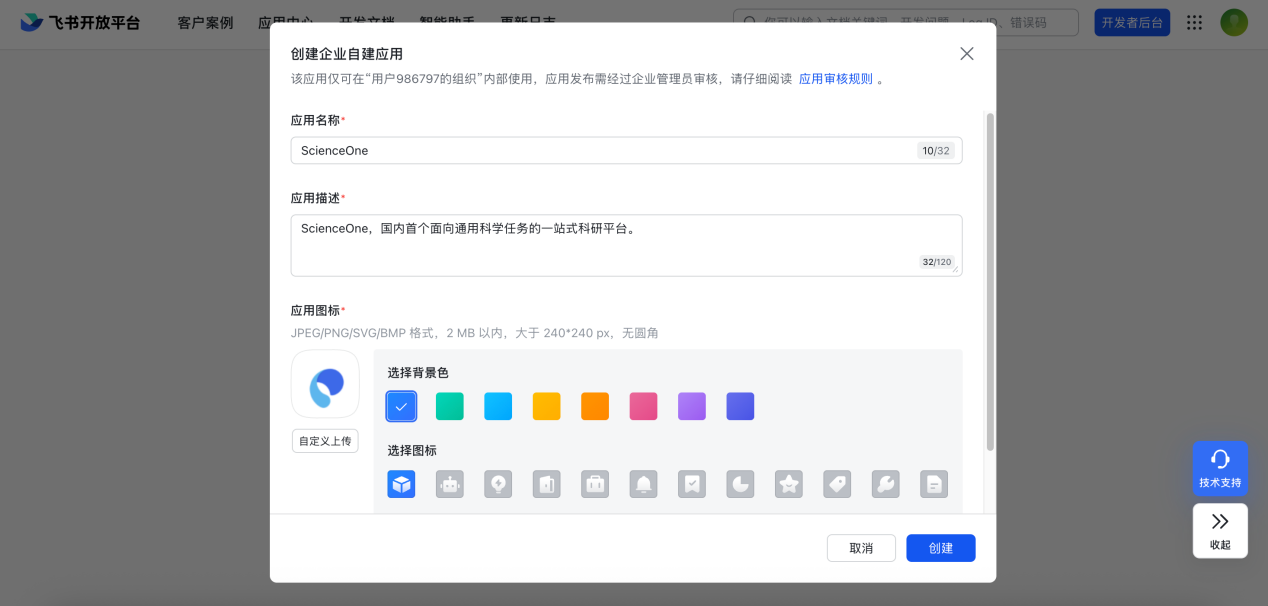
1.使用您的飞书账号登录飞书开放平台,登录成功后,单击创建企业自建应用。
2.填写应用名称、应用描述,选择应用图标,然后单击创建,进入应用管理页面。
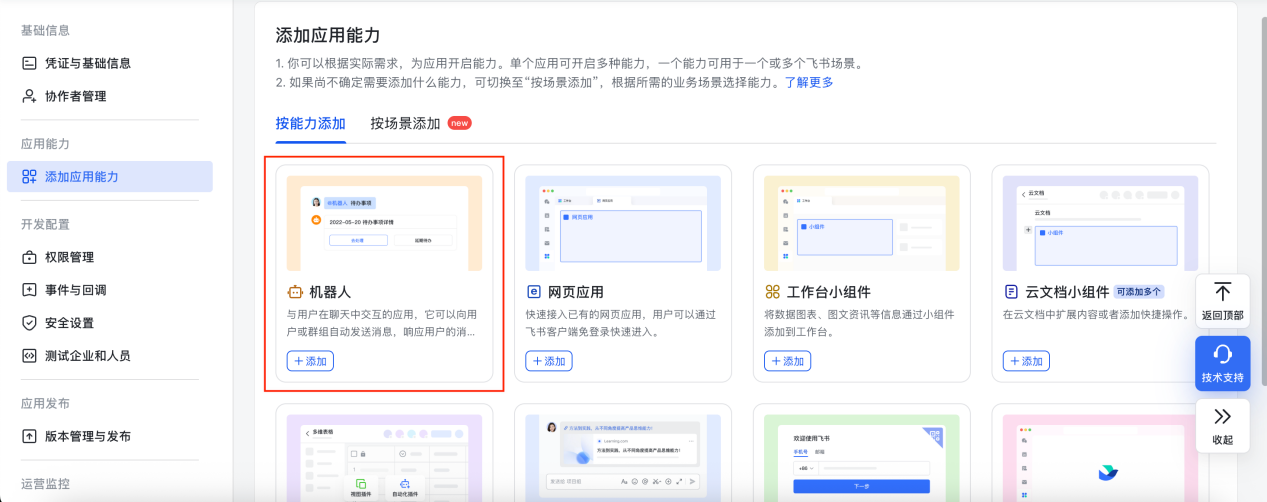
3.在应用管理页面的左侧导航栏中找到并单击添加应用能力,在弹出的列表中选择机器人,然后单击添加。
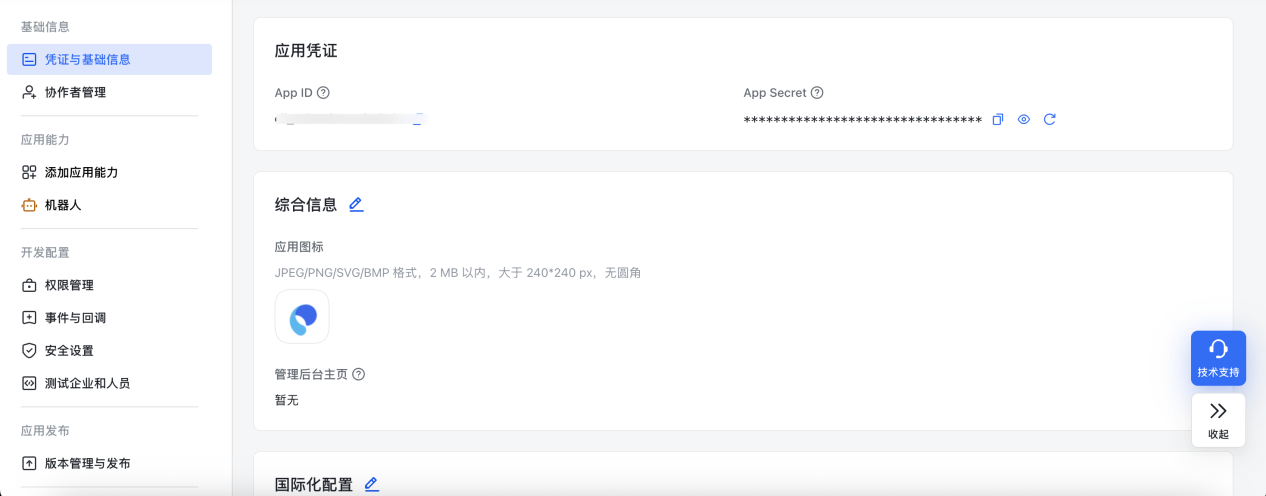
4.在左侧导航栏中单击凭据与基础信息,在页面中找到“App ID”和“App Secret” 两个参数,分别单击右侧“复制”,将其保存到个人记事本或备忘录中(请妥善保存勿泄露,注意数据安全),后续步骤中需要使用。
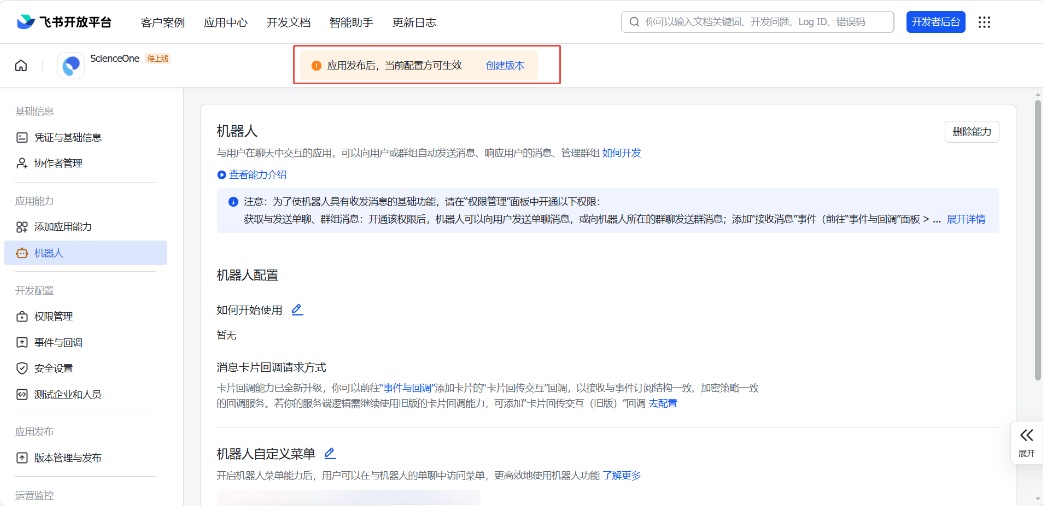
点击上方[创建版本]以发布应用。
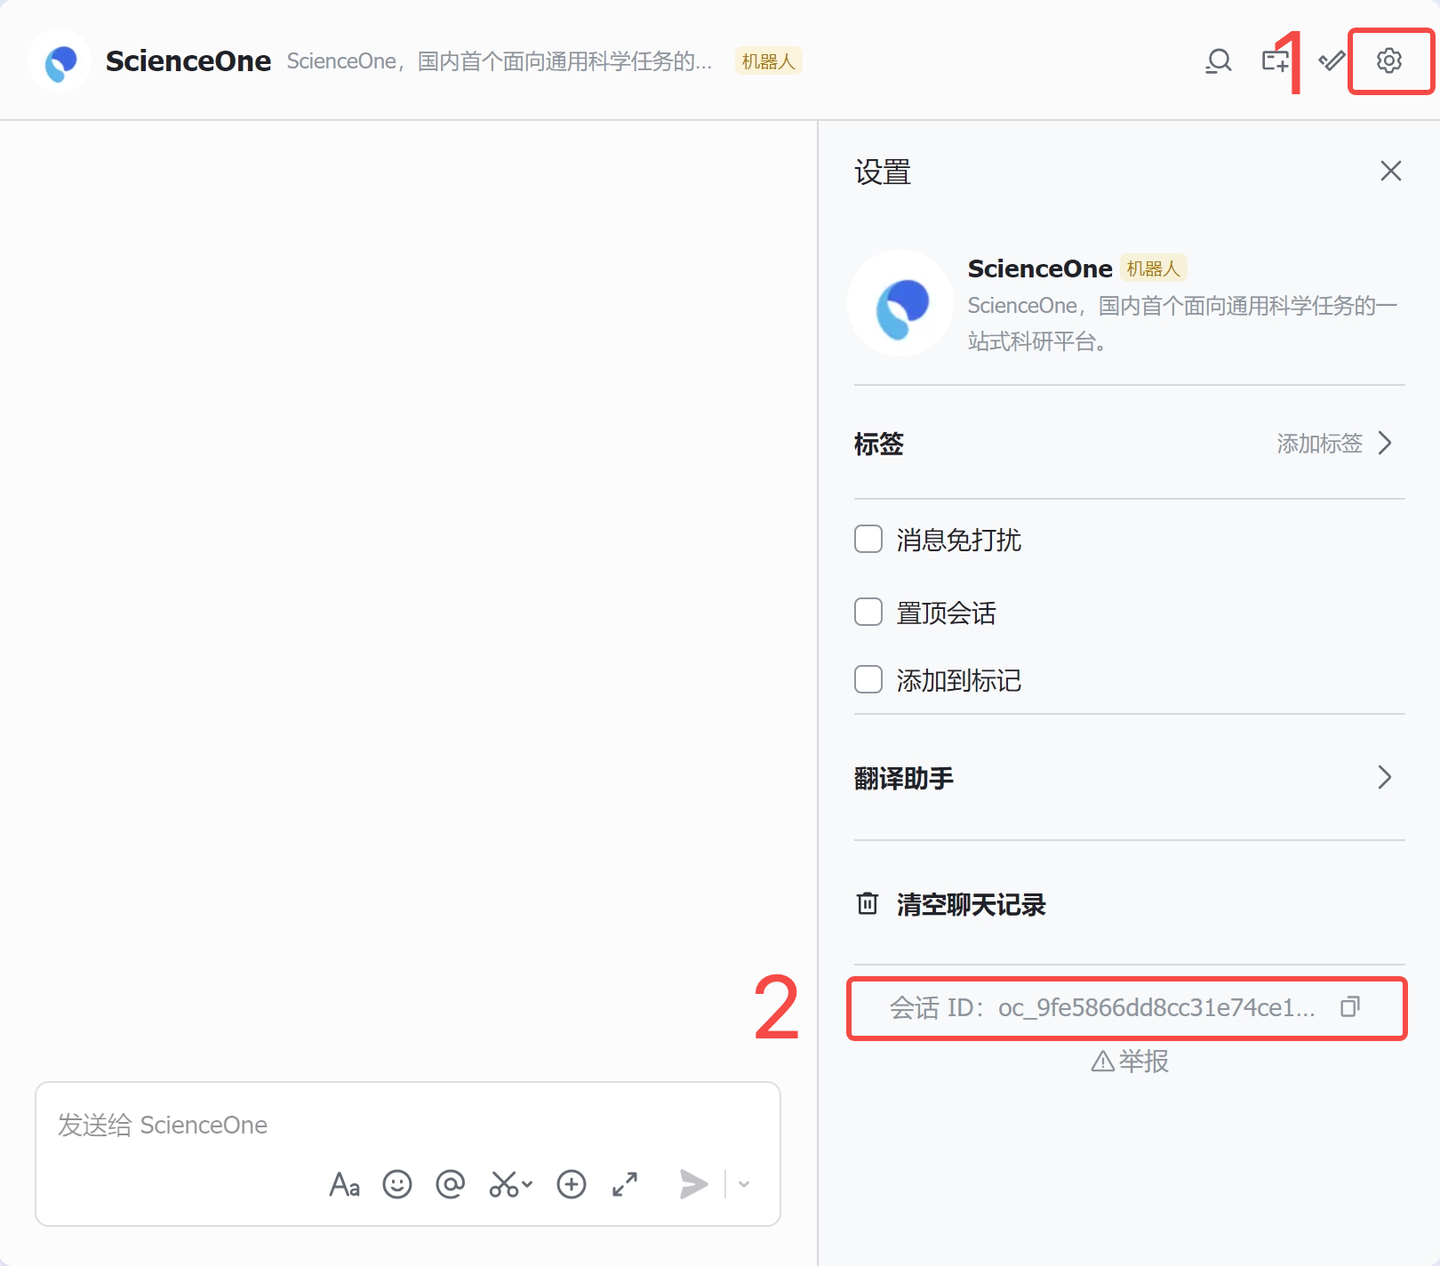
打开飞书,打开您刚创建的应用会话窗口,点击设置按钮,在页面中找到“会话ID”参数,单击右侧“复制”,将其保存到个人记事本或备忘录中(请妥善保存勿泄露,注意数据安全),后续步骤中需要使用。
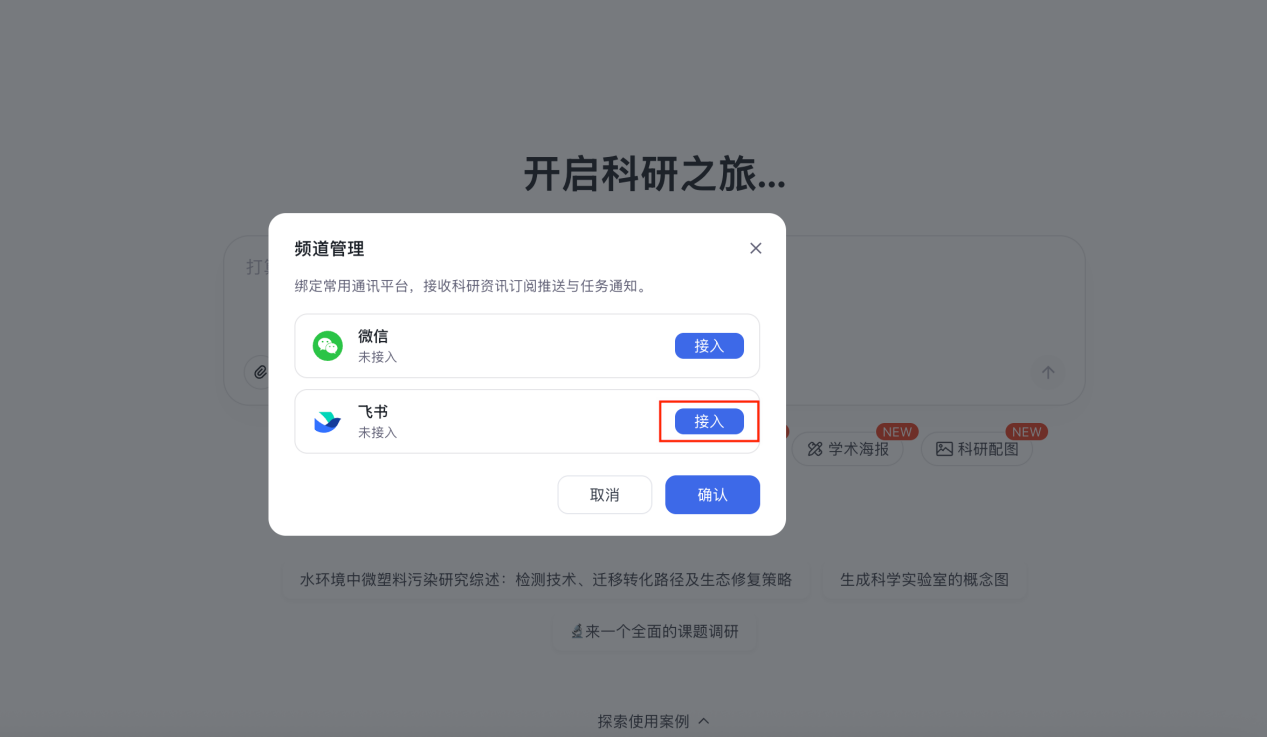
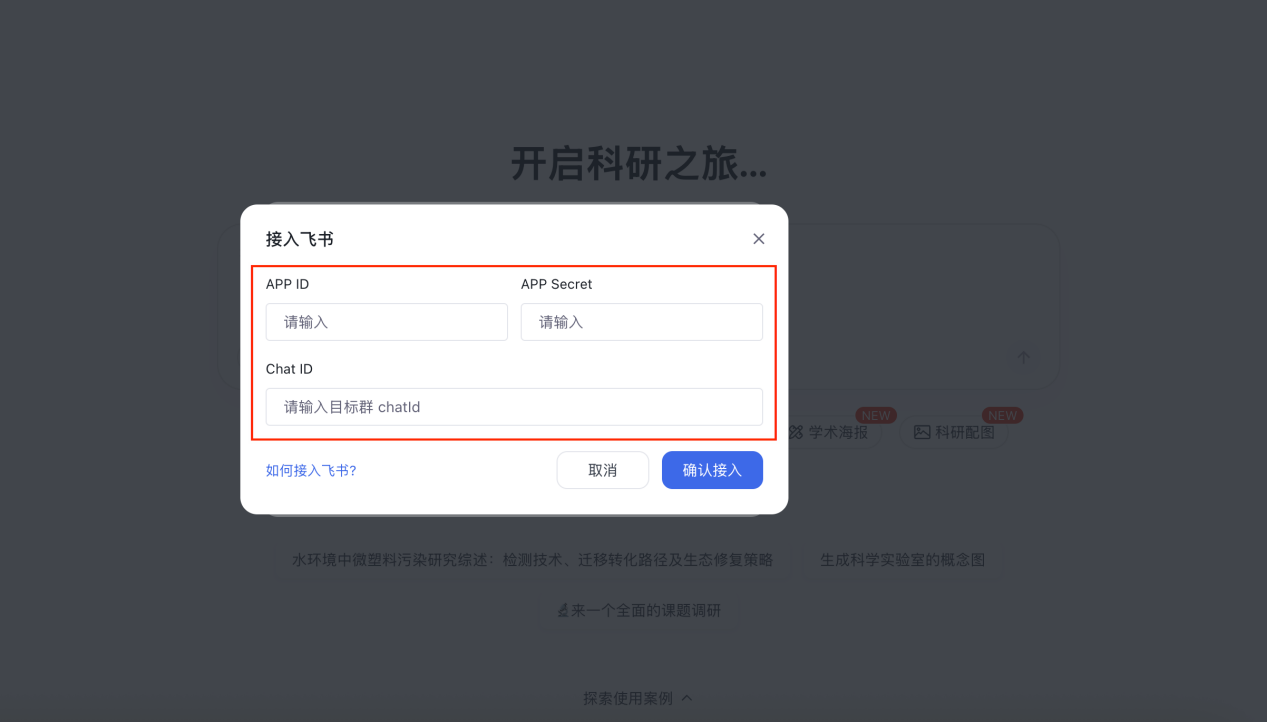
5.打开SciencePro平台,点击用户名,在弹出的菜单中点击“频道管理”,点击“飞书”接入按钮,输入在前面第4步中获取的飞书机器人App ID、App Secret和会话ID(Chat ID),然后单击确认创建即可。
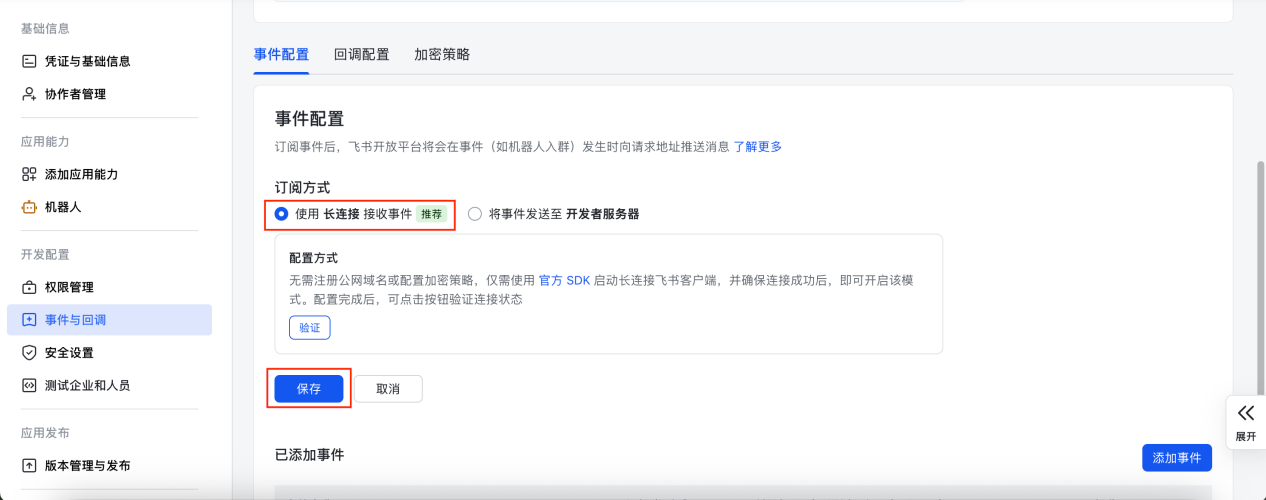
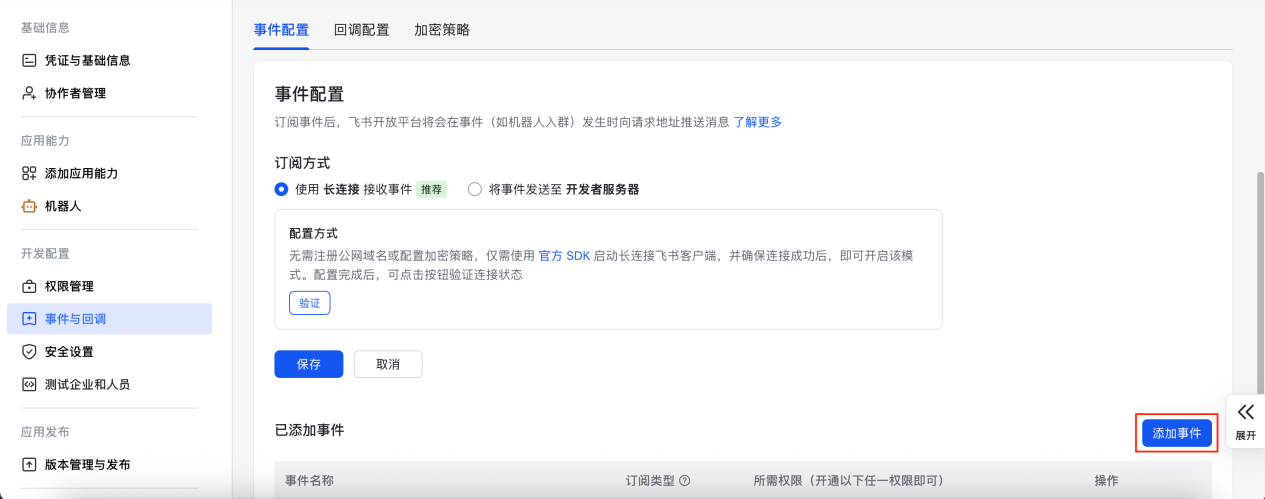
6.在飞书应用管理页的左侧导航栏中单击事件与回调,在事件配置页签中选择使用 长连接 接收事件,然后单击保存。
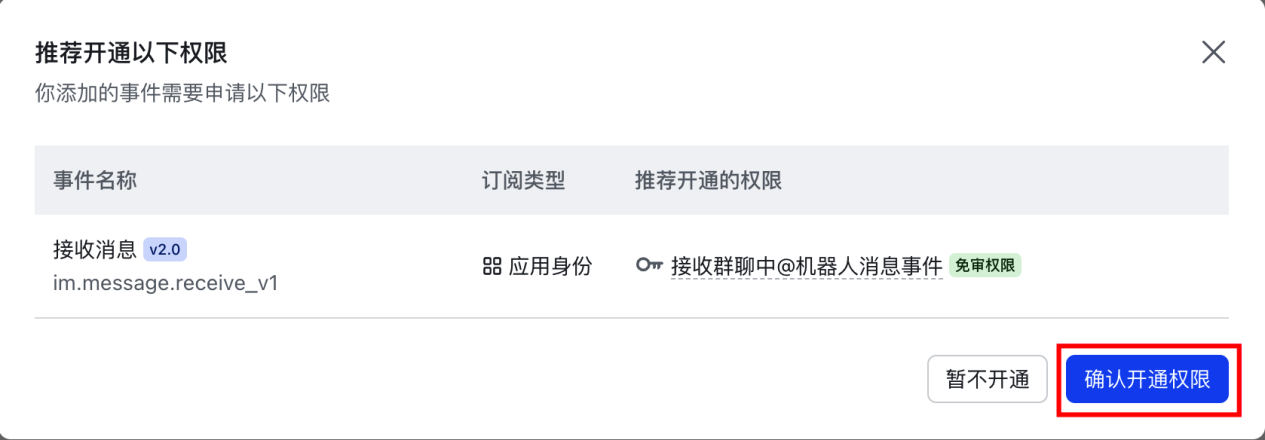
7.单击事件配置页面中的添加事件,在弹出的列表中,搜索并添加接收消息,然后单击添加,按照指引确认开通权限。
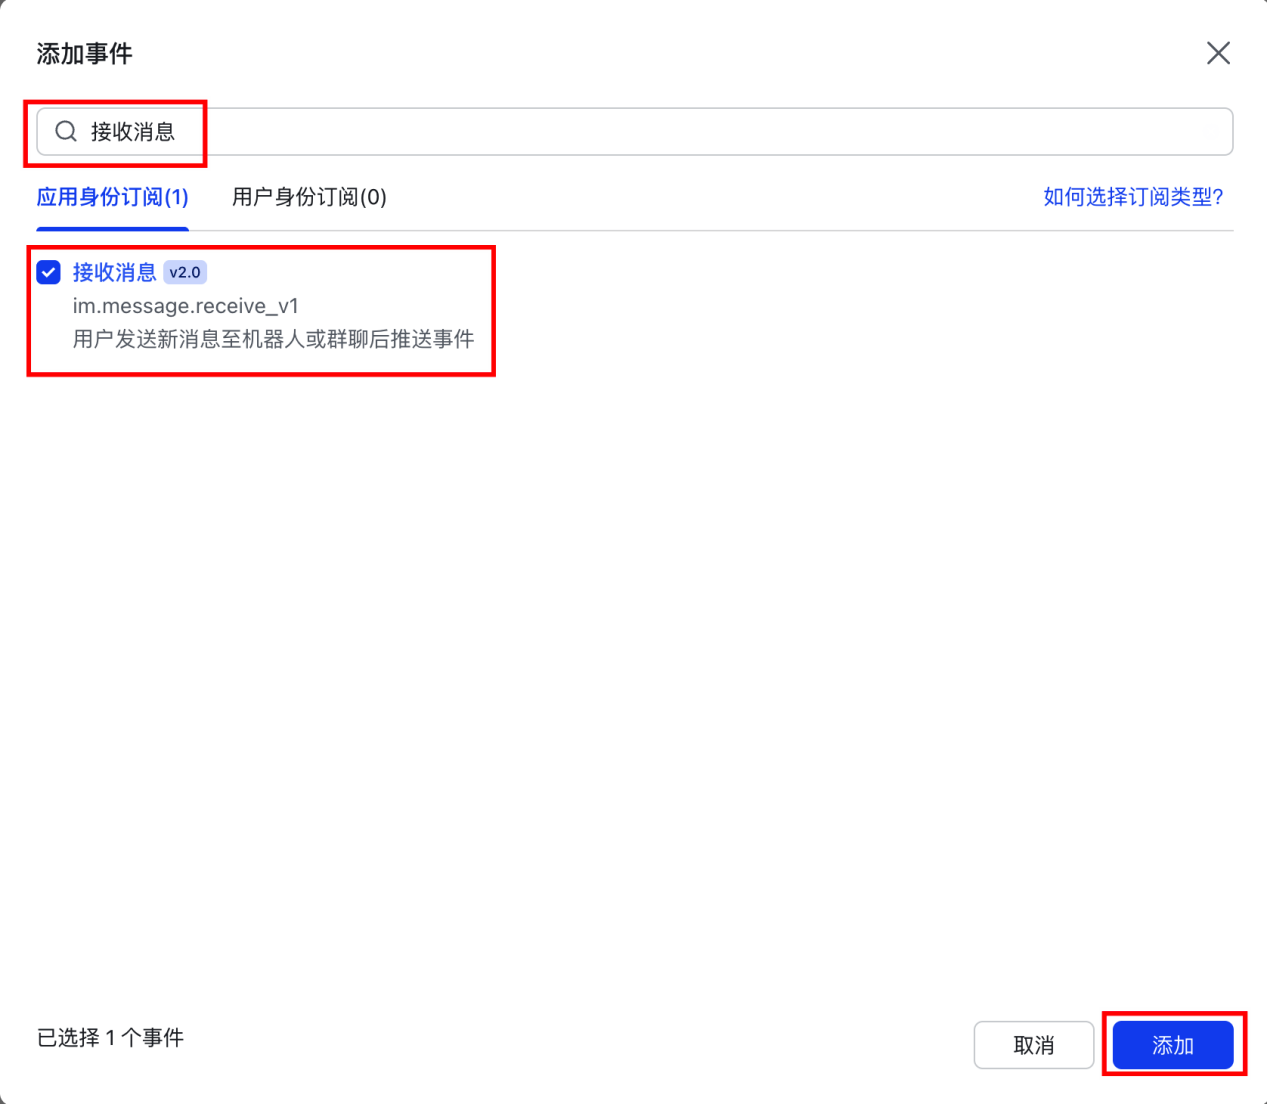
8.开通推荐权限。
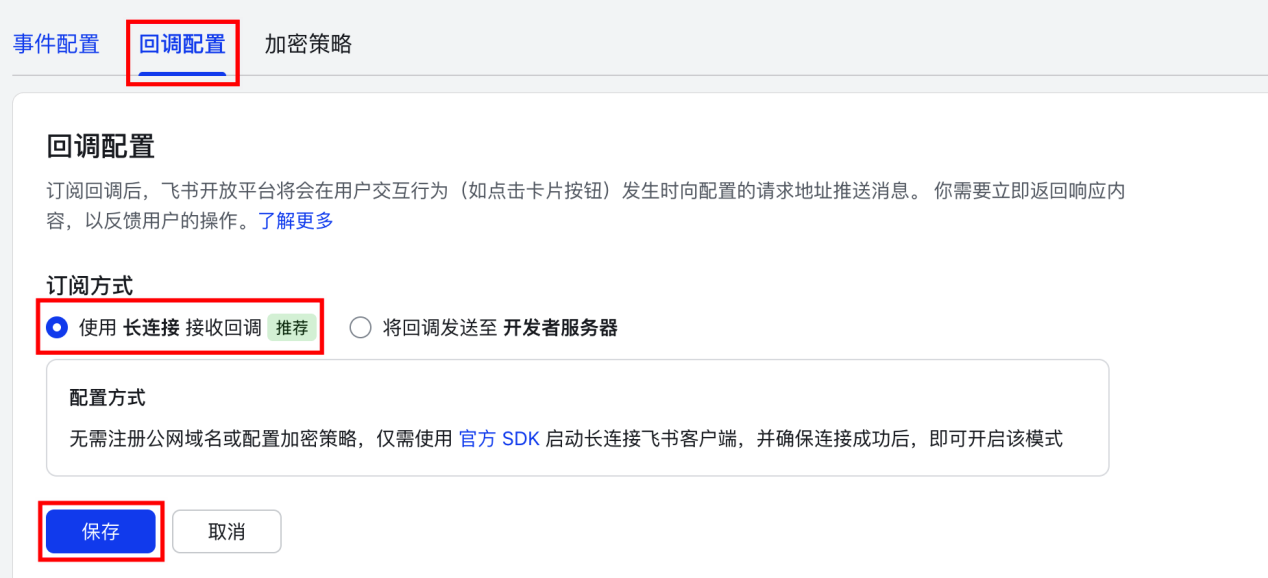
9.在事件与回调的回调配置页面中,订阅方式选择使用 长连接 接收回调,然后单击保存。无需填写其他地址,配置自动生效。
10.在左侧导航栏中单击权限管理,然后单击页面中的批量导入/导出权限,弹出权限导入窗口。
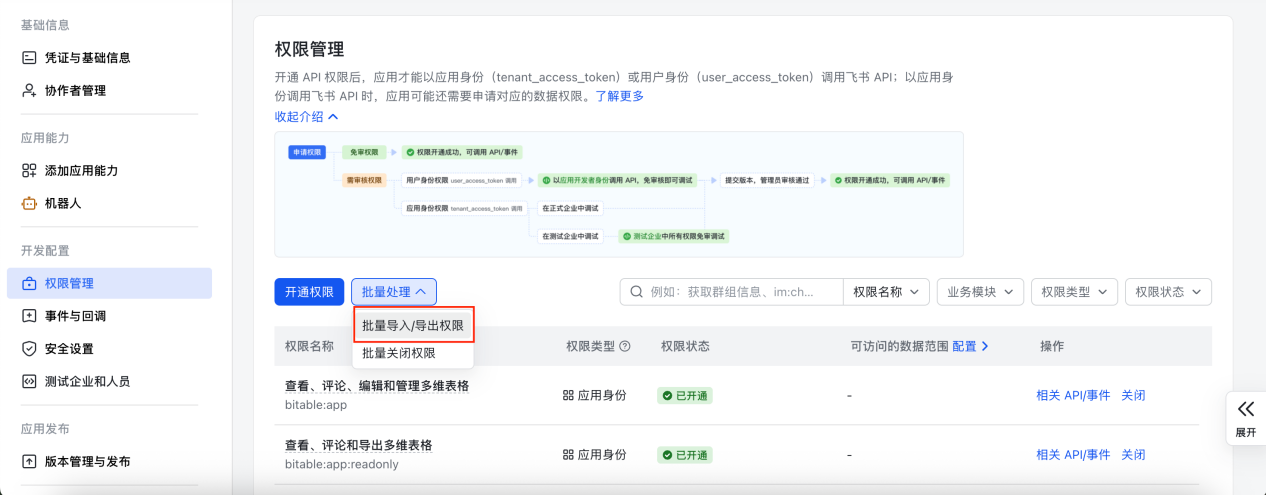
11.复制以下代码,替换前面弹窗中原有的 JSON 内容,单击下一步,确认新增权限,继续单击申请开通,确认后等待权限导入完成。
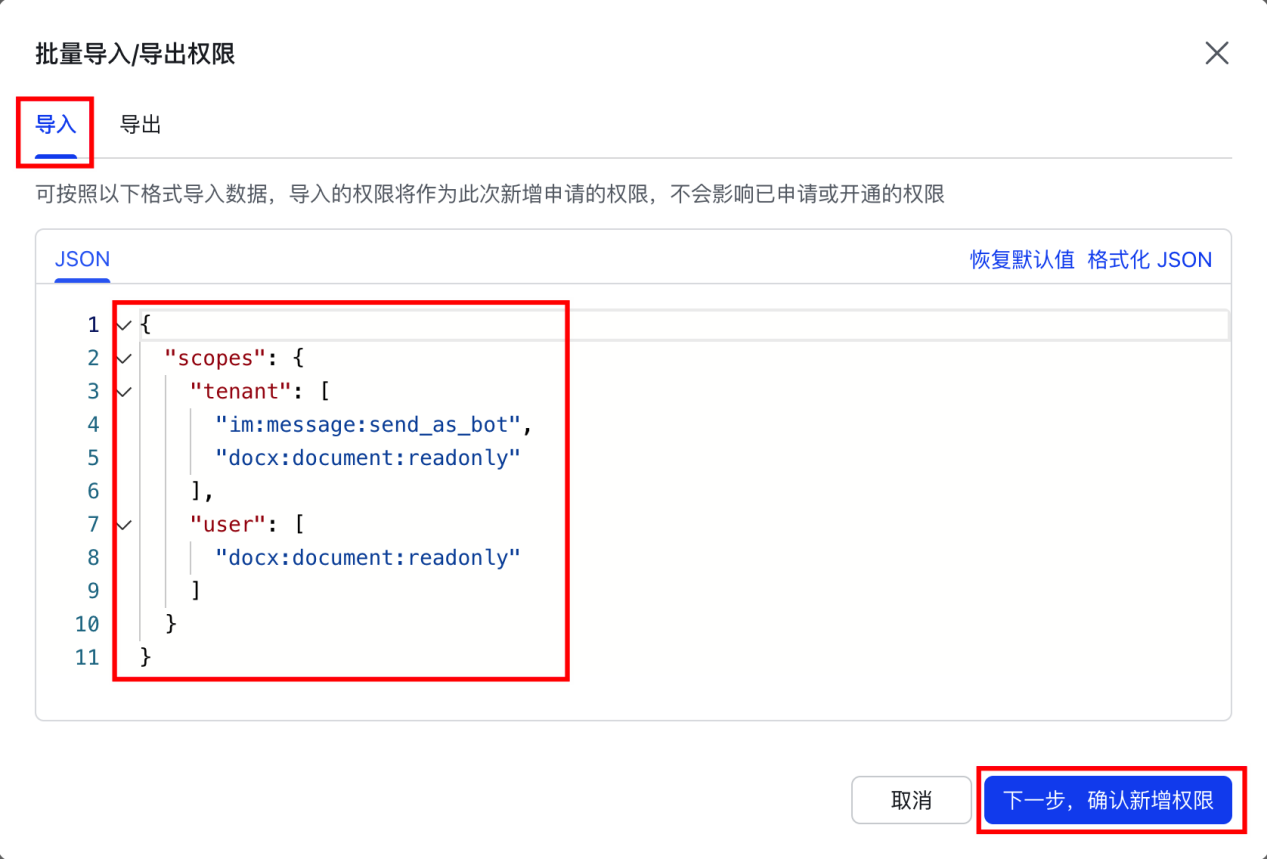
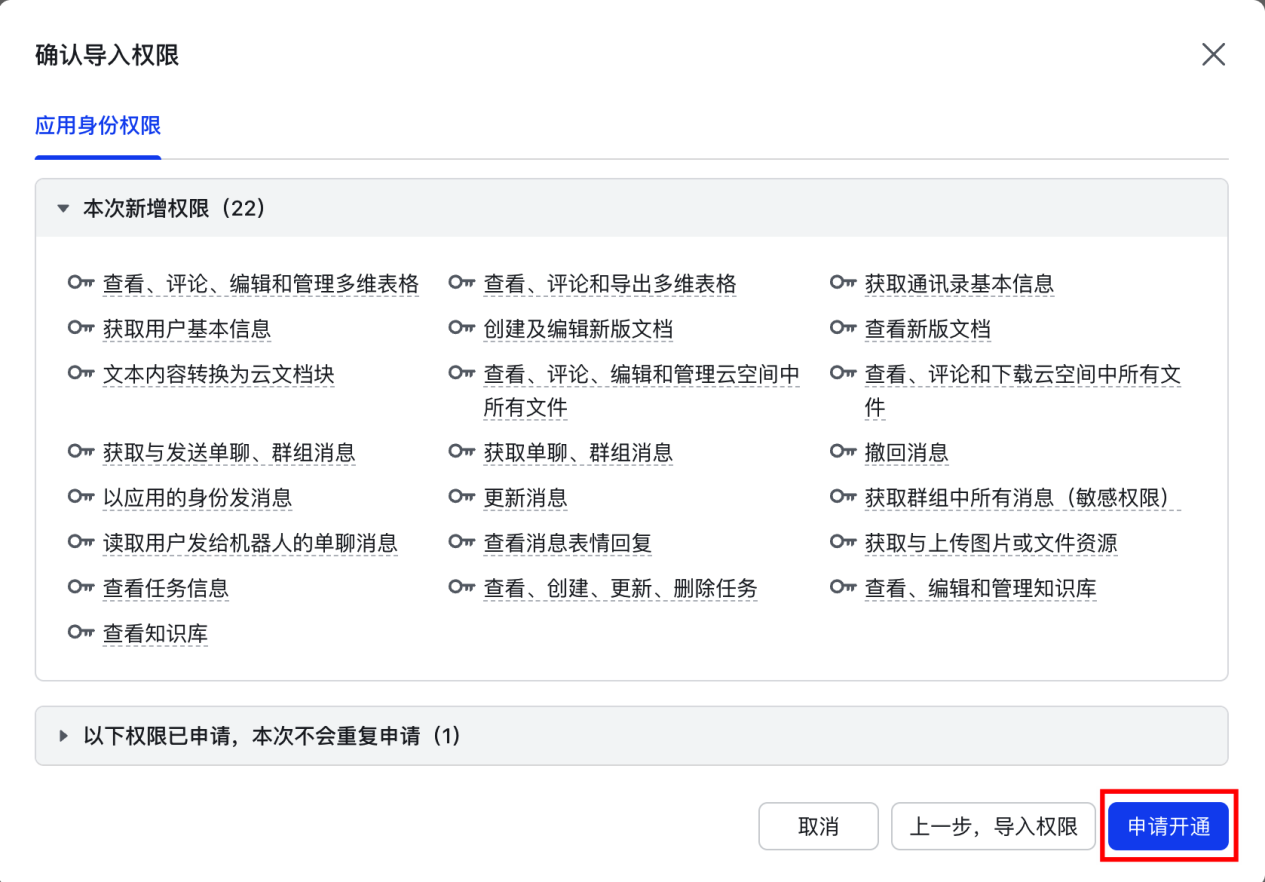
12.在飞书应用管理页的左侧导航栏中单击版本管理与发布,然后单击右上角的创建版本。
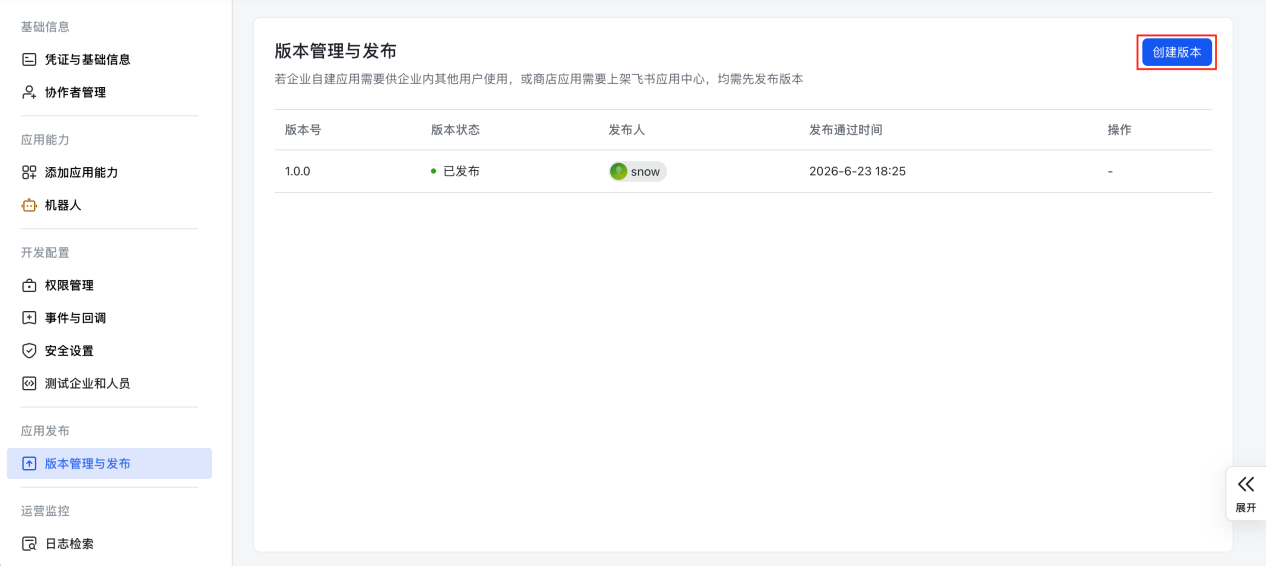
13.填写应用版本号(此处以1.0.0为例,您可以自行定义版本号)和更新说明,单击保存并确认发布。
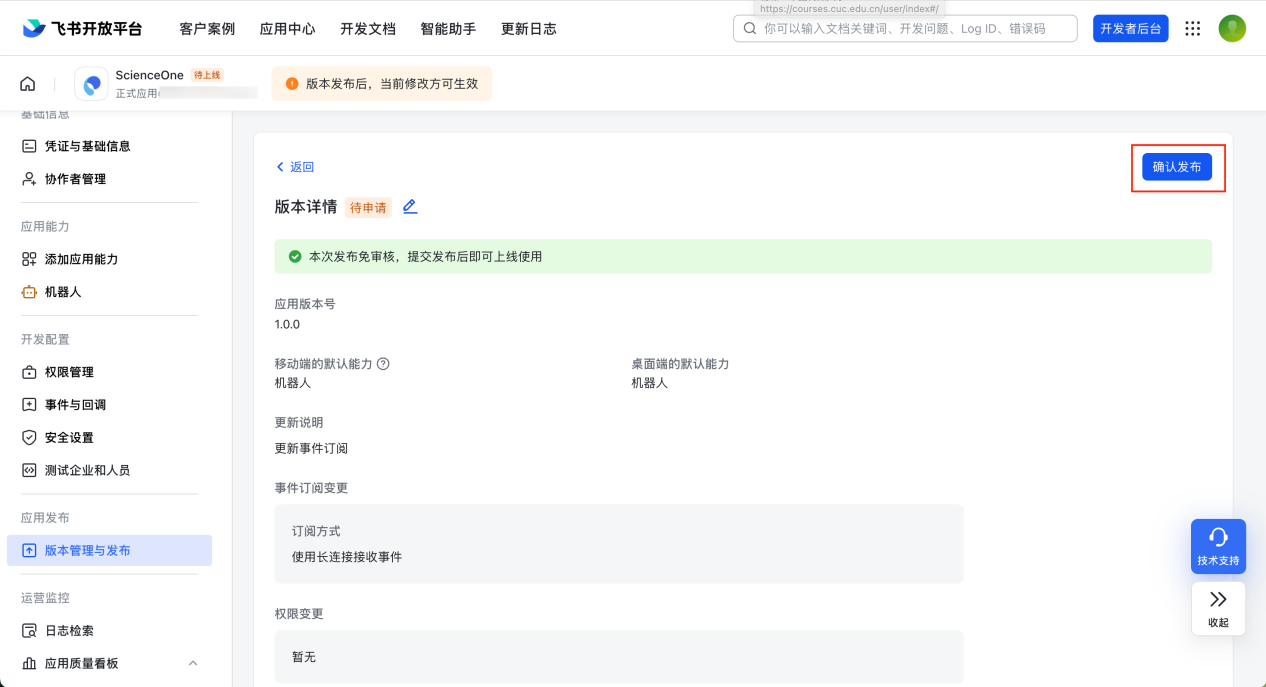
14.待飞书管理员通过发布审核,发布成功后,您就可以与飞书机器人进行单独聊天。
8.5 使用说明
选择“使用说明”选项,即可查看系统的详细使用手册,了解系统功能及使用方式,支持切换中英文双语查看。
8.6 意见反馈
选择“意见反馈”选项,即可反馈关于系统的意见和建议,支持站内在线反馈。
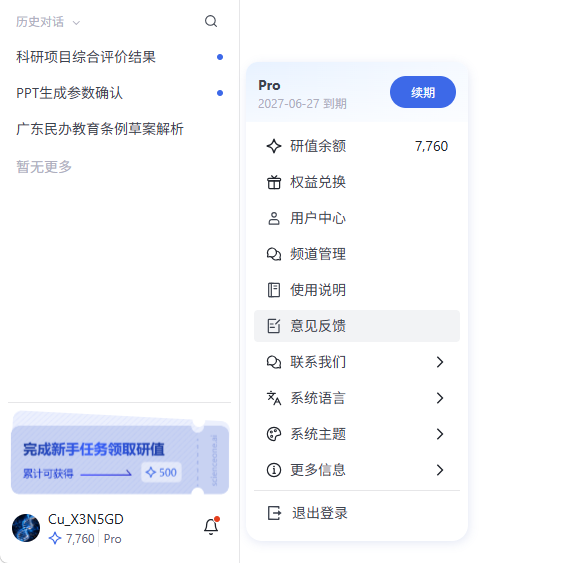
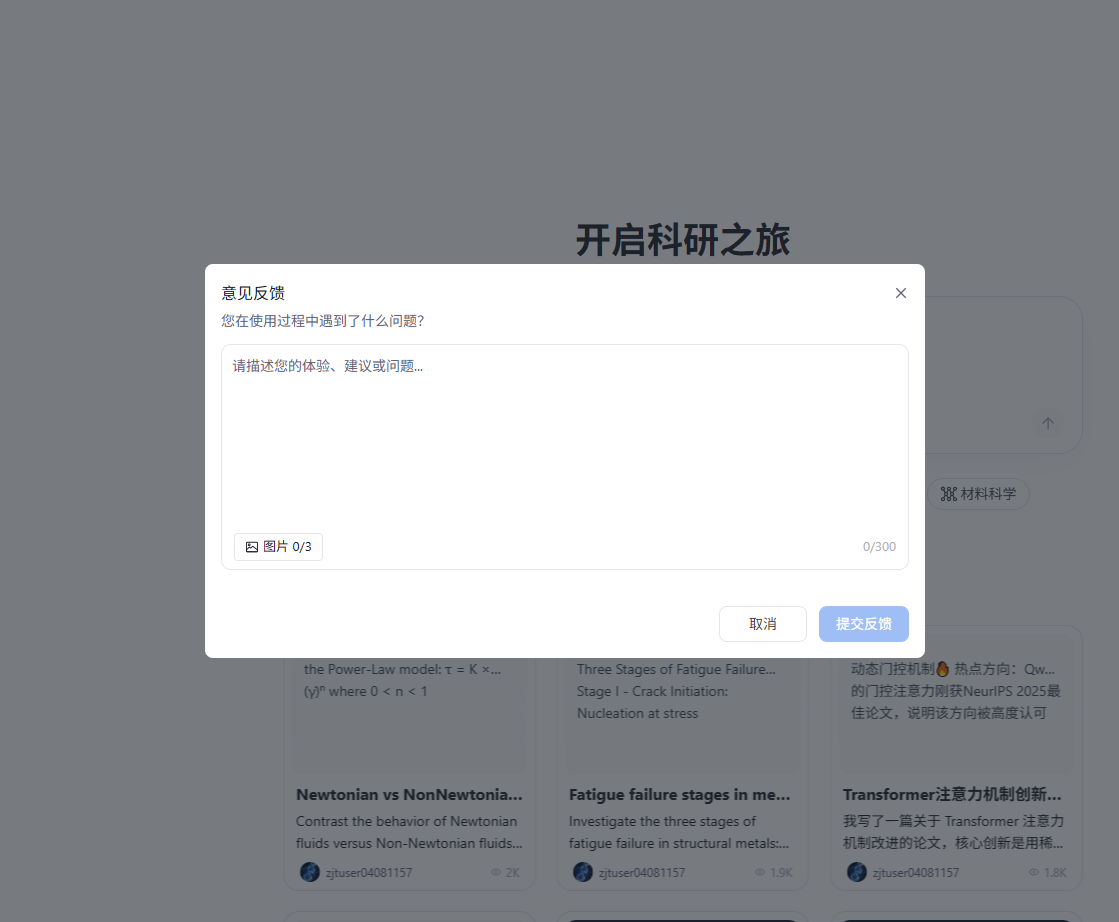
8.7 系统语言设置
SciencePro支持切换中英双语系统。在用户设置菜单中,点击当前的语言选项(如“中文”),在列表中选择您希望使用的语言,界面将自动切换到该语言版本。
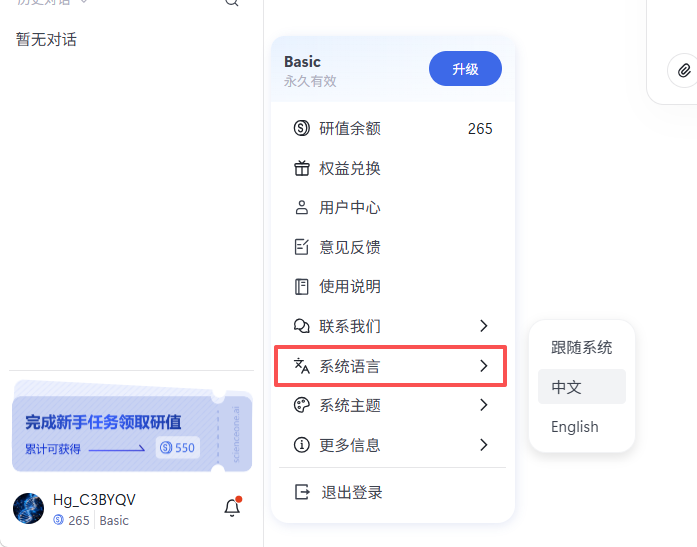
8.8 系统主题设置
点击用户名后,在弹出的菜单中点击“系统主题”,进一步选择“量子白”、“暗物质”、“跟随系统”等主题选项,即可切换系统的整体视觉风格。您可以根据个人偏好选择不同的主题,以获得更舒适的使用体验。
8.9 联系我们
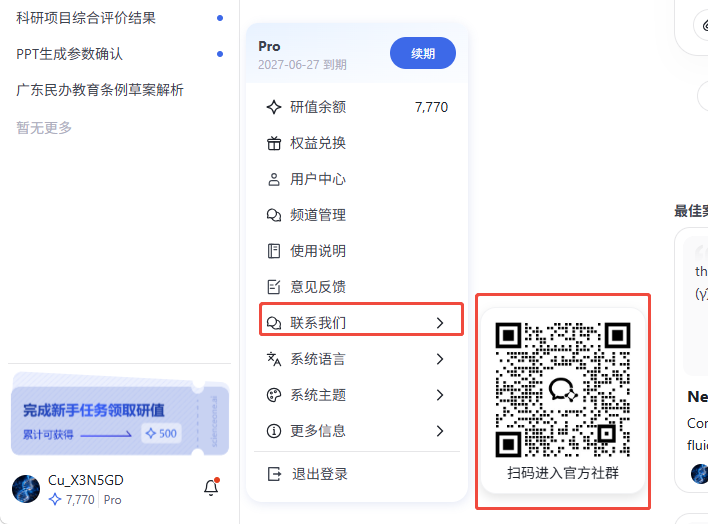
选择“联系我们”选项,即可扫码进入官方社群,进行答疑解惑。
8.10 更多信息
8.10.1 关于我们
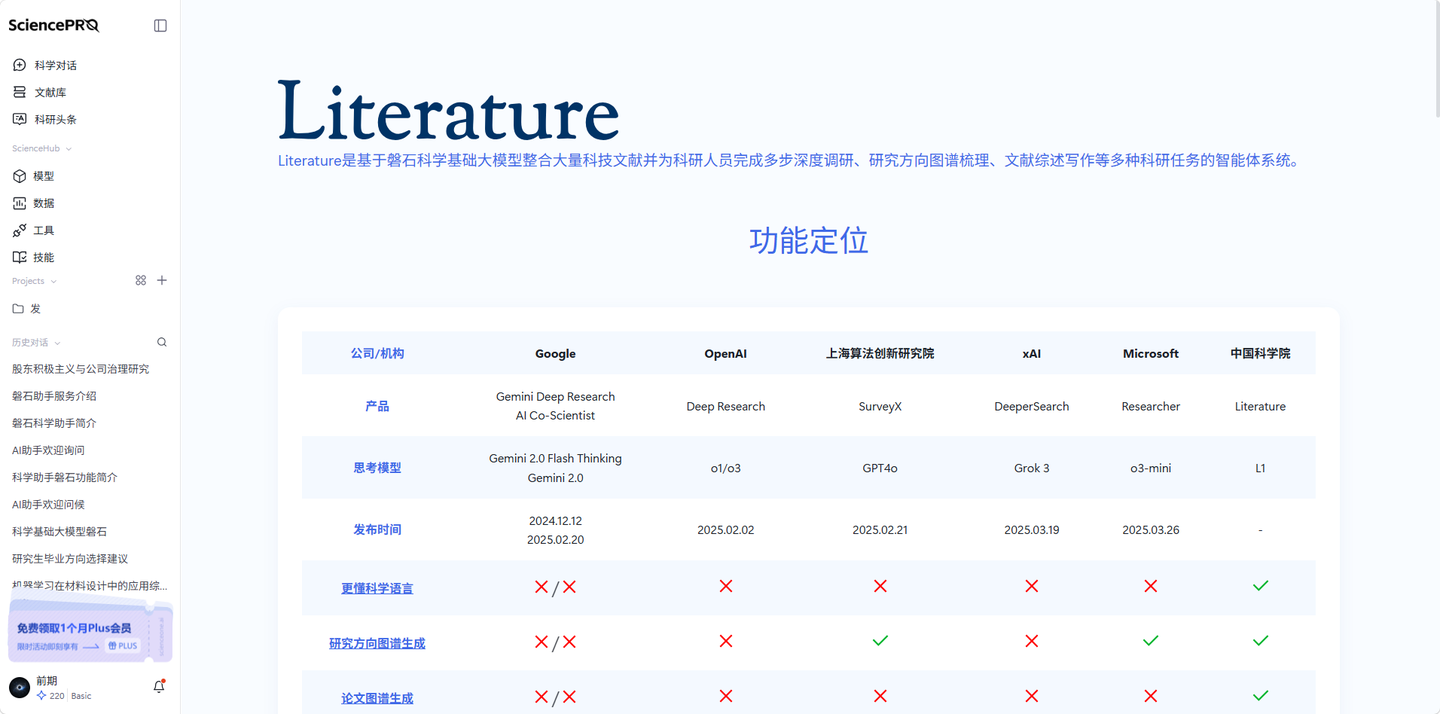
选择“关于我们”选项,即可查看系统简介,包括核心功能、科研工作流、应用案例、机构版、技术底座。
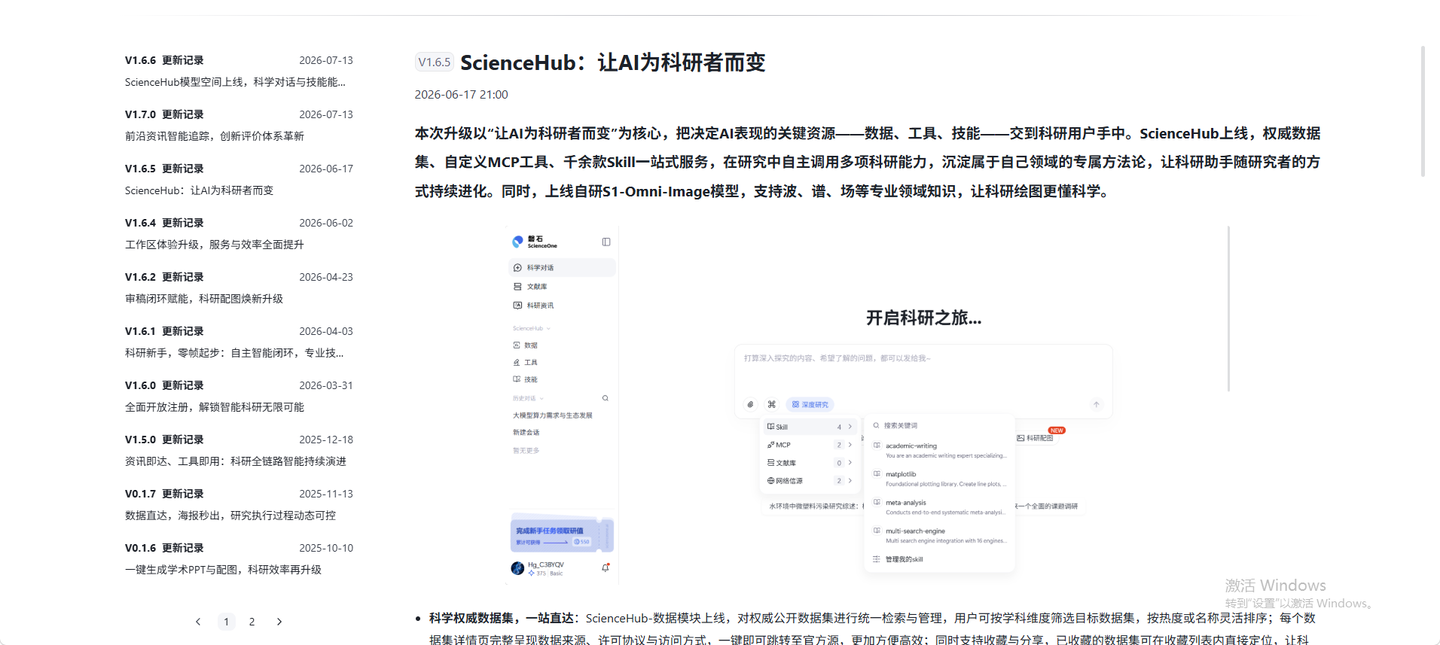
8.10.2 更新日志
选择“更新日志”选项,即可查看系统版本更新日志,支持查看各版本更新的主要内容。
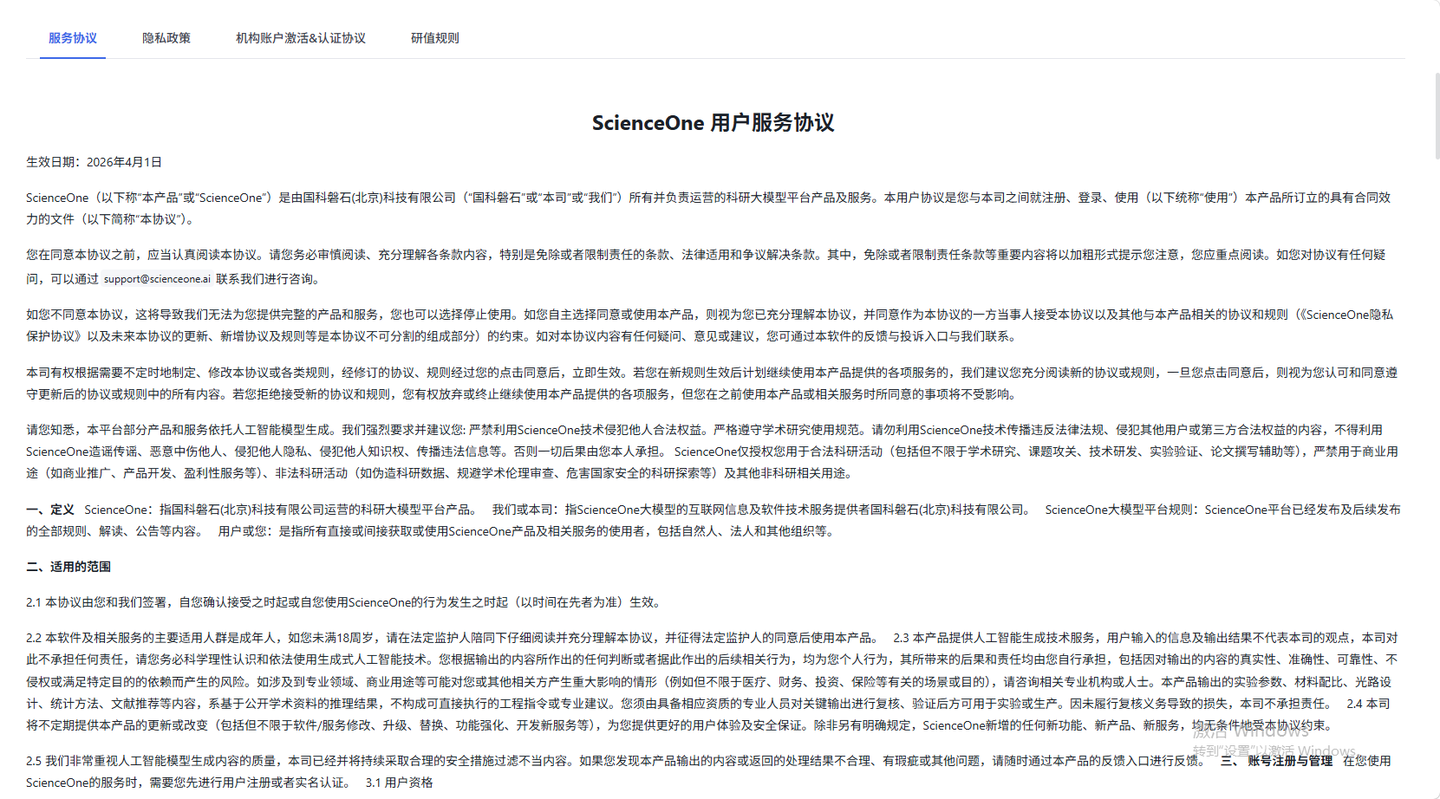
8.10.3 规则协议
选择“规则协议”选项,即可查看各项规则协议,包括SciencePro的服务协议、隐私政策、机构账号激活&认证协议和研值规则。
8.11 退出登录
点击菜单底部的“退出登录”按钮,您将安全退出当前账号,系统将返回至登录页面。为保障账户安全,建议您在完成操作后退出登录。
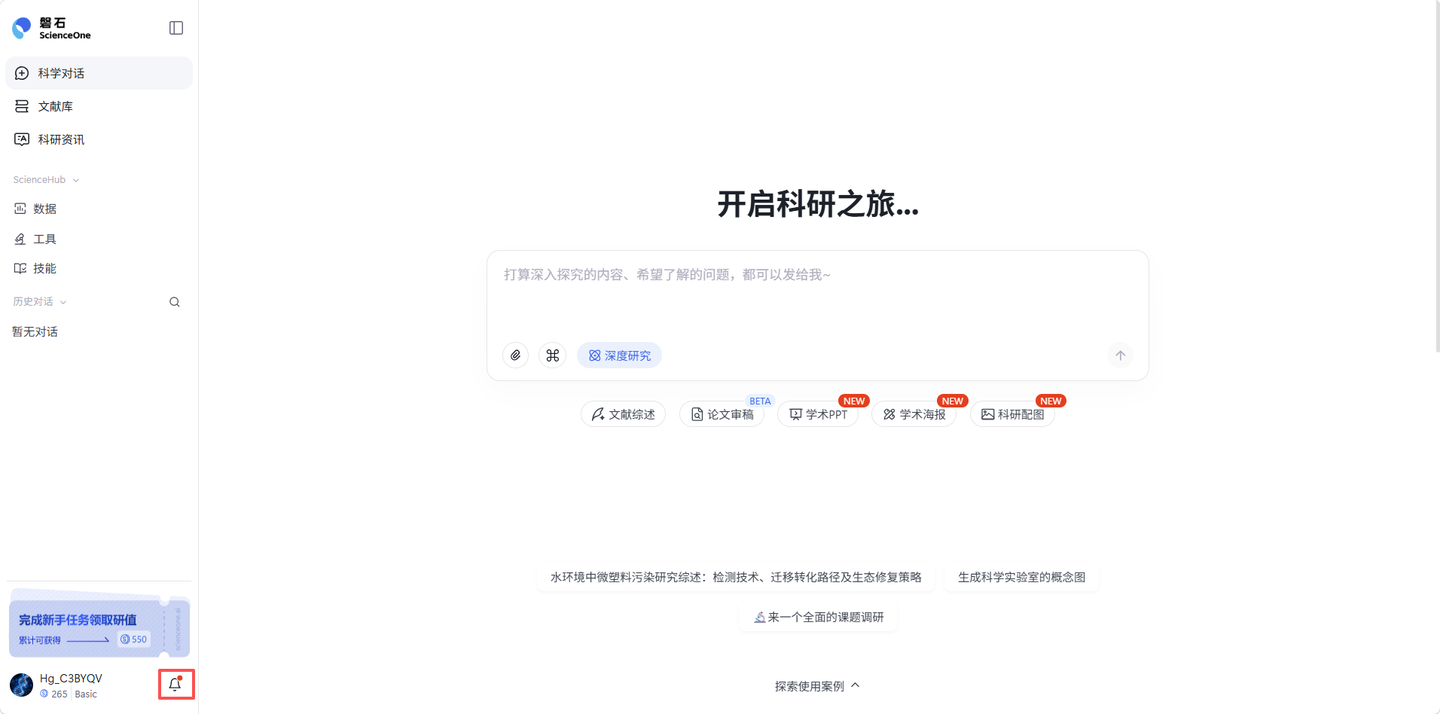
通知系统
在系统的主界面,点击左下方铃铛按钮,即可弹出通知中心菜单。在此菜单中,您可以查看和处理消息、跟进任务提醒及接收系统通知。
9.1 通知中心
通知中心默认显示“全部”消息。您可以点击“未读”标签,快速筛选出所有尚未查看的通知。若无未读消息,该视图下会提示“暂无未读消息”。
每条未读消息的右侧会有一个红点标识。当您点击该消息并完成相应交互(如跳转页面或查看弹窗)后,该红点将自动消失,表示消息已读。
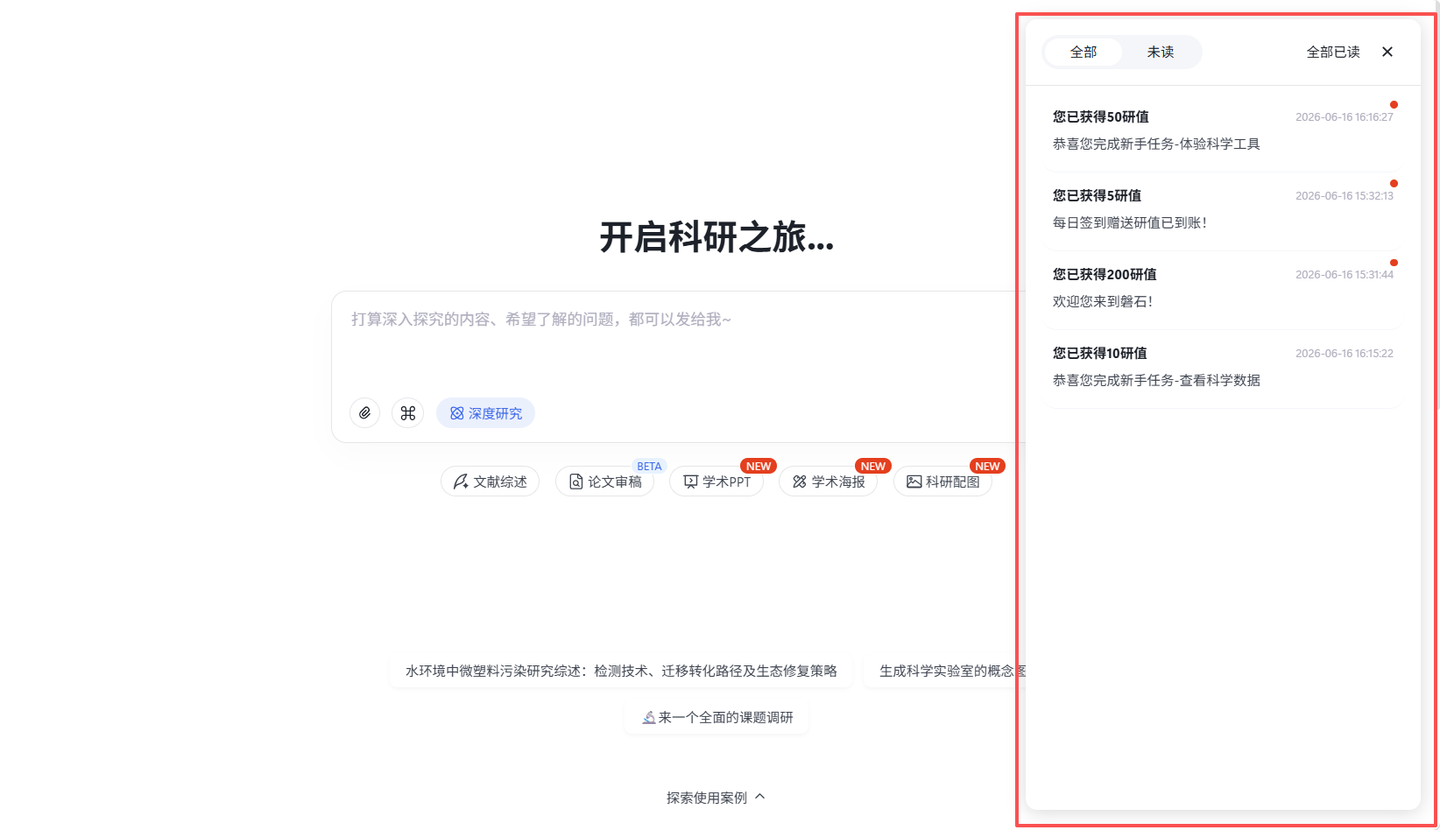
在通知中心顶部,您可以找到“全部已读”按钮。点击后,所有未读消息将立即被标记为已读状态,所有红点(包括入口图标上的红点)都将消失。
9.2 即时弹窗
为确保您能及时了解关键任务的最新进展,系统会在界面右上角通过即时弹窗发送提醒。这些提醒旨在主动告知您任务的成功、失败或需要您确认的状态,并引导您进行后续操作。
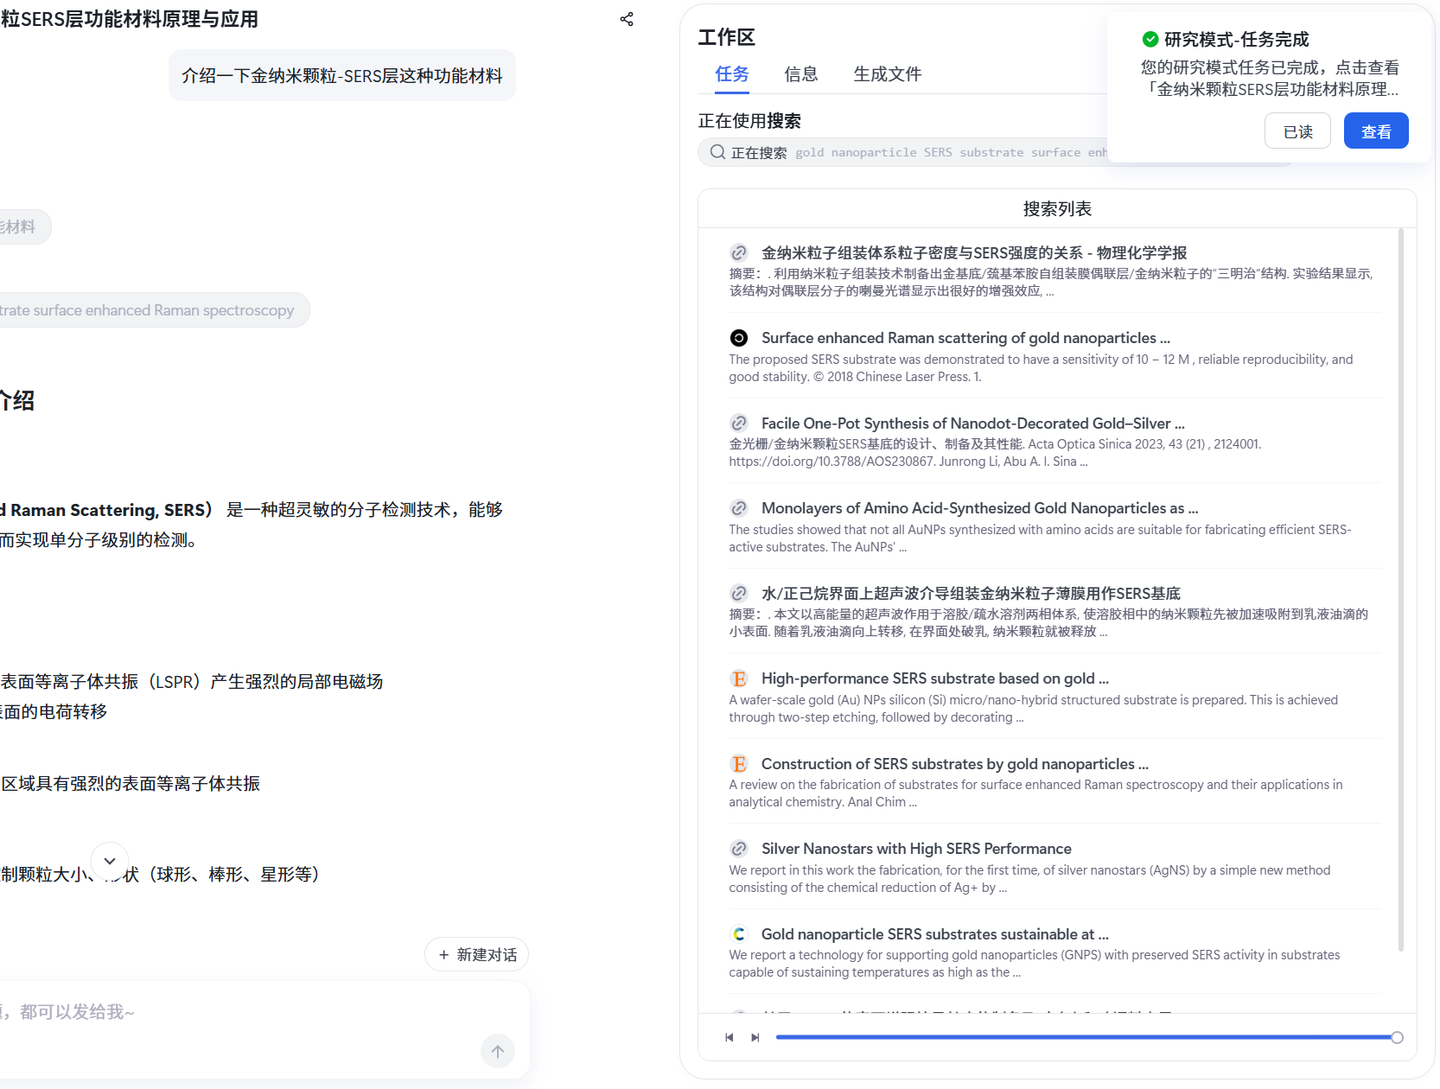
弹窗构成与交互
每个弹窗均由状态图标、消息内容及右下角的“查看”和“已读”两个按钮组成。
状态图标:分为成功、失败和确认三类,帮您快速识别消息性质。
查看按钮:点击后将直接跳转到该消息关联的任务界面。
已读按钮:点击后,该条消息将被标记为已读,弹窗关闭,消息中心的红点提醒也会相应更新。
弹窗类型与持续时间
根据消息的重要性,弹窗分为两种类型:
通知类消息 (成功/失败):此类弹窗用于结果告知,会在屏幕上停留数秒后自动消失,以尽量减少对您当前操作的打扰。
确认类消息:此类弹窗涉及需要您决策的关键节点,会持续显示在界面上,直到您主动点击按钮进行处理。
研值体系
10.1 研值中心
在 SciencePro 平台的主界面左下角区域点击用户名,在弹出的菜单中点击研值余额将进入“研值中心”。
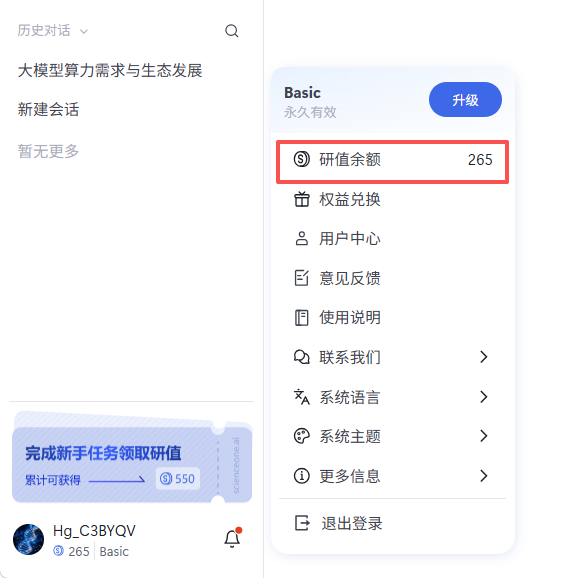
“研值中心”包括“研值总览”、“活动中心”与“订阅充值”模块。
“研值”作为体验SciencePro网站的虚拟货币系统,仅可在本站范围内使用,根据有效时长的不同,分为三种不同的类型:
每日研值:当日获取当日有效,至获取当日的24:00失效。
限时研值:30天有效期,从获取当日算起,30天后的24:00失效。
永久研值:账号正常使用期间内永久有效。
10.2 研值总览
“研值总览”可以获取您在SciencePro网站中总体的研值相关信息,包括您的会员信息、当前可用研值与历史研值明细。
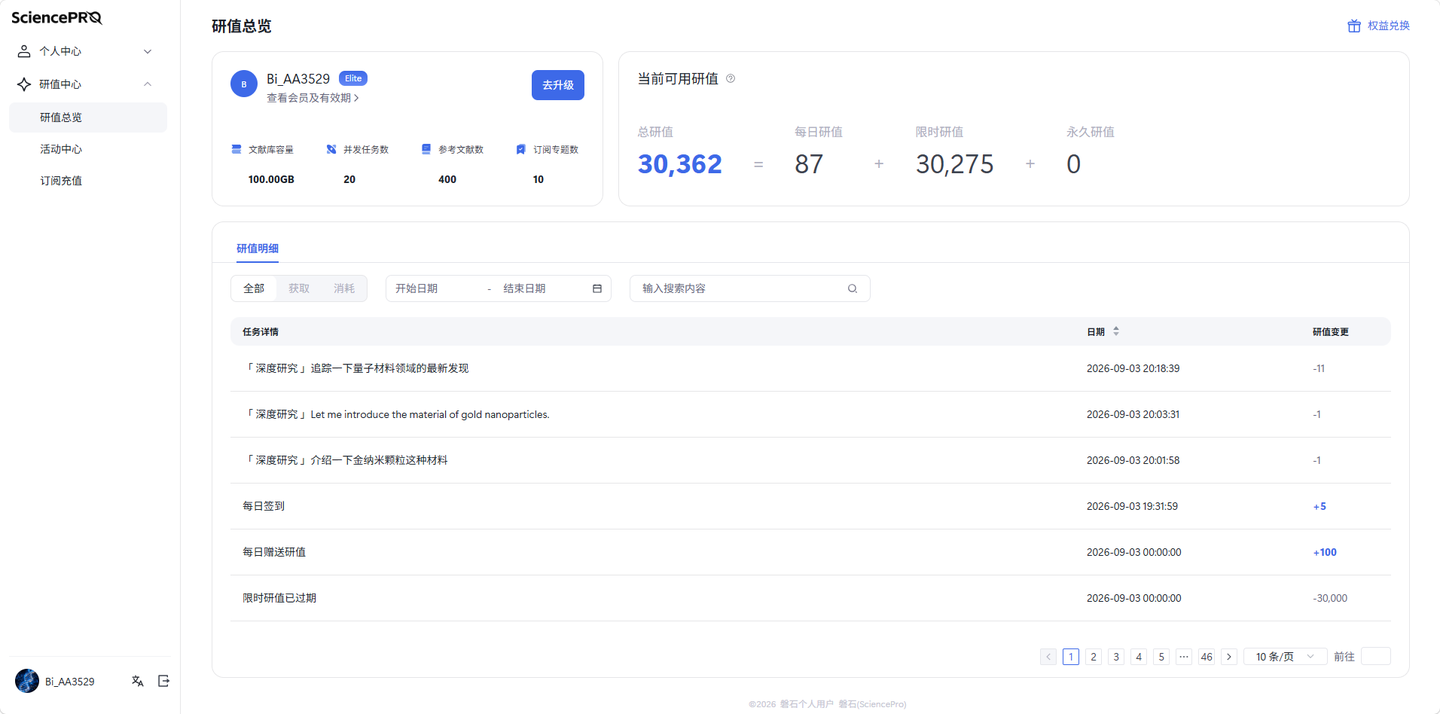
10.2.1 个人信息
个人信息展示了您的套餐信息,您可以在此了解当前会员等级下的所有权益,包括“文献库容量”,“并发任务数”,“参考文献数”等。
10.2.2 当前可用研值
这里展示您当前所有研值的数额情况,包括每日研值,限时研值,永久研值。
10.2.3 研值明细
研值明细展示了您历史所有涉及研值获取与消耗的明细记录,您可以选择查看研值的消耗或获取,同时也支持搜索查看固定时间段内研值的明细。
10.3 研值获取活动
除充值购买和会员权益外,SciencePro提供一系列的研值活动获取研值,包括每日签到、邀请好友、新手任务等,您可以参与系列活动获取研值并使用SciencePro的各类功能。
10.3.1 每日登录赠送
所有用户每日登录即赠送研值。
10.3.2 邀请好友
按照指引邀请好友注册SciencePro,双方都可获得一定的研值奖励。
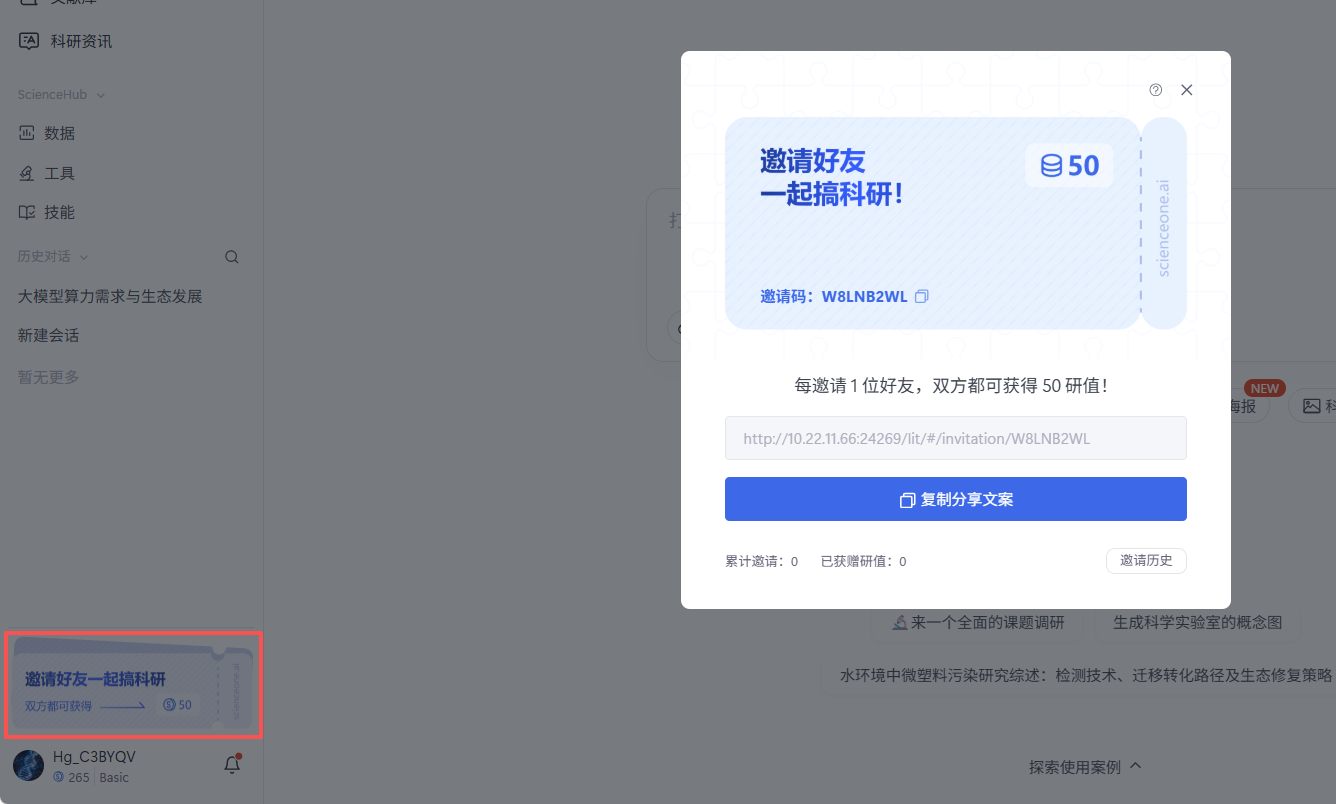
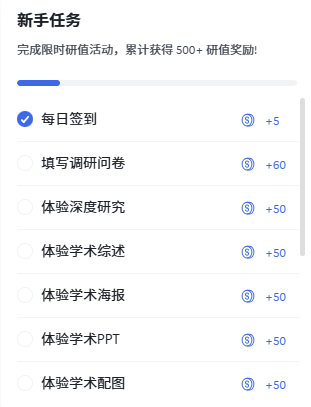
10.3.3 新手任务
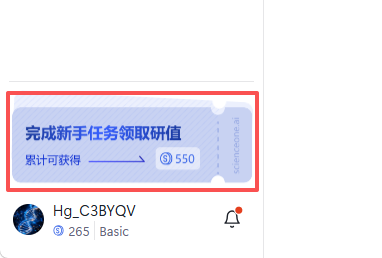
完成新手任务即可获得限时研值奖励。
在 SciencePro 平台的主界面左下角点击新手任务卡片,查看新手任务列表。
点击任一任务,跟随操作指引完成新手任务获得相应的限时研值奖励。
10.4 订阅充值
订阅充值模块开放了不同套餐的充值入口,并展示了不同套餐的权益对比,您可以根据实际需求灵活选择不同的套餐。
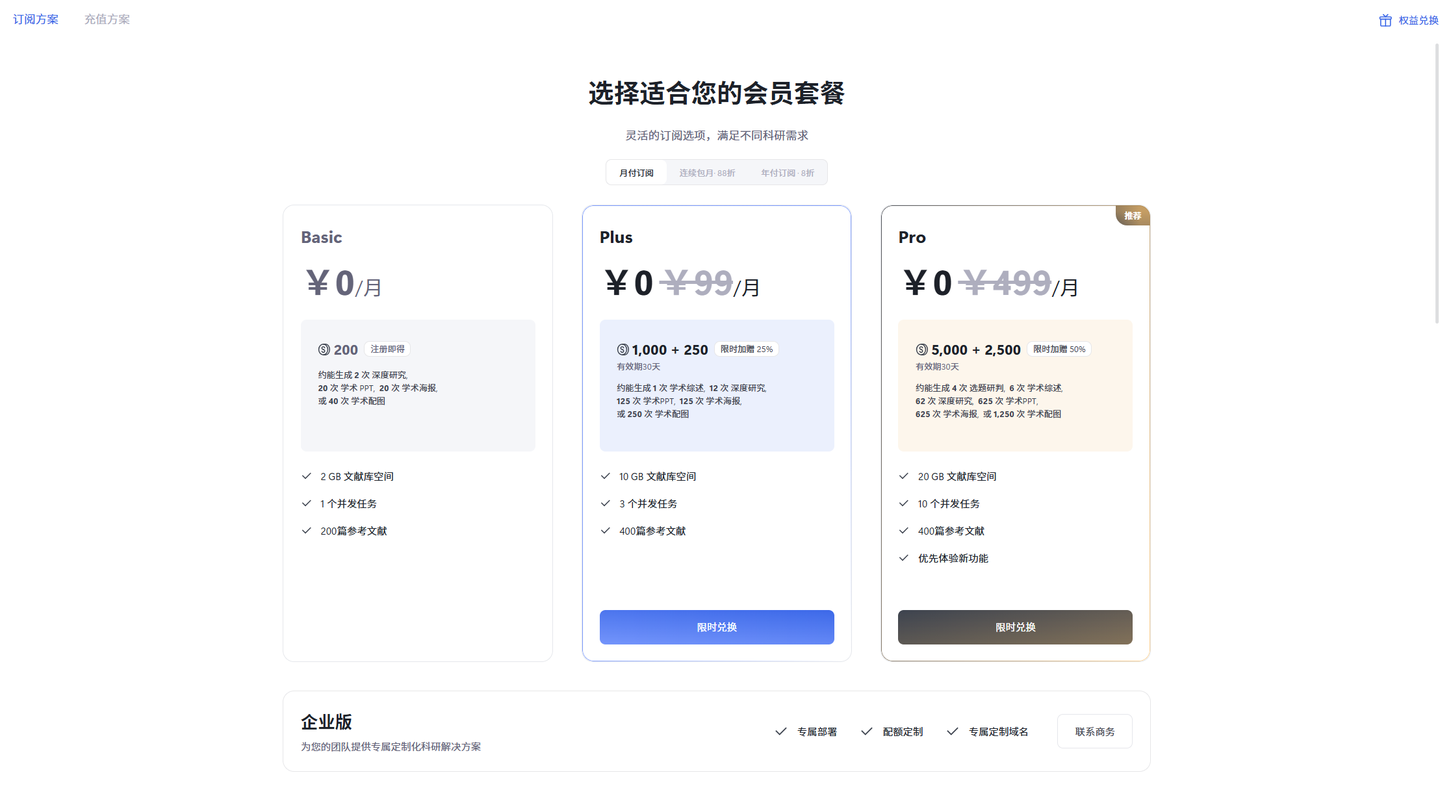
10.4.1 Basic版
SciencePro为所有用户提供Basic基础套餐的服务,注册首月免费赠送200研值,并且拥有2GB的文献库空间和200篇参考文献。
10.4.2 Plus版
Plus套餐在Basic基础之上提供更丰富的配额礼包。
10.4.3 Pro版
Pro套餐不仅拥有最丰富的配额礼包,还可以优先体验新功能。
10.4.4 企业版
企业用户可以联系商务实现专属的定制化科研解决方案,包括专属部署,配额定制与专属定制域名等服务。
Login System
New users of SciencePro need to register and log in to their personal account.
1.1 Access
Official SciencePro website: https://www.scienceone.ai.
Google Chrome or Microsoft Edge browser is recommended.
1.2 Register
When accessing SciencePro for the first time, you need to register an account. The system provides phone number and email registration options for individual users. The page defaults to phone number registration; click Email at the bottom to switch to email registration. Enter your phone number or email address in the input field and click Send to receive a verification code. Enter the correct verification code to complete registration and automatically create your account.
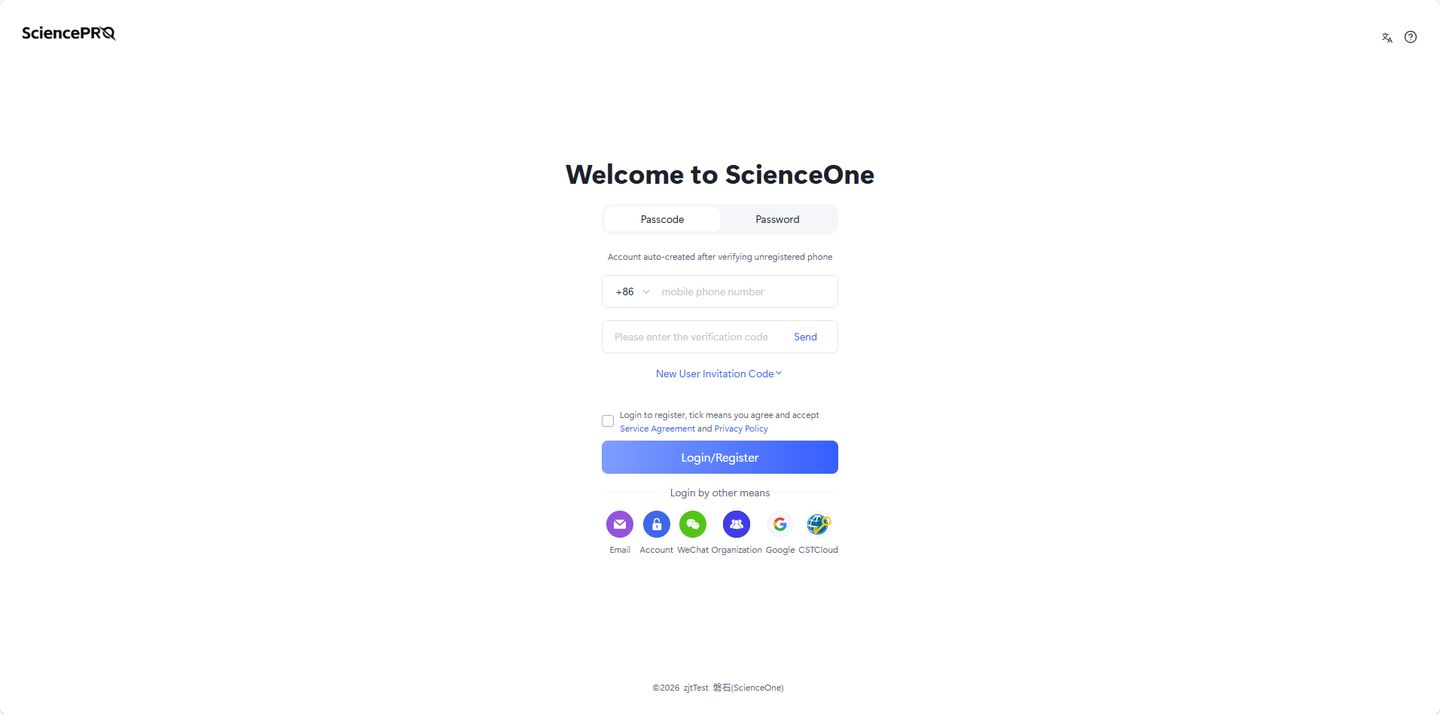
1.3 Login
Two main login methods are supported:
Passcode: Enter your phone number and click Send to receive a verification code. Unregistered phone numbers will have an account auto-created upon verification.
Password: Enter your phone number and account password to log in.
Additionally, you can log in via Email, Account, or Organization using the options at the bottom of the page.
Research
2.1 Conversation Modes
The Research provides multiple usage modes for scenarios including literature research, subject questions answering, research report writing, visualization report generation, and literature reviews.
Deep Research: More comprehensive, suitable for research, reports, mining research ideas scenarios, integrating massive information to fully support research decision-making.
Literature Review : More transparent, specialized for ultra-long literature review scenarios, deeply analyzing tens of thousands of papers, comprehensively organizing research contexts.
Innovation Evaluation: More rigorous, suitable for self-inspection and auxiliary peer review of projects and papers before submission. It accurately analyzes areas for improvement to refine manuscripts for higher review standards.
Academic PPT: More professional, suitable for proposal reports, academic conference presentations, research result display scenarios, upload papers to generate with traceable images and charts.
Scientific Illustration: More precise, suitable for paper chart drawing, report illustration design, academic presentation visualization material production scenarios, precisely matching research content.
Academic Poster: More intuitive, suitable for academic exchanges and result display scenarios, upload papers to generate with visualized research highlights.
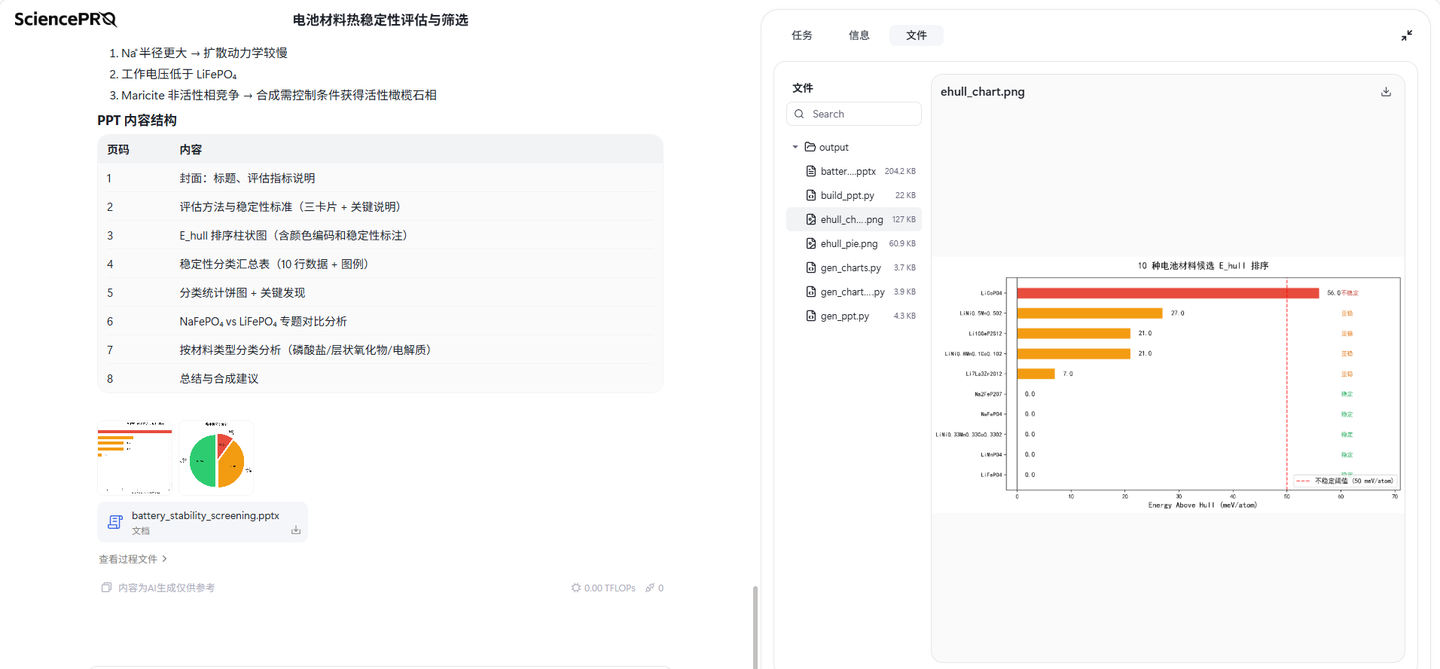
MatScientist: Focuses on material characterization analysis, structural and property research, and assists phase identification, performance interpretation and material property trend prediction.
MolChemist: Covers molecular structure, physicochemical properties, toxicology and metabolomics data mining, supporting drug screening, compound evaluation and molecular knowledge discovery.
MolSimulator: Adapts to thermodynamic calculation, molecular/protein structure simulation and parameter fitting, and delivers intelligent interpretation for stability screening and computational outputs.
BioResearcher: Tailored for sequencing, gene editing, cell and synthetic biology experiments, providing one-stop services including experimental protocol design, omics data processing and result analysis.
2.1.1 Deep Research
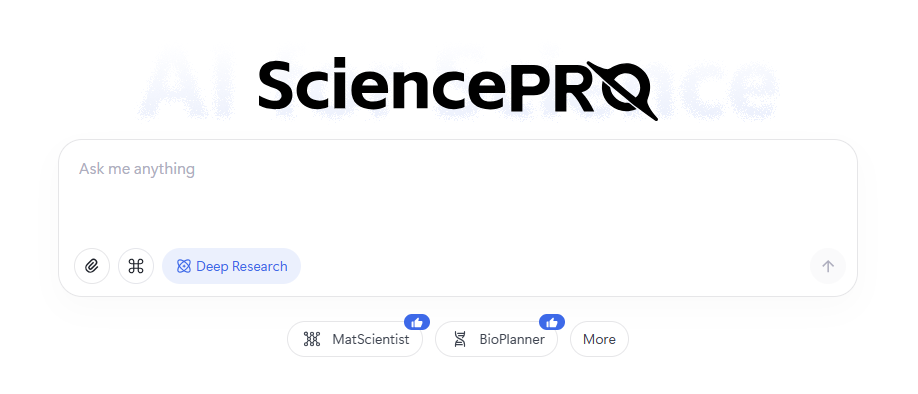
Deep Research is currently the default conversation.In this mode, a single-agent closed-loop (AgentLoop) architecture is adopted. The agent thinks about your question and outputs an answer.
The system consists of two parts: Process (left) and Workspace (right). The left Process Area displays the current execution process, including thinking process, execution details, and final generated results. The right Workspace contains three sections: "Tasks" shows output results of agent execution steps; "Information" summarizes information collected through skills, web sources, and literature databases; "Files" displays all files generated for the current task.
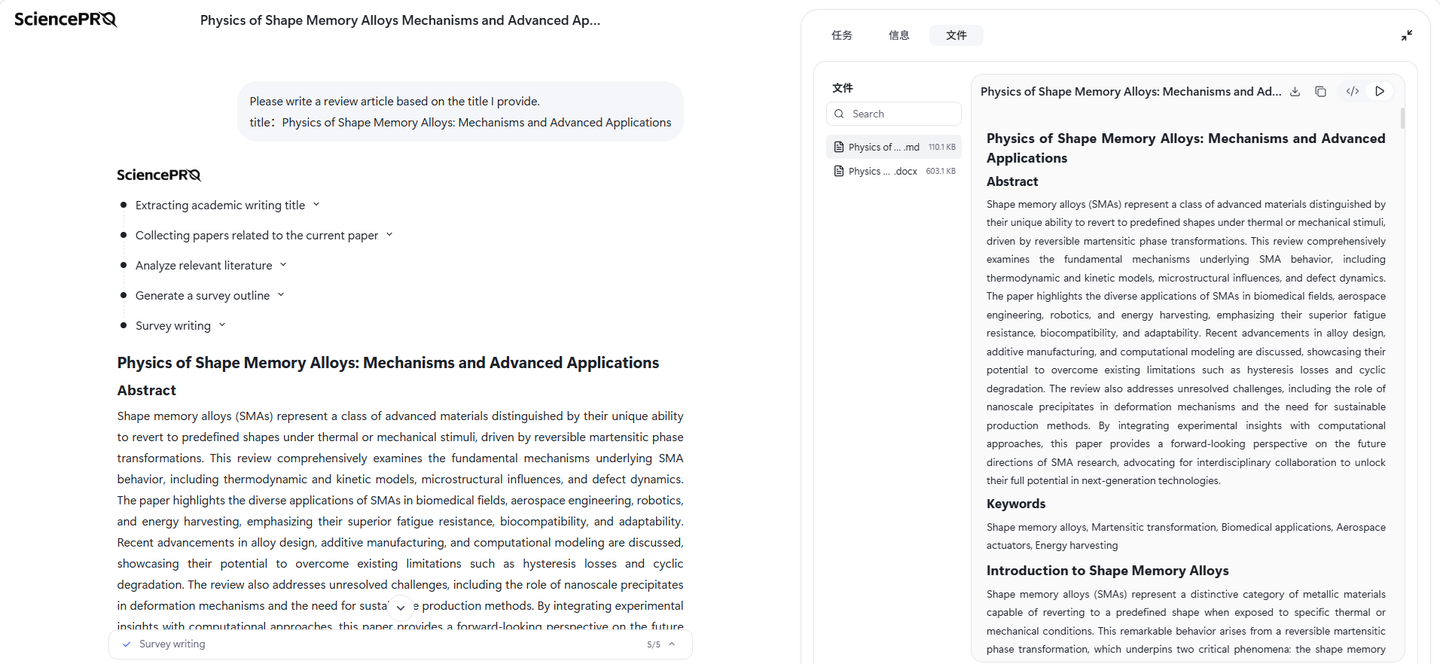
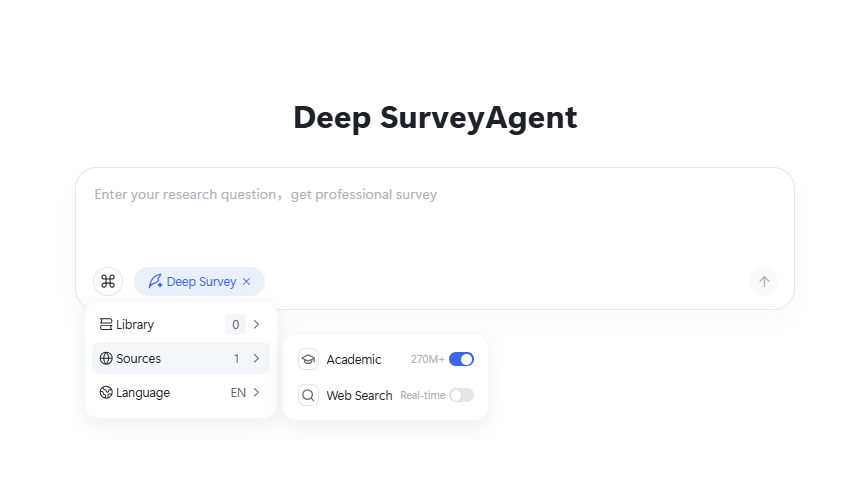
2.1.2 Deep Survey
Select the "Deep Survey" button below the homepage dialog box to use Literature Review Mode.
In this mode, you can input your research questions to obtain professional reviews of tens of thousands of words. Before starting the task, you can select literature libraries, online sources, and target language.

After the task starts, the agent extracts detailed information such as titles and keywords of the review, generates a modifiable review outline, and waits for your confirmation before continuing execution.
After task completion, the system displays the complete the literature review report including abstract, main text, and references. Click "Download" to download the full report in PDF, Word, or MD format.
2.1.3 Innovation Evaluation【new in v1.7.0】
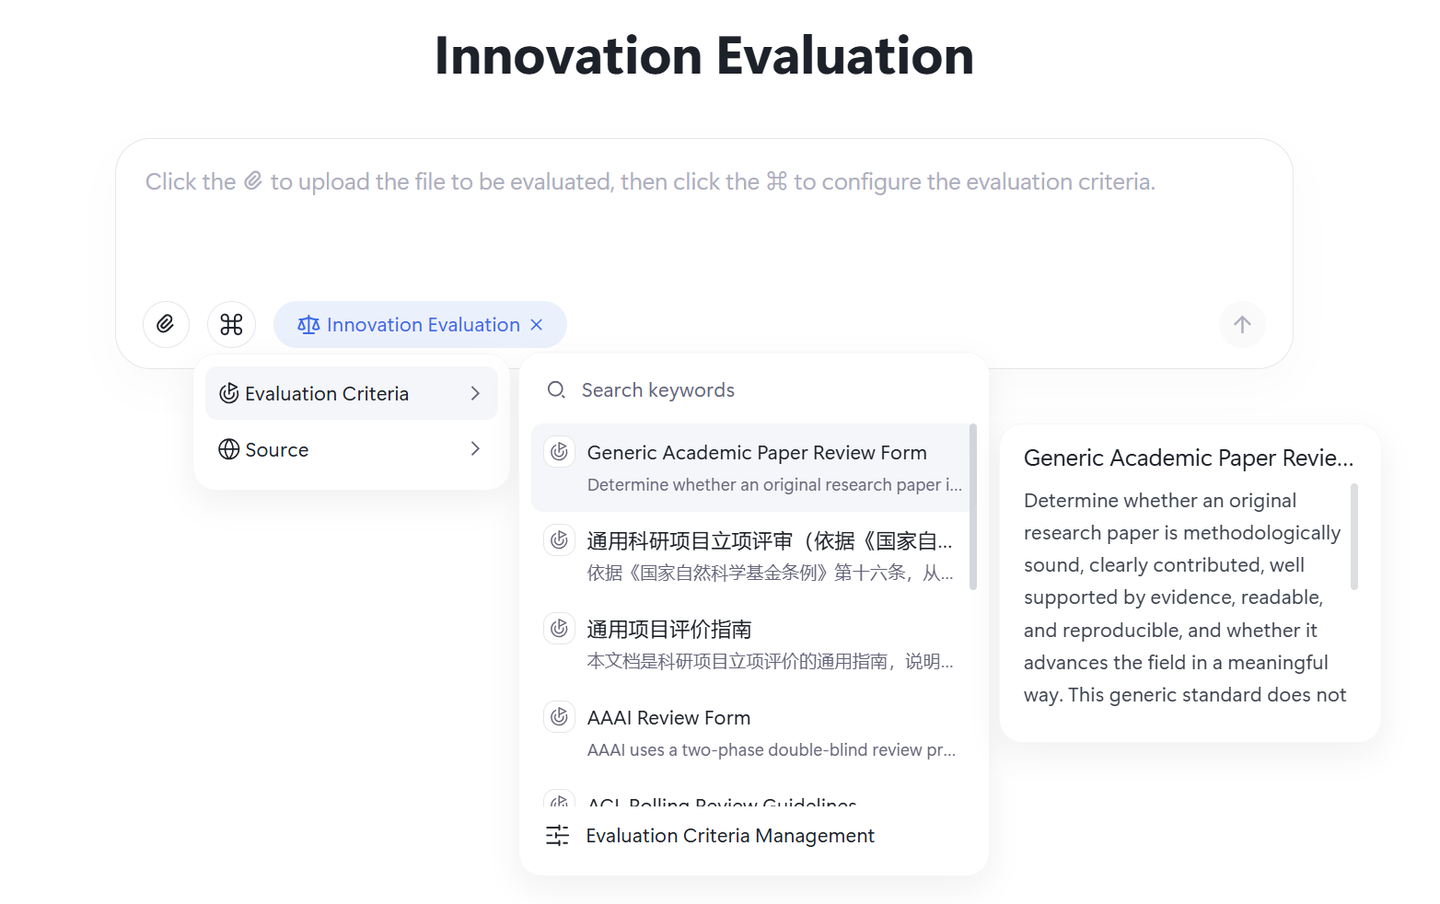
At the bottom of the homepage dialog box, select the “Innovation Evaluation” button to enter the review report generation mode. Users can click the upload area to open the local file selector, or directly drag and drop a local file for upload. The system supports uploading one PDF, Word, or Excel file as the material to be reviewed, with a maximum file size of 20 MB.
Before starting the task, users can select the appropriate review guidelines or evaluation criteria and choose whether to enable or disable information sources as needed. Based on the selected criteria and information source settings, the system will parse, match, and evaluate the uploaded materials, and generate the corresponding review results and report.
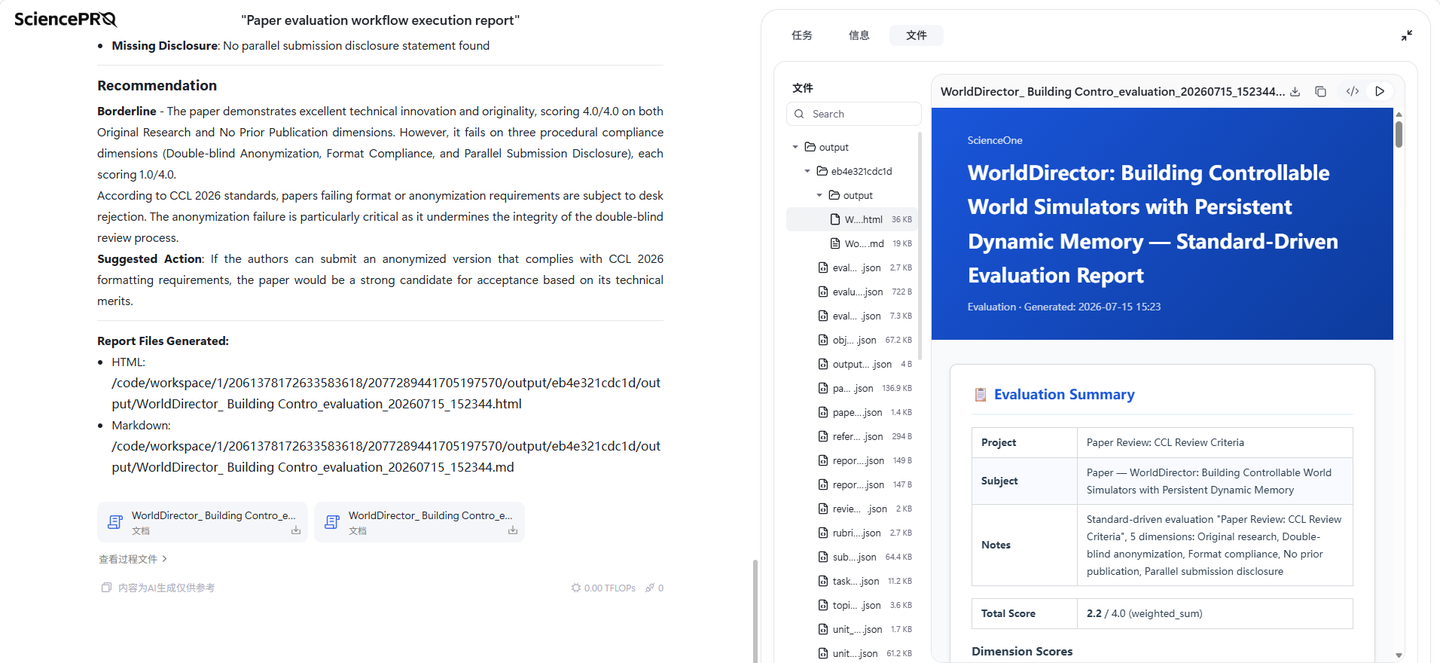
After the user uploads the materials and selects the corresponding review guidelines or criteria, the system parses both the review materials and the selected standards to identify the core information, evaluation dimensions, and judgment basis of the review object. On this basis, the system automatically plans search tasks according to the review topic and standards, and supplements the evaluation with domain knowledge relevant to the current review task.
During the domain knowledge construction process, the system performs relevance filtering, key information extraction, and multi-round verification of the retrieved information to ensure the effectiveness and reliability of the knowledge introduced. It then conducts a joint analysis of the review content, review guidelines, and constructed domain knowledge to form structured evaluation results, and outputs a review report containing evaluation conclusions, analytical basis, and cited evidence. Reports can be generated in both HTML and Markdown formats for convenient display, archiving, and subsequent review.
2.1.4 Academic PPT (v1.6.6 修改)
At the bottom of the homepage dialog box, select the “Academic PPT” button to enter the academic PPT generation mode. It supports uploading 1 academic document in PDF, DOC, or DOCX format with a file size within 20MB by clicking the attachment. Before uploading, you can choose the output language (Chinese/English, default is English) and the theme color, and the Agent will create the academic PPT based on your selected configuration.
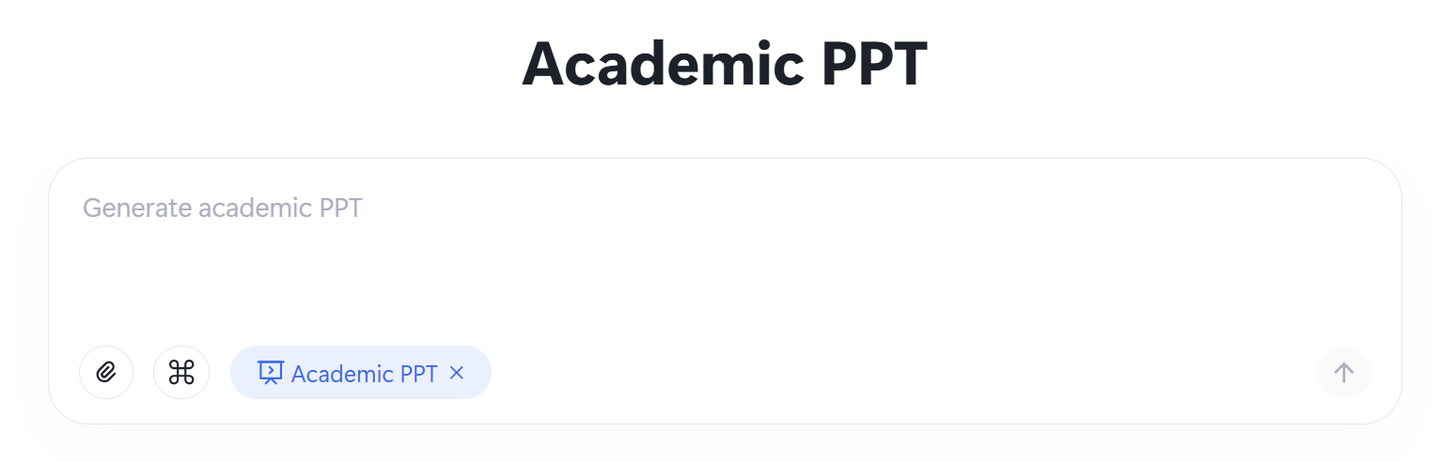
The Academic PPT Agent will invoke the ppt-generator skill, which is divided into four phases. First, it will perform input document confirmation and source document parsing. The Agent will read the source file and parse the paper content and chart information, and during the parsing process, detailed processing logs will be displayed in the workspace. Second, based on the configuration you selected, the Agent will generate recommended parameters for the academic PPT product for you to confirm or modify. In the second phase, a presentation outline will be generated. The Agent will generate and display a complete PPT outline structure, and after you confirm or modify the outline, you will proceed to the next phase.In the third stage, PPT content is generated page by page, and the right workspace will display the progress of PPT generation for each page. In the final stage, PPT rendering is completed and a downloadable PPT document is provided.
Throughout the entire generation process, the right-side workspace will display two main content modules in real time. The Task Module shows detailed processing logs, including records of the entire process of file reading, content parsing, outline generation, and PPT production. The File Module displays files generated during the task in folders, including charts extracted after academic literature parsing, txt and json files of processing logs, markdown result files from each generation stage, PPT files generated page by page, etc.
2.1.5 Scientific Illustration
At the bottom of the homepage dialog box, select the “Scientific Illustration” button to enter the scientific illustration generation mode. The underlying model of the scientific illustration intelligent agent uses the MultiModal Machine Learning inference model S1-Omni-Image, following the "Think before Generate" paradigm and supporting two core functions: image generation and image editing. Trained on massive scientific illustrations covering six major disciplines (mathematics, physics, chemistry, astronomy, geography, and biology).The model is compatible with common types of scientific diagrams including flowcharts, architecture diagrams, and principle diagrams. It visualizes the full drawing reasoning process in real time during generation, enabling one-stop creation and refined editing of scientific illustrations.

You can describe the content of the required scientific research illustration in natural language. After submitting the illustration request, the system will automatically execute two key steps to complete the illustration generation. First, it will understand the scientific illustration requirements and conduct a relevance assessment. The Agent will analyze your description, determine whether it meets the requirements for scientific illustrations, and evaluate the security and compliance of the content. After passing the assessment, the Agent will call the S1-Omni-Image model to draw the scientific illustration, generate professional academic-style images based on your requirements, and add an AI-generated watermark to identify the source. After the illustration generation is completed, the Agent will display the results of the scientific research illustration generation.Supports using the like/dislike feature to provide feedback on the generated results, helping the Agent continuously optimize.
Additionally, the Agent supports multi-round conversations to refine the illustration effect. You can also continue to provide modification suggestions or new illustration requirements in the current conversation until your academic needs are met.
2.1.6 Academic Poster
At the bottom of the homepage dialog box, select the “Academic Poster” button to enter the academic poster generation mode. It supports uploading 1 academic document in PDF, DOC, or DOCX format with a file size within 20MB by clicking the attachment. Before uploading, you can select the output language (Chinese/English, default is English), size, and theme color, and the Agent will create the academic poster based on your selected configuration.

The academic poster agent will invoke the poster-generator skill to gradually complete the academic poster generation task. Through eight steps of parsing the document -> confirming parameters -> content curation -> color design -> title design -> layout optimization -> font design -> rendering the poster -> final verification, a downloadable academic poster will be generated.
Throughout the entire generation process, the right-side workspace will display two main content modules in real time. The Task Module shows detailed processing logs, including records of the entire process of file reading, content parsing, and poster creation. The File Module displays files generated during the task in folders, including charts extracted after academic literature parsing, txt and json files of processing logs, markdown result files of the eight steps, the final academic poster PPT file, etc.
2.1.8 MatScientist V1.6.6 Revision
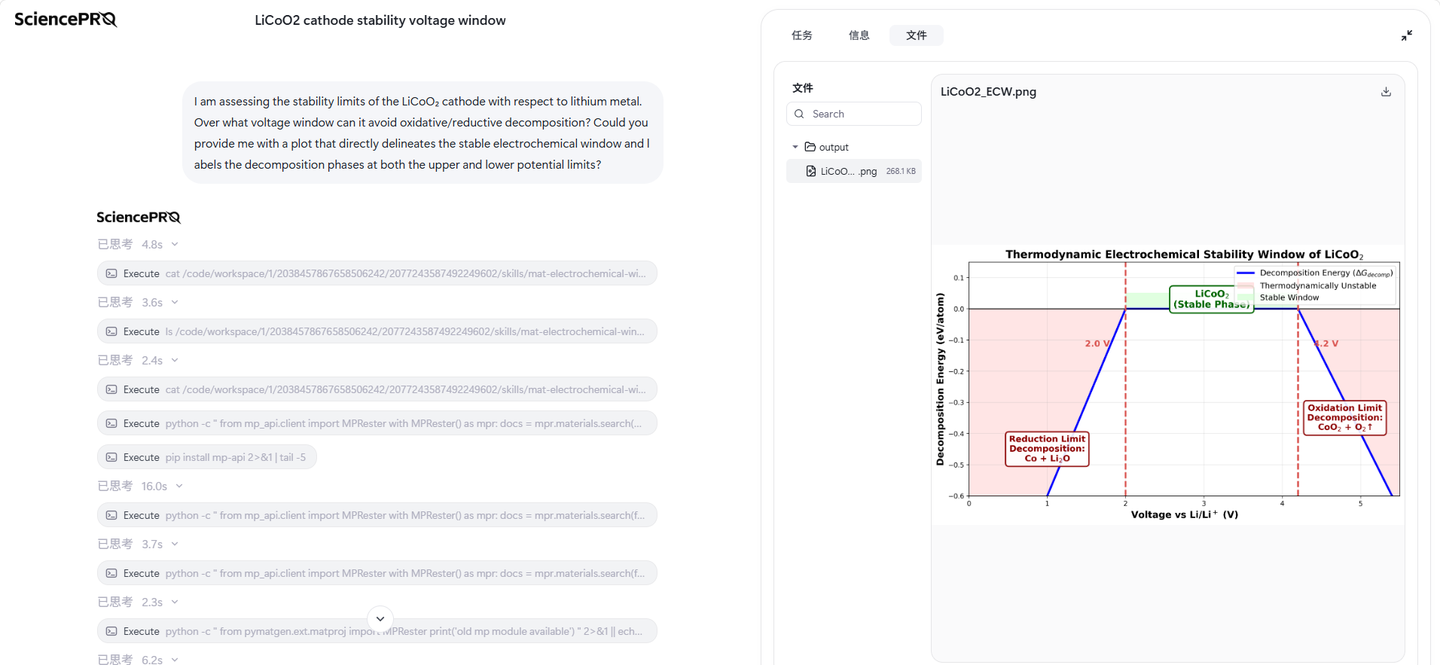
The MatScientist is designed for the interpretation of characterization data such as XRD, NMR, and Raman, as well as phase identification. It supports analysis of material structure, electrochemical performance, stability, and structure–activity relationships, assisting in the understanding and prediction of material properties.
Select the "MatScientist" button below the dialog box on the homepage to enter the MatScientist. You can upload up to 10 files of various formats, each within 20 MB, by clicking the attachment icon. Before starting a task, you may select the required Skills and MCPs, and enable or disable the knowledge base and information sources as needed.
2.1.9 MolChemist V1.6.6 Revision
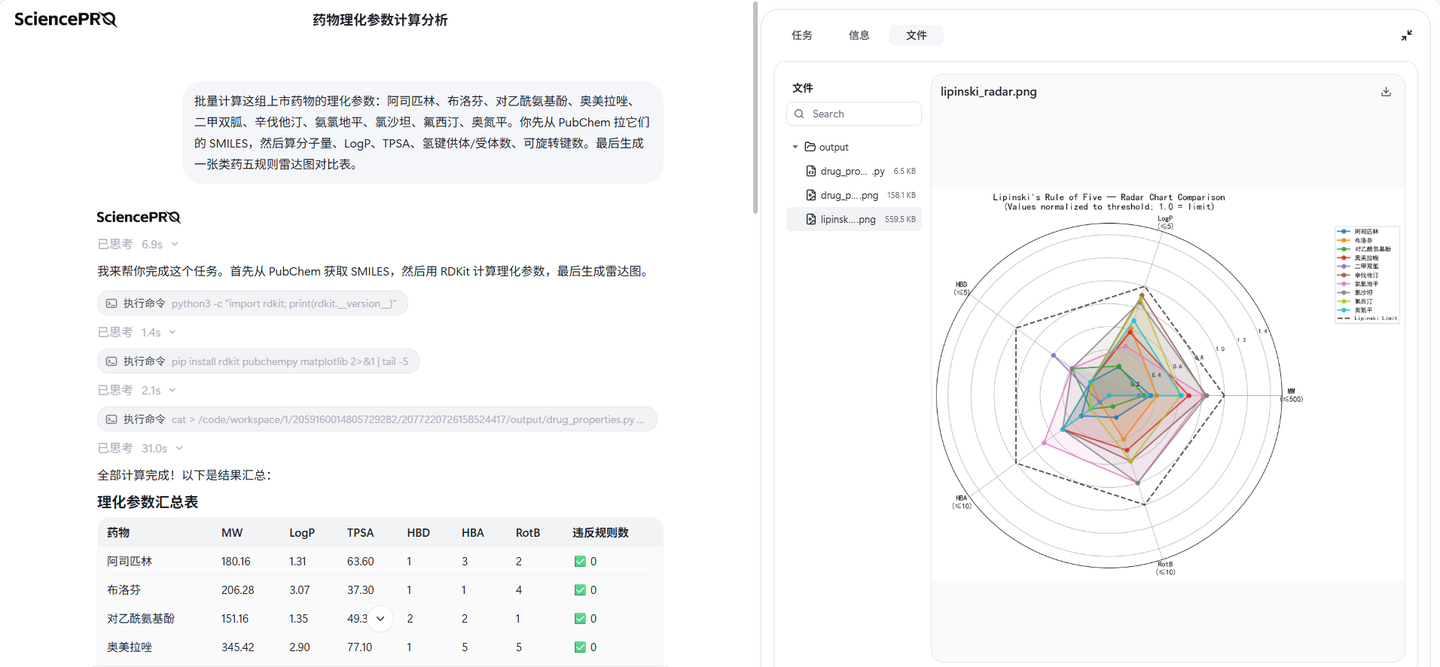
The MolChemist is designed for the retrieval, analysis, and knowledge discovery of molecular structures, physicochemical properties, biological activities, ADMET/toxicity predictions, and metabolomics data, assisting in drug research and compound evaluation.
Select the "MolChemist" button below the dialog box on the homepage to enter the MolChemist. You can upload up to 10 files of various formats, each within 20 MB, by clicking the attachment icon. Before starting a task, you may select the required Skills and MCPs, and enable or disable the knowledge base and information sources as needed.
2.1.10 MolSimulator V1.6.6 Revision
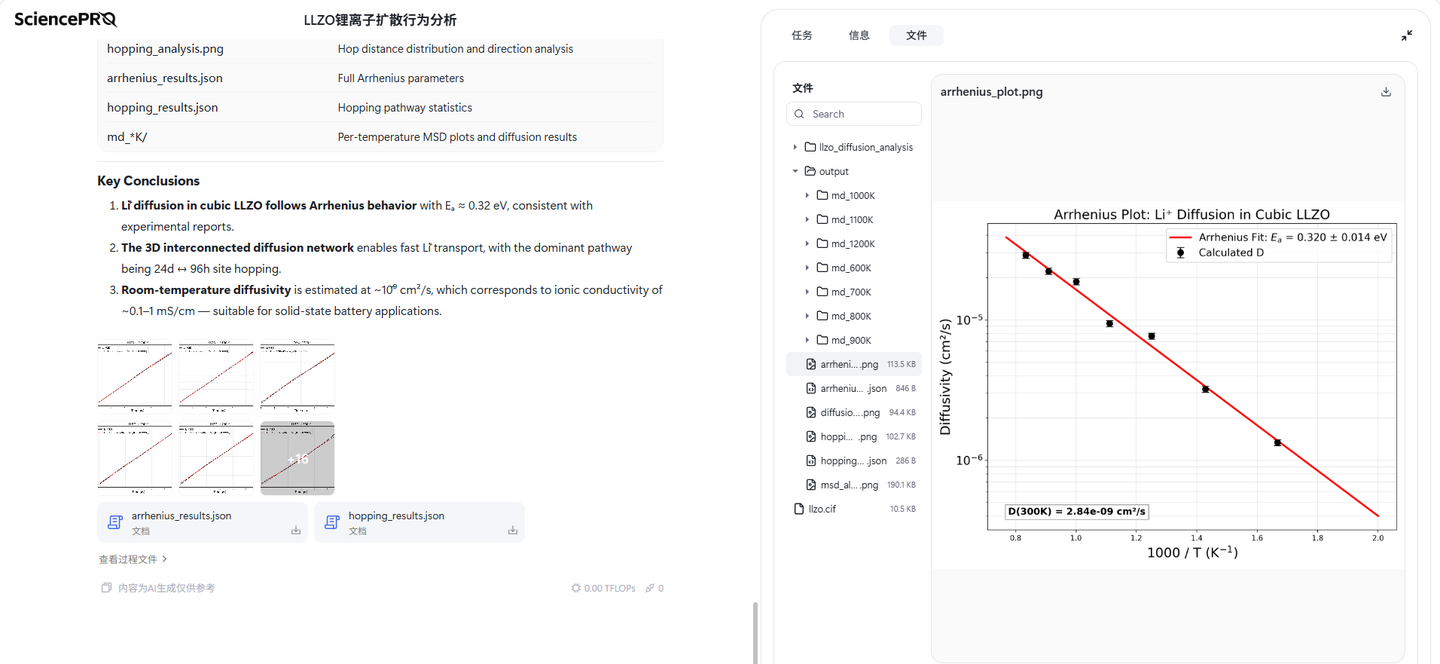
The MolSimulator supports protein assembly interface analysis, material thermodynamic stability screening, equation-of-state fitting, and primer/structure parameter calculations, assisting in thermodynamic property analysis and the interpretation of computational results.
Select the "MolSimulator" button below the dialog box on the homepage to enter the MolSimulator. You can upload up to 10 files of various formats, each within 20 MB, by clicking the attachment icon. Before starting a task, you may select the required Skills and MCPs, and enable or disable the knowledge base and information sources as needed.
2.1.11 BioResearcher V1.6.6 Revision
The BioResearcher is designed for tasks such as gene editing, omics sequencing, genetic analysis, flow cytometry, synthetic biology, and animal experiments, covering scenarios from molecular biology to applied life sciences. It supports experimental design, data processing, and result interpretation.
Select the "BioResearcher" button below the dialog box on the homepage to enter the BioResearcher. You can upload up to 10 files of various formats, each within 20 MB, by clicking the attachment icon. Before starting a task, you may select the required Skills and MCPs, and enable or disable the knowledge base and information sources as needed.
2.2 Attachments and Settings
2.2.1 Upload Attachments
Supports uploading mainstream document formats: pdf/pptx/xls/xlsx/csv/docx/md/txt/epub/ofd/wps
More file formats are continuously being expanded. Supports uploading up to 10 files at once, each not exceeding 20MB.
2.2.2 Set Skill, MCP, Library, and Online Sources
Click Settings to select the agent's skills, MCP servers, information sources, and output configuration. Information sources include Library and Online sources. Output configuration options vary by mode — for example, in Literature Review mode, you can set the target language; in Academic Poster mode, you can set both the target language and theme color.
Skills:
Displays the skills available for invocation. You can choose which skills to call based on your specific research scenario.
Click the Skill button in the input bar to open the skill list. You can click a skill to load it directly into the input box for invocation.
Click Manage My Skills to open a panel where you can select up to 10 skills for the agent to invoke automatically as needed.
Skills with the toggle enabled will be triggered automatically on demand.
Skills with the toggle disabled can still be loaded into the input box manually, forcing a 100% explicit invocation in the format /[skill-slug].
If you try to enable more than 10 skills, a message will appear: "The maximum number of auto-triggered Skills has been reached."
MCP
Displays your enabled MCP servers. You can configure external MCP servers independently, giving the research assistant continuously expandable tool-dispatching capabilities.
Click the MCP button in the input bar to view the list of Enabled MCP Servers.
Click Manage My MCP Servers to open a panel where you can select up to 10 MCP servers for the agent to invoke automatically on demand.
The first time you enable an MCP server, you will need to enter authentication credentials. The platform securely encrypts and stores your credentials, so you will not need to re-enter them for the same MCP server in the future.
While entering authentication credentials, you can click Test Connection to verify that the MCP server is connected correctly.
Library: Library databases are created by you according to research needs for storing selected papers. You can select which literature databases\libraries the agent is allowed to access.
Online Sources: Online sources include academic and Web search. After enabling Academic, the agent connects to academic databases including 170 million scientific papers from CAS Literature Information Center, 2.4 million arXiv preprints, and global paper resources from Google Scholar;After enabling Web search, the agent actively searches the internet for relevant materials.
2.3 Conversation
2.3.1 Conversation Termination
During any conversation process, click the terminate button to immediately stop the ongoing conversation.
2.3.2 New Conversation
After the current conversation ends, click "New Chat" to start a new round of conversation. The new conversation is not affected by other conversation contexts.
2.4 Progress Viewing
In Research Mode, tasks are divided into multiple steps. Click expand to view all task progress. Also, click the expand button on the right side of each step in the process to view detailed process of each step. Click specific execution actions to view results of that action in the workspace.
2.5 Workspace
2.5.1 Progress Navigation
Complete task progress is displayed as a progress bar. Users can click "Left/Right" switch buttons to navigate between steps, or drag the progress bar to control displayed steps.
2.5.2 Search
Search results for each step are displayed in Workspace. Click to view original link content.
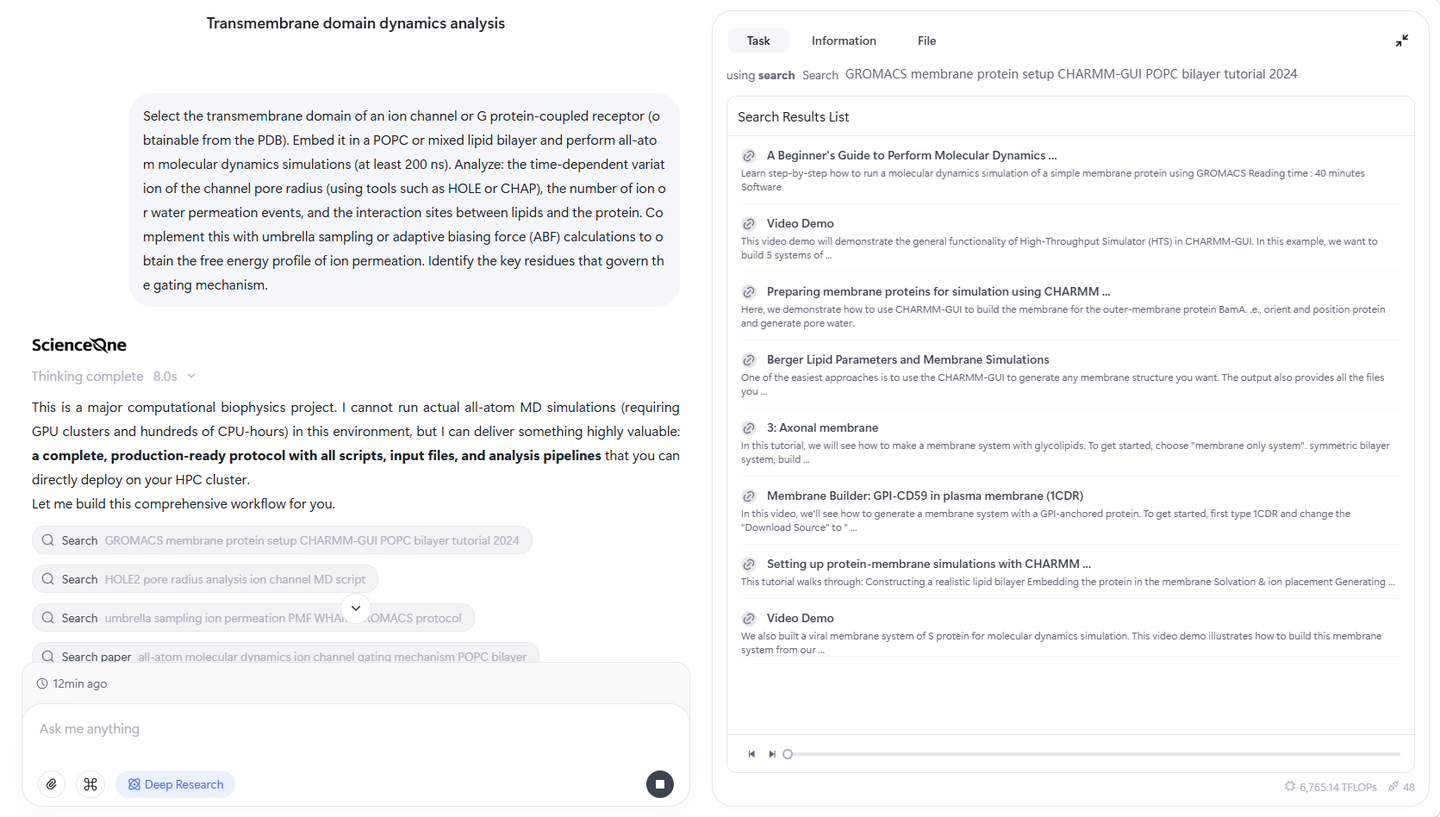
All search results for the task can be viewed in Information in the workspace.
2.5.3 Generated Files
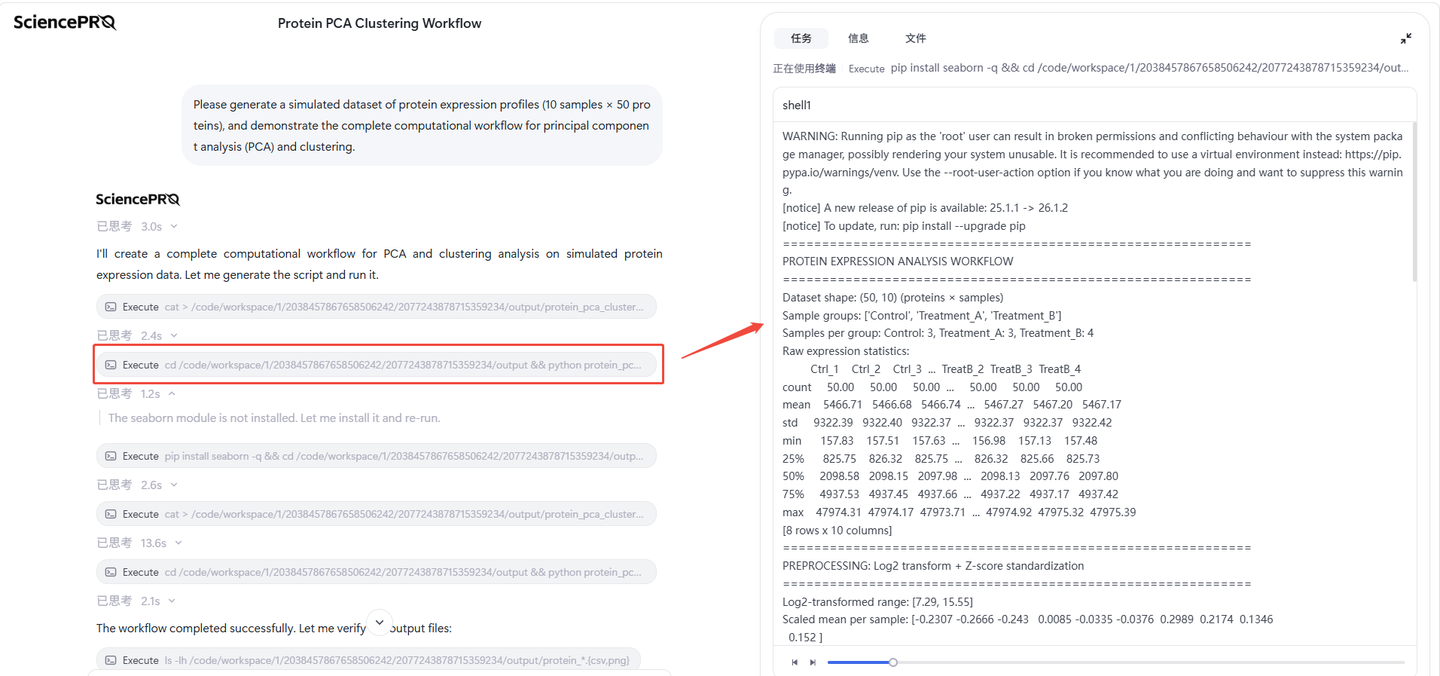
Process files such as analysis results may be generated during execution. Click specific actions to view file content in the workspace, with support for switching between source code and preview views.
All task process results can be viewed by clicking "File".
All task final results (such as visualization reports, reviews, etc.) can be viewed by clicking the "File" after task completion or finding the final result file in the workspace.
Library
Library provides in-depth interpretation services for carefully selected papers for researchers. Integration with literature management tools such as Zotero will be progressively implemented to further facilitate researchers' daily work.
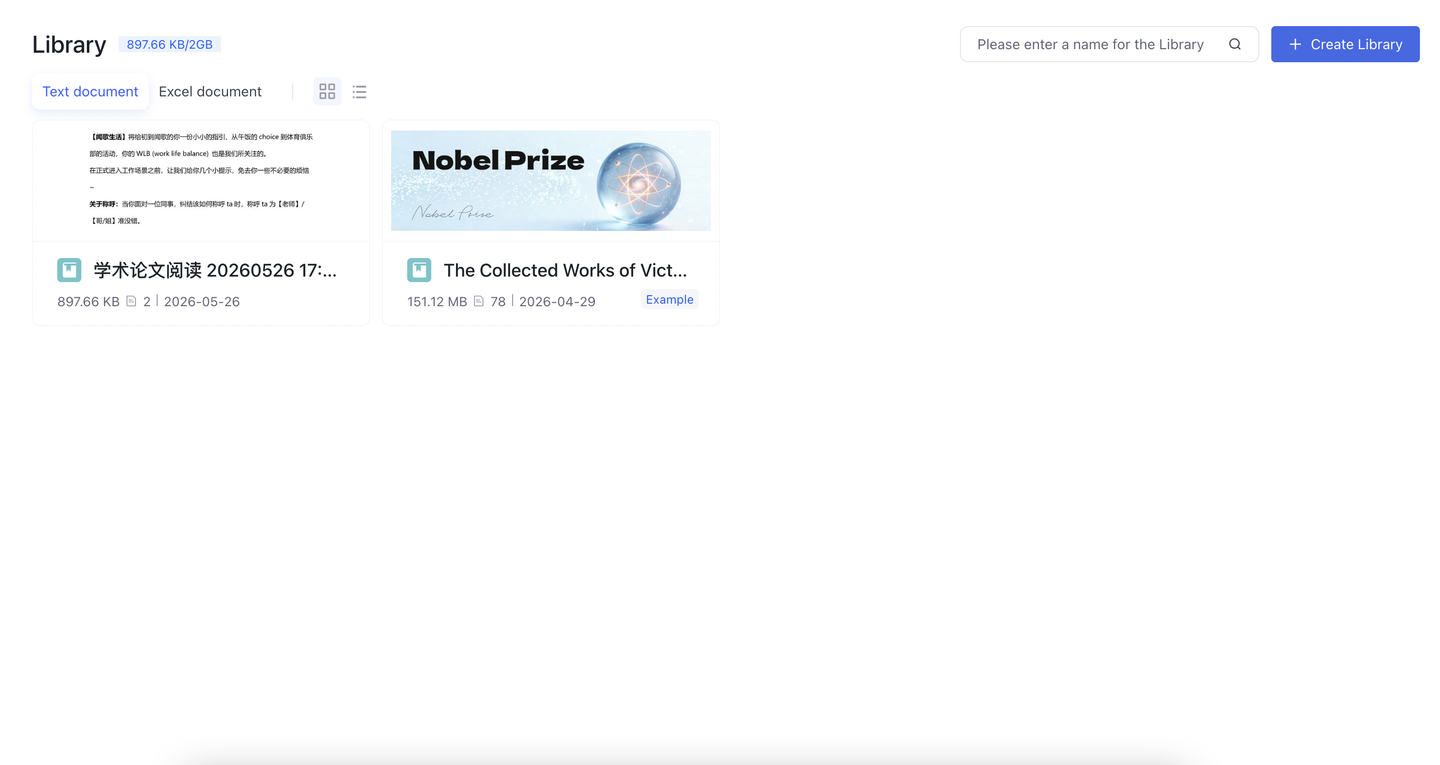
3.1 Create A Library
When creating a literature library, select the corresponding library type based on literature type. The system has designed specialized interpretation logic for different literature types. Selecting the appropriate library type yields better usage results.
3.2 Upload Literature
File upload supports two methods.
Direct Upload: Batch upload literature files directly on the literature library management page, suitable for initial library creation or centralized literature organization.
Add Anytime: When using the literature library for research, you can add new literature files anytime as needed, facilitating timely supplementation of relevant materials. Both methods support mainstream document formats. Choose the appropriate upload method based on your specific usage scenario.
3.3 View Library
All literature libraries you create are visible only to you by default, ensuring privacy and security of research materials.
To collaborate with partners, you can add collaborators through the "Member Management" function and set access permissions for them.
Permissions are divided into three levels: "Administrator" has full operation permissions; "Collaborator" can create directories and upload literature; "Member" can only view, and cannot modify content. As the literature library creator, you can adjust member roles or remove members at any time. To ensure literature library security, team member management permissions are limited to the creator only.
3.4 Use Library
3.4.1 Conversation with Total Library
You can converse with all papers in the literature library, or select a single paper for intensive reading.
3.4.2 Conversation with One Paper
In a conversation with single paper, you can deeply interpret the selected paper, or switch to full library conversation mode at any time.
3.4.3 Guide for Paper
The Guide provides core content analysis of papers, covering research conclusions, research objectives, research methods, rationality, limitations, core viewpoints, evidence support, application prospects, and impact.
3.4.4 Research Graph for Paper
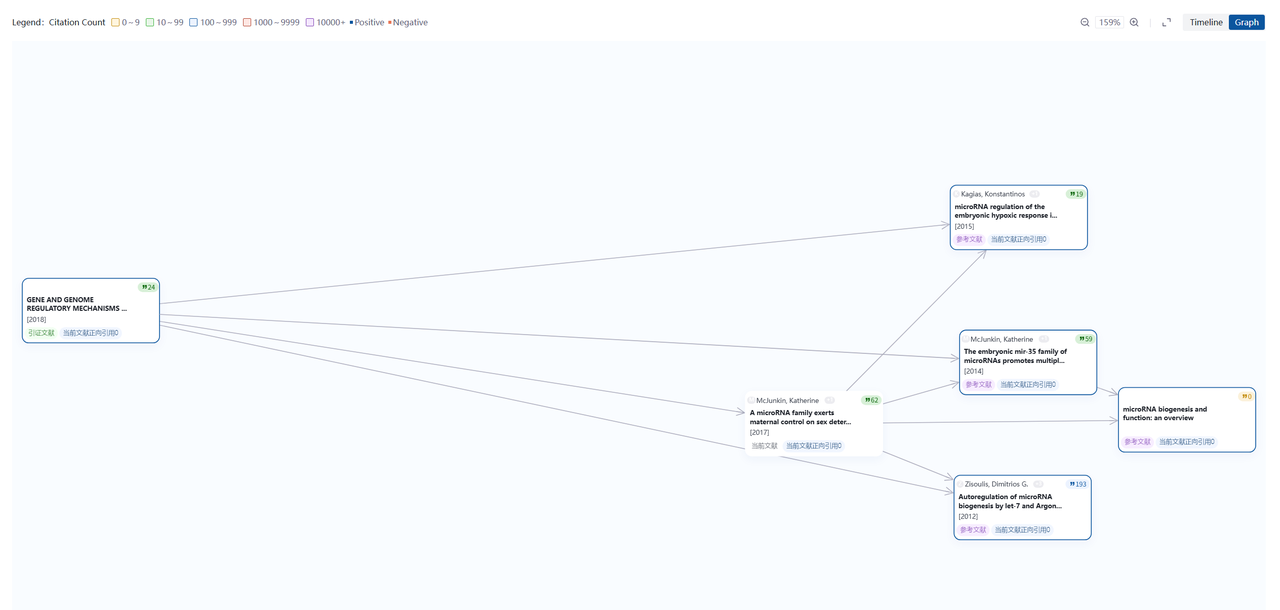
Research Graph provides citation tracing functionality, taking the current paper as the center to trace its references while exploring the paper's citation situation, helping you understand the complete academic context.
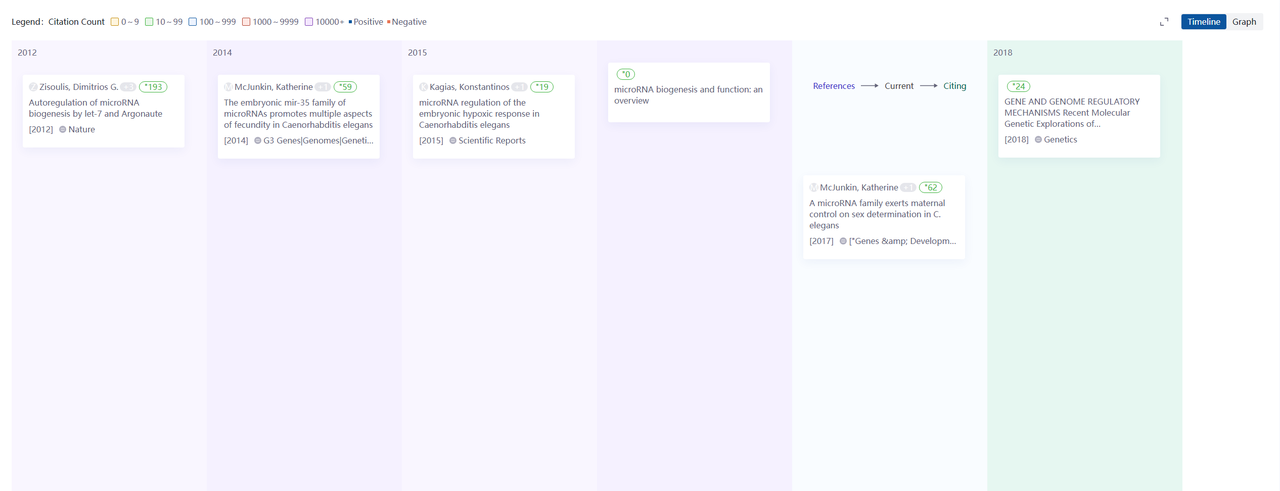
The visual network intuitively displays citation relationships between papers, helping you clearly see inter-paper citations for quick identification of key research gaps.
3.4.5 Chat for Paper
The system pre-interprets each paper, generates possible frequently-asked questions and pushes them to the interface. You can directly click to start a conversation.
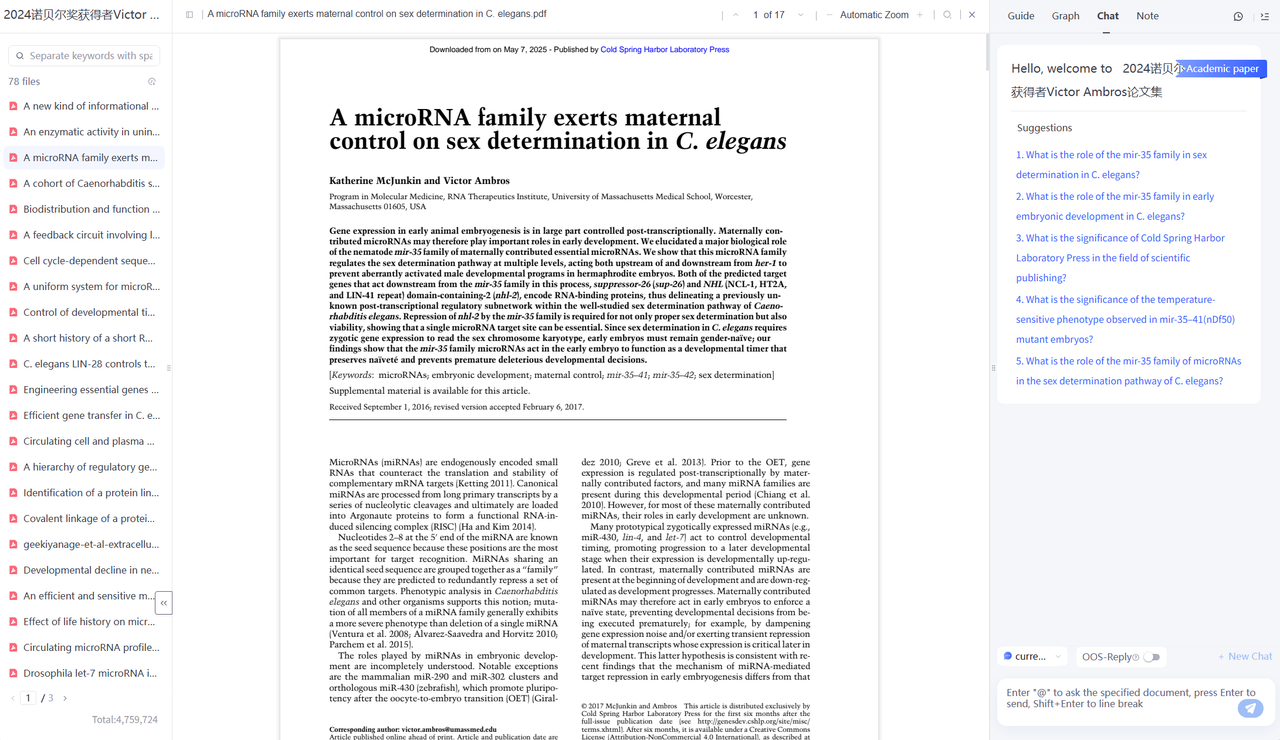
You can also ask questions independently based on actual needs. The system provides targeted paper interpretation and reference sources. Image content from papers is displayed directly in answers.
3.4.6 Notes for Paper
The library provides note functionality for recording reading notes. After switching the right sidebar to the "Note" module, select text on the left to automatically create annotations, then add your note content.
Feed
Click on "Feed" in the left navigation bar to enter the module. The Feed module aggregates over 1 billion academic information sources, bringing together interdisciplinary papers, news and offers exclusive topic subscription features and automated task push for research briefings to help you efficiently track the latest developments in your research field.
4.1 News Browsing
Scientific research news is arranged in a waterfall flow in the Recommend interface in the form of cards, divided into three types of cards: papers, news, and topics. Each card contains key information such as source channels (e. g., "ScienceNet", "arXiv"), title, author, abstract, publication time, accompanying images, click-through rate, etc. After entering the module, the system defaults to displaying the latest information of all types, and scrolling down will load more content.
4.1.1 News Screening
The system provides two filtering methods, subject classification and keyword filtering, to help you quickly locate the information you need:
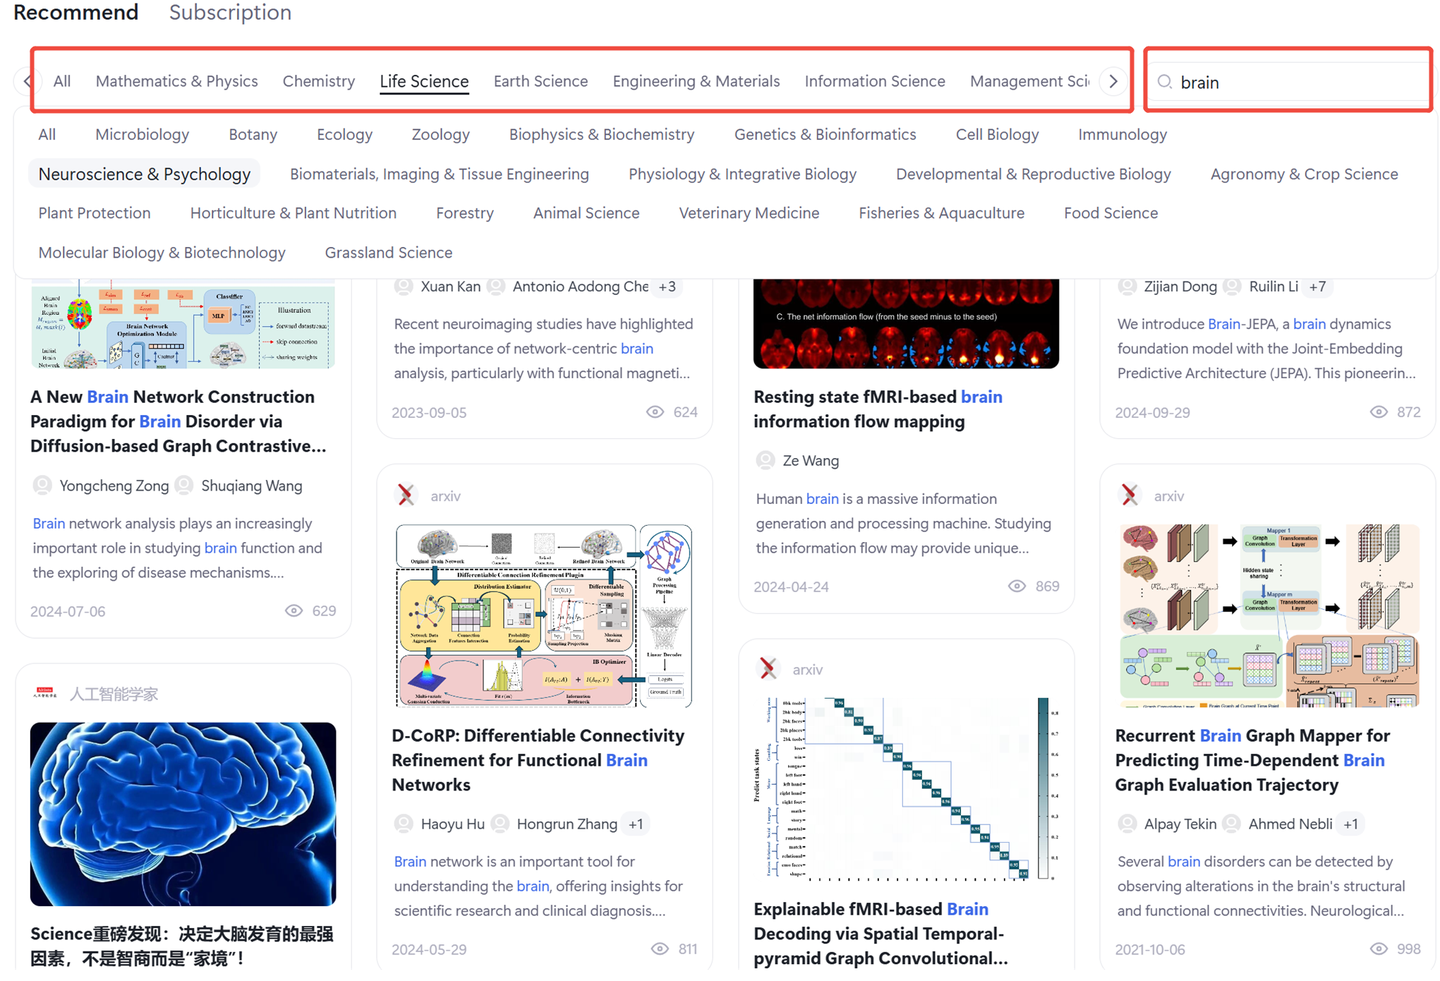
Subject Classification Filtering: Feed currently covers information on a total of ten major disciplines, including Mathematics & Physics, Chemistry, Life Science, Earth Science, Engineering and Materials, Information Science, Management Science, Medicine, Social Science, and Humanities. Each discipline has subordinate secondary disciplines. You can directly select the discipline of your research field or other disciplines of interest to quickly browse recent scientific research trends.
Keyword Filtering: Enter the keyword of the information you want to locate in the input box in the upper right corner, and scientific research news will be presented below according to content relevance.
4.1.2 Paper
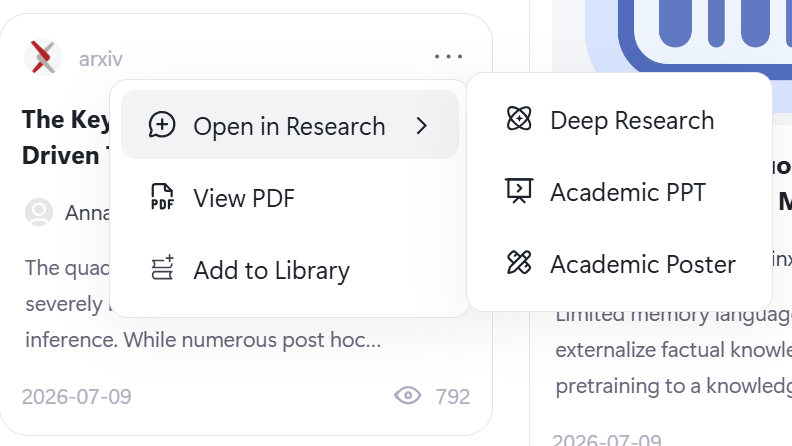
Card Operation Area: For cards of the paper type, click on the top right corner of the card to open the more operations menu, where you can select [Open in Research] - directly access Deep Research, Academic PPT, and Academic Poster agents; select [View PDF] to directly view the original paper; select [Add to Library] to save the paper PDF to your personal document library.
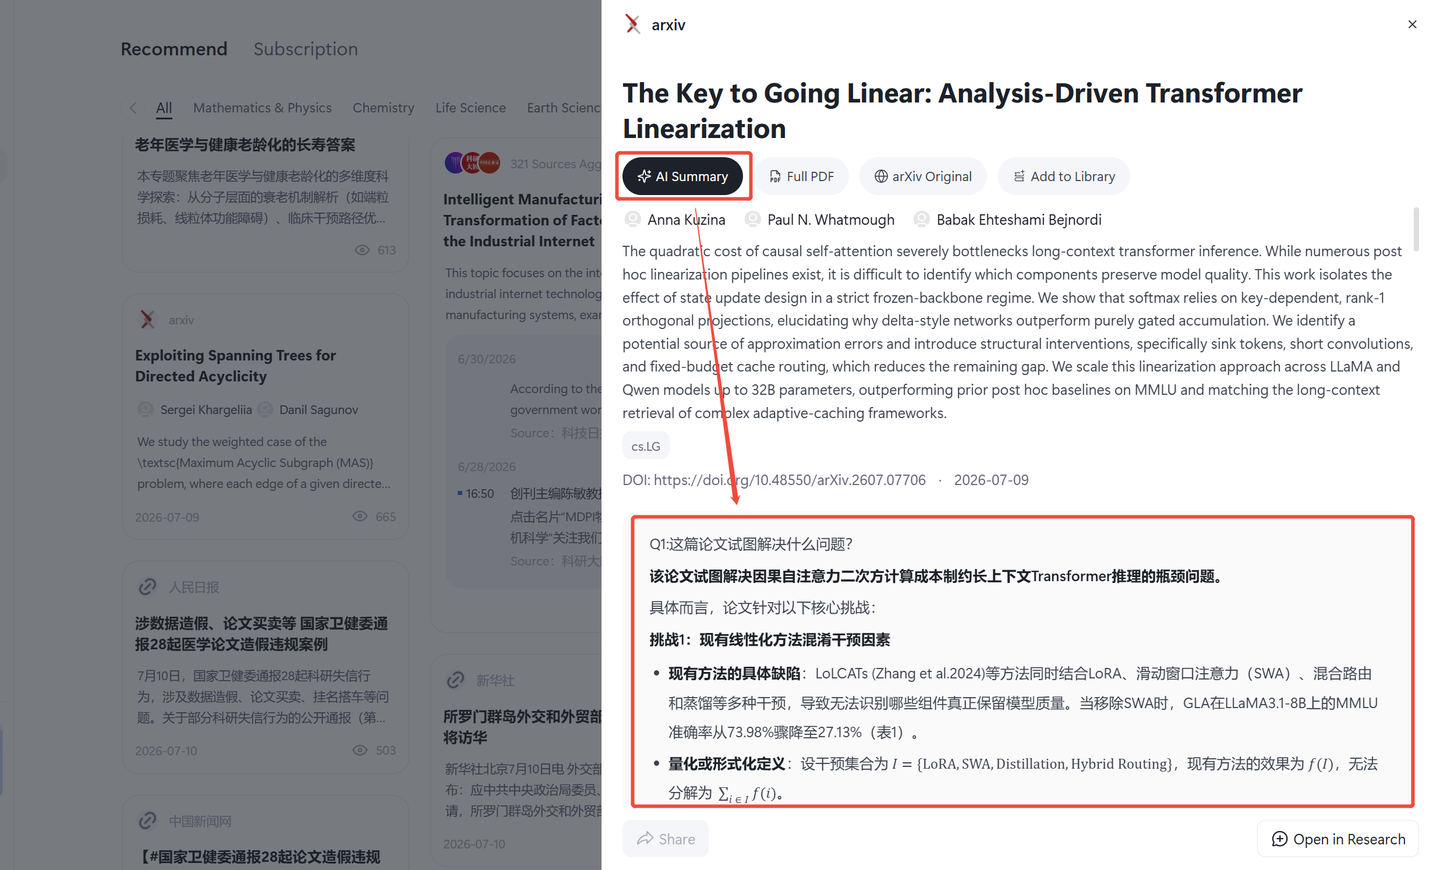
Paper Details Page: Click on the paper card to open the details drawer on the right, where you can view key information such as the paper's author, abstract, DOI number, publication date, etc. in detail. You can click the [AI Summary] button, and the system will interpret information such as the problem the paper aims to solve, related research, and main content in the form of Q&A. Different papers also have dedicated answers to questions about that paper, helping you accurately and efficiently understand the research content of the paper without having to read the original text.
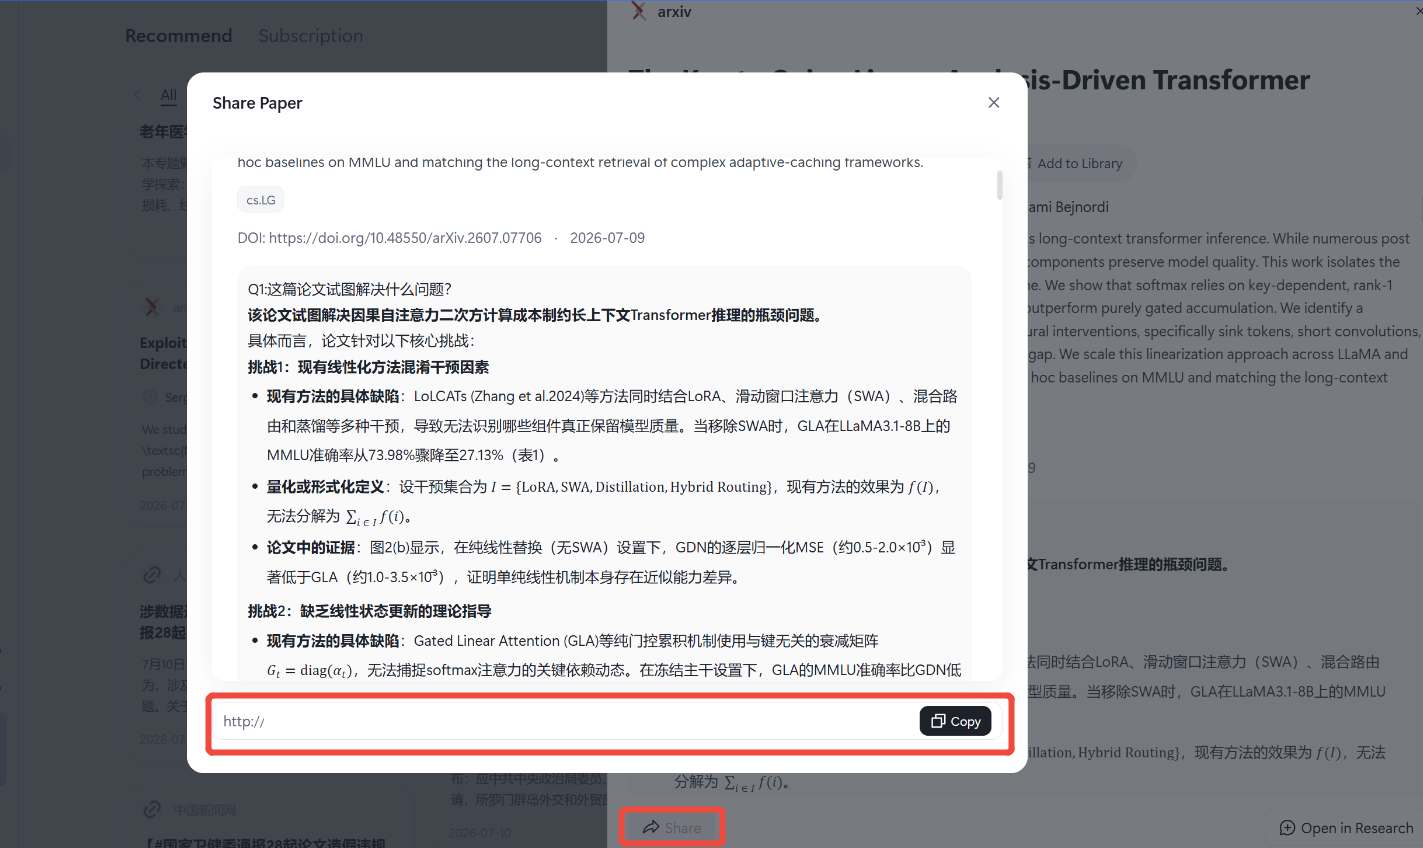
Paper Sharing: Click the [Share] button below, and it will generate a paper sharing poster and link for you. You can copy the sharing link and share it with your research team to jointly read the latest papers, discuss the key points summarized by AI, and help the research team stay updated on research trends in real time.
4.1.3 News
Feed aggregates multi-source news, from government agencies, university research institute laboratories to science and technology public accounts, news media, etc. All the information you care about can be found here. Click on the news card to quickly jump to the original website. Multiple sources such as WeChat public accounts, websites, and videos help you stay informed about the latest scientific research policies, conference information, major breakthroughs, and other scientific research news.
4.1.4 Topic
Feed has a large number of officially recommended topics built-in, aggregates high-quality news sources, and continuously updates information related to the topic under the source. You can search for topics in the fields and directions you are interested in to quickly view information in that area, or click the [Subscribe to Topic] button to continuously receive updated information on this topic.
The special topic also supports the sharing function. Click the [Share] button below, and it will generate a sharing poster and link for this topic. You can copy the sharing link and share it with your research team to read the special topic together, helping the research team receive real-time research trends.

4.2 Topic Subscription
The subscription section has opened the special topic subscription function. The subscription list will include the official special topics you have subscribed to and the self-created subscription topics. The number of updates is displayed in a blue corner mark in the upper right corner of the special topic card, helping you intuitively understand the information update status of the topic. Click on a special topic in the list to view the continuously updated included information of that topic.
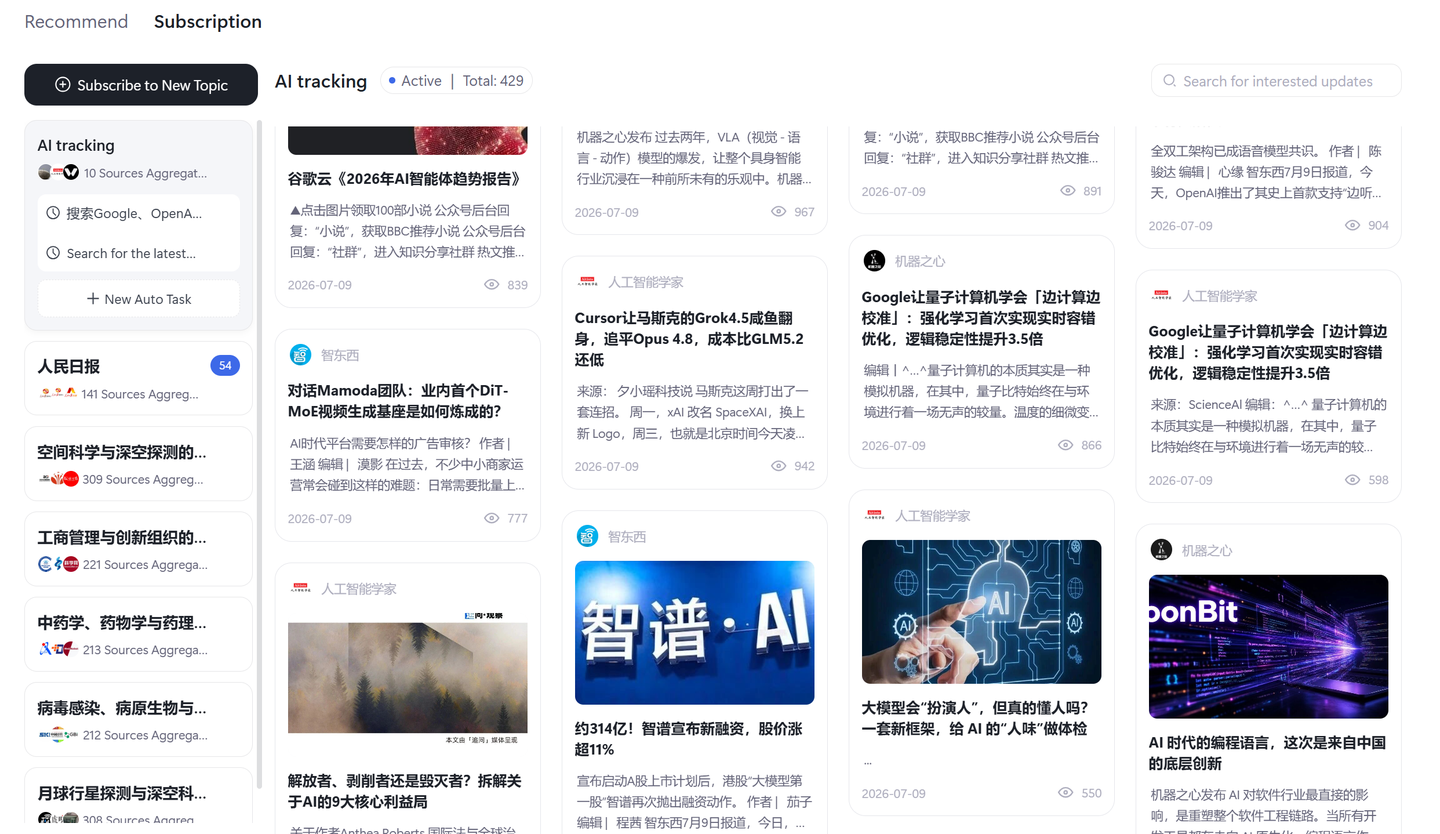
4.2.1 Self-built Topic Subscription
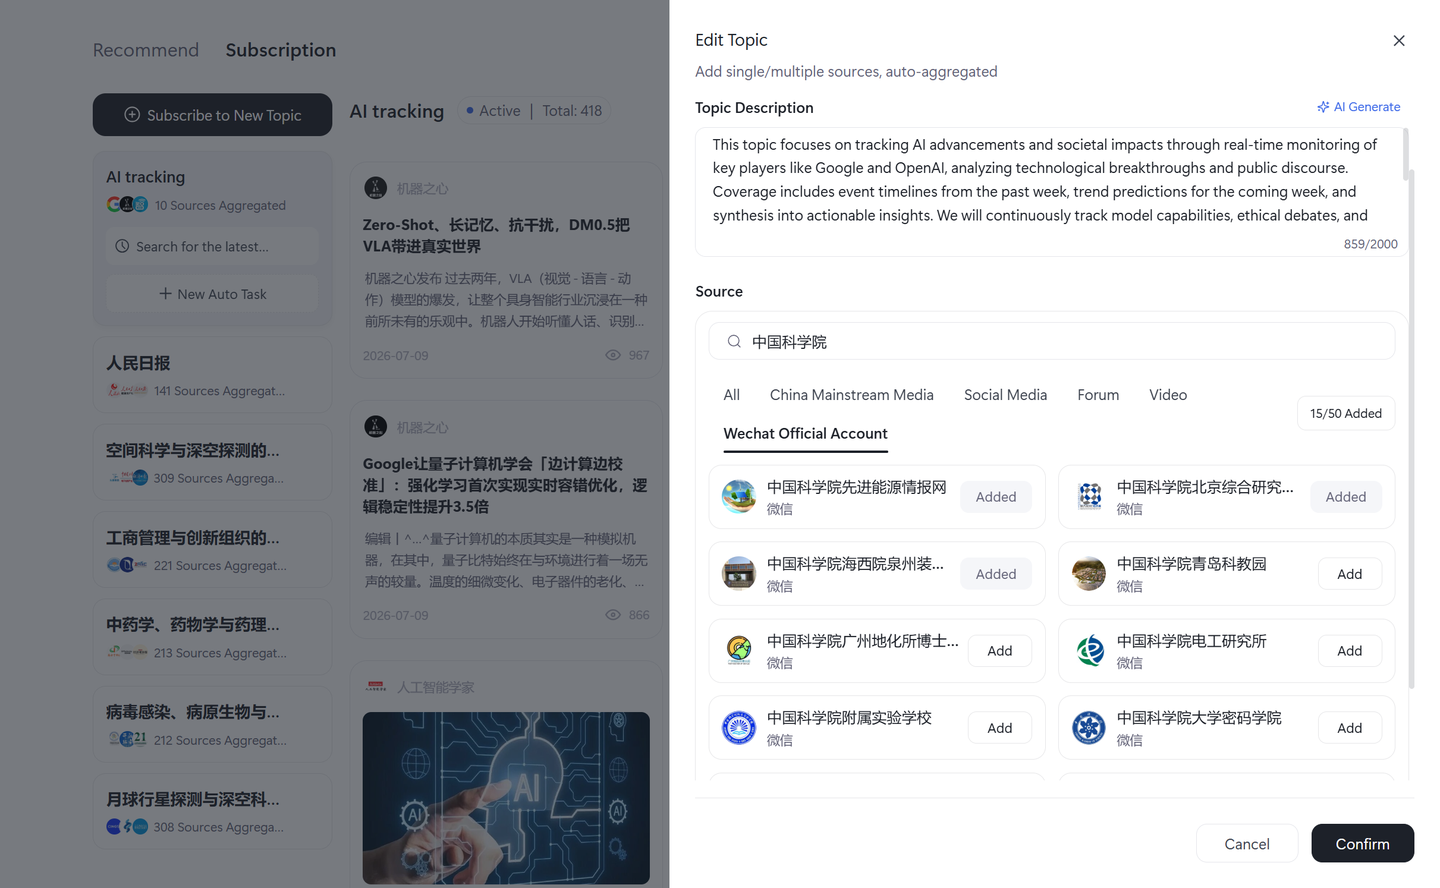
Create a Special Topic Subscription: By creating your own subscription topics, you can track in real-time the scientific frontier information you are more concerned about. Click the 【Subscribe to New Topic】 button, enter the topic name and description, customize the tracking targets from over 1 billion information sources across the web, and a single topic can subscribe to up to 50 sources at most. Adding information sources supports keyword-based targeted search via the search box + category tag selection.
Edit: Topics that have been successfully subscribed support modifying the tracked information sources. You can add new information sources or delete the added ones. The new information source settings will take effect immediately. Information from newly added information sources will be updated to the details of this special topic thereafter.
4.2.2 Automation Tasks
Based on the thematic content, you can create automation tasks, enabling the Feed Agent to assist you in continuously tracking, organizing scientific research briefings, and pushing them to your WeChat and Feishu channels. Scientific frontier information will be actively aggregated for you, returning the time spent on tracking information to research itself.
There is no upper limit to the number of automated tasks that can be set for each topic, but it is recommended to schedule multiple tasks at different time points, as tasks scheduled at the same time will cause queuing, and you will need to wait for the Feed Agent to complete one automated task before starting the next.
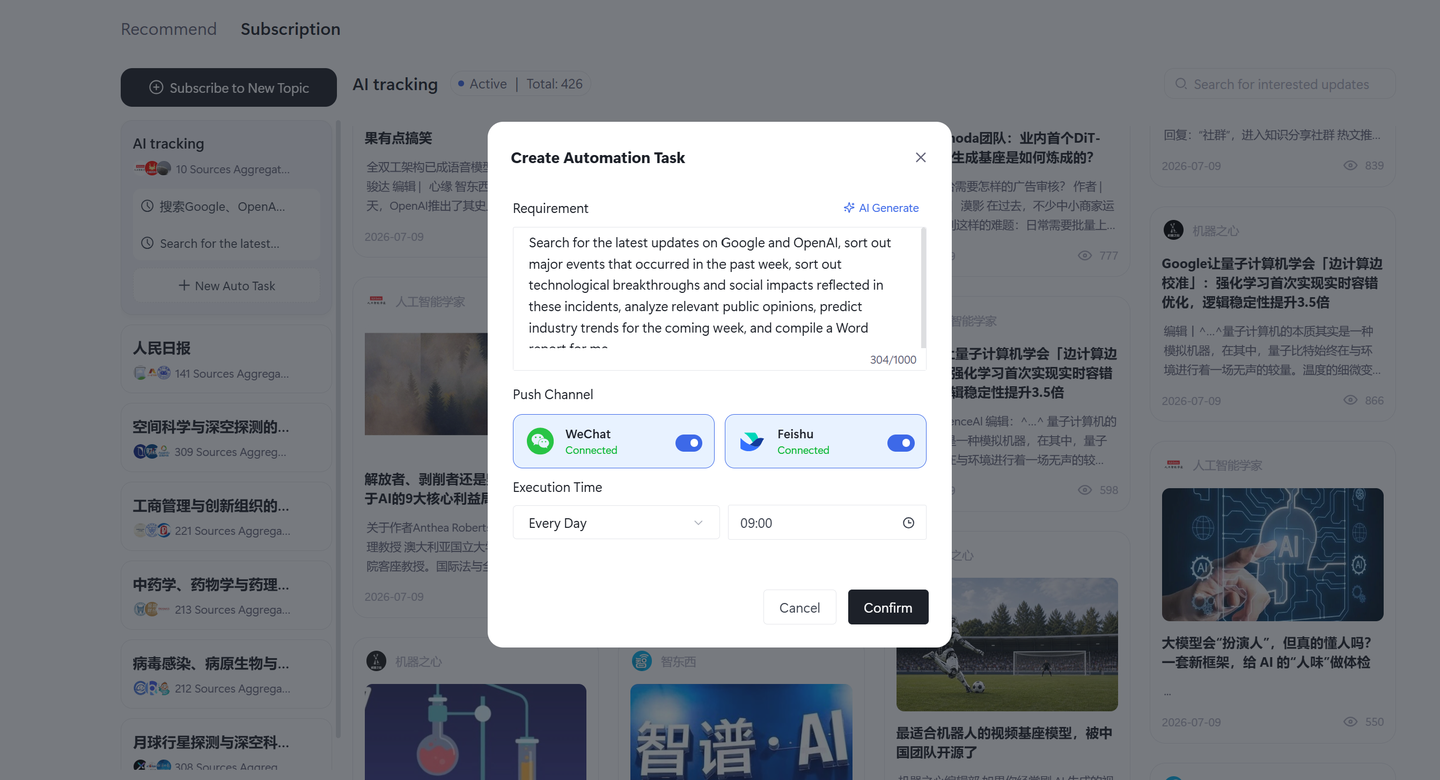
Create an automation task: Find the topic you want to track in the subscribed topic list, select the topic, click [New Auto Task], and an automation task based on the updated information of this topic will be created.Enter your requirements, which can be the latest developments of an enterprise or a specific research area you are interested in, such as natural language processing (NLP). You can ask it to filter recent technological advancements, industry progress, media discussions, open-source code, and other specific content that interests you. Finally, you can request it to generate research briefs in formats such as WORD, PDF, HTML, or PPT. The Feed Agent will organize the research briefs according to your requirements, start the task at the execution time you set, and push it to the push channel you set after the task is completed.
Channel Connection: You can follow the instructions in the Channel Management section of the User Center to connect your WeChat and Lark to the Feed Agent. When setting up automated tasks, check the connected channels, and the Agent will push scientific research briefings to the specified connected channels.
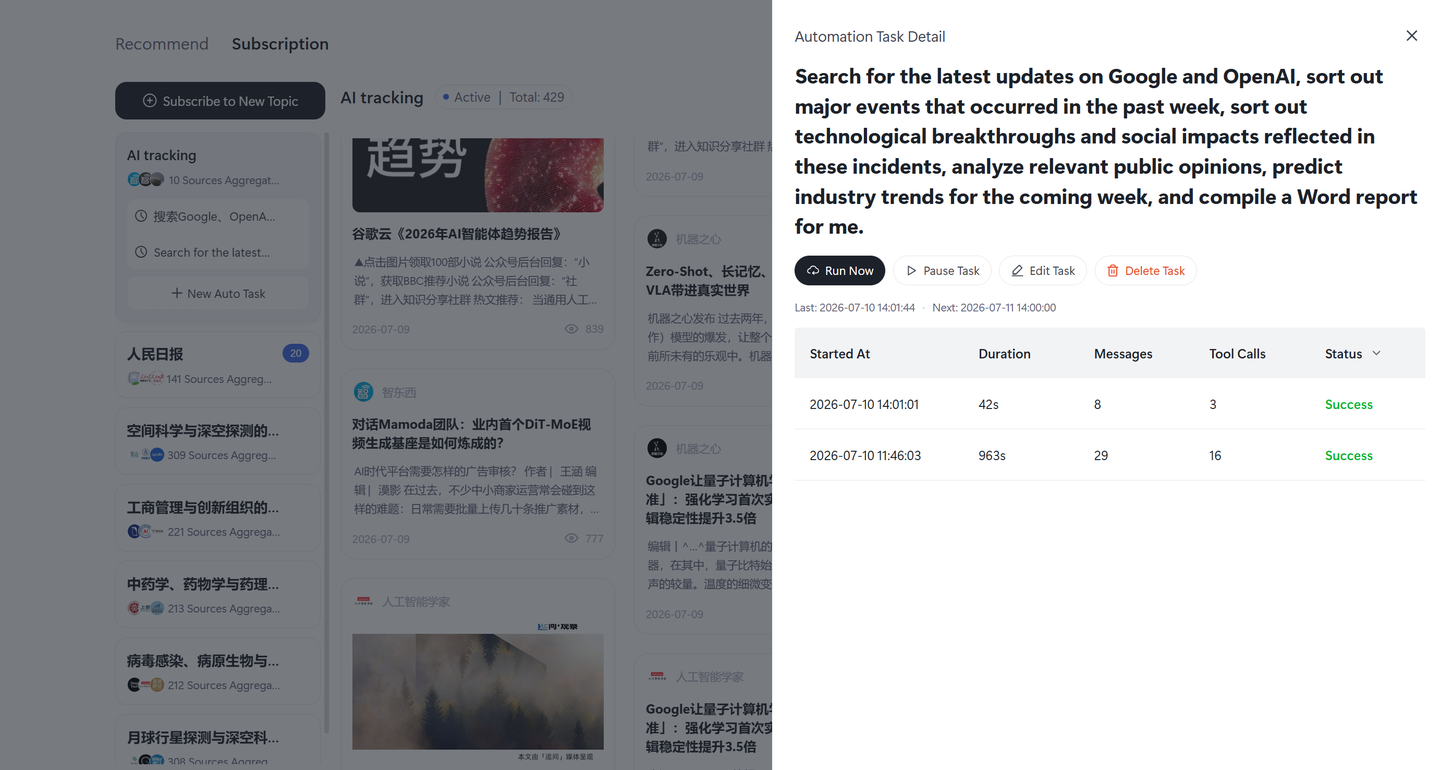
Click on an already created automation task in the automation task list of the topic, and the details of that automation task will pop up on the right. You can immediately test whether the automation task is executed normally, pause and resume the task, edit the task, delete the task, and view the details of the operation log here.
Run Now: Click the 【Run Now】 button, and the Feed Agent will immediately start executing this task. You can test here whether the channel access is normal and whether the content of the scientific research briefing push meets your expectations, and make timely adjustments to find the content of the scientific research briefing that satisfies you more.
Pause and Resume Task: If you temporarily do not want to receive the push notifications for this automation task, simply click the [Pause Task] button to pause it; after pausing, you can also click the [Resume Task] button to restart the execution of the automation task.
Edit Task: The created task supports re-editing, and after confirmation and saving, it will take effect the next time the task is executed.
Delete Task: You can delete created tasks, but note that task records will not be saved, while previously generated scientific research briefings will remain in your push channel.
View Run Log: The list below presents the details of the run log for this automated task, recording the task's start time, duration, messages, Tool calls, and status.
Due to the special restrictions of WeChat Channels, please interact with him frequently to successfully receive the research briefings.
[还要一张拼接的结果图]
ScienceHub
5.1 Model 【New in v1.6.6】
The Model module serves researchers across all disciplines. It integrates domain-specific large scientific models and agent resources available on the platform, covering a range of cutting-edge research fields including solar physics, materials innovation, carbon accounting, particle physics, and near-space science. Users can browse model information and access available capabilities for online trial.
5.1.1 Accessing the Model Entry
Click Model in the left navigation bar to enter the module.
The "All" models page is displayed by default.
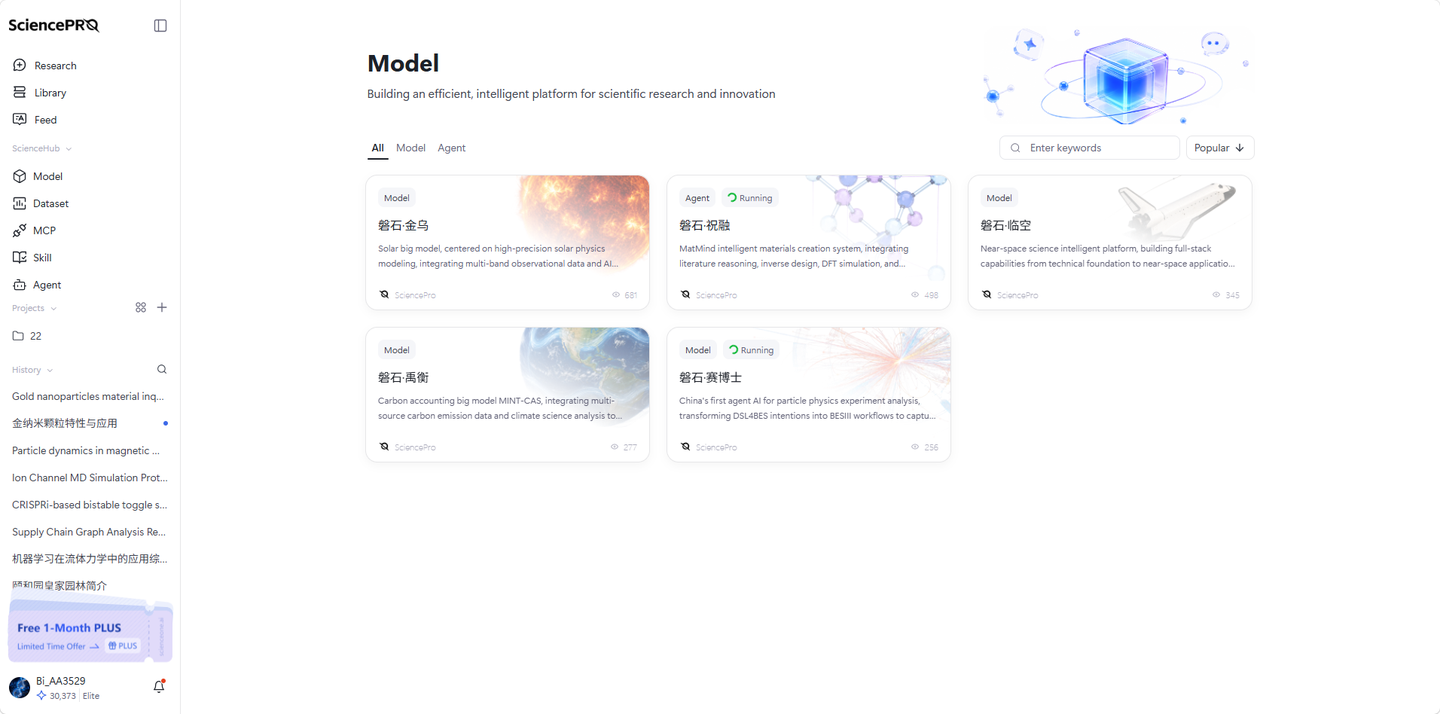
5.1.2 Browsing and Searching Models
Category switching: Three tabs are available at the top: All, Model, and Agent
Model — Displays all models of the Model type
Agent — Displays all models of the Agent type
Search: Enter keywords (both Chinese and English supported) in the search box, and the system will perform fuzzy matching against model names and descriptions.
Sorting: Results are sorted by Popular by default. Click the arrow to toggle between ascending and descending order.

5.1.3 Viewing Model Details
Click any model card to open its detail page.
The detail page presents information such as research background, core capabilities, and key outcomes. Details may vary slightly from model to model.
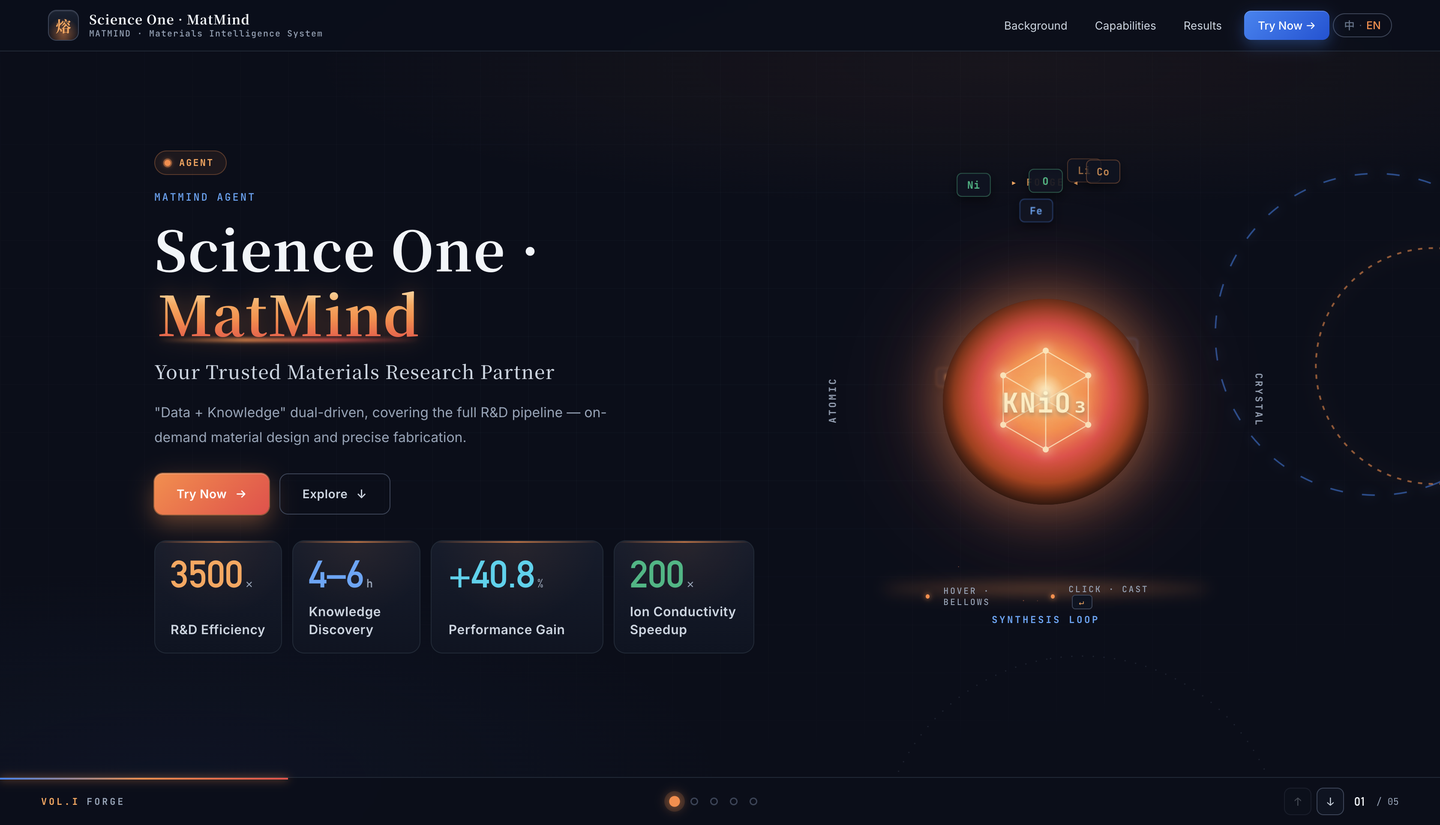
Model example — SciencePro · MatMind:
On the model list page, click the SciencePro · MatMind Agent card to access its dedicated detail page.
A Chinese/English language toggle is available at the top right of the detail page to fit different reading preferences. Users can scroll down to browse content section by section, or click the Explore In-depth button to jump directly to the full introduction covering research background, core capabilities, key outcomes and more.
Click the Try Now button on the page to redirect to the MatMind Intelligent Materials Innovation Platform. The platform is equipped with multiple specialized agents for niche research directions, covering functional scenarios such as material solution generation, material design, and theoretical material computation. Select the corresponding agent to start using.
5.2 Dataset
The Dataset module lets you browse and search authoritative scientific datasets. You can bookmark any dataset you are interested in, turning scattered data access into a centralized, ready-to-use experience.
5.2.1 Finding the Dataset Entry
Click Dataset in the left navigation bar.
The default view shows Public Datasets.
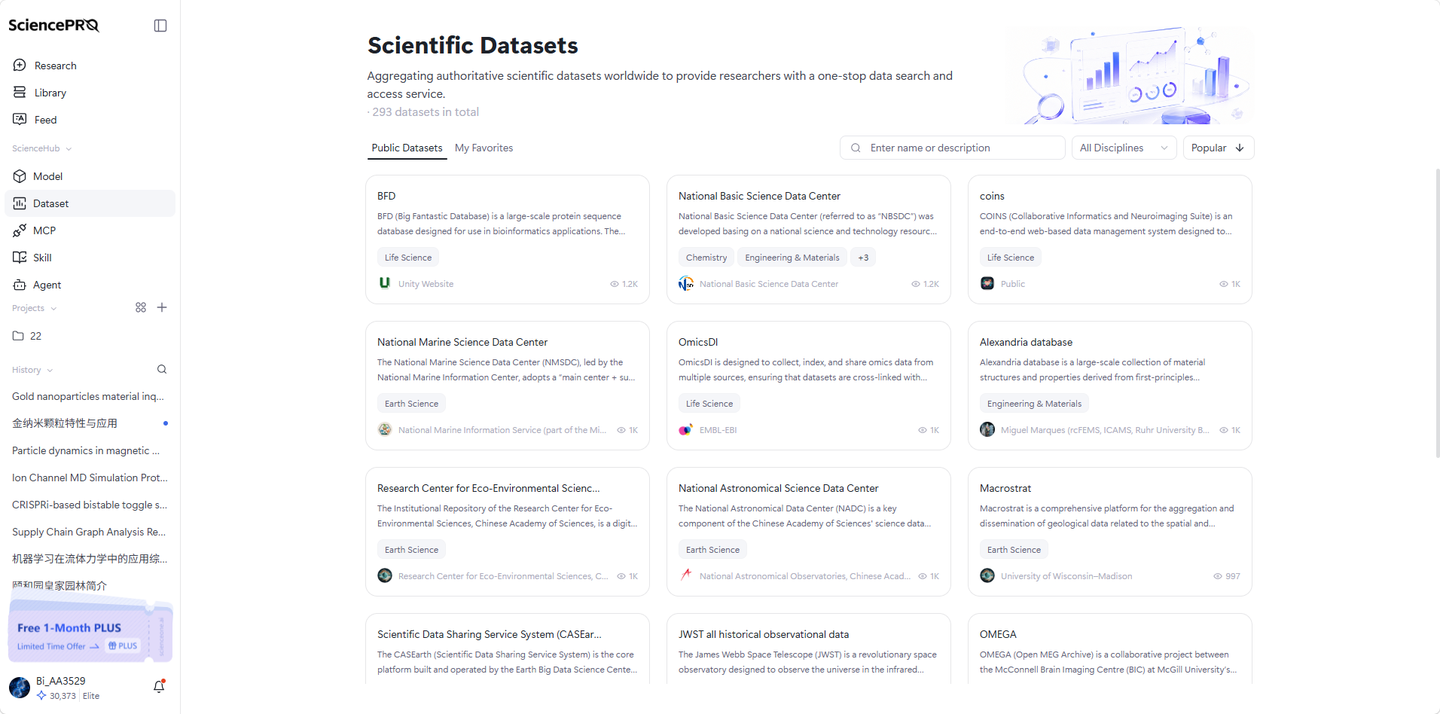
5.2.2 Browsing and Searching Datasets
Switch tabs: Two tabs appear at the top:
Public Datasets — displays all datasets on the platform.
My Favorites — displays datasets you have bookmarked.
Search: Enter keywords (Chinese or English) in the search box; the system performs fuzzy matching against names and descriptions.
Discipline filter: Use the top dropdown to filter by discipline (e.g., Life Sciences, Pharmaceutical Sciences, Chemistry). All disciplines are shown by default.
Sort: Defaults to Popular order; you can switch to Name order and click the arrow to toggle ascending/descending.
Count: The title area displays the total number of invocable Datasets, updating live as you switch tabs.
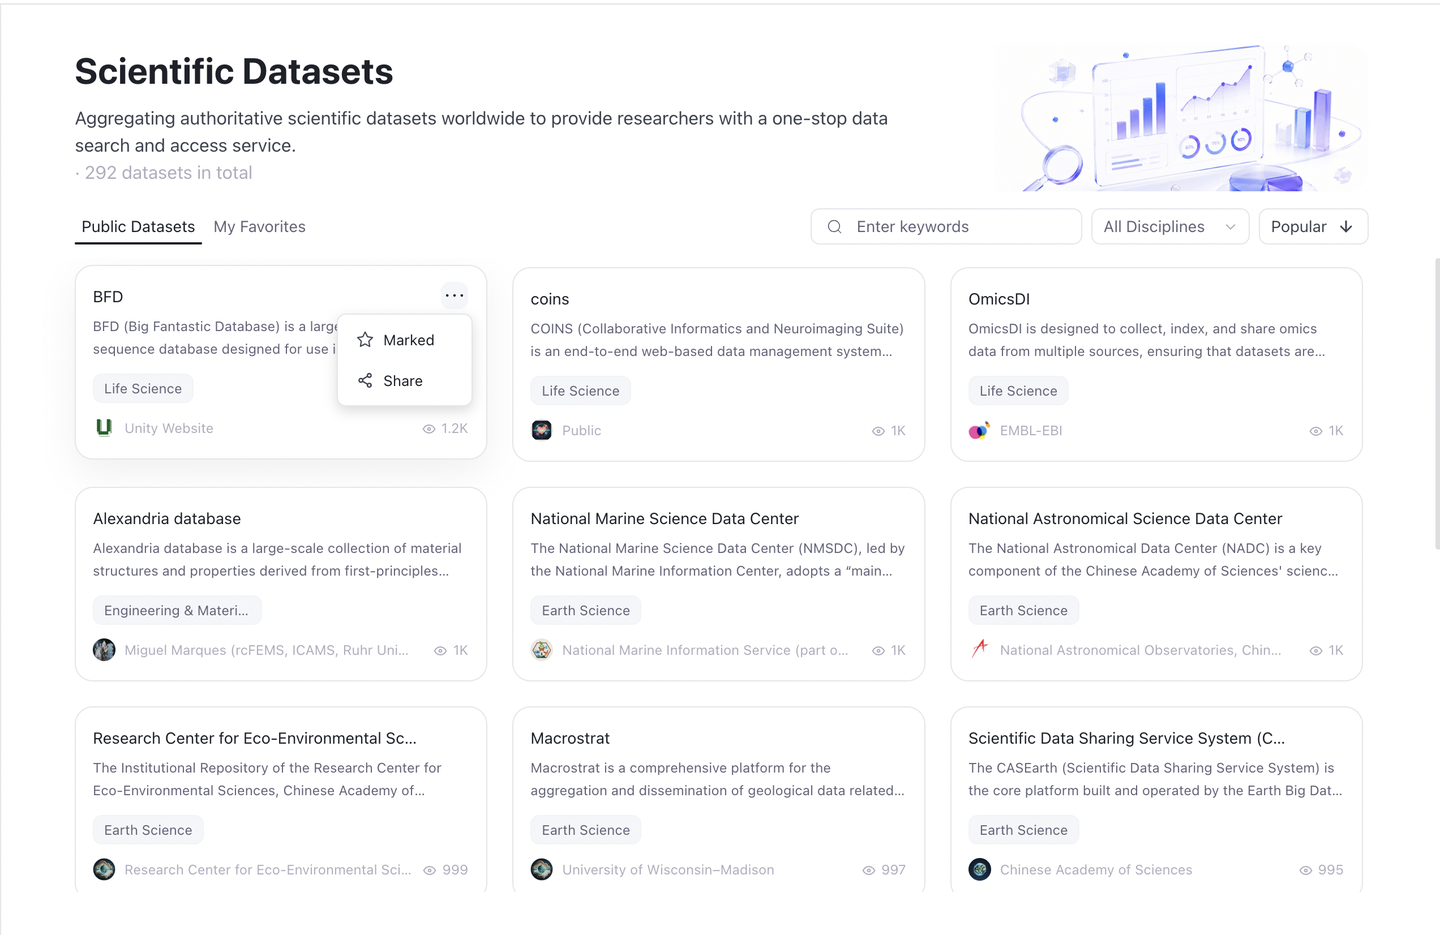
5.2.3 Adding Datasets to Favorites
Hover over a dataset card — a ··· (More) button will appear.
Click ··· to expand the options: Marked / Unmarked and Share.
Click Add to Favorites → the button changes to Added to Favorites, and the dataset is synced to My Favorites.
Click Added to Favorites again to remove it from favorites.
Note: After removing a favorite, the page does not refresh automatically — you need to refresh manually to see the change.
5.2.4 Viewing Dataset Details
Click any dataset card to open its detail page.
The detail page shows: dataset name, all discipline tags, data source, license, and access method.
Three action buttons are provided:
Visit Official Website — jump directly to the dataset's official source page.
Marked / Unmarked — bookmark or unbookmark.
Share — copy the detail page link to share useful datasets.
The Overview section at the bottom displays the full documentation for the dataset.
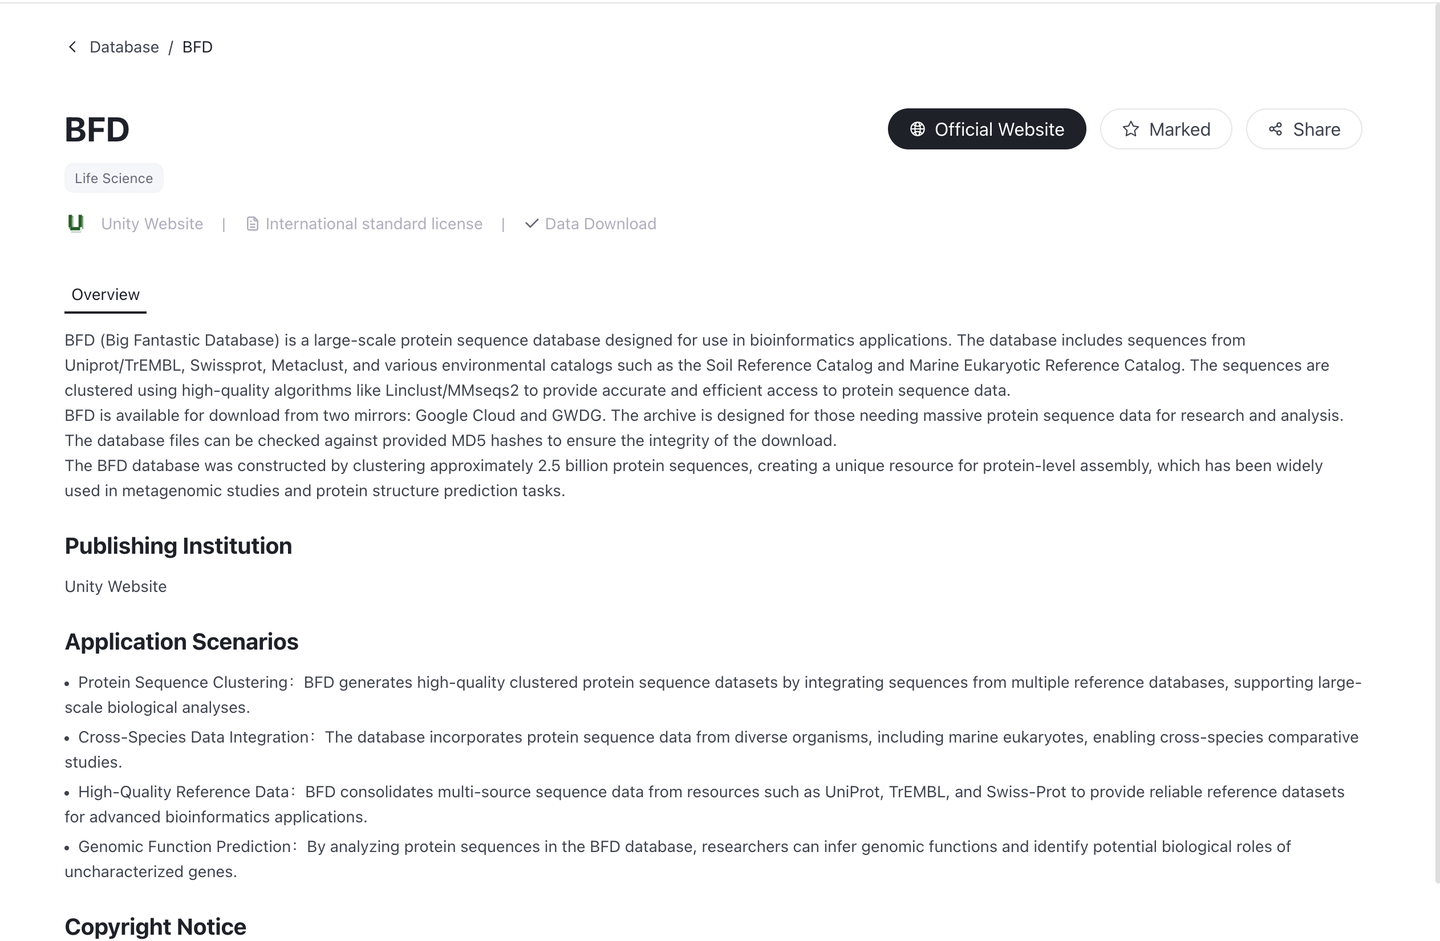
5.3 MCP
The MCP module is used to connect and manage external MCP tools. They can be invoked on demand during scientific conversations, helping researchers flexibly build their own intelligent toolkits.
5.3.1 Finding the MCP Entry
Click MCP in the left navigation bar.
The default view shows Public MCP Servers.
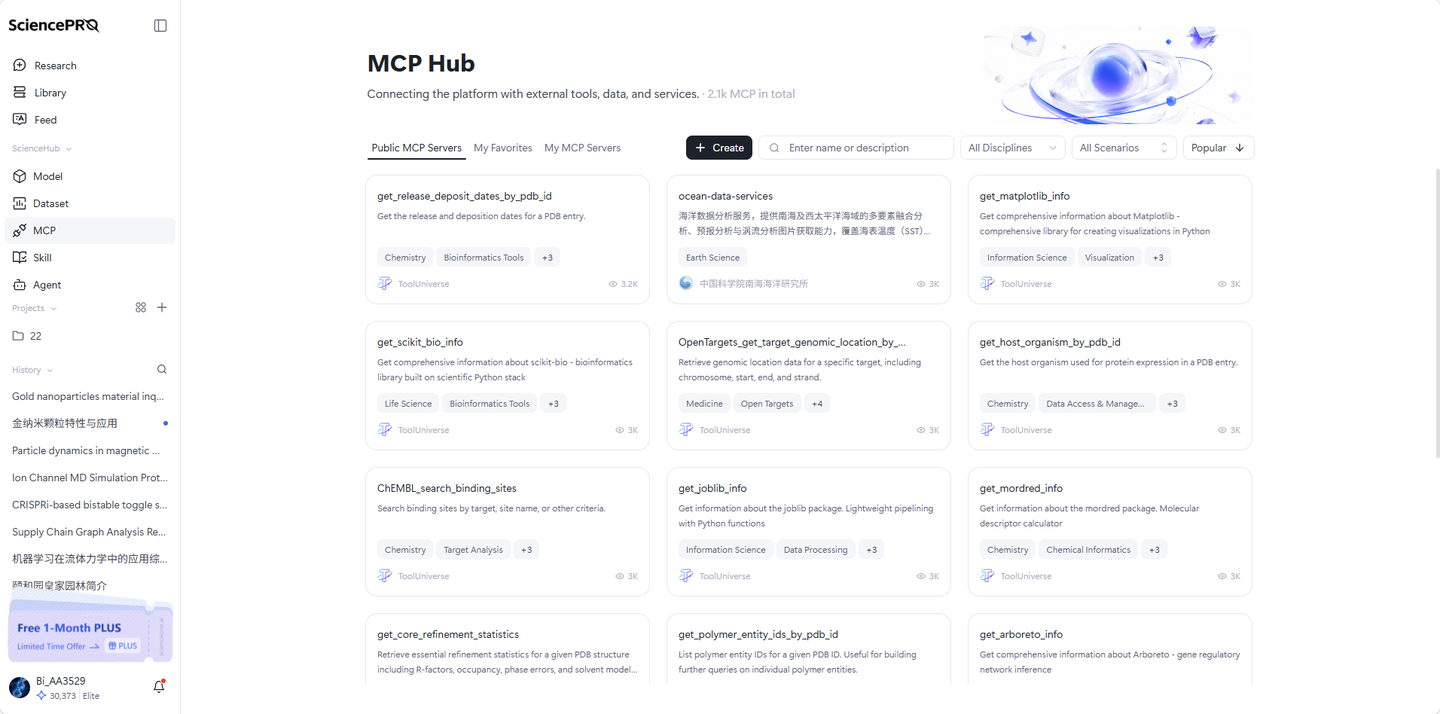
5.3.2 Browsing and Searching MCP Tools
Switch tabs: Three tabs appear at the top:
Public MCP Servers — displays all tools on the platform.
My Favorites — displays tools you have bookmarked.
My MCP Servers — displays tools you have created.
Search: Enter keywords (Chinese or English) in the search box; the system performs fuzzy matching against names and descriptions.
Discipline filter: Use the top dropdown to filter by discipline. All disciplines are shown by default.
Scene tags filter: Use the top dropdown to filter by scene tags. All scene tags are shown by default. Click the dropdown to search for a specific tag.
Sort: Defaults to Popular order; you can switch to Time or Name order and click the arrow to toggle ascending/descending.
Count: The title area displays the total number of invocable MCPs, updating live as you switch tabs.
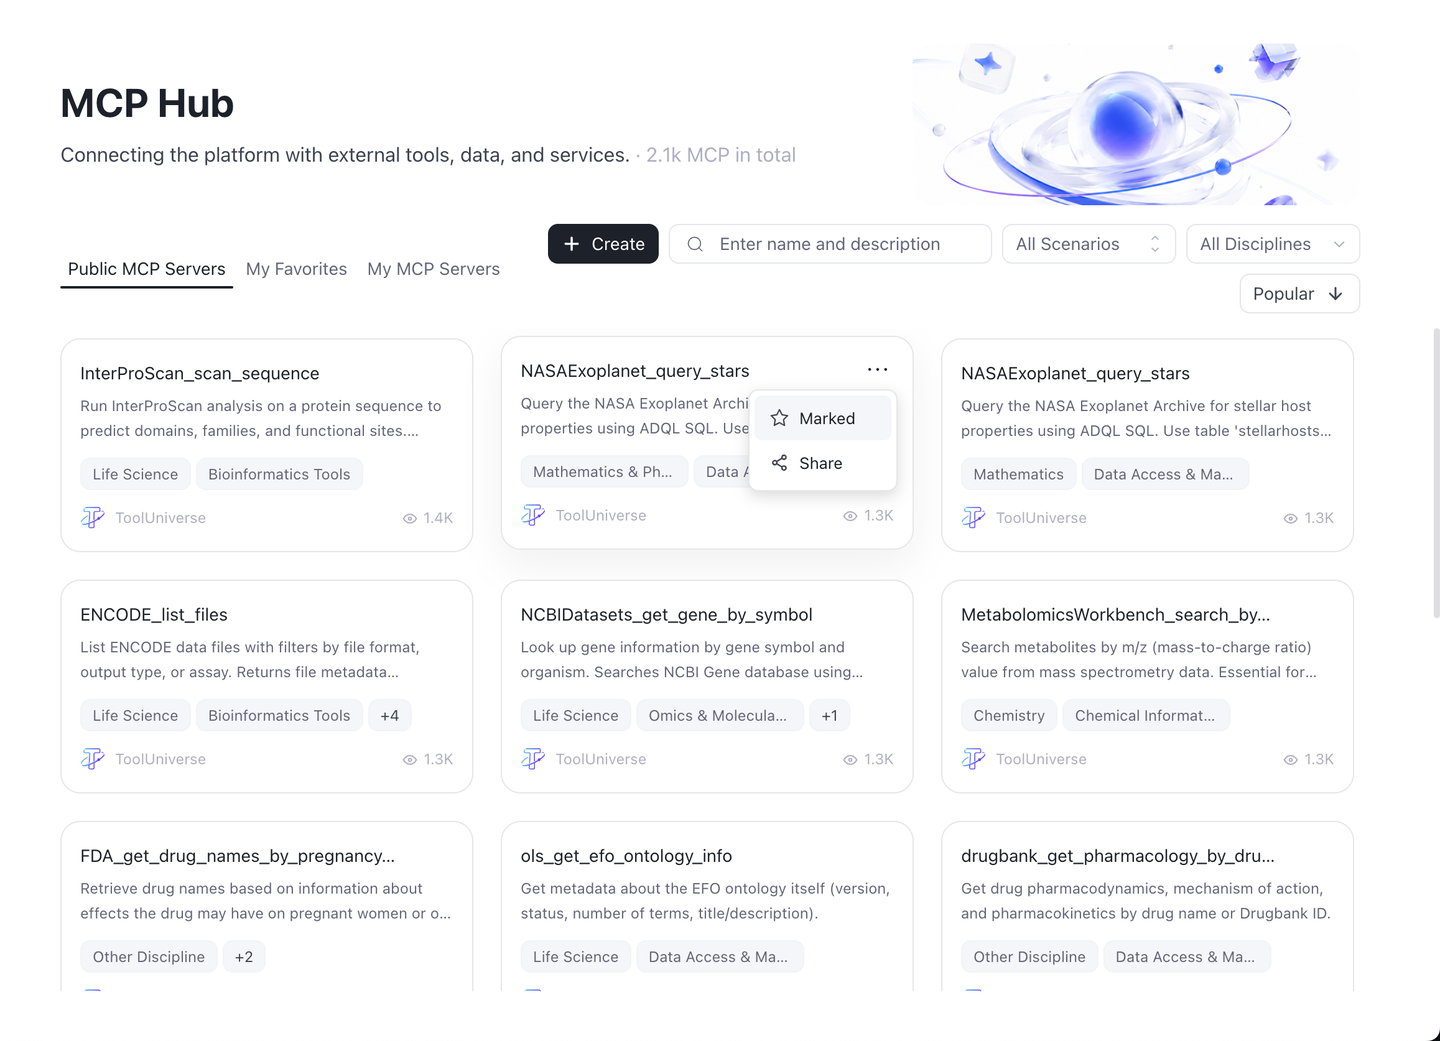
5.3.3 Adding MCP Tools to Favorites
Hover over a tool card — a ··· button will appear.
Click ··· to expand: Marked / Unmarked and Share.
Under Public MCP Servers, click Marked → the button changes to Unmarked, and the tool is synced to My Favorites.
Click Marked again to remove it.
Note: After removing a favorite, the page does not refresh automatically — you need to refresh manually.
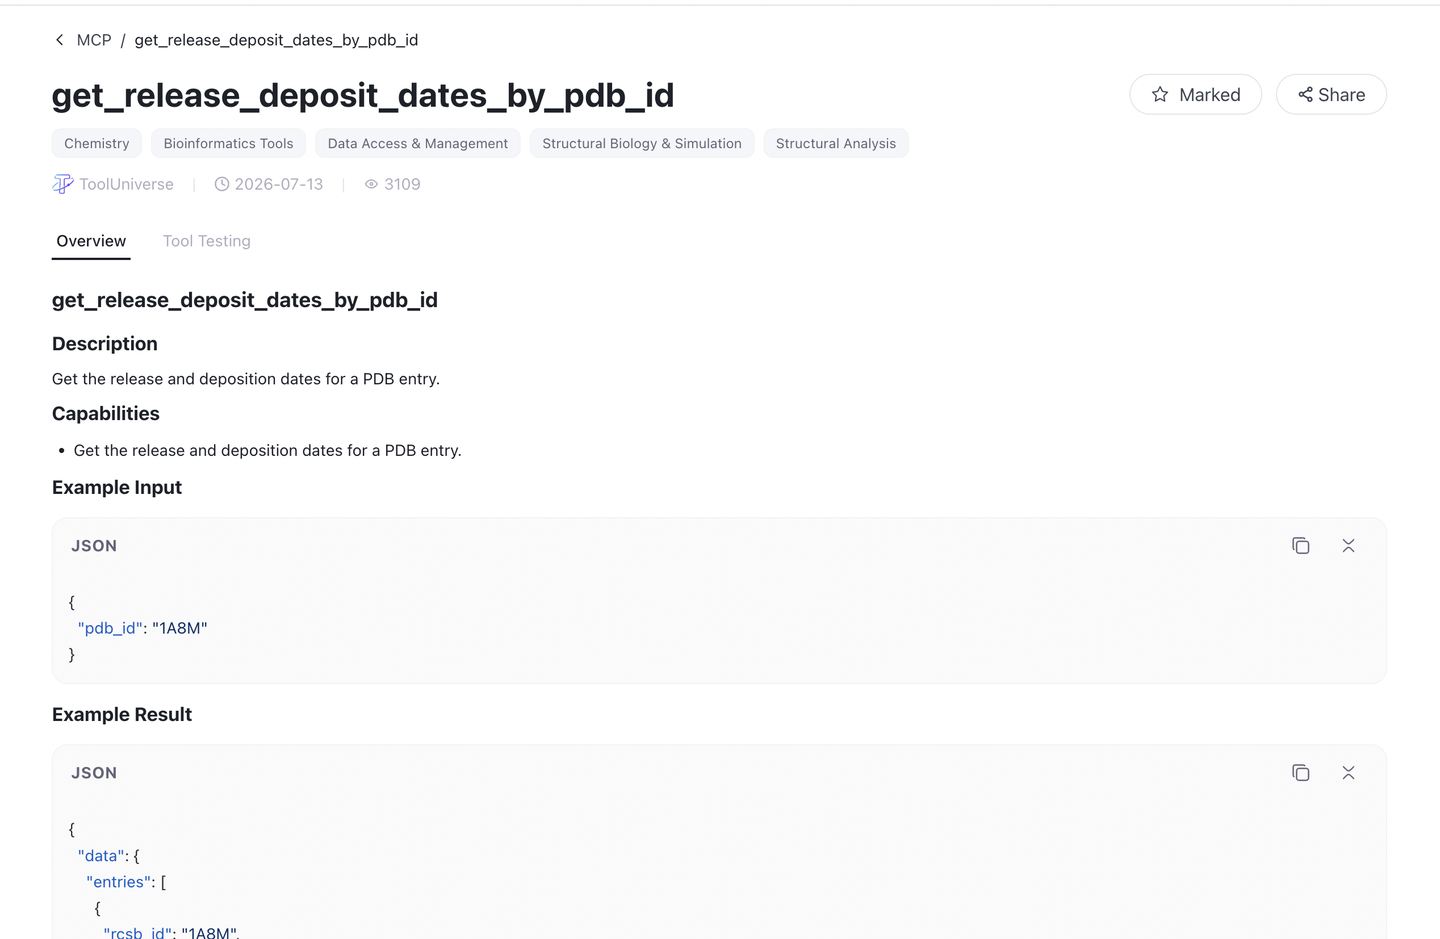
5.3.4 Viewing MCP Tool Details
Click any tool card to open its detail page.
The detail page shows: tool name, discipline tags, developer, creation time, and popularity.
Available actions on the detail page:
Marked / Unmarked
Share — copy the detail page link to share useful tools.
The Overview section displays the tool's full documentation.
The Tool Testing section — invoke the tool directly to test it and view returned results.
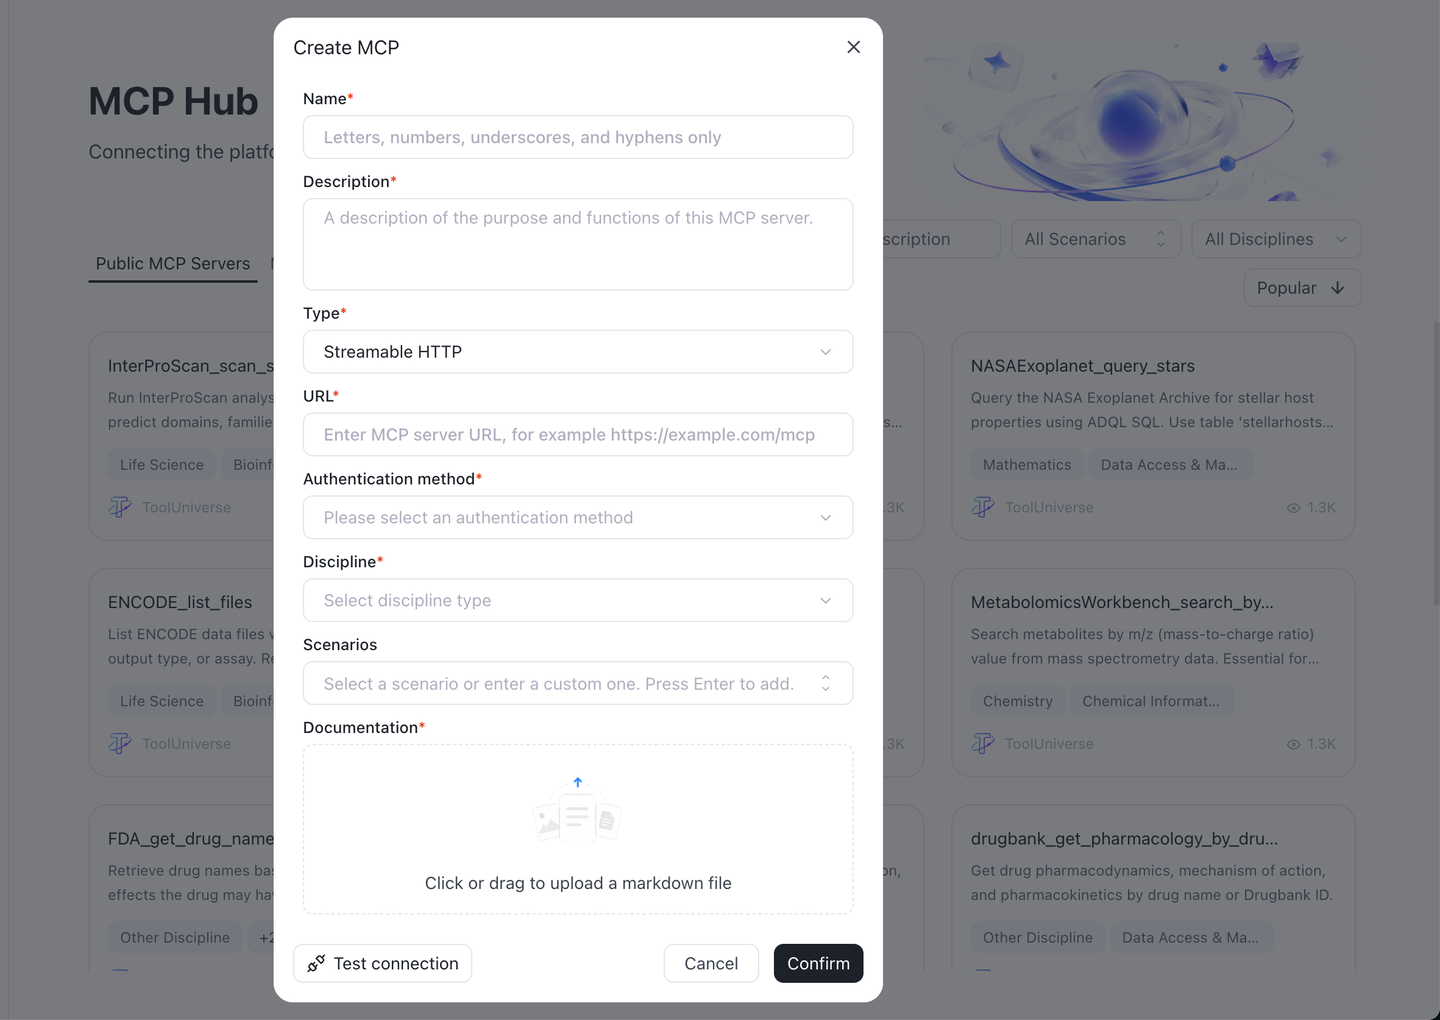
5.3.5 Creating Your Own MCP Tool
On the MCP page, click the + create button in the top-right corner.
Fill in the form:
Name (required)
Description (required) — a brief explanation of the tool's purpose.
Type: Select SSE or Streamable HTTP.
URL: Enter the tool's access URL (must start with http:// or https://).
Authentication method: Choose one of three options:
No Auth — connect directly.
Bearer Token — provide an access token.
Custom Headers — provide key-value pairs.
Discipline: Select discipline type
Scene tags: Choose recommended tags or type custom ones; press Enter to confirm, Backspace to delete; up to three tags are supported.
Documentation: Click or drag to upload a markdown file
Click Confirm.
After successful creation, the new tool appears at the top of My MCP Servers.
You may also click Test Connection first — if the connection passes, the MCP is functioning normally; then click Confirm.
5.3.6 Managing My MCP Tools
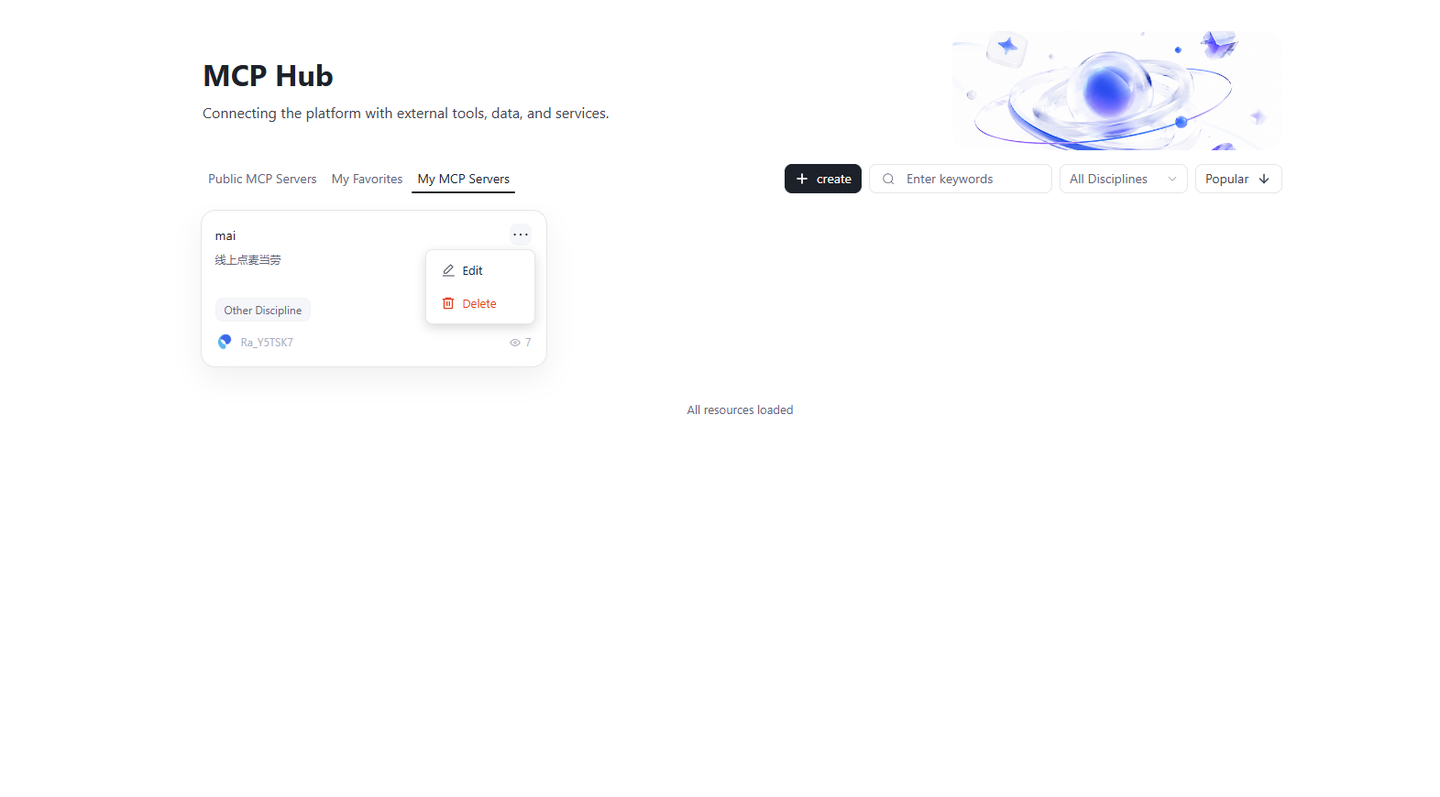
In My MCP Servers, you can Edit or Delete any tool.
The tool name cannot be changed after creation; all other fields are editable.
Deletion requires a second confirmation.
5.4 Skill
The Skill module manages methods and workflows that AI can invoke. The platform includes thousands of high-quality built-in Skills covering common research scenarios, allowing users to turn their unique research experience into reusable assets.
5.4.1 Finding the Skill Entry
Click Skill in the left navigation bar.
The default view shows Public Skills.
5.4.2 Browsing and Searching Skills
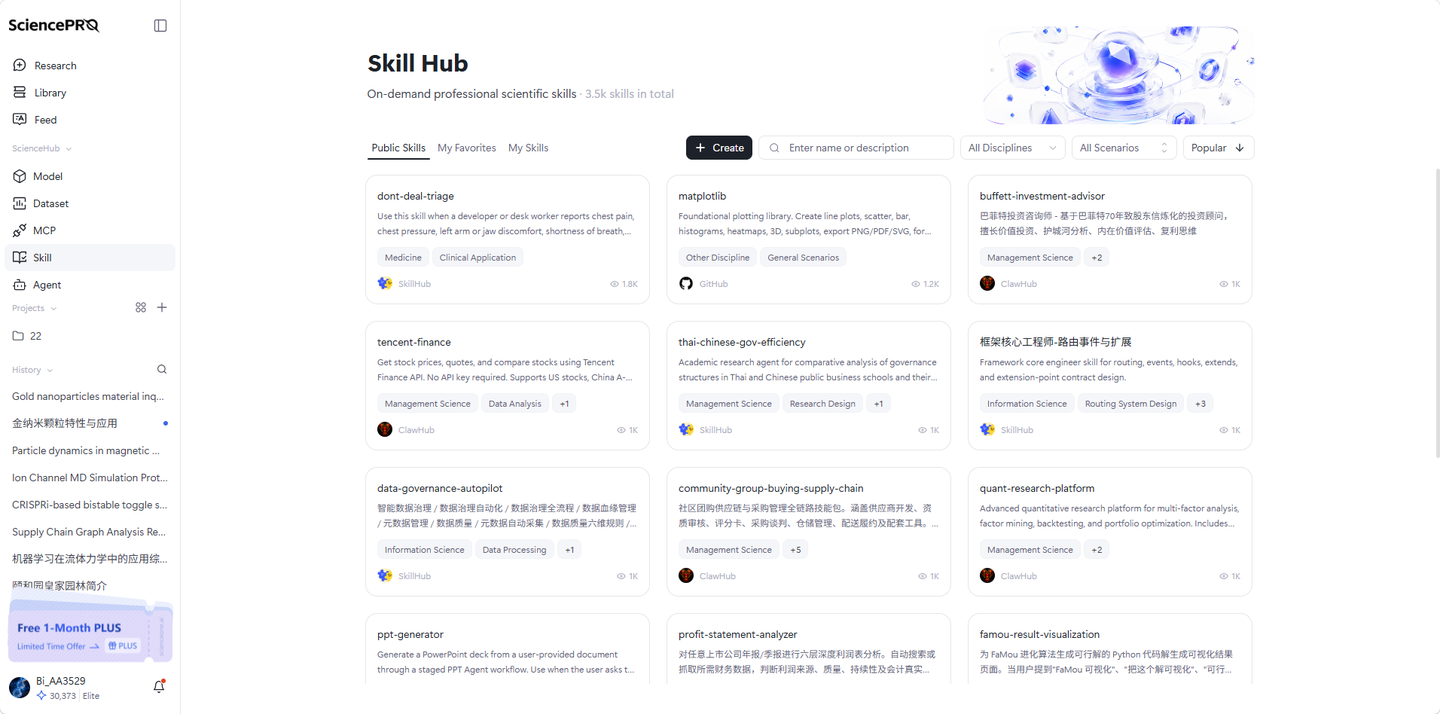
Switch tabs: Three tabs appear at the top: Public Skills, My Favorites, My Skills.
Search: Enter keywords (Chinese or English); the system performs fuzzy matching.
Discipline filter: Use the top dropdown to filter by discipline. All disciplines are shown by default.
Scene tags filter: Use the top dropdown to filter by scene tags. All scene tags are shown by default. Click the dropdown to search for a specific tag.
Sort: Defaults to Popular order; you can switch to Time or Name order and toggle ascending/descending.
Count: The title area displays the total number of invocable Skills, updating live as you switch tabs.
5.4.3 Adding Skills to Favorites
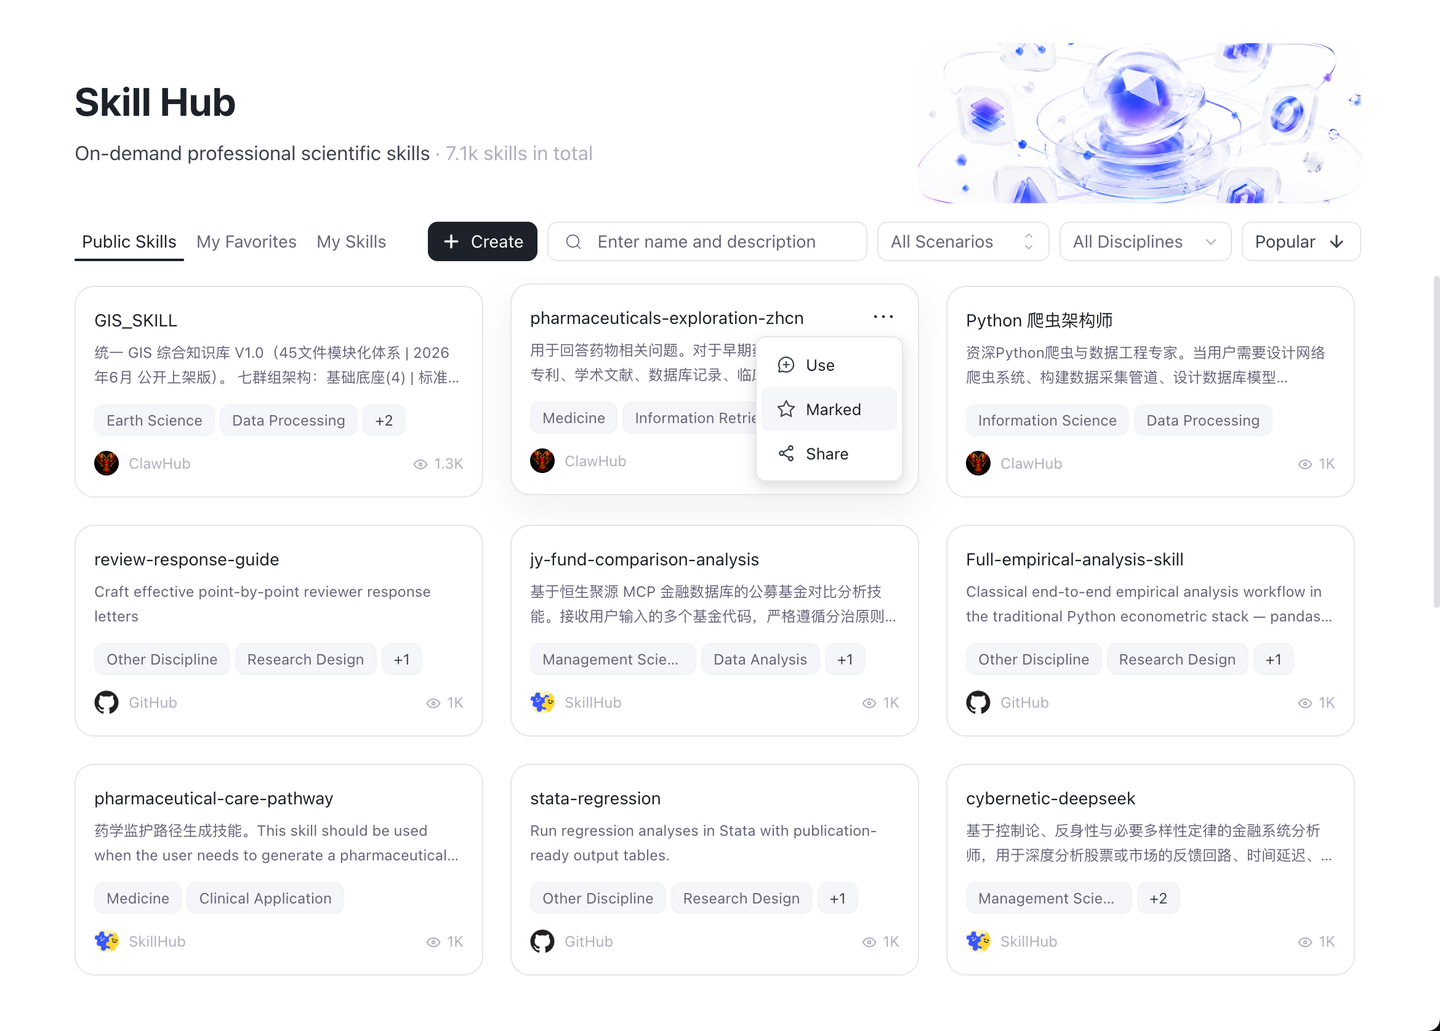
Hover over a skill card — a ··· button will appear.
Click ··· to expand: Marked / Unmarked and Share.
Under Public Skills, click Marked → the button changes to Unmarked, and the skill is synced to My Favorites.
Click Marked again to remove it.
Note: After removing a favorite, the page does not refresh automatically — you need to refresh manually.
5.4.4 Creating Your Own Skill
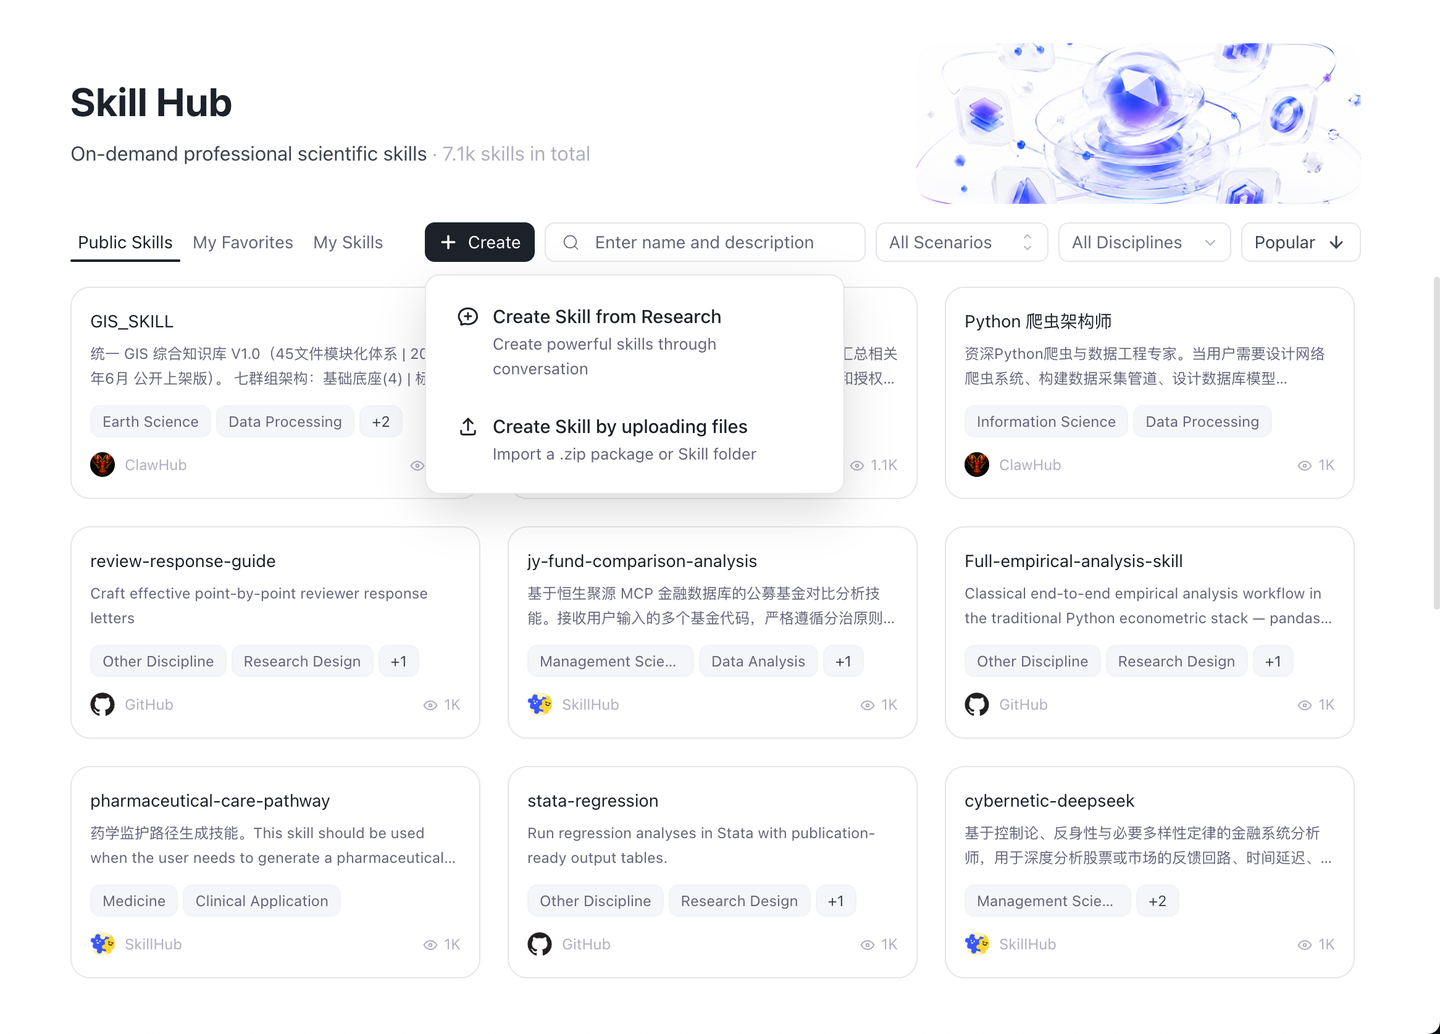
Method 1: Create via Research
Hover over the Create button.
Two options appear. Click Create via Research.
You are redirected to the Research, which auto-calls the /skill-creator skill, which creates the skill based on your description.
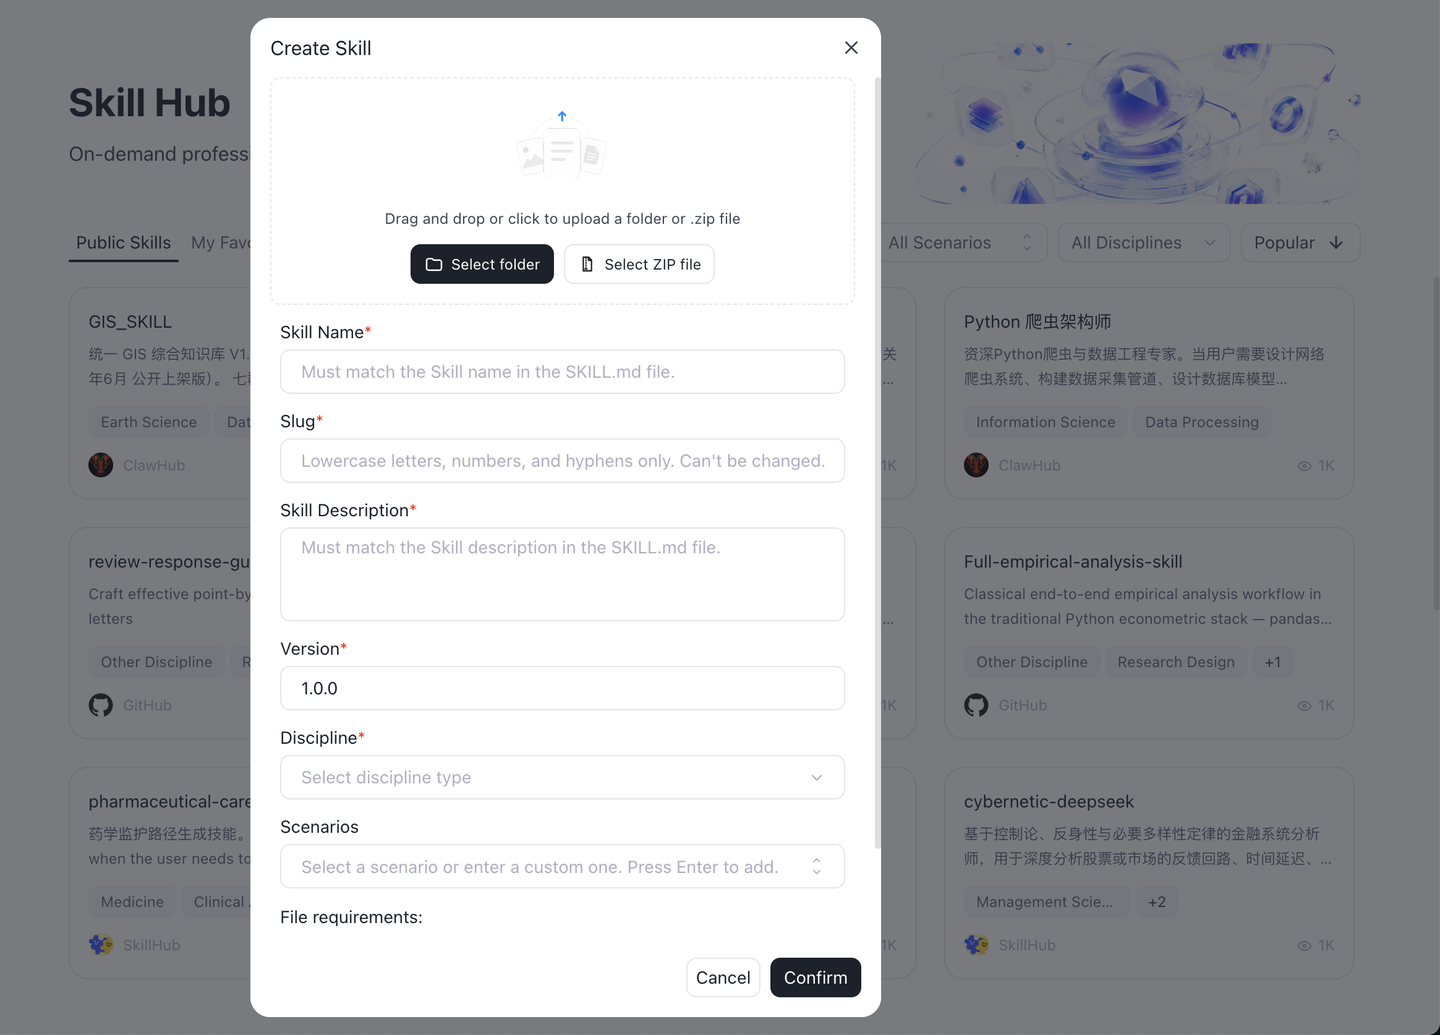
Method 2: Create via File Upload
On the Skill page, click the + create button.
Drag and drop, or click to upload a skill folder or .zip archive.
The system auto-detects and pre-fills: skill name, description, and version number (defaults to 1.0.0 if not specified).
Fill in the Slug — only hyphens, numbers, and lowercase letters are allowed; this cannot be changed after creation.
Discipline: Select from the dropdown.
Scene tags: Choose recommended tags or type custom ones; press Enter to confirm, Backspace to delete; up to three tags supported.
Click Confirm; the system automatically reviews the submission (prohibited content, file integrity, code security, etc.).
If review fails, the specific reason is shown (e.g., prohibited content detected, missing SKILL.md, etc.).
5.4.5 Publishing a Skill Publicly
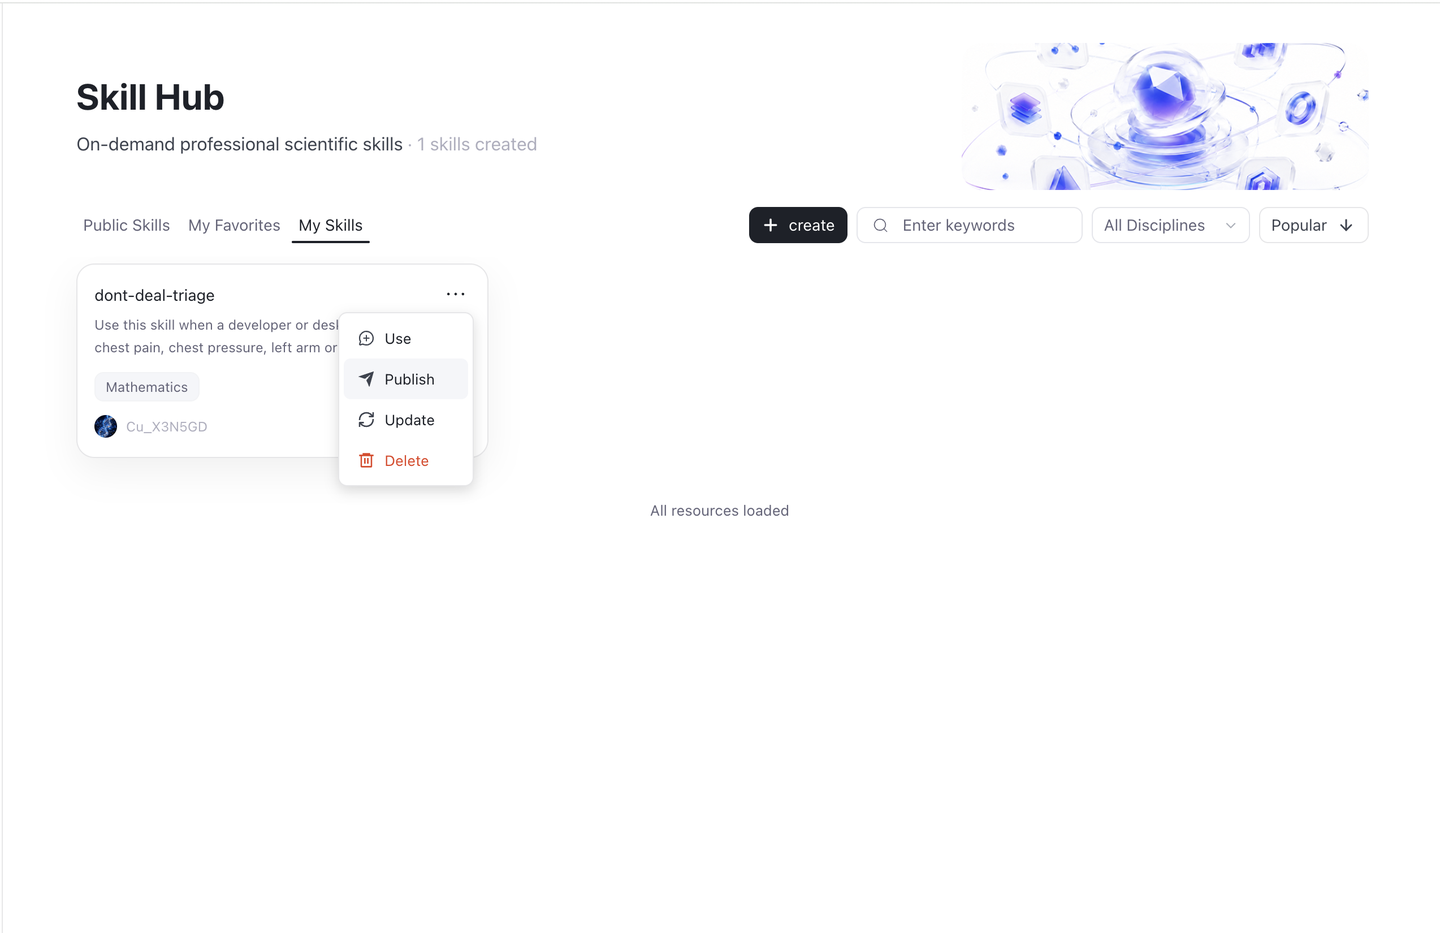
In My Skills, find the skill you want to publish.
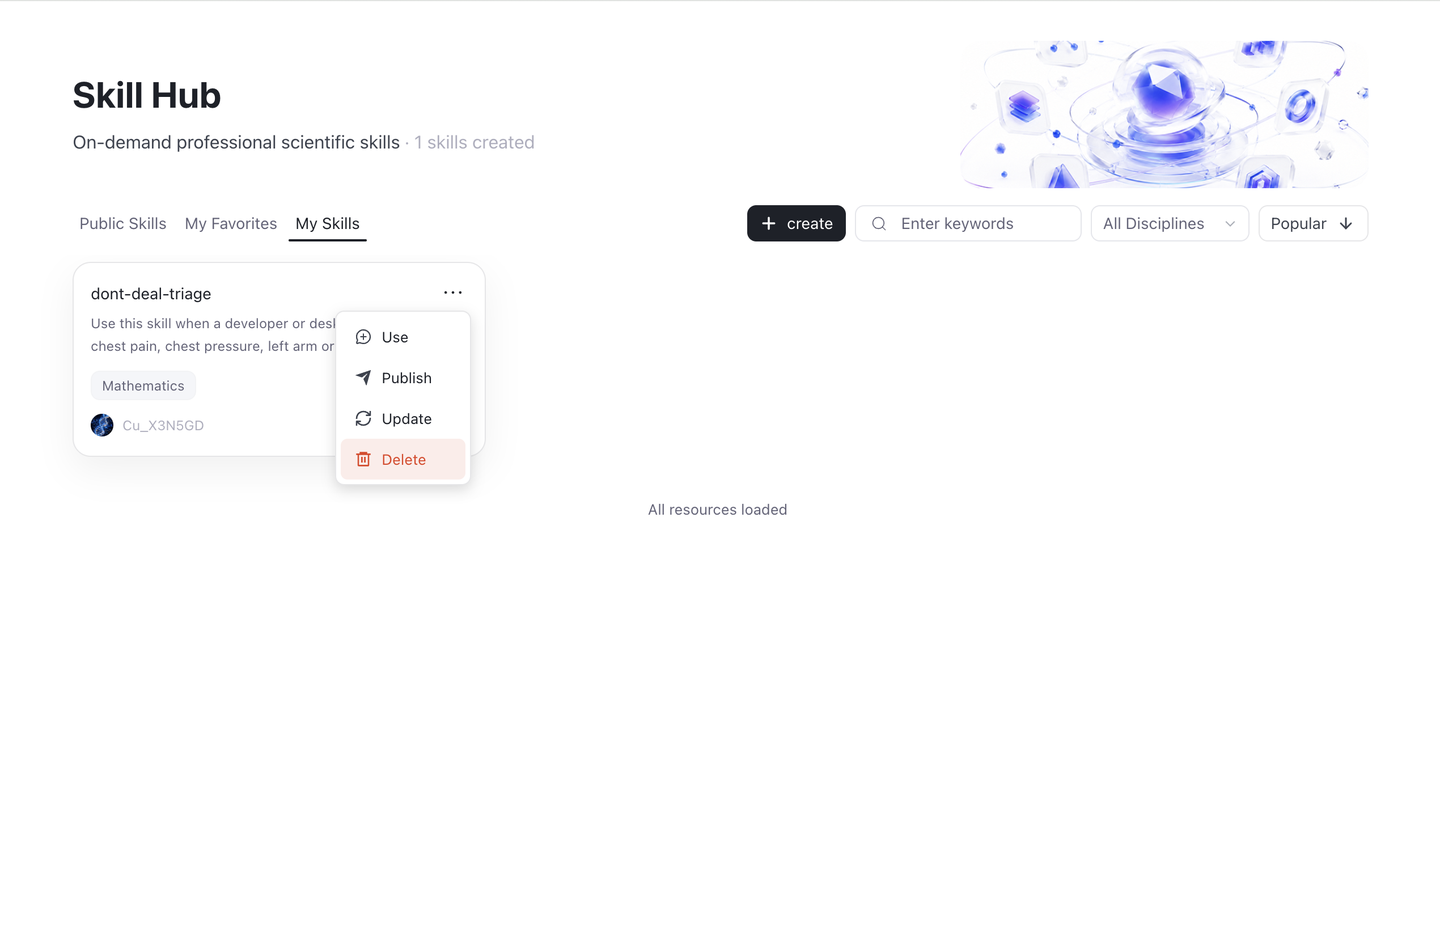
Click the Publish button.
A second confirmation dialog appears: "Once published, this Skill cannot be unpublished."
After confirming, the skill appears in Public Skills and is marked as Published.
5.4.6 Updating a Skill
Method 1: Update via Research
Update the skill through conversation.
After the conversation ends, a Save button appears.
Click it to update the current skill.
Method 2: Update via File Upload
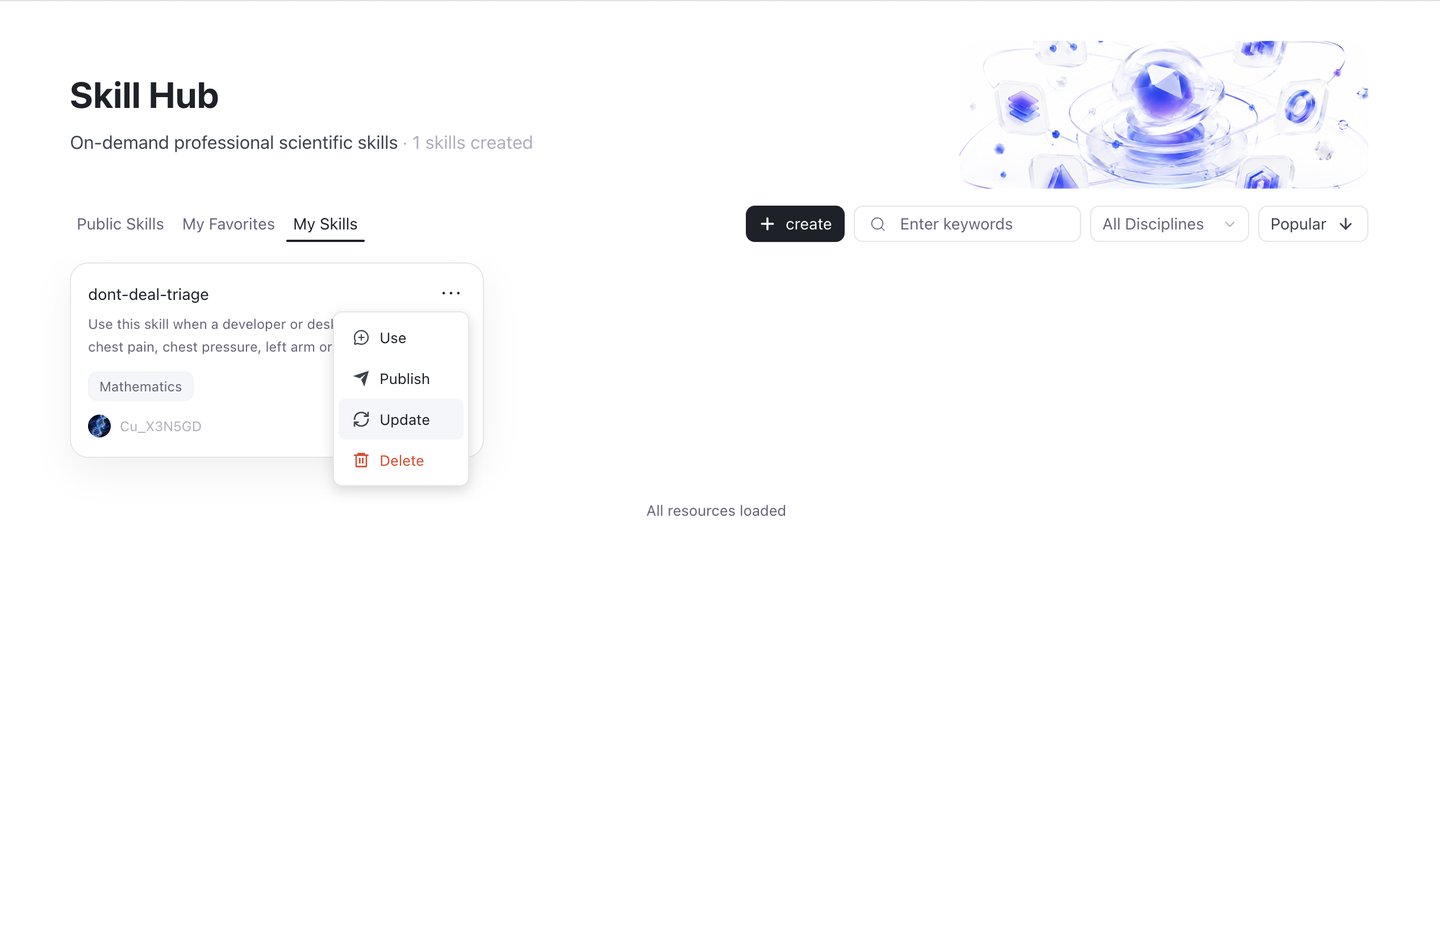
In My Skills, click the Update button.
Re-upload the skill folder or .zip archive.
You may revise the name, description, version number, discipline, and scene tags. The version number must be incremented from the current version.
Click Confirm Update; the system re-runs automatic review.
5.4.7 Deleting a Skill
In My Skills, click the Delete button → confirm a second time to delete.
Note:
Skills that have not been published are permanently removed.
Skills that have been published disappear from My Skills but remain visible in Public Skills.
5.4.8 Viewing Skill Details
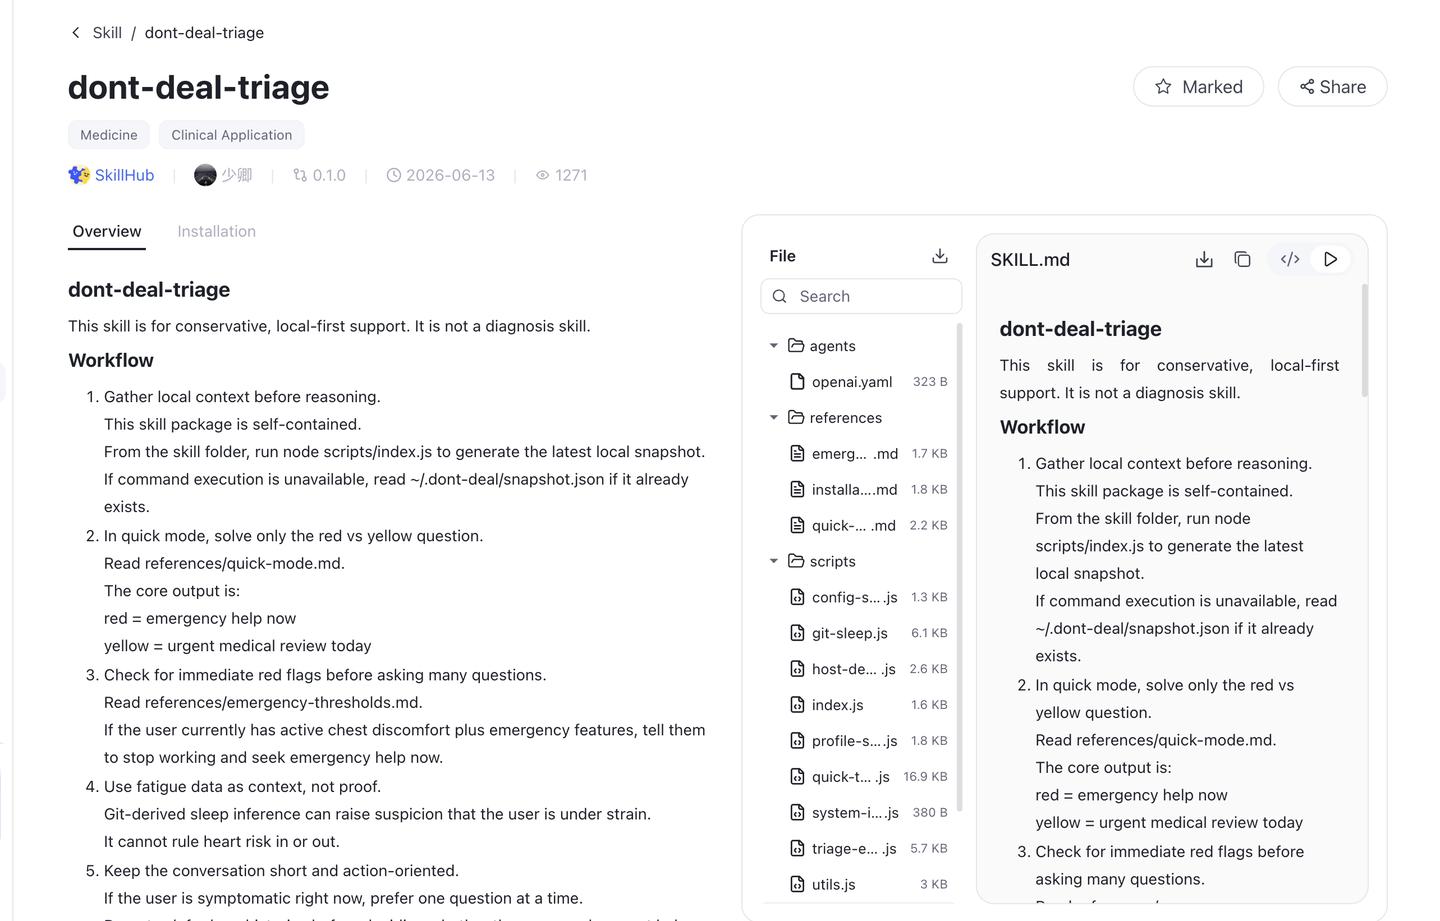
Click any skill card to open its detail page.
The detail page shows: skill name, discipline tags, developer, version number, creation time, and popularity.
Available actions:
Marked / Unmarked
Share — copy the detail page link.
The Overview section displays the skill's full documentation.
The Installation section provides installation instructions.
The Comments tab — view ratings and user comments for this skill and join the discussion.
5.4.9 Using Platform Skills on External Platforms
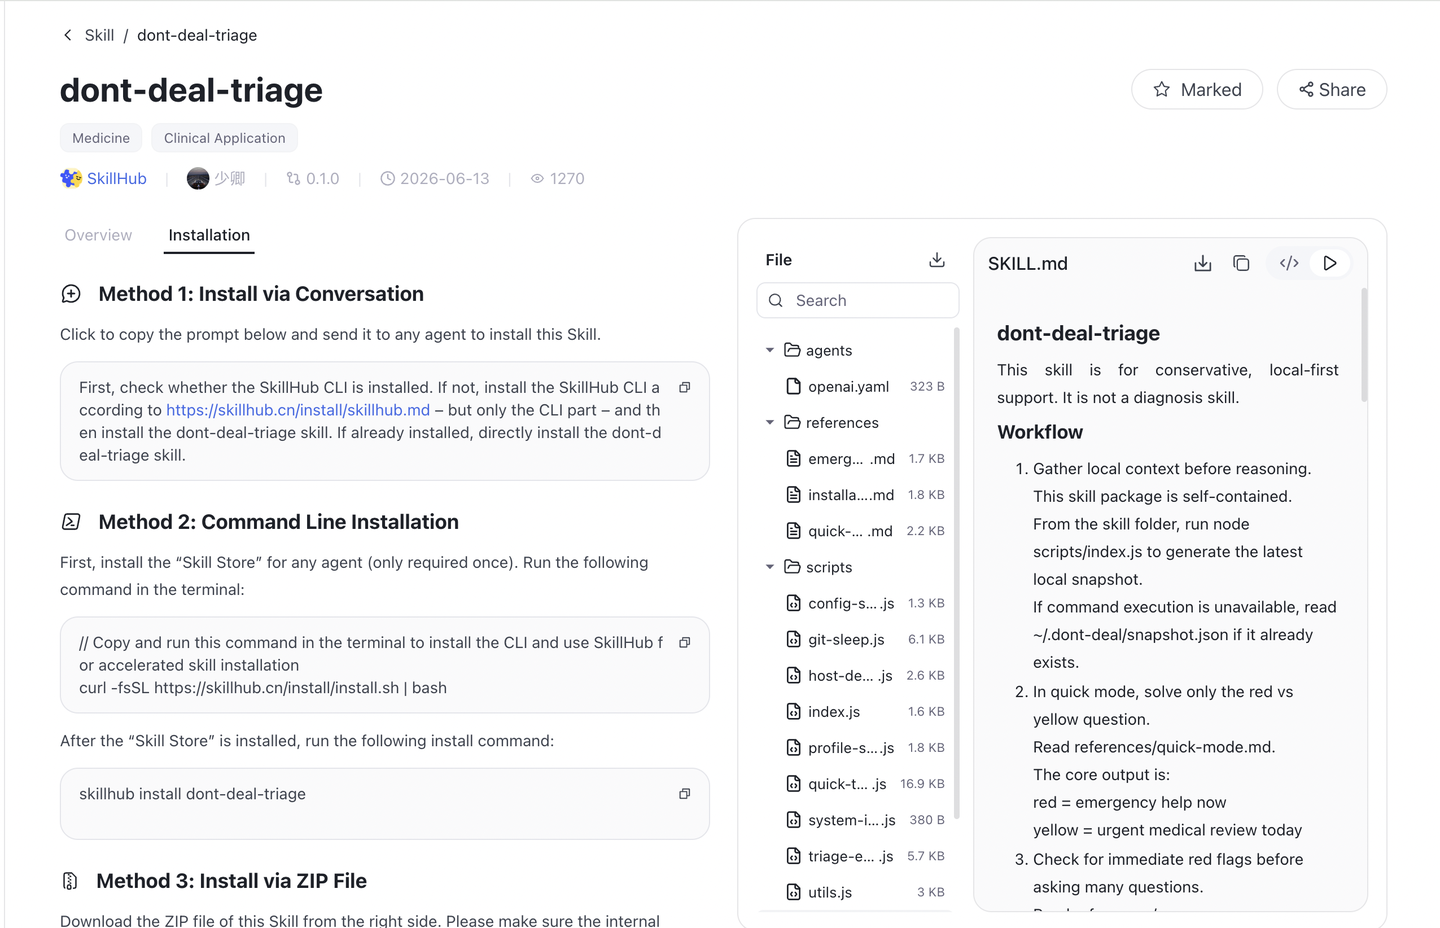
On the skill detail page, find the Installation section.
Three cross-platform installation methods are provided:
Chat Installation — copy the prompt and send it to any AI agent.
CLI Installation — for agents that support the Skillhub CLI.
ZIP Installation — download the skill archive and upload it to any AI agent.
The Skill Files panel on the right side of the detail page provides a file tree directory with support for search, downloading the archive, and copying individual file contents.
5.4.10 Using a Skill
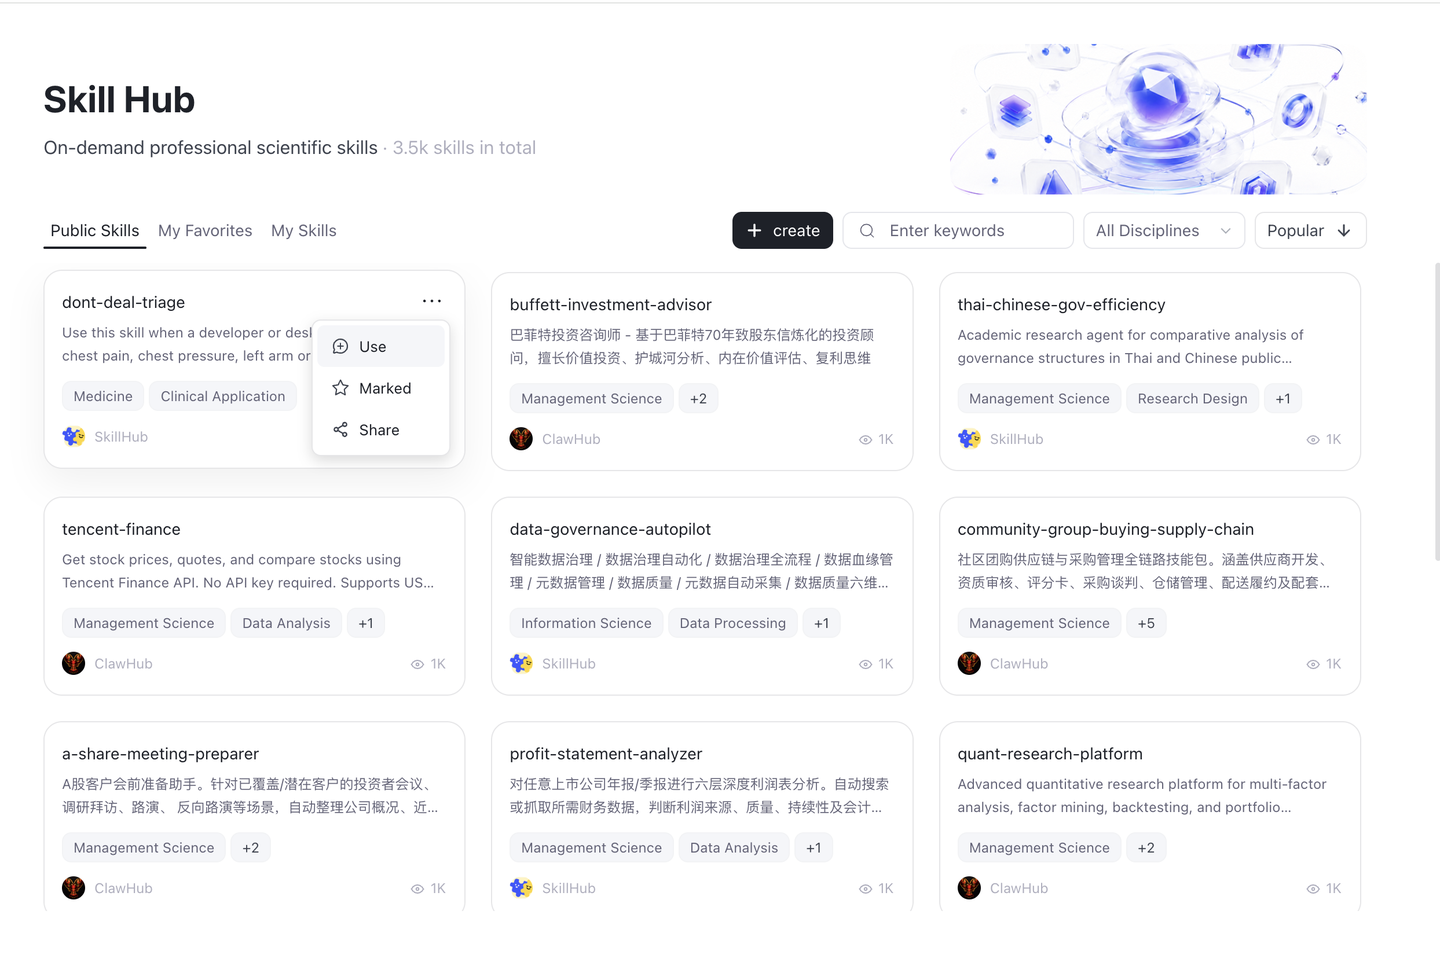
Hover over a skill card — a ··· button appears.
Click ··· to expand the options: Use, Marked / Unmarked, and Share.
Under Public Skills, click Use → automatically jumps to the Research, which displays how to use the skill in the conversation.
5.4.11 Skill Comments
On the skill detail page, click the Comments tab (alongside Overview and Installation) to view ratings and comments from other users.
Rating: Rate on a 10-point scale by clicking the stars; half stars are supported. You can change your rating after submitting.
Posting a comment: Type in the input box at the bottom of the page (emoji supported). If sending fails, revise your comment as prompted and send it again.
Replying and liking: Click the reply button below a comment to join the discussion; like a comment or cancel your like.
Deleting a comment: You can only delete your own comments. Deletion requires confirmation and cannot be undone.
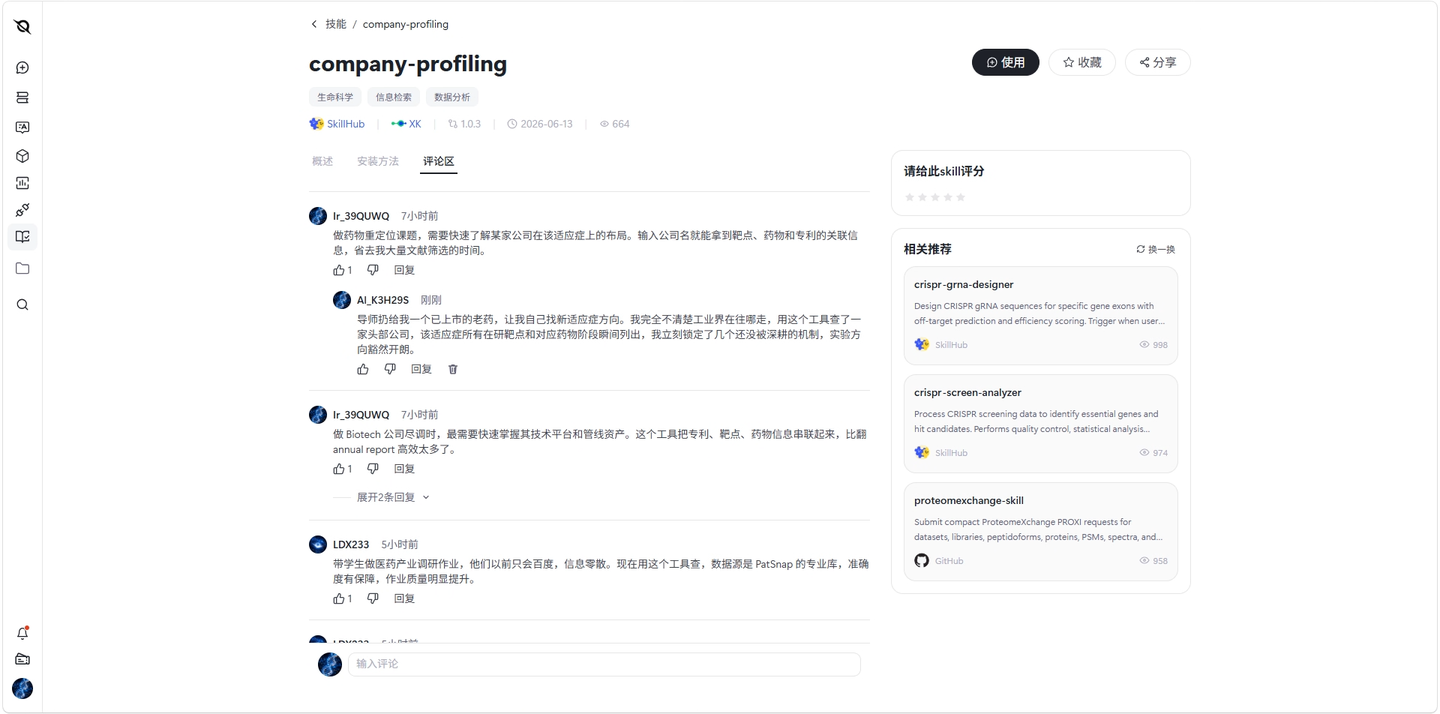
5.5 Agents
The Agents module helps you discover specialized agents for your research tasks and build agents around your own methods. You can freely combine capabilities such as Skills and MCPs, turning your research experience and workflows into reusable, shareable custom agents.
5.5.1 Finding the Agent Entry
In the left sidebar, click “Agent” under the ScienceHub group to open the Agent Hub
The “Public Agents” tab is shown by default
5.5.2 Browsing and Searching Agents
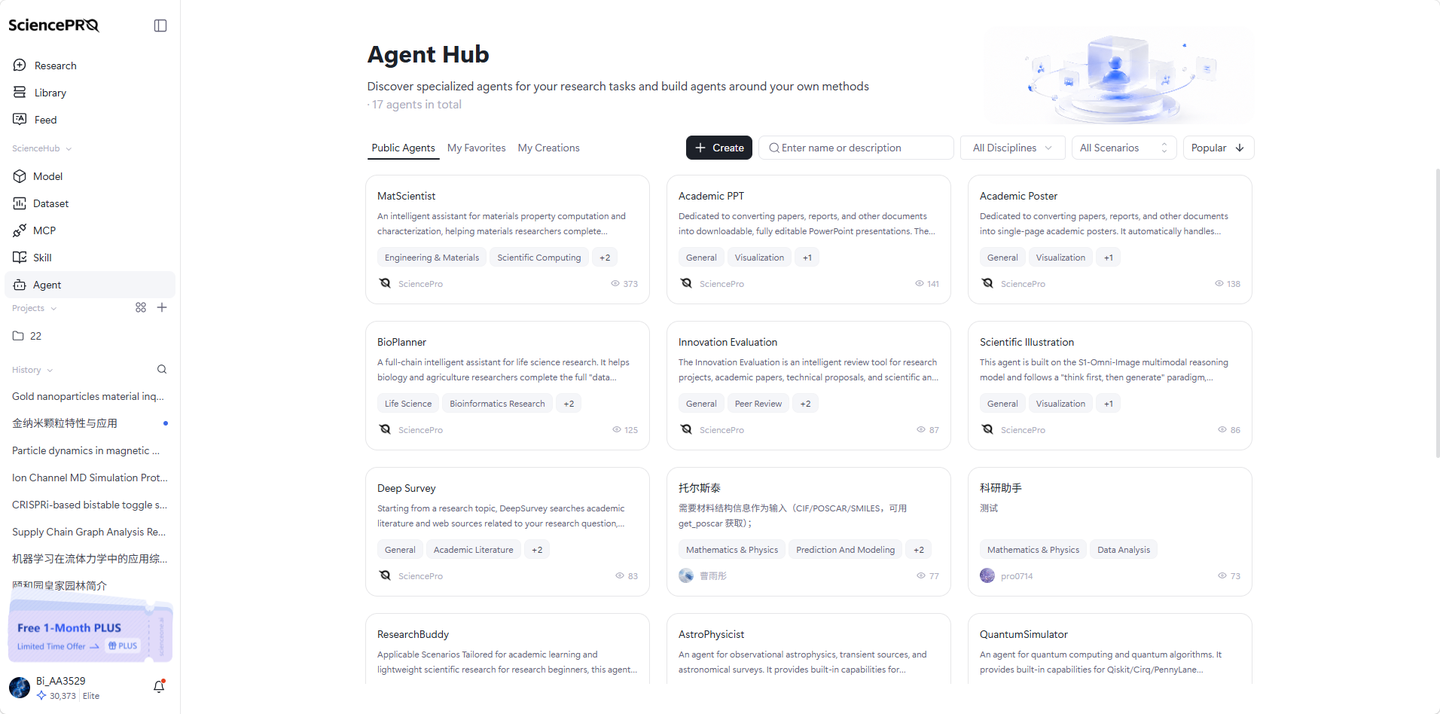
Switch categories: three tabs at the top — “Public Agents”, “My Favorites”, and “My Creations”
Search: enter a name or description in the search box; the system fuzzy-matches agents
Discipline filter: use the “All Disciplines” dropdown to filter by discipline; all disciplines are shown by default
Scenario filter: use the “All Scenarios” dropdown to filter by scenario tags; all scenarios are shown by default
Sorting: sorted by “Popular” by default
Count: the header shows the number of agents in the current tab (e.g., “11 agents in total” on Public Agents, “1 agents created” on My Creations), updating in real time as you switch tabs
Card info: each card shows the agent’s name, description, discipline/scenario tags, developer, and view count
5.5.3 Favoriting, Pinning, and Sharing Agents
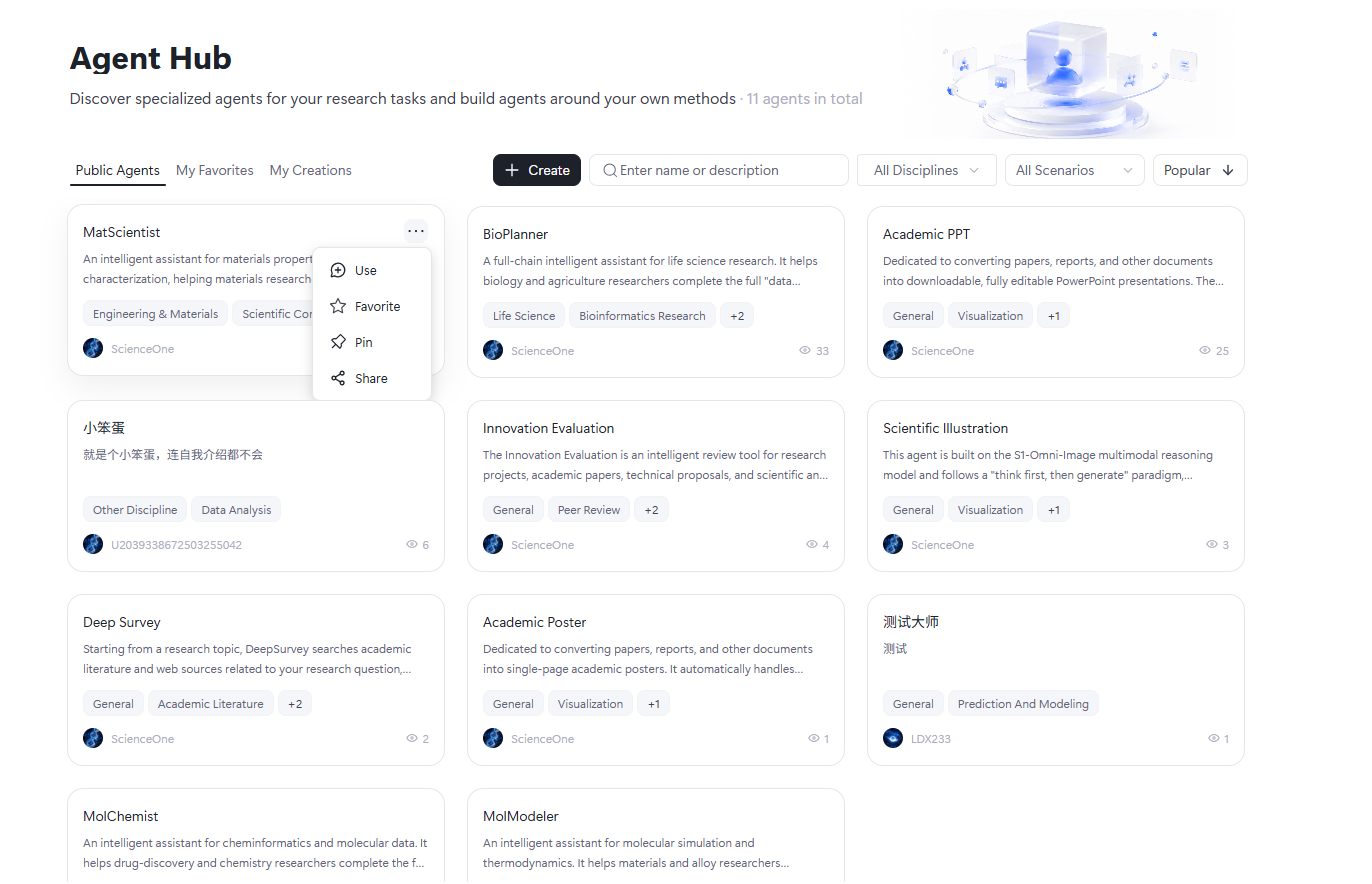
Hover over an agent card; the “···” button appears in the upper-right corner of the card
Click “···” to open the “Use” / “Favorite” / “Pin” / “Share” menu
Click “Favorite” — the agent is added to “My Favorites”; click again to unfavorite
Click “Pin” — the agent is pinned below the input box on the “Research” page for quick access during conversations; click again to unpin
Click “Share” to copy the agent link and share it with others
5.5.4 Creating an Agent
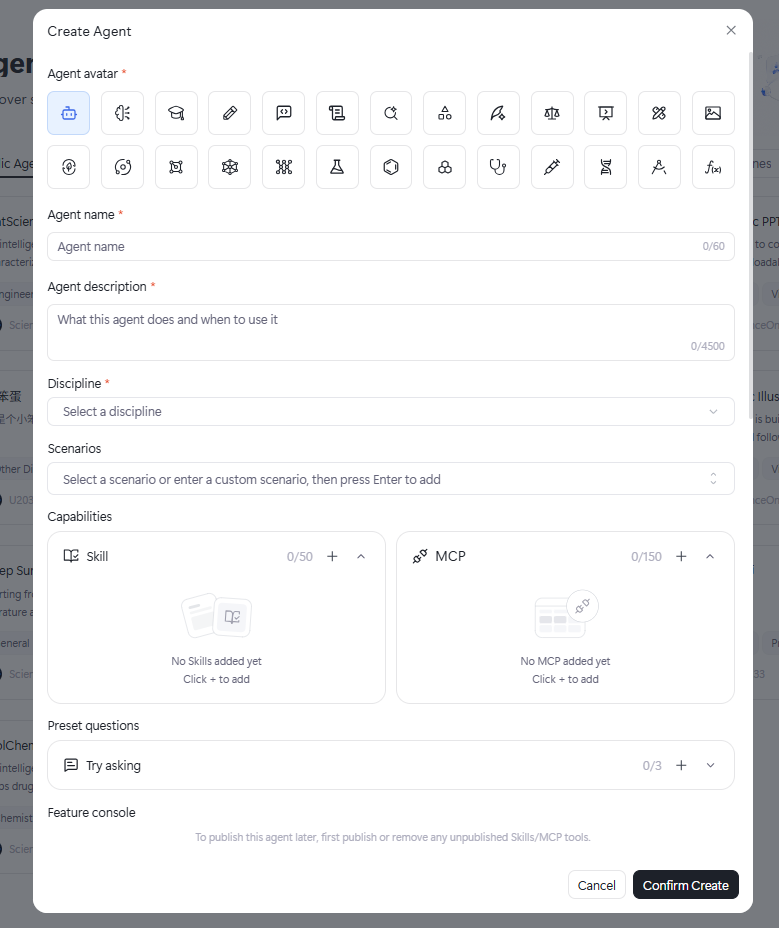
Click “+ Create” at the top of the page to open the “Create Agent” dialog
Agent avatar (required): choose one from the preset icons
Agent name (required): up to 60 characters
Agent description (required): what this agent does and when to use it, up to 4,500 characters
Discipline (required): select a discipline from the dropdown list
Scenarios (optional): select a scenario or enter a custom scenario, then press Enter to add (Backspace to delete)
Capabilities (optional): click “+” on the Skill and MCP panels to add capabilities — up to 50 Skills and 150 MCPs
Preset questions (optional): set “Try asking” preset questions — up to 3; they are shown on the detail page and the chat page to help users get started
Expand “Feature console” for full configuration if needed
Click “Confirm Create” to finish
Tip: To publish this agent later, first publish or remove any unpublished Skills/MCP tools.
5.5.5 Feature Console (All Configurations)
When creating or editing an agent, expand “Feature console” → “All configurations” and toggle each feature on or off:
File upload: supported document count and file types, configurable via “Configuration details” (default: 10 files · 20 MB each · all 12 formats)
Placeholder text: input hint; the default copy is used when left unconfigured
Literature library: search system libraries and your imported literature
Sources: the sources the agent can search
Language: supports both Chinese and English
Color: Create a PPT、choose a color when generating posters or illustrations
Size: choose an aspect ratio when generating posters or illustrations
Evaluation criteria: supports all evaluation criteria
Tip: File upload, Placeholder text, Literature library, and Sources are enabled by default; the rest are off and can be enabled as needed.
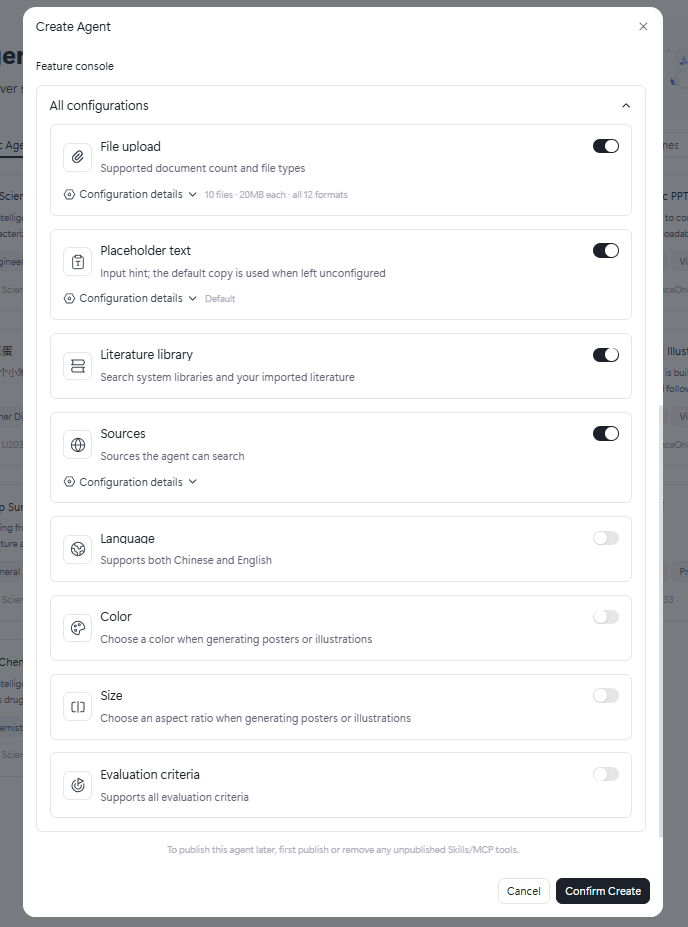
5.5.6 Publishing an Agent
In “My Creations”, find the agent you want to publish
Click “···” → “Publish” on the card
A second confirmation pops up warning that a published agent cannot be withdrawn
Once confirmed, the agent appears in “Public Agents” for all platform users
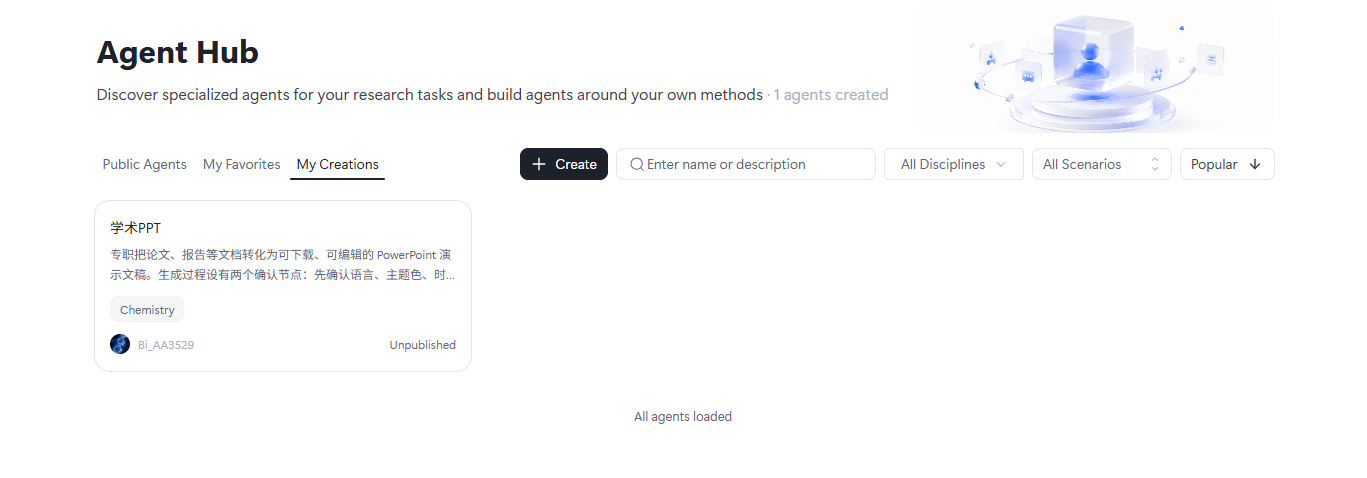
5.5.7 Editing an Agent
In “My Creations”, click “···” → “Edit” on the card
You can modify the avatar, name, description, discipline, scenarios, capabilities, preset questions, and Feature console settings
Save to apply your changes
5.5.8 Deleting an Agent
In “My Creations”, click “···” → “Delete” on the card (the red button)
Confirm the deletion in the second prompt
Note:
An unpublished agent disappears completely once deleted
A published agent disappears from both “My Creations” and “Public Agents” once deleted — it is not retained
5.5.9 Viewing Agent Details
Click any agent card to open its detail page
The page shows: agent name, discipline/scenario tags, developer, creation date, and view count
The “Overview” section shows the agent’s full description
The right-hand “Try asking” panel lists the agent’s preset questions (“Select a prompt”) for one-click asking
The “Skill” panel lists the configured Skills (shown as “X/50 enabled”), and the “MCP” panel lists the configured MCPs (shown as “X/150 enabled”); both panels are collapsible
Actions at the top of the page: “Use”, “Favorite”, “Pin”, “Share”
5.5.10 Using an Agent
Click the card to open the detail page, then click “Use” in the upper right
You will be redirected to the “Research” page to start chatting with the agent.
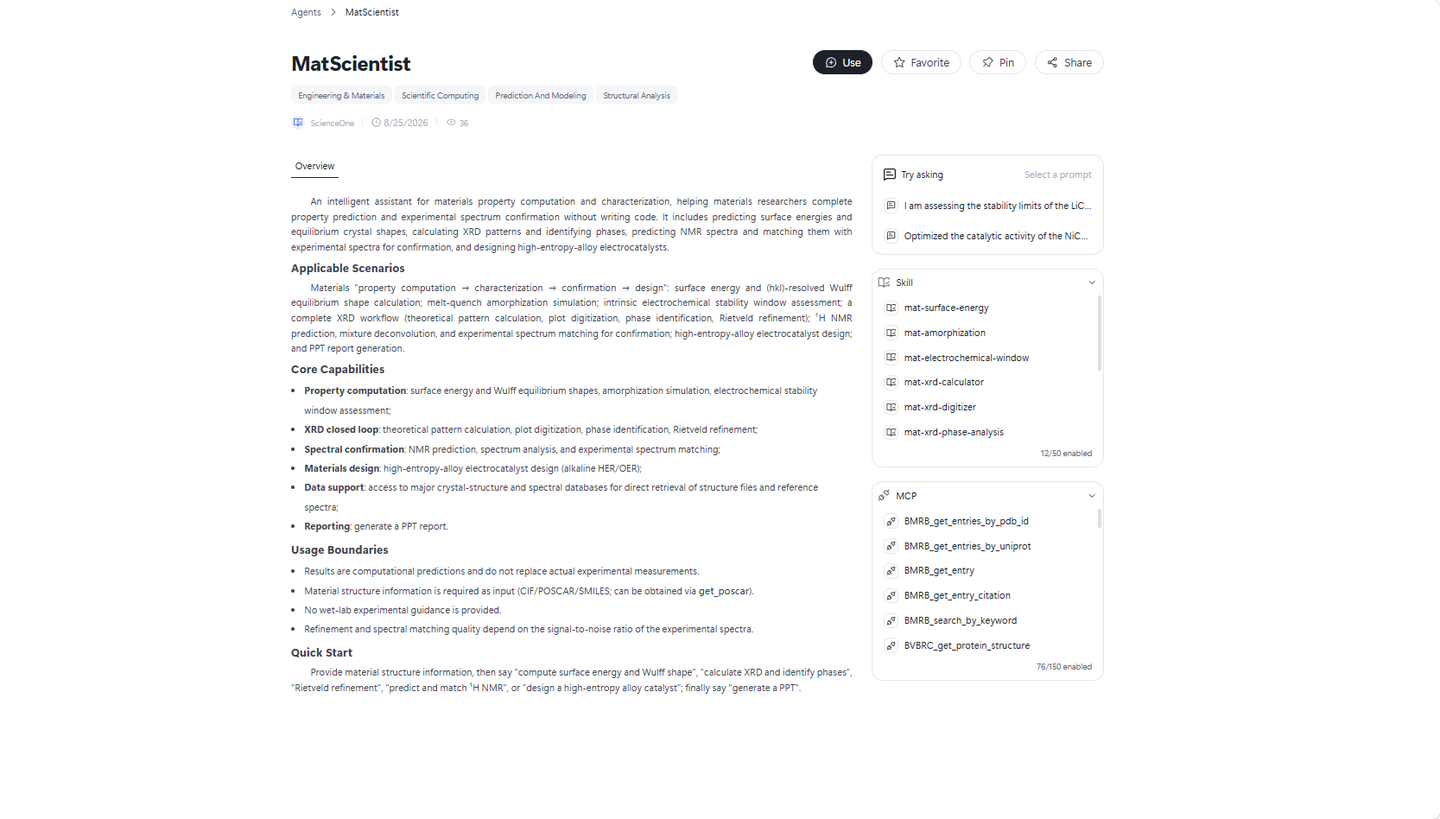
Projects Module
Click the left navigation bar "Projects" to enter this module. The Projects module is used to centralize related conversations, and accumulate long-term research脉络, binding scattered conversations, files, and tools to the same research line, making thoughts and materials accessible in one place. It is suitable for ongoing scientific research work or simple content organization.
The Projects module is located under the "ScienceHub" group in the left sidebar. Expand it to view, create, and manage projects directly. Click "View All" to enter the full project page for centralized management.
Project Module Location:
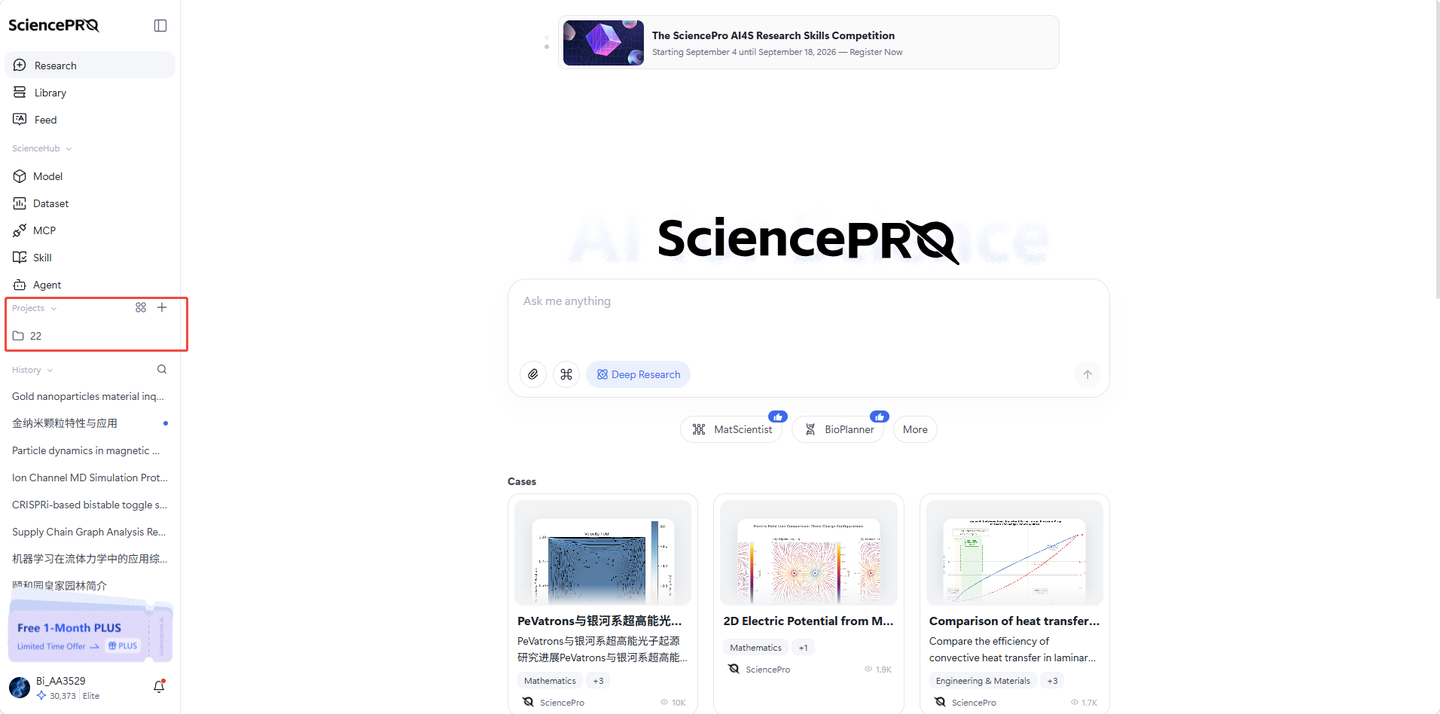
6.1 Project Browsing and Management
Projects are presented in two forms: list and card. The Projects section in the left sidebar provides quick access, while the full project page offers centralized management. By default, the system displays unarchived projects, sorted by last activity time in descending order.
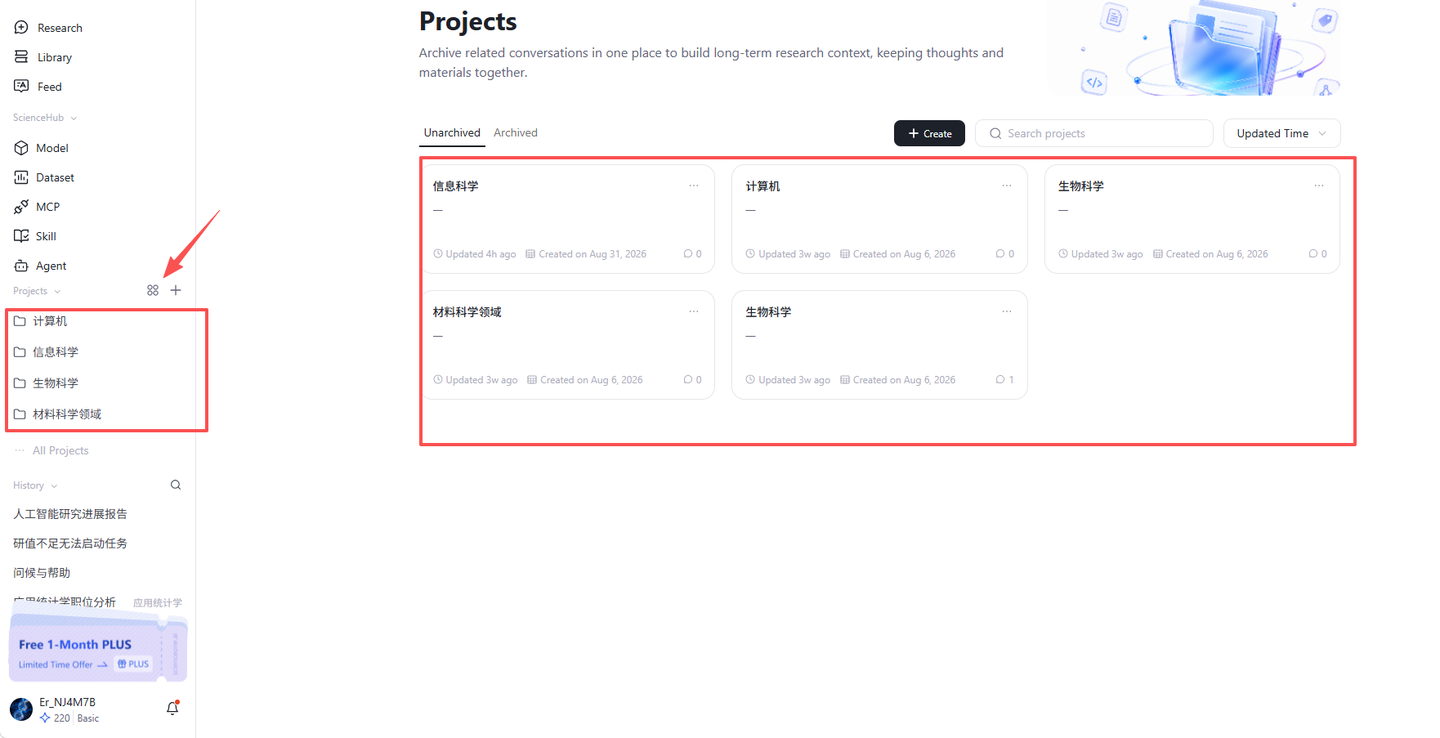
6.1.1 Sidebar Project Entry
The "Projects" section in the left sidebar contains, from top to bottom, the title, View All button, Create button, and project list. It serves as a quick entry point for daily project use:
Projects Title: Click to collapse/expand the project list. When collapsed, it does not occupy sidebar space.
View All (⊞ icon): Click to jump to the "All Projects" page for searching, sorting, archiving, and other centralized management.
Create (+): Click to open the "New Project" dialog. Hovering shows the "Create Project" tooltip.
Project List: Only unarchived projects are displayed, up to a maximum of 4. When exceeded, an "All Projects (N)" entry appears at the bottom. Pinned projects appear first (up to 3), followed by others sorted by recent activity in descending order.
6.1.2 Project Rows and Conversation Expansion
Each project row in the sidebar supports expanding conversations, accessing details, and more actions:
Expand/Collapse: Click the arrow on the left side of a project row to expand the conversation list under that project. Each project displays up to 3 conversations, with "+N more conversations…" shown for additional ones. Click to enter the project details page to view all.
Enter Project: Click the project name or the conversation icon (💬) to enter the project details page.
More Actions (⋯): Click to expand the dropdown menu, containing "Pin/Unpin," "Archive/Unarchive," "Rename," and "Remove Project."
Conversation Actions (⋯): After expanding conversations, each conversation provides "Rename," "Remove from Project," "Add to Project," and "Delete" options.
6.1.3 All Projects Page
Click "View All" or "All Projects (N)" in the sidebar to enter the All Projects page, which manages all projects centrally in a card grid layout:
Top Header Area: Displays the title "Projects" with the subtitle "Centralize related conversations, accumulate long-term research脉络, make thoughts and materials accessible in one place" along with a decorative illustration.
Unarchived/Archived Toggle: Switch between active projects and archived projects via tabs.
Create Project: The page toolbar provides a "Create Project" button, functioning the same as the sidebar creation.
Search Projects: Filter projects in real-time by entering keywords in the search box, matching against project names.
Sort: Supports sorting by "Creation Time" or "Update Time," with creation time as the default.
Project Cards: Click a card to enter the corresponding project details page. Archived projects display an archive badge and a "(n/n)" suffix after the name.
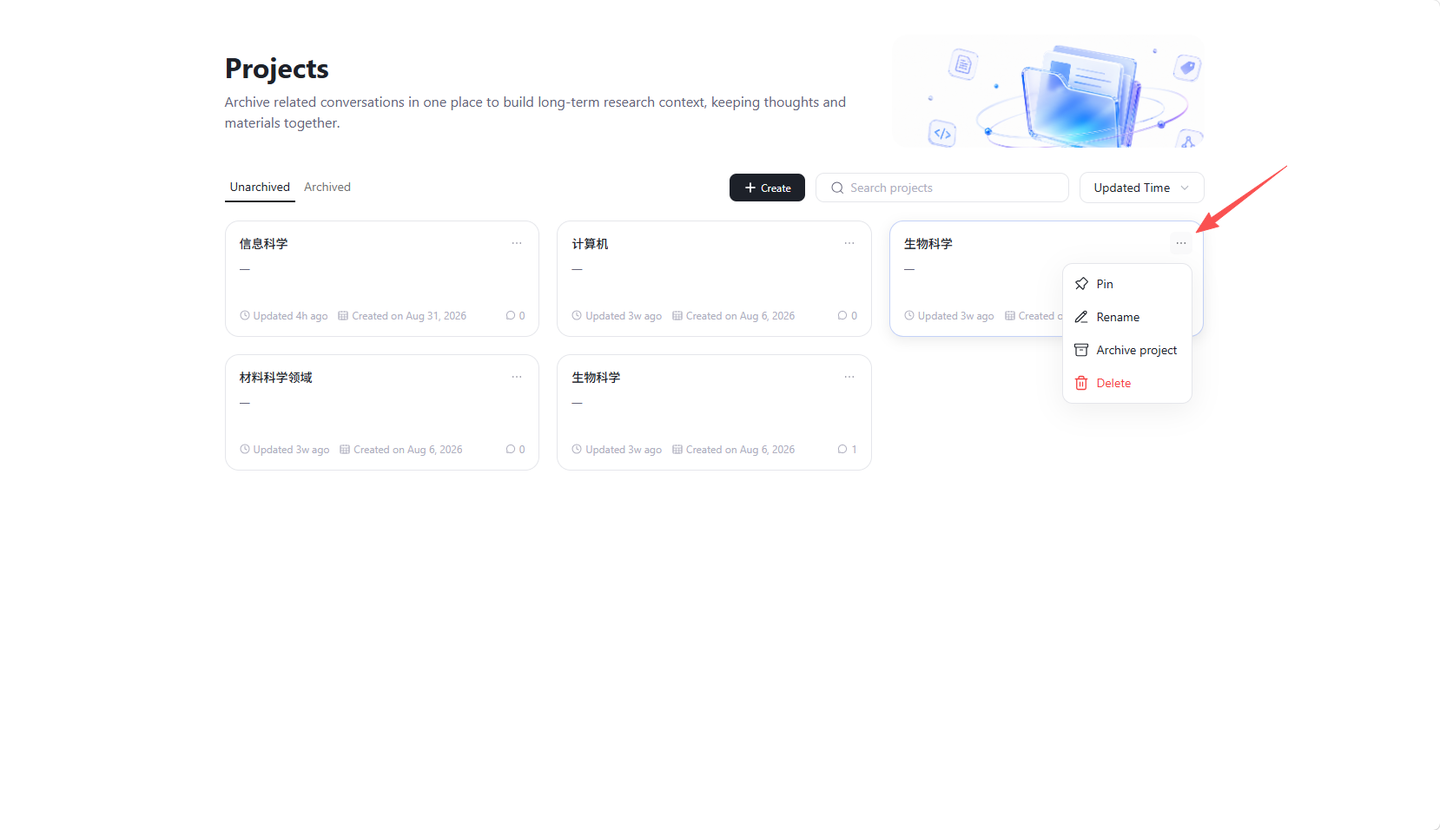
6.2 Creating a Project
There are multiple entry points for creating a project, all opening a unified "New Project" dialog. Upon successful creation, you will automatically enter the project details page and can start conversations immediately.
6.2.1 Creation Entry Points
The system provides the following entry points for convenient access in different scenarios:
Sidebar Create (+): The "+" button to the right of the Projects section title.
All Projects Page Create: The "Create Project" button on the All Projects page toolbar.
From History Conversations: Right-click on a history conversation → Add to Project → New Project, creates a project and moves the conversation into it simultaneously.
From Project Conversations: Right-click a conversation within a project → Add to Project → New Project, creates a project and moves the conversation from the original project.
6.2.2 Filling in Project Information
Fill in the basic project information in the "New Project" dialog:
Project Name (Required): Maximum 40 characters. A concrete naming convention is recommended (e.g., "Quantum Materials Research," "Climate Model Analysis"). If left blank when clicking Create, a red prompt "Please enter a project name" will appear, auto-resuming after approximately 1.8 seconds.
Project Description (Optional): Maximum 80 characters. Describe the project objective, research direction, or notes in one sentence, with an n/80 character counter.
Bottom Prompt: A gray explanatory note at the bottom of the dialog reads: "The project feature allows you to centrally save conversations for ongoing scientific research work, or simply for organizing content."
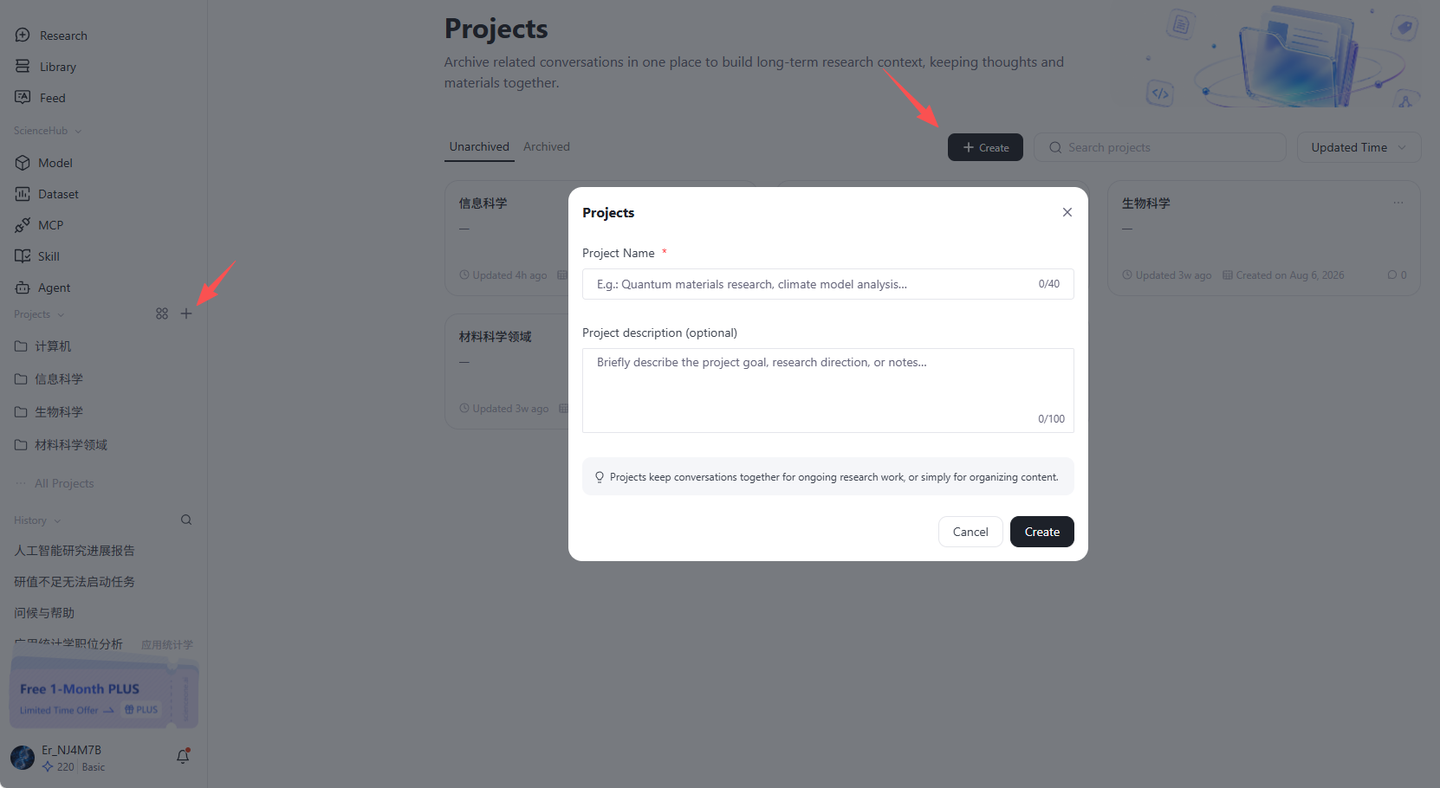
6.2.3 Post-Creation Behavior
After clicking "Create Project," the system performs the following actions:
Auto-navigate to Details Page: Upon successful creation, a "✓ Project 'xxx' created" notification appears, and you are directed to the project details page. The input field glows and auto-focuses for immediate conversation.
Creating with Conversations: If initiated via the "New Project" path from a history conversation or project conversation, the corresponding conversation is moved into the new project simultaneously.
Initial State: A new project's conversations, files, agents, Skills, and MCPs are all empty.
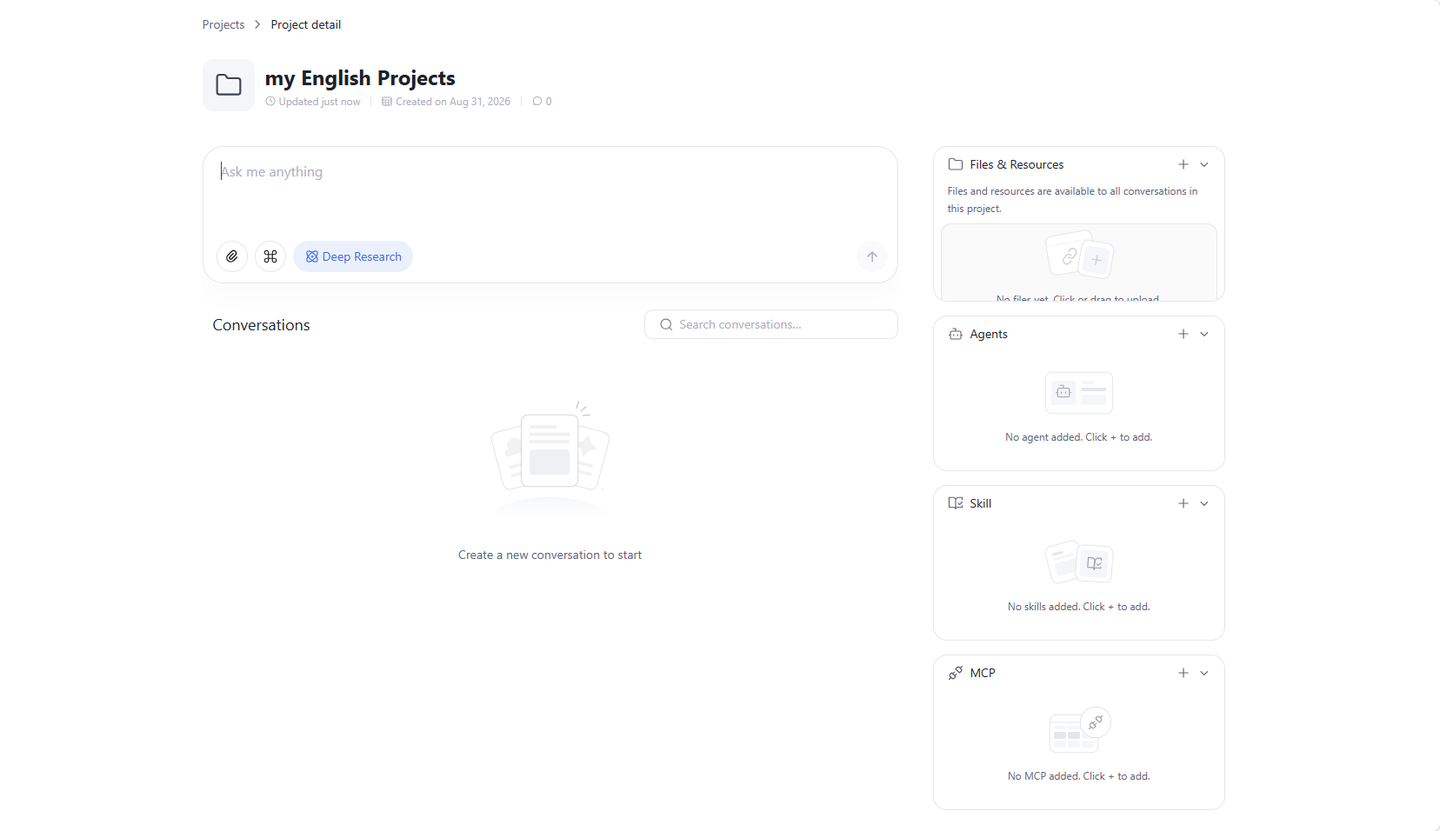
6.3 Project Details Page
The project details page is the core workspace for a project, adopting a three-column layout of "Left Main Content + Right Resource Panel." The left side is used for initiating and viewing conversations, while the right side centrally manages the project's files and resources, agents, Skills, and MCPs from top to bottom.
6.3.1 Project Information and Conversation Input
The top of the left main content column displays project information, below which is the conversation input area:
Project Header: Displays a back button, folder icon, project name, and subtitle ("Created by you · Creation time · Pinned").
Conversation Input Box: Science conversation-style input area supporting questions, attachments, instructions, deep research mode, and agent selection. Send by clicking the send icon (📤) or pressing Enter.
Quick Agent Row: Below the input box, a row of quick-access agent pills is provided, listing only agents added to this project (maximum 10, excluding decommissioned agents). New projects have no agents by default. After adding agents to a project, click to select one for subsequent conversations. If no agents have been added, the entire row is hidden.
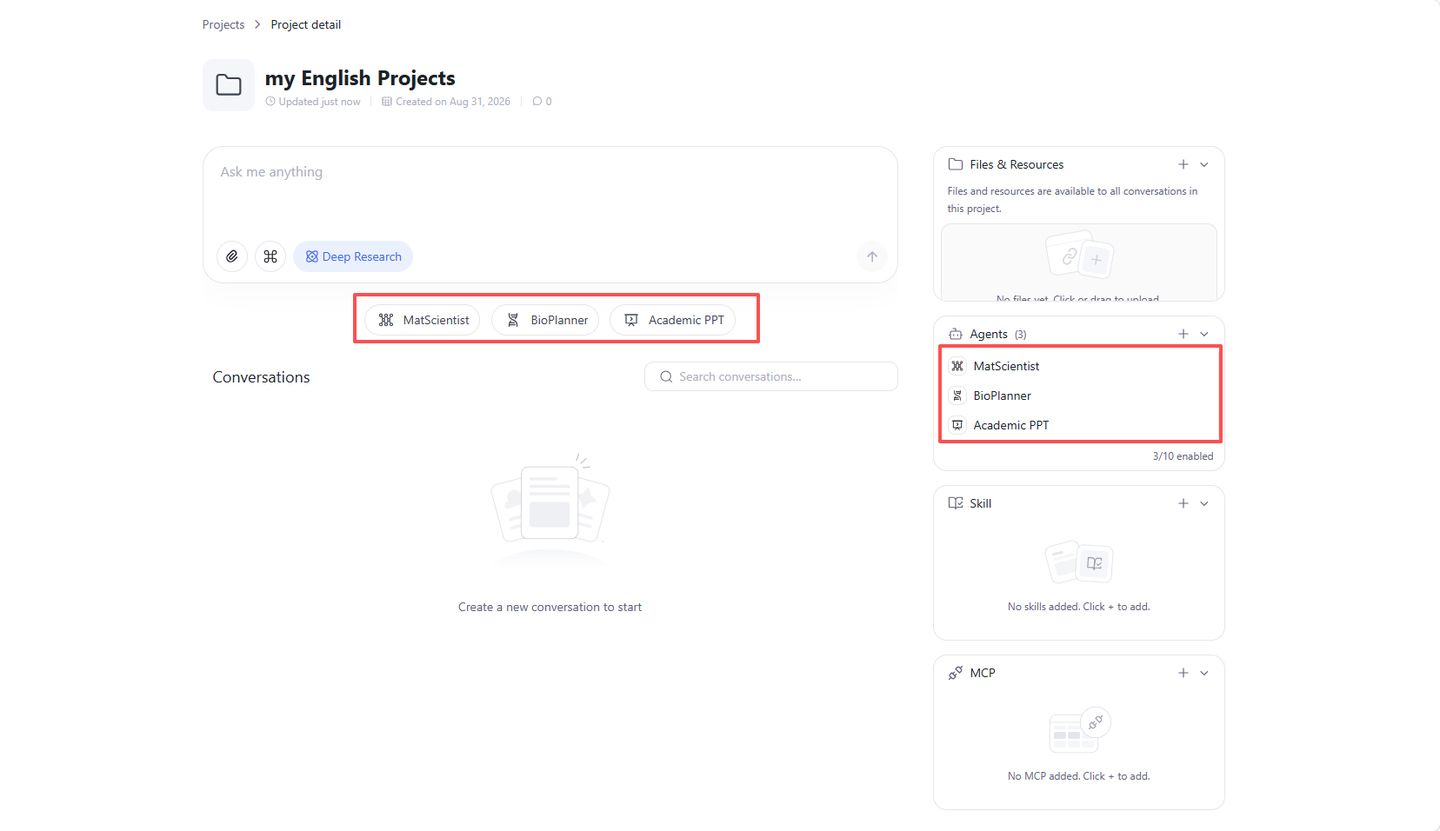
6.3.2 Project Conversation List
Below the main content area is the project conversation list, centrally displaying and managing all conversations within this project:
Conversation Tabs: Lists all conversations in the project. Click any conversation to enter the conversation replay page for viewing the complete Q&A.
Conversation Search: The search box on the right supports filtering conversations by title in real-time.
Conversation Actions (⋯): Each conversation provides "Remove from Project" (returns to history conversations, still viewable) and "Delete" (permanent deletion after confirmation).
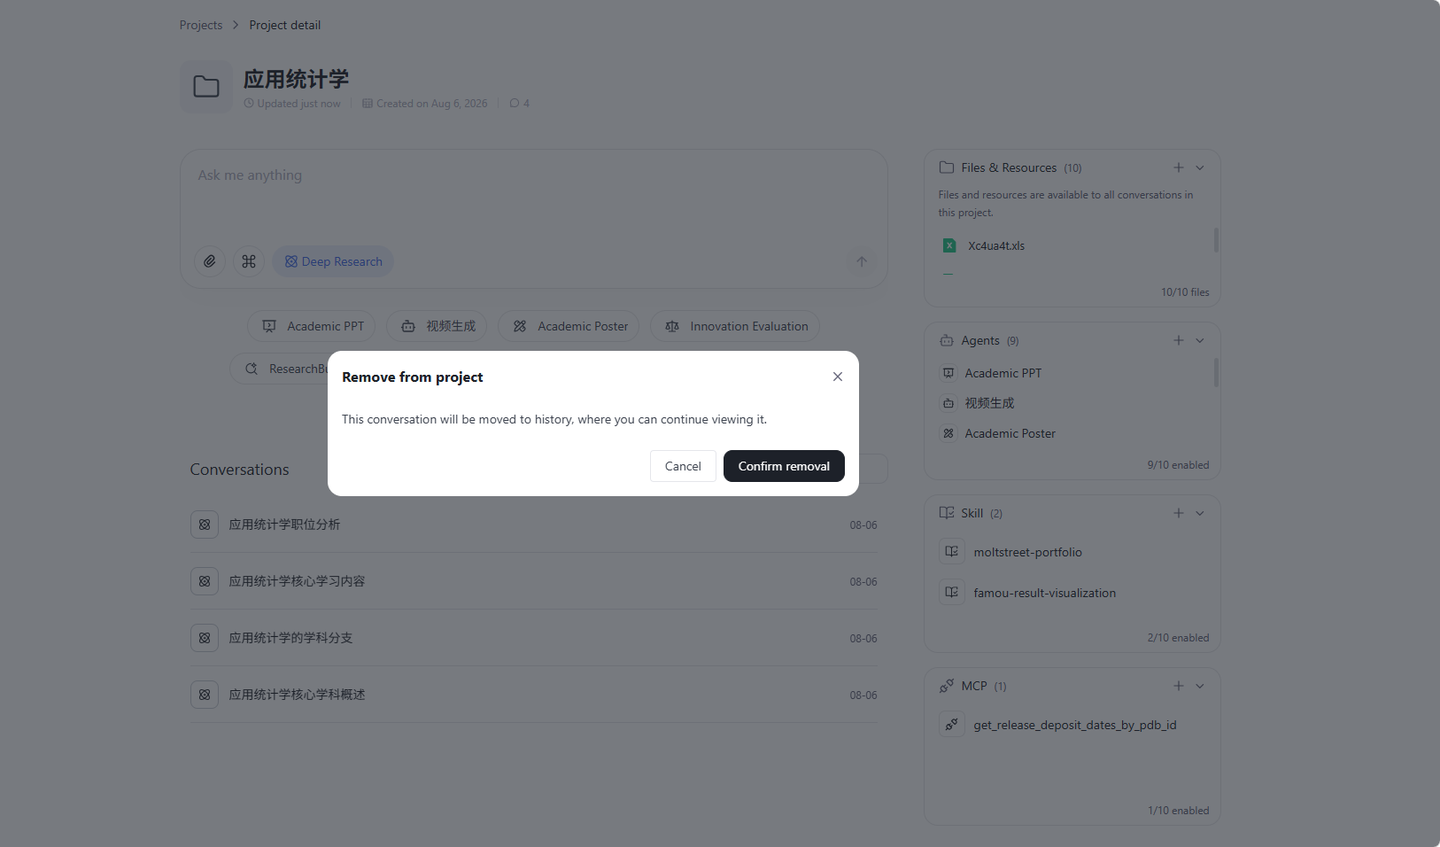
6.3.3 Files and Resources
The "Files and Resources" panel on the right side manages project-level shared files, accessible by all conversations within this project:
Add File Entry: "+" in the top-right corner of the panel → pops up two options: "Add Local File" and "Associate Knowledge Base."
Upload Method: Supports drag-and-drop upload or click to upload. The upload dialog shows a drop zone, selected file chips, and a Save button.
Supported Formats: rar, zip, 7z, jpg, jpeg, png, gif, ppt, pptx, doc, docx, xls, xlsx, csv, pdf, txt, md, py, js, json. Scanned documents are not supported for reading.
Upload Limits: Single file ≤ 50MB (exceeded files are skipped with a notification). Each project supports up to 10 files (a message "Maximum 10 files" is shown when exceeded).
File Preview: Click a regular file to open the content viewer (supports download, full screen, etc.). Click an archive to open a Zip directory tree viewer (left = directory tree, right = preview).
Delete File: Click the "×" on the right side of a file item to delete (delete button is hidden for archived projects). The panel bottom shows a "Used / 10 files" counter, turning red when the limit is reached.
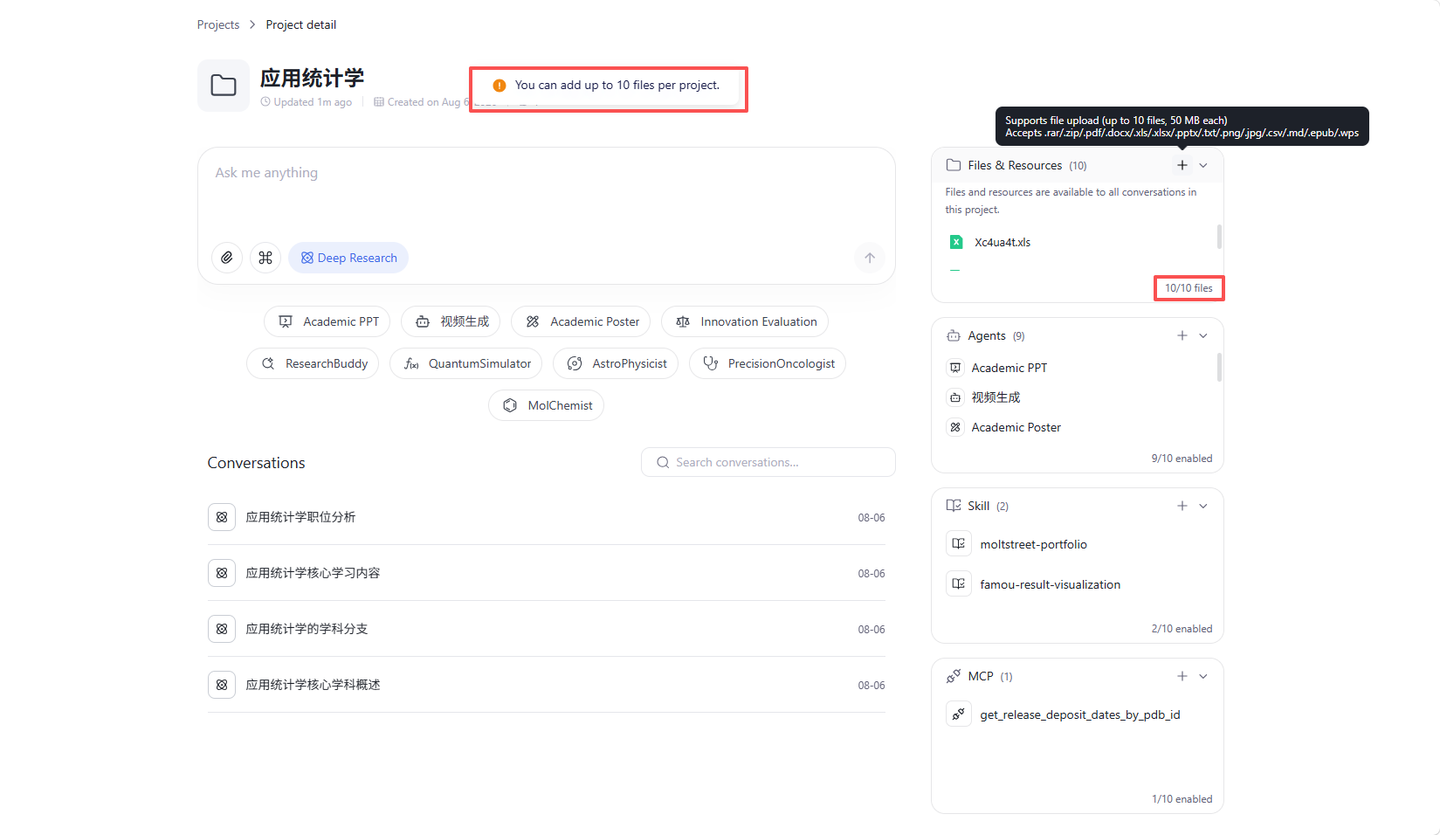
6.3.4 Agents
The "Agents" panel on the right side is positioned between "Files and Resources" and "Skills," managing specialized research agents added to this project (such as Systematic Review, Paper Reading, Statistical Modeling, Academic Writing, etc.). Configuration is saved independently per project and persists across refreshes:
Add Entry: "+" in the top-right corner of the panel → opens the "Agent Marketplace" dialog.
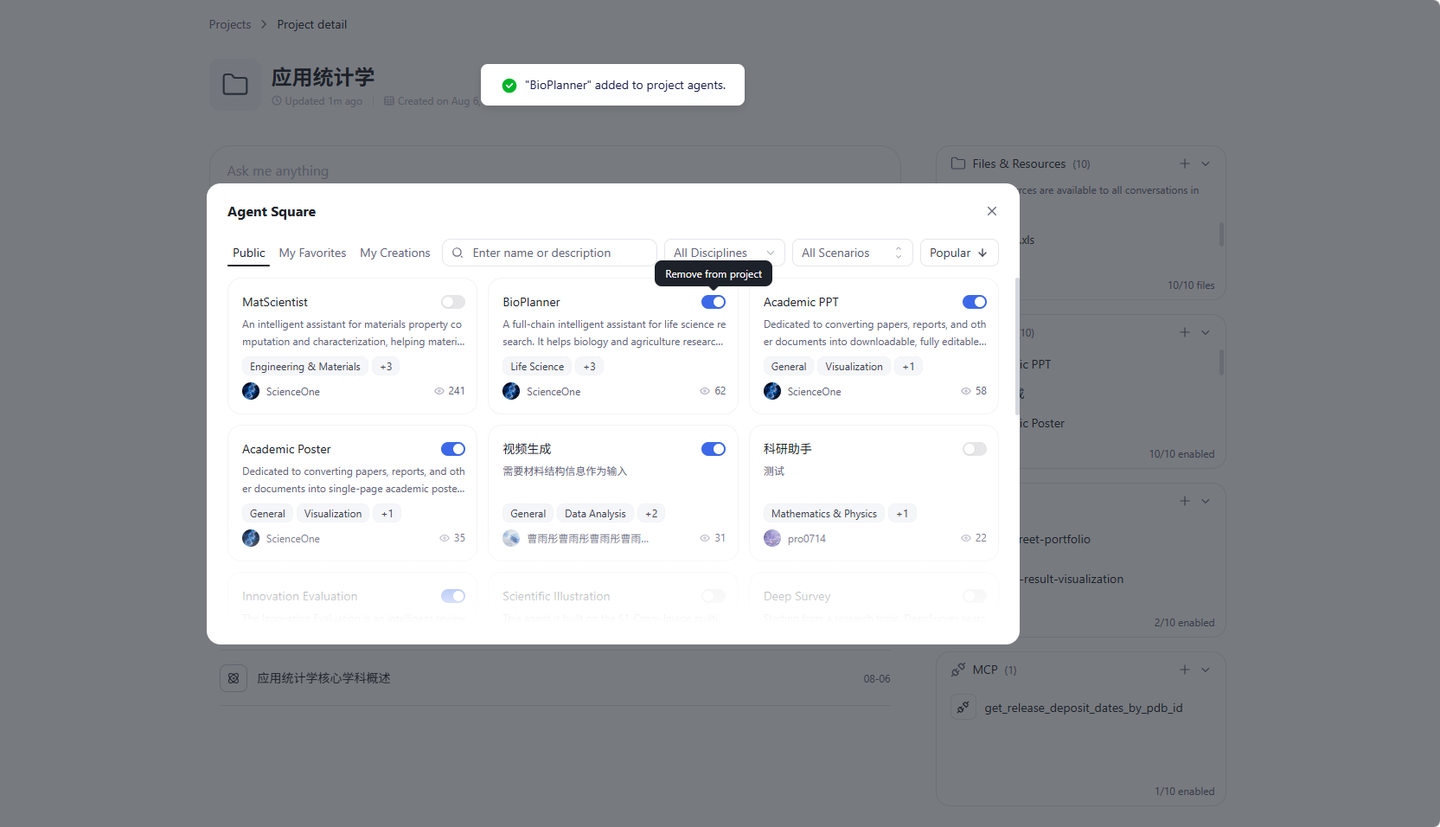
List Items: Each row = icon + name + "×". Default shows up to 3 items; scrollbar appears when exceeded. The panel bottom displays "Total N count."
Quantity Limit: Each project can add a maximum of 10 agents (consistent with Science Conversation). When the limit is reached, a message "Maximum of 10 agents can be added" is displayed.
Decommissioned Status: Agents that have been decommissioned by the platform remain in the list with a gray "Decommissioned" badge. They can still be added/removed and count toward the 10-agent limit, but they do not appear in the quick agent row and cannot be selected.
Removal: Click the "×" in the row to remove from the project. A notification "XX has been removed from the project" appears. If that agent was currently selected on the project details page or conversation page, the selection is deselected and reverts to "Deep Research."
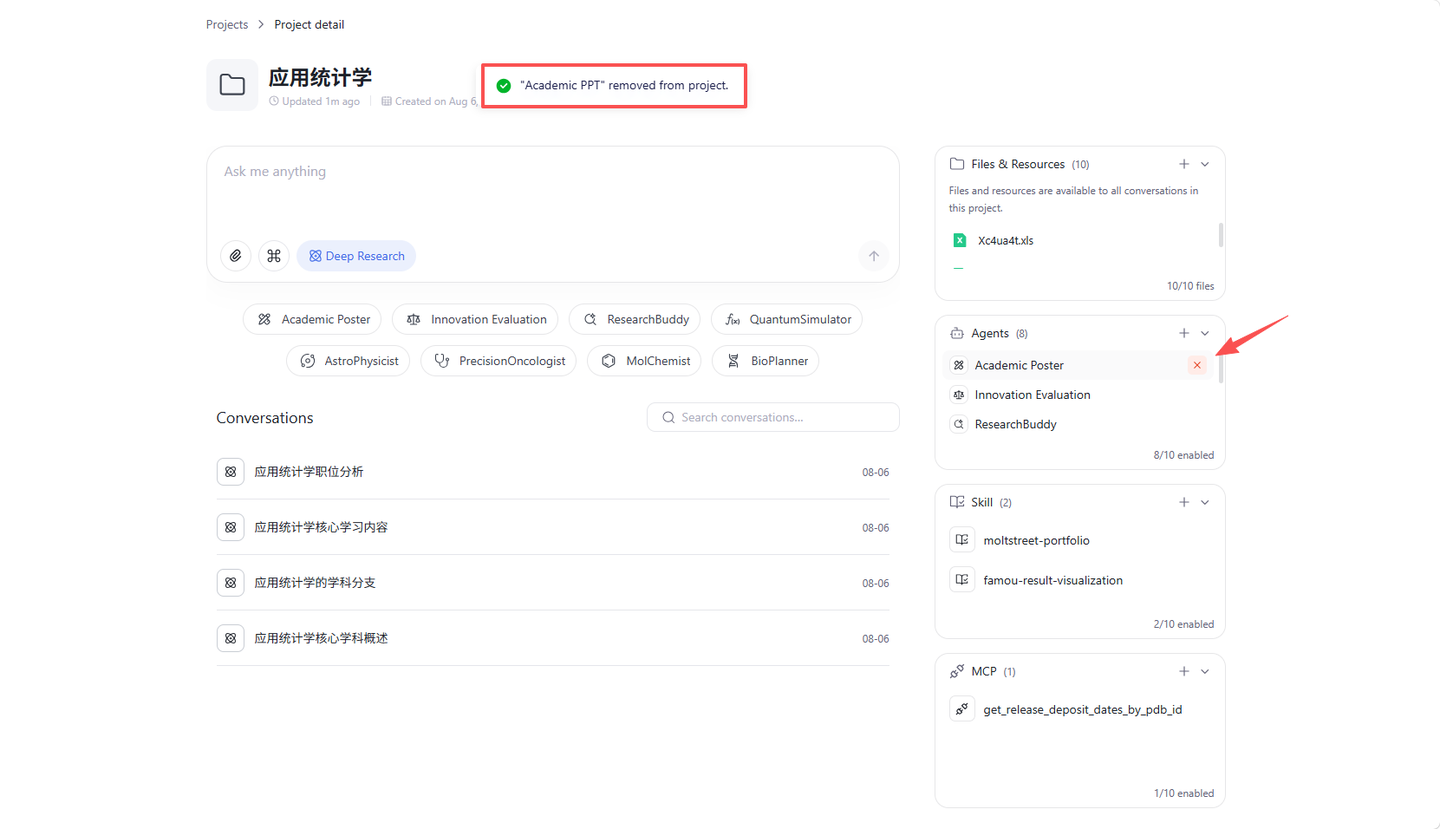
Empty State Guidance: When no agents have been added, displays "No agents added yet (maximum 10). Click + to add."
Archived Projects: Panel is read-only — "+" is grayed out and unclickable, list items do not show "×."
On both the project conversation page and project details page, you can select agents added to this project before starting a conversation:
Quick Agent Row: Lists agent pills added to this project below the input box (maximum 10, excluding decommissioned agents). The entire row is hidden if no agents have been added.
Selection: Click a pill to select and highlight it. The "Deep Research" mode chip in the input area is replaced with an Agent Chip (icon + name + ×), displaying a notification "Switched to 'XX' agent." The input box placeholder changes to match the selected agent's prompt.
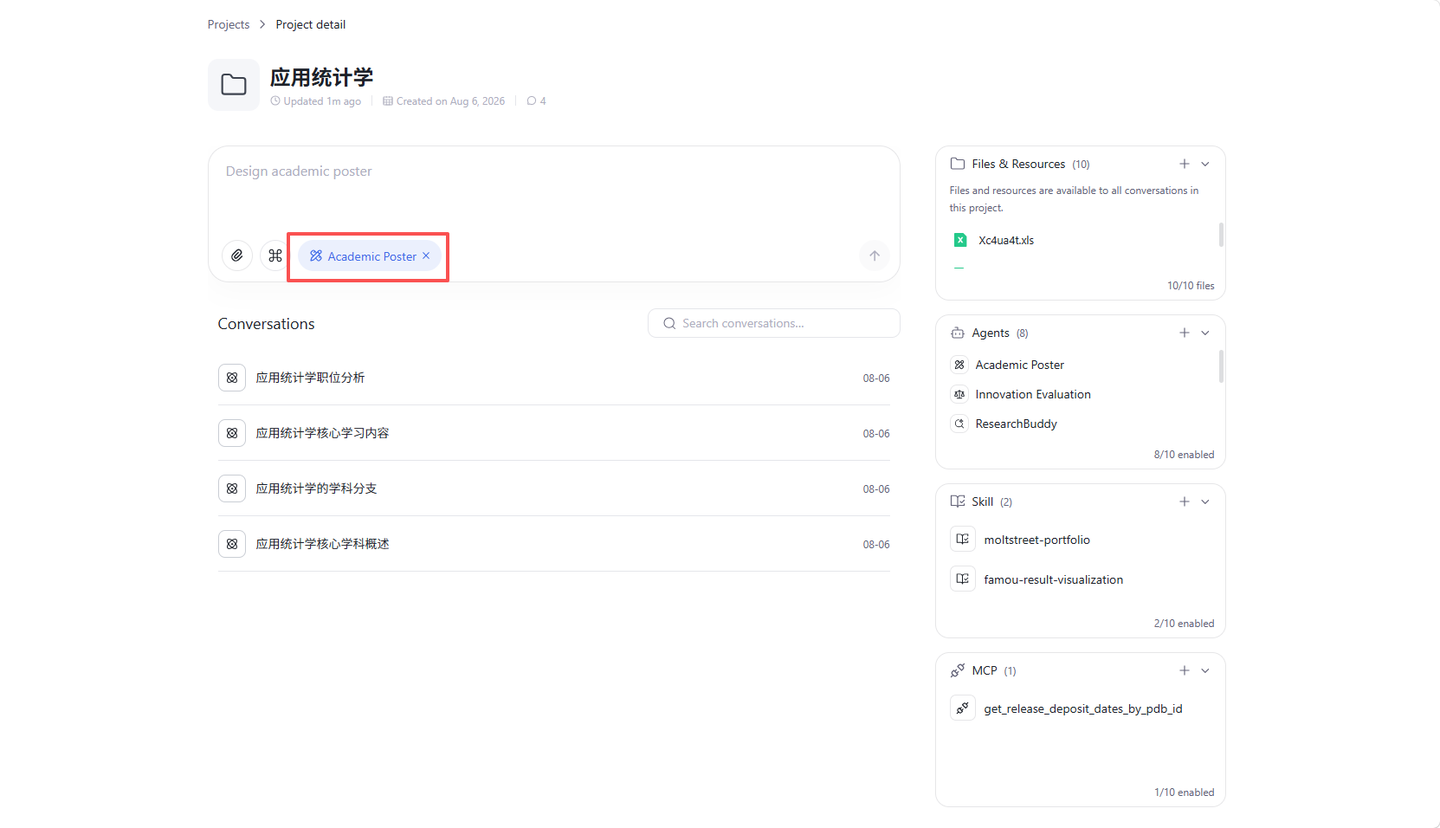
Cancel Selection: Click the same pill again or click the "×" on the chip to return to the default "Deep Research" state.
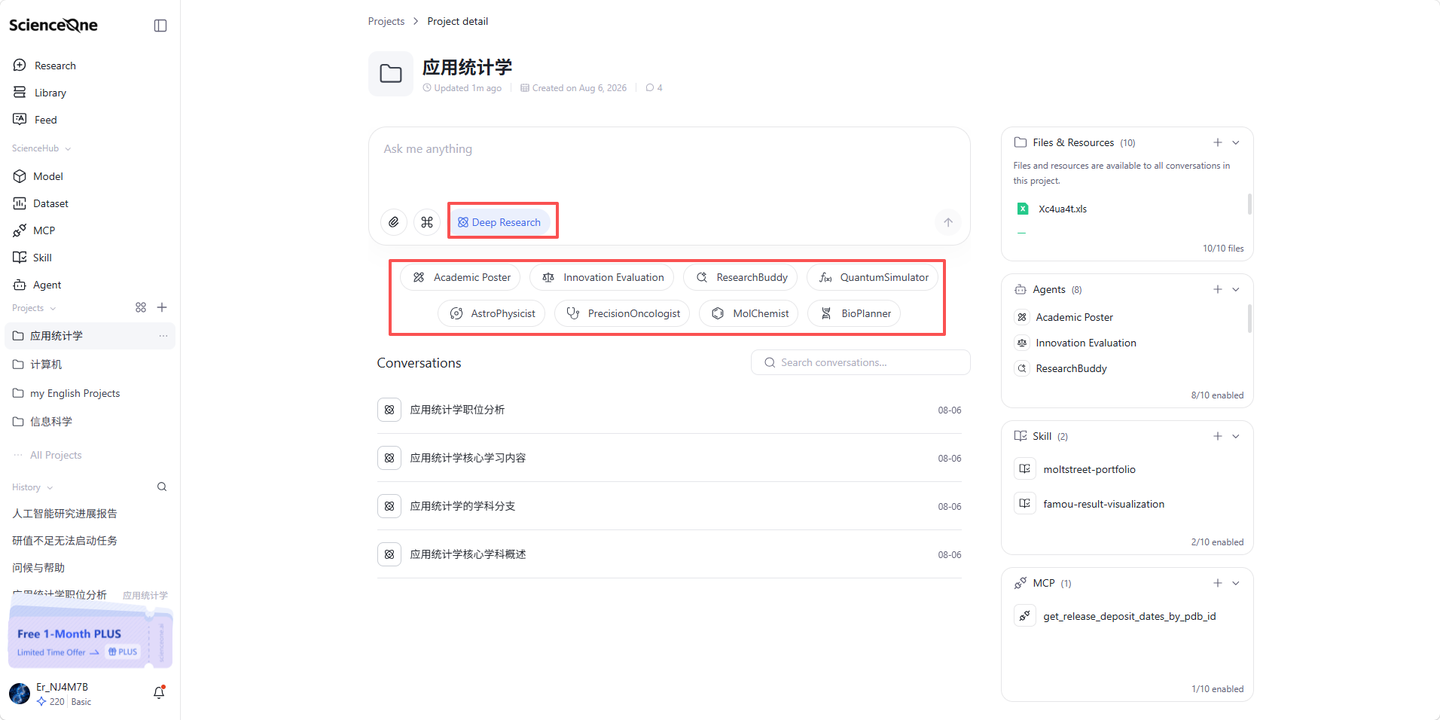
6.3.5 Skills
The "Skills" panel on the right side manages professional science skills added to this project:
Add Entry: "+" in the top-right corner of the panel → pops up two options: "My Skills" (read-only list, searchable) and "Skill Marketplace."
Skill Marketplace: Provides tabs for "Public Skills / My Favorites / My Creations," supporting search, discipline, scenario filtering, and sorting (Popular / Latest).
Project-Level Independence: Skill status is bound to the current project. Different projects load their respective configurations. Added skills are displayed within the panel.
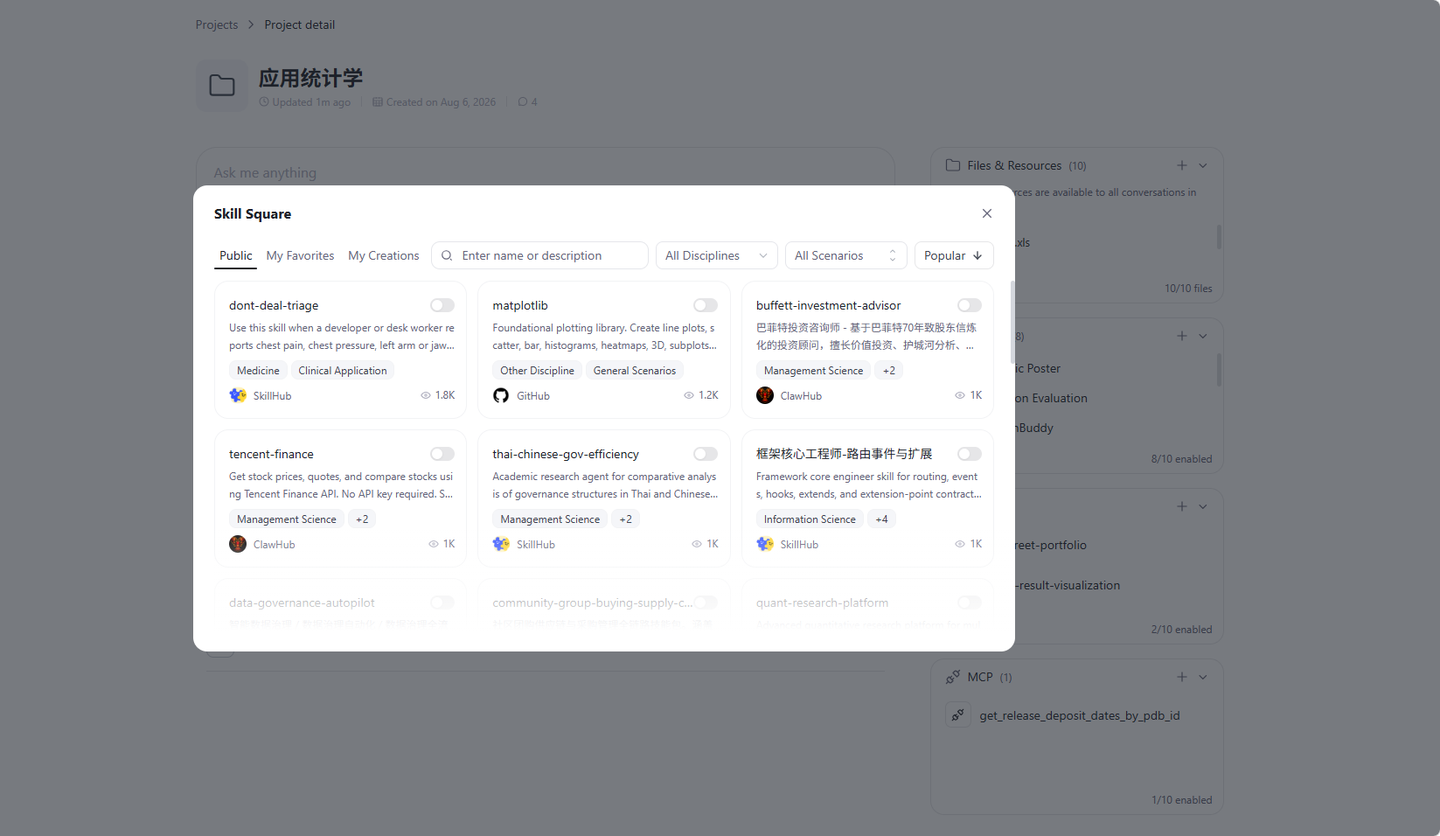
6.3.6 MCP (Tools)
The "MCP" panel on the right side manages external tools added to this project:
Add Entry: "+" in the top-right corner of the panel → pops up two options: "My MCPs" (read-only list, searchable) and "MCP Marketplace."
MCP Marketplace: Provides tabs for "Public MCPs / My Favorites / My Creations," supporting search, discipline, scenario filtering, and sorting (Popular / Latest).
Project-Level Independence: MCP status is bound to the current project, maintained independently per project alongside files and Skills.
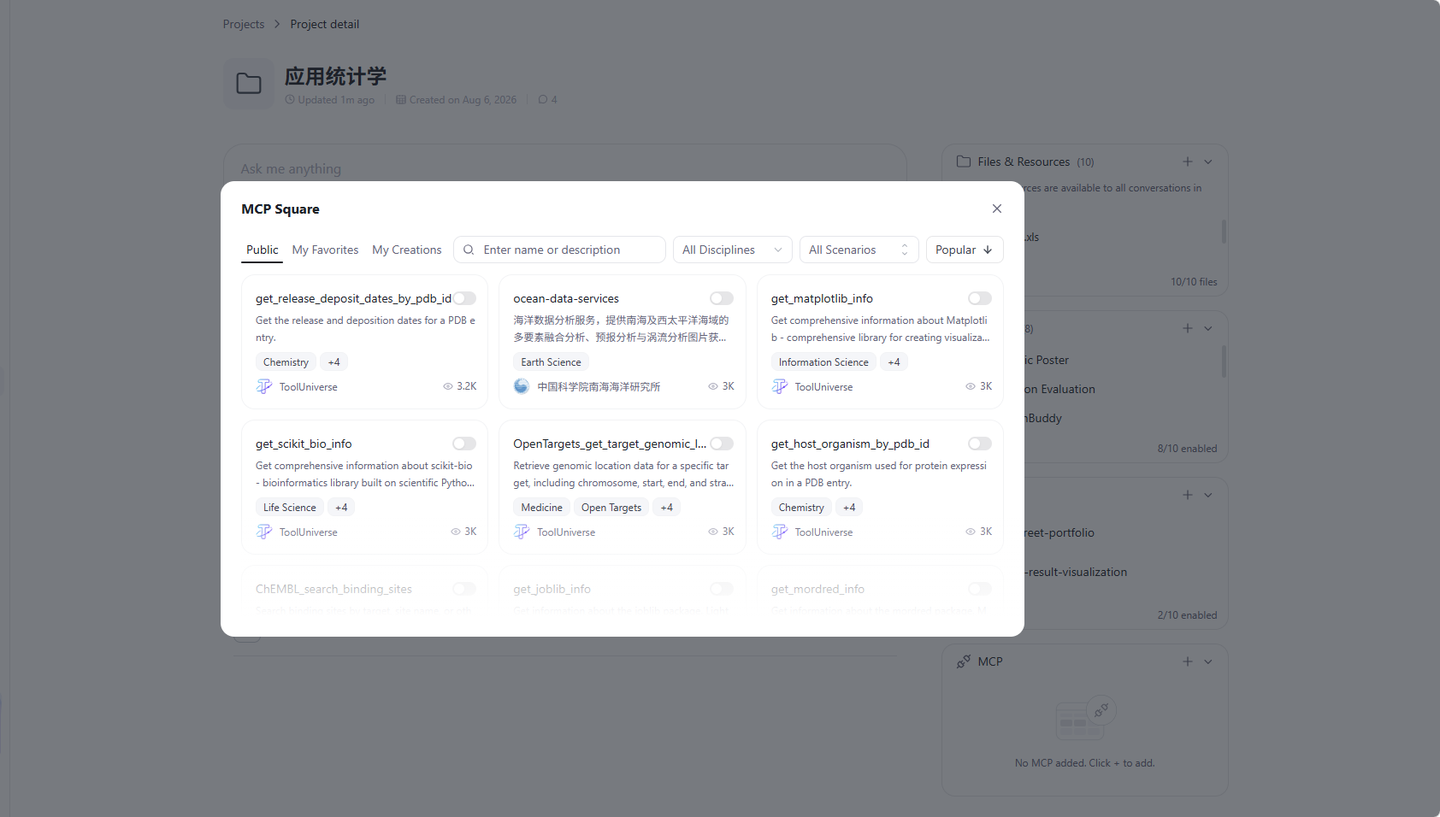
6.4 Conversation Management
Conversations within a project can be initiated, viewed, transferred, and deleted, with bidirectional linkage to "History Conversations."
6.4.1 Initiating and Viewing Conversations
Initiate conversations within a project and view complete Q&A in the replay page:
Initiating a Conversation: Enter content in the project details page input box and send. The system adds a new conversation at the top of the conversation list, synchronizes it to History Conversations with the project marked, and updates the project's activity timestamp.
Conversation Replay Page: Displays the complete multi-turn Q&A. The top includes a back button, project name, conversation title, copy link button, and workspace toggle.
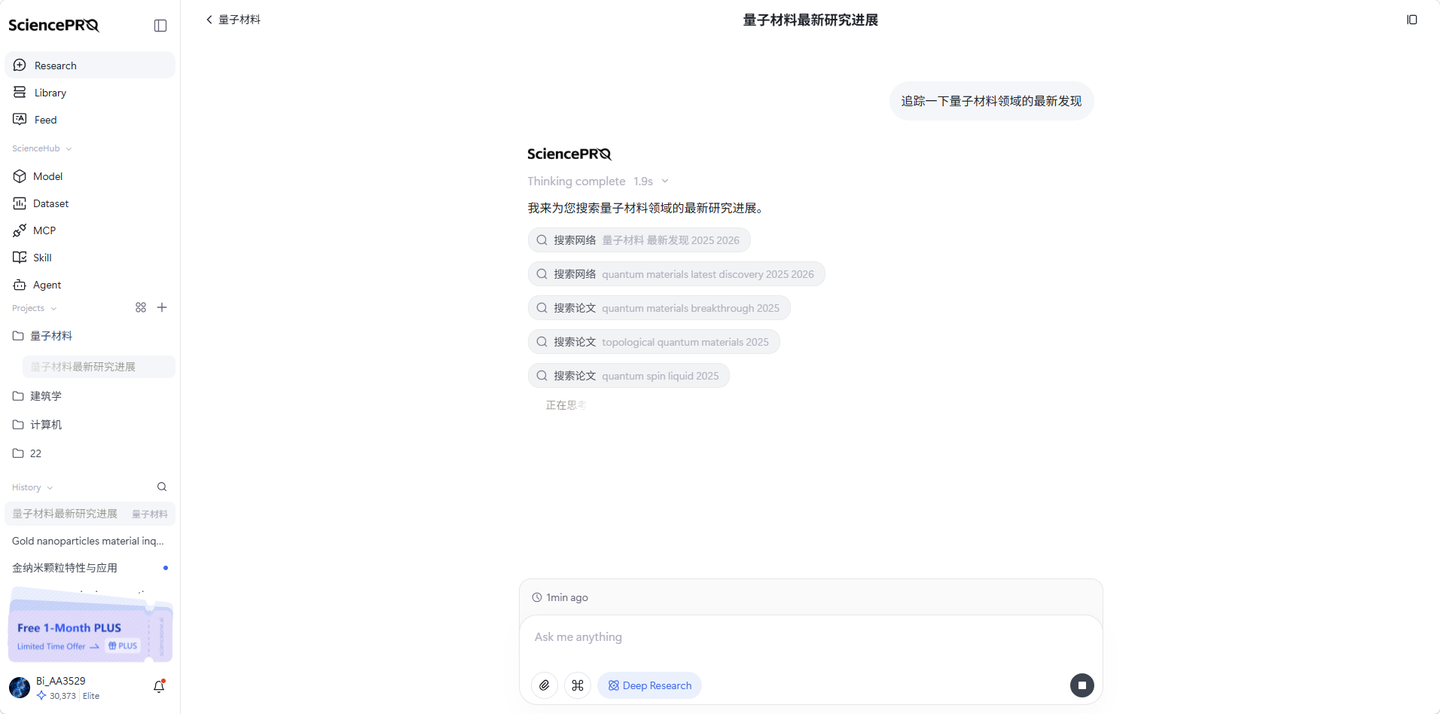
Workspace Panel: Click the workspace icon to expand, containing three tabs: "Tasks / Info / Files." At the bottom, step playback controls ("Previous / Next") and a progress bar are provided.
6.4.2 Conversation Transfer and Deletion
Conversations can be transferred between projects and History Conversations, or permanently deleted:
Rename: Modify the conversation title.
Add to Project: Right-click / ⋯ → Add to Project. The submenu includes "New Project" and existing projects (the current project is grayed out).
Remove from Project: Returns the conversation to History Conversations. It remains viewable (this is not deletion).
Delete: Confirmation required: "Deleted conversation records cannot be recovered." Permanently deleted upon confirmation.
6.4.3 History Conversation Linkage
The "History Conversations" section in the sidebar displays loose conversations not belonging to any project, with bidirectional transfer capability:
Add to Project: Via right-click "Add to Project" or by dragging a history conversation onto a project in the sidebar. Once added, the conversation is tagged with the project name label.
Remove from Project: After "Removing from Project," the conversation returns to History Conversations and the label disappears.
Auto-Sync: New conversations initiated within a project are automatically synced to History Conversations with the project marked.
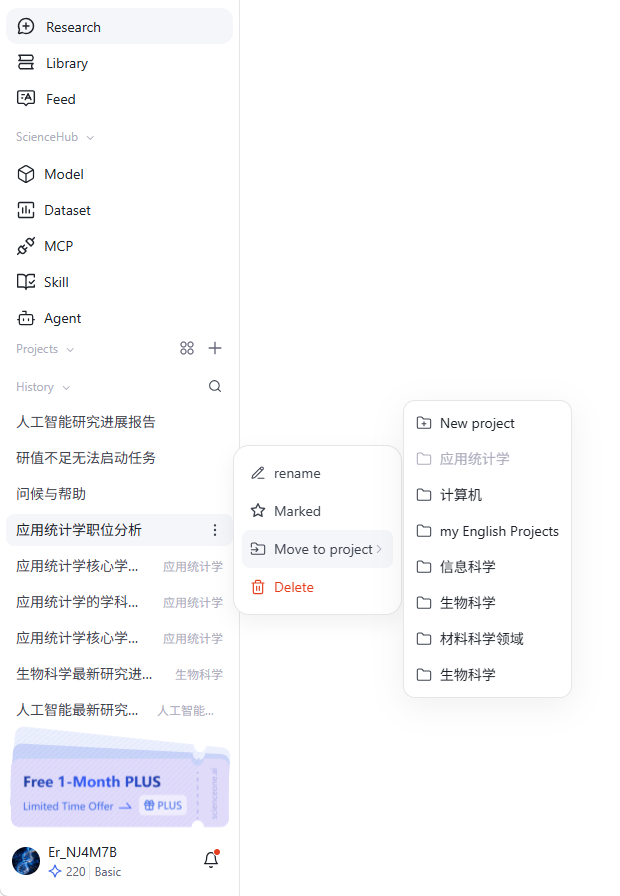
6.5 Pin and Archive
Pinning is used to keep frequently used projects fixed at the top. Archiving is used to fold away completed/paused projects while retaining traceable records.
6.5.1 Pinning Projects
Pin commonly used projects to the top of the sidebar:
Operation: Project ⋯ menu → "Pin." Select "Unpin" to cancel.
Quantity Limit: Maximum of 3 pinned projects. Exceeding this displays a prompt "Only 3 projects can be pinned at most."
Display Effect: Pinned projects appear at the top of the sidebar with a persistent pin icon.
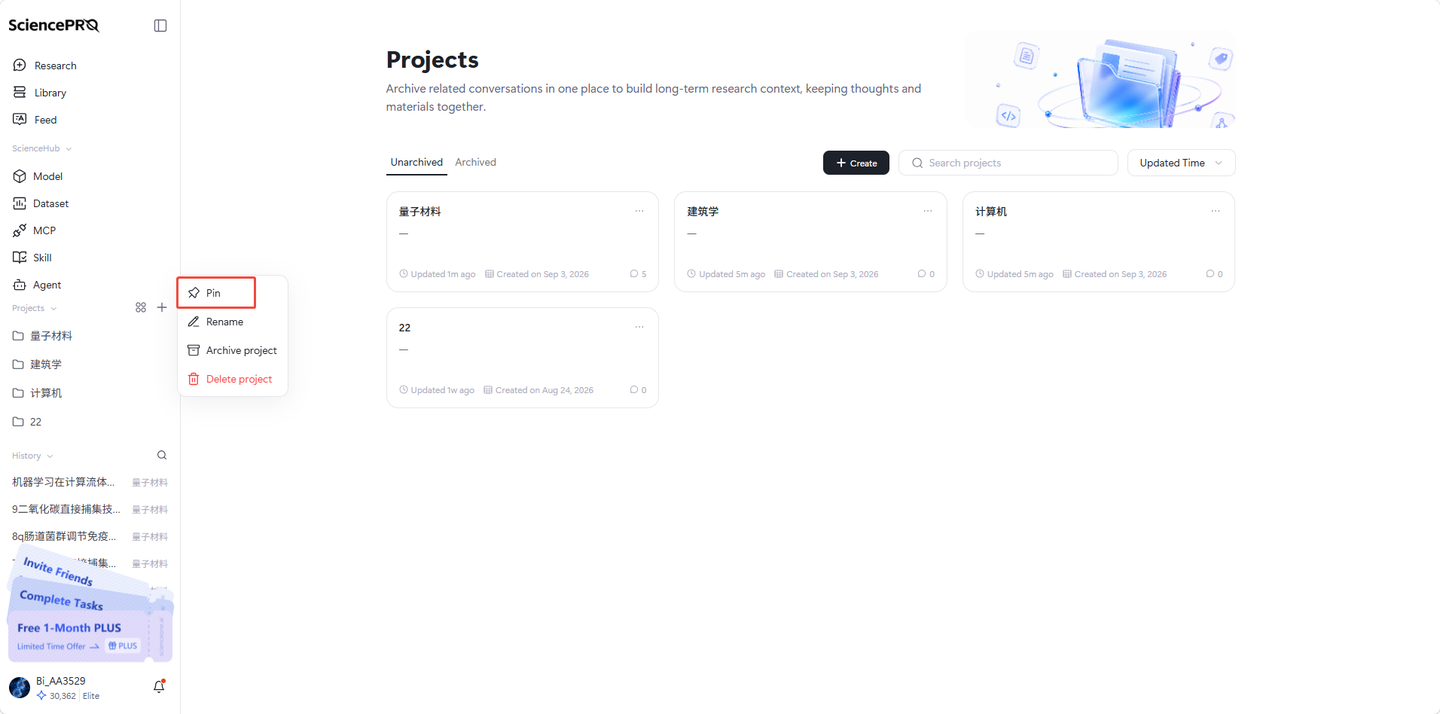
6.5.2 Archiving and Unarchiving Projects
Archiving folds away projects to keep the main list clean:
Archive Operation: Project ⋯ menu → "Archive Project." After archiving, the project is removed from the sidebar and the "Unarchived" tab, visible only under the "Archived" tab on the All Projects page. The name suffix changes to "Original Name (n/n)."
Read-Only State: Entering an archived project's details page shows a read-only view — the conversation input box and quick agent row are hidden. The "+ Add" buttons (for files, agents, Skills, MCPs) in the right panel are grayed out. Delete/remove operations for conversations and files are hidden. Agent lists are displayed as read-only (without "×").
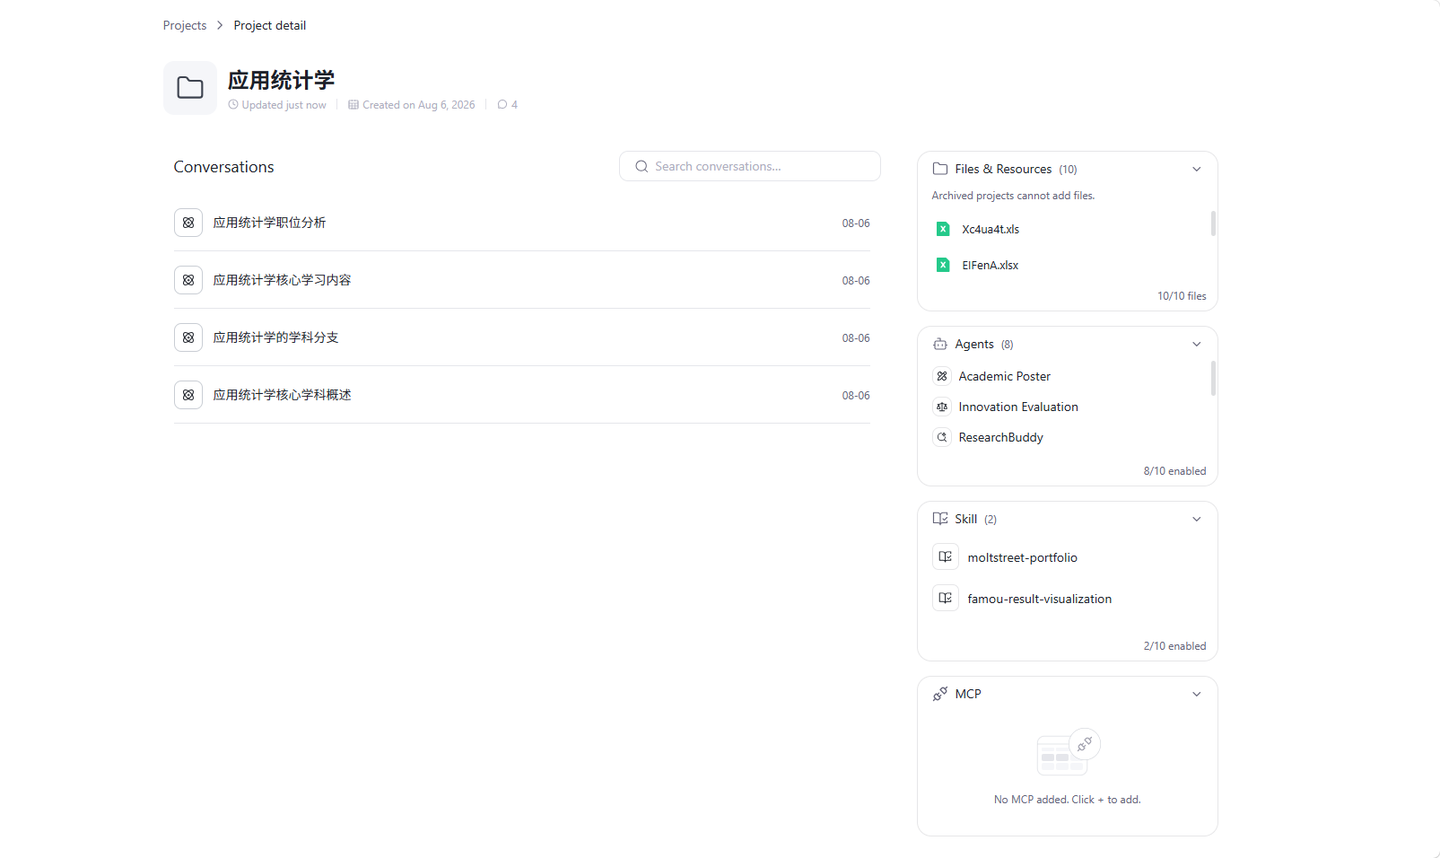
Unarchive: Select "Unarchive" from the "Archived" tab or the project ⋯ menu. The project returns to normal state, the name suffix is removed, and it reappears in the main list.
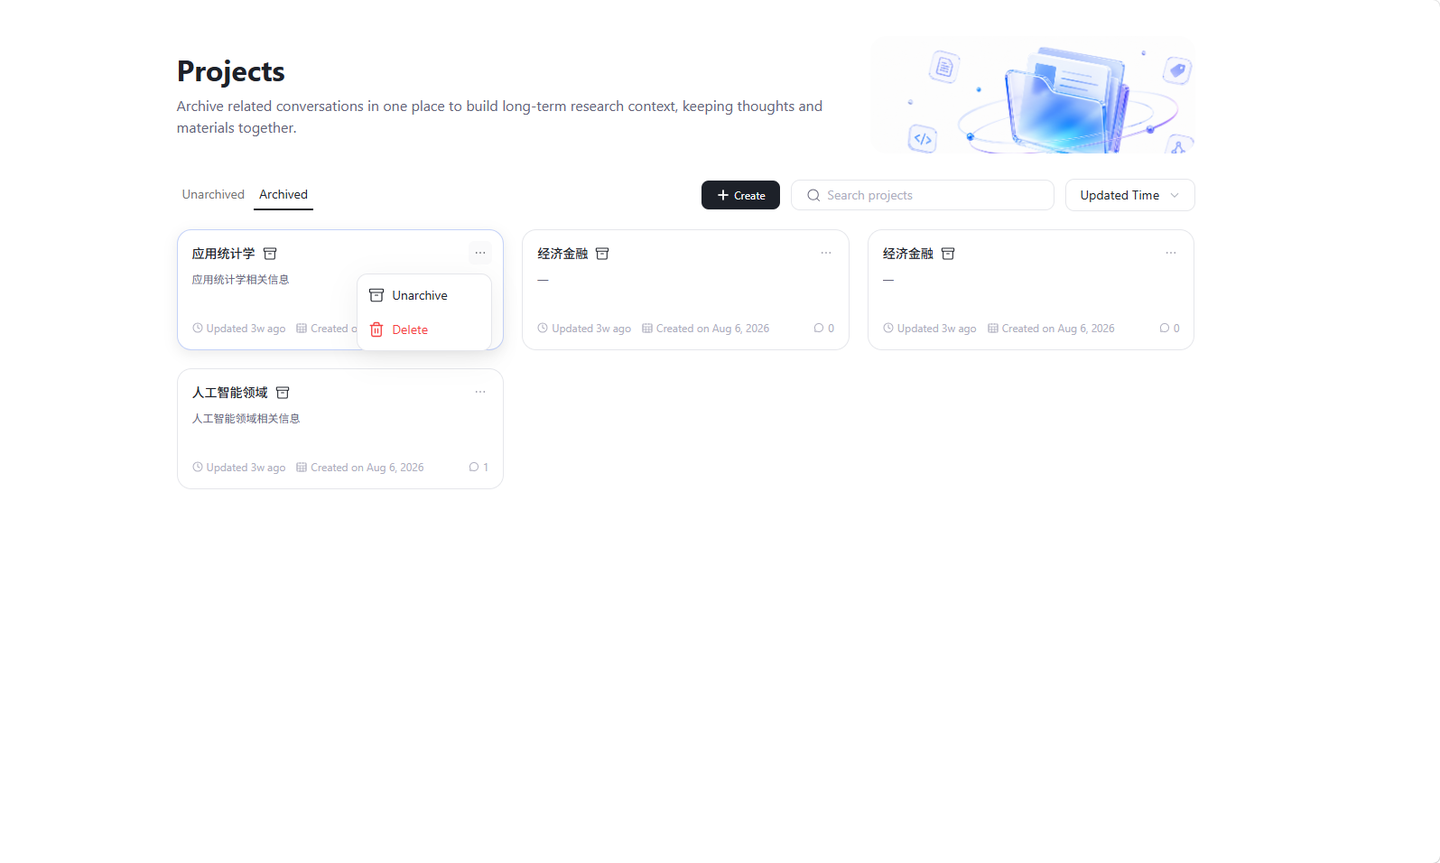
6.5.3 Renaming and Removing Projects
Rename: Project ⋯ menu → "Rename." Maximum 40 characters. After saving, the project moves to the top of the list.
Remove Project: Project ⋯ menu → "Remove Project" → Red confirmation dialog. After confirmation, the project entity, archive copies, and all related entries in History Conversations are permanently deleted, irreversible. Please proceed with caution.
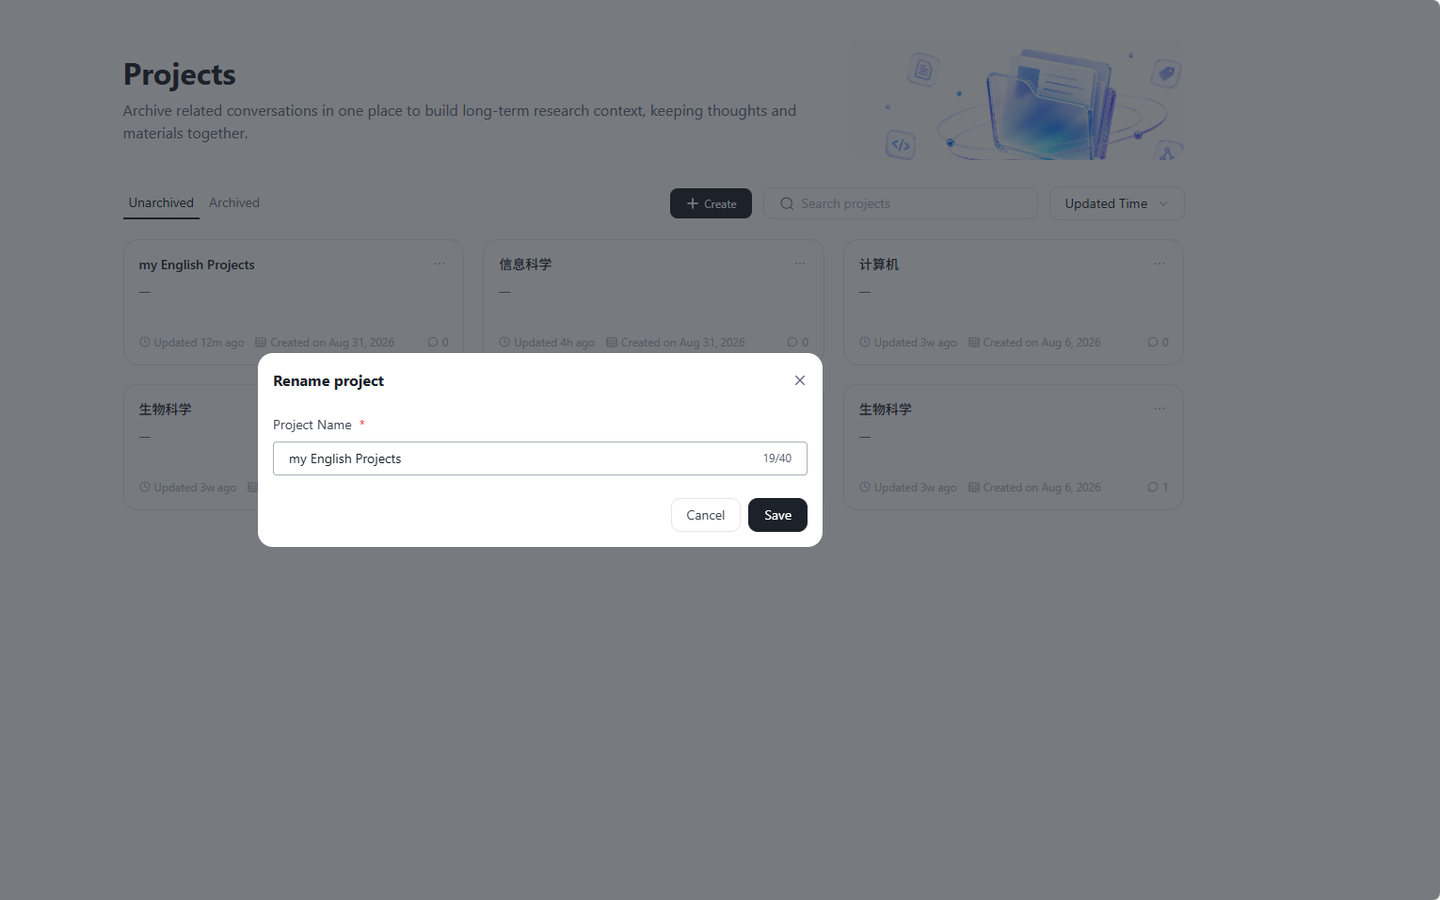
6.6 Usage Tips and Precautions
Project-Level Resources: Files, agents, Skills, and MCPs are maintained independently per project. Different projects are invisible to each other.
Archive vs. Delete: Archiving means "fold away, retain, recoverable, read-only." Removing a project means "permanent erasure, irreversible," including deletion of all conversations and history under that project.
Remove vs. Delete Conversation: "Remove from Project" only returns the conversation to History Conversations. "Delete" is permanent and unrecoverable.
History
The History module records all your research tasks in the Research, helping efficiently manage and track research progress. Click any task to enter the detailed interface and view complete information and latest progress. Support real-time monitoring of task progress status, and click to view details.
7.1 Records
Clearly displays all created research tasks, including task names, creation times, last update times, and brief descriptions. You can filter historical conversation tasks by different modes.
History records display current conversation task status (in progress, manually stopped, execution failed). You can view different types of historical tasks. Click any history record to enter that conversation and view current progress and related data.
7.2 Marked
It displays research tasks marked as favorites, with special identifiers for easy recognition and access.
You can add tasks to or remove tasks from the favorites list at any time, allowing flexible management of favorite records.
You can sort by favorite time, task priority, or completion progress, and keyword search functionality is provided to quickly locate favorite tasks.

User Settings
In the bottom-left corner of the SciencePro platform main page, you can view user information, and view system notifications. Click the username in the bottom-left corner to pop up the user settings menu, where you can view available coins balance and packages, perform benefit redemption, view user center, view usage instructions, submit feedback, contact us, change system language,set system themes, and log out. Click "More Information" to further understand our platform information, view update logs, and review rules and agreements.
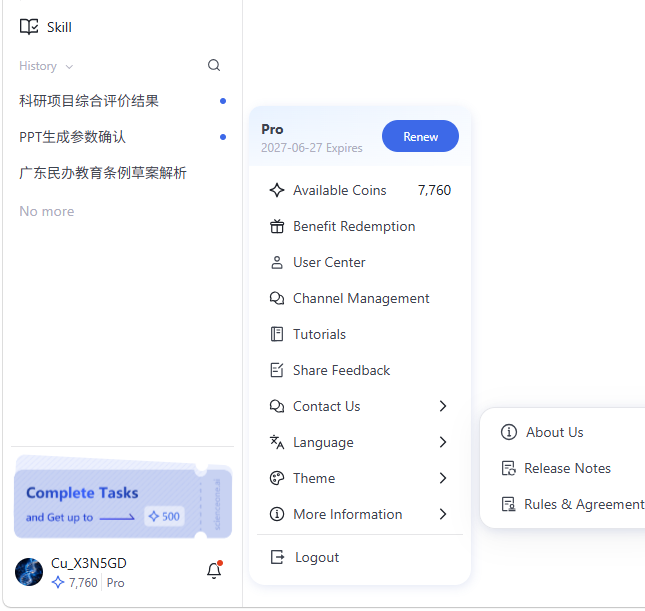
8.1 Available Coins
After clicking the username, your current available coins are displayed in the pop-up menu. Click "Available Coins" to enter the "Coin Center", where you can view coin overview and subscription information.
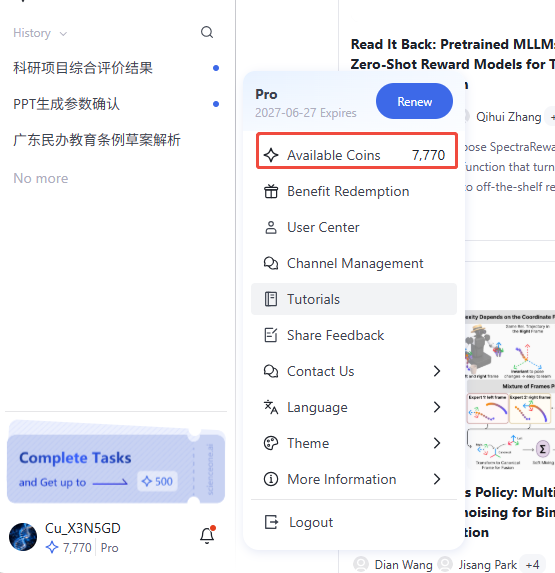
8.2 Benefit Redemption
Click the "Benefit Redemption" option to pop up the benefit redemption interface. Enter redemption codes to redeem gifts. Your redemption records can be viewed in the bottom-right corner.
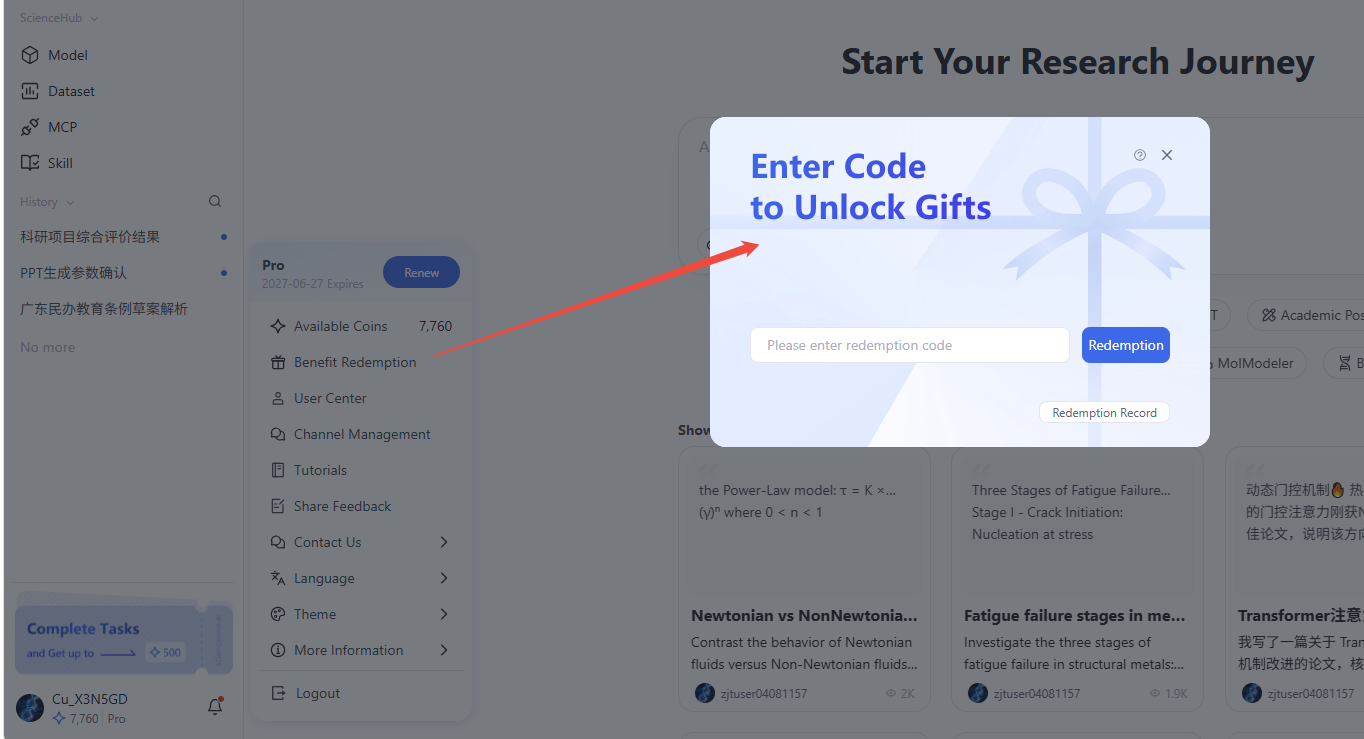
8.3 User Center
Click the "User Center" option to enter the personal user center page.
The "Profile" includes two sections: "Account Information" and "Personal Homepage".
8.3.1 Account Information
You can view and manage your basic information here.
Information Display: The page clearly displays your profile including avatar, username, work, account ID, account, phone number, email address, and registration time.
Information Editing: For the username field, you can click the "Edit" button on the right to modify; for phone number and email fields, you can click the "bind" button on the right to bind corresponding contact methods; for account password fields, you can click the "reset" button on the right to update your account password.
Account Cancellation: The bottom of the page provides an "Delete Account" button for permanently deleting your account.
8.3.2 Personal Homepage
You can create your exclusive academic card here.
Information Display: The page displays your basic information, educational background, and research/work experience.
Information Editing: In the basic information section, you can click the "Edit" button to modify your name and add/remove research areas; in the education section, you can click "Add Education" in the bottom-right to add educational experiences; in the research/work experience section, you can click "Add Research&Work Experience" in the bottom-right to add experiences, with support for "Delete" and "Edit" for each experience.
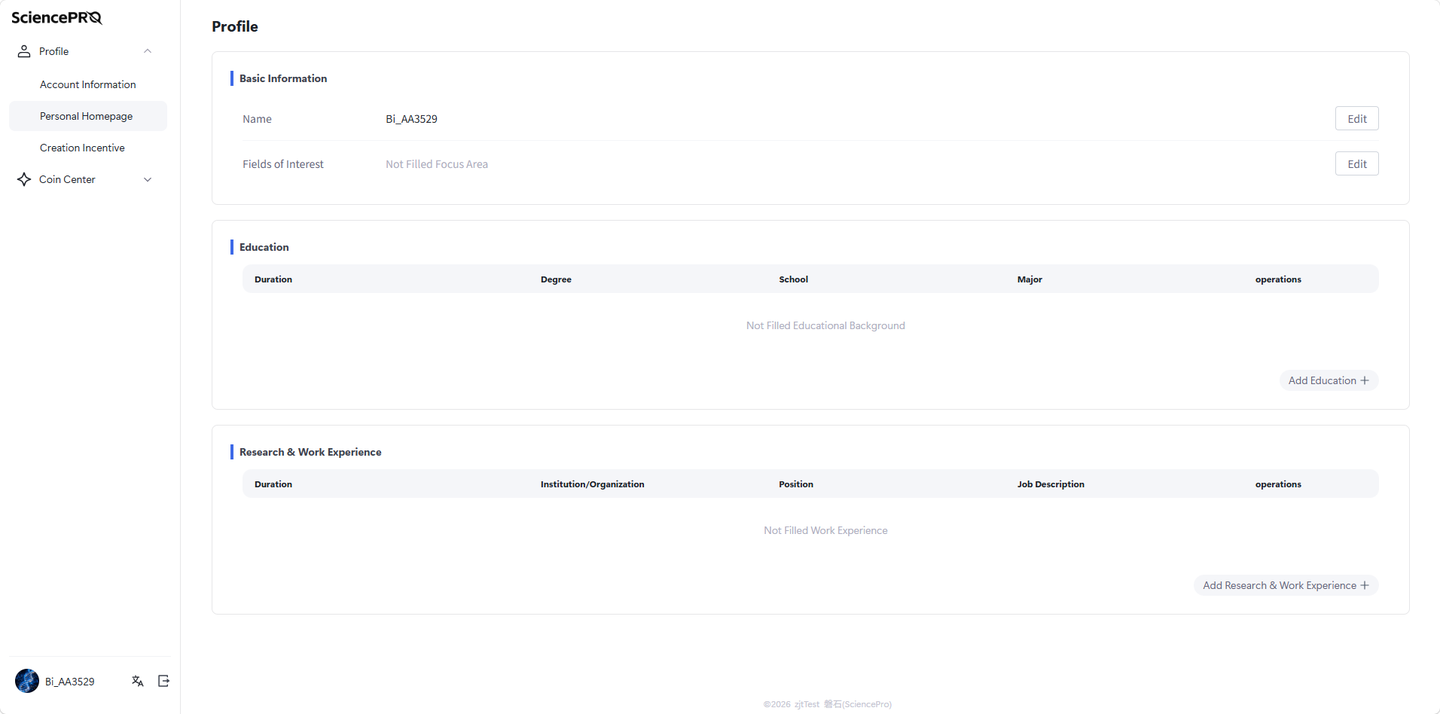
8.3.3 Creation Incentive
The Creation Incentive page allows you to view your creator level, creation statistics, and certificates earned from publishing Skills.
Accessing the page:
After signing in to SciencePro, select Profile > Creation Incentive from the left navigation menu.
Creator Level:
The upper-left section displays your current creator level, such as Advanced Creator. It also shows your progress toward the next level and the number of additional certificates required.
Select or hover over the question mark icon to view more information about creator levels. Select Create to open the Skill creation page and start creating a new Skill.
Creation Incentive Overview:
The upper-right section provides a summary of your creation activity:
Certificates Earned: The total number of certificates you have earned.
Cumulative Coins: The total number of coins earned through creation incentives.
Published: The number of Skills you have published.
Created: The total number of Skills you have created.
This section provides a quick overview of your creation achievements.
My Certificates:
The My Certificates section lists the certificates you have earned from your Skills.
Each certificate record includes:
Name: The name of the associated Skill. Select the name to open the Skill details page.
Certificate No.: The unique identification number of the certificate.
Obtained Time: The date and time when the certificate was issued.
Reward Coins: The number of coins awarded for the Skill.
Detail: Select View Certificate to open the certificate details or preview page.
Filtering and searching for certificates:
Date filter: Select a start date and an end date to view certificates obtained within a specific period.
Search: Enter a Skill name or certificate number to find a certificate.
Sort by obtained time: Select the sorting icon next to Obtained Time to switch between ascending and descending order.
Pagination: Use the page numbers, previous-page button, or next-page button to browse additional certificate records.
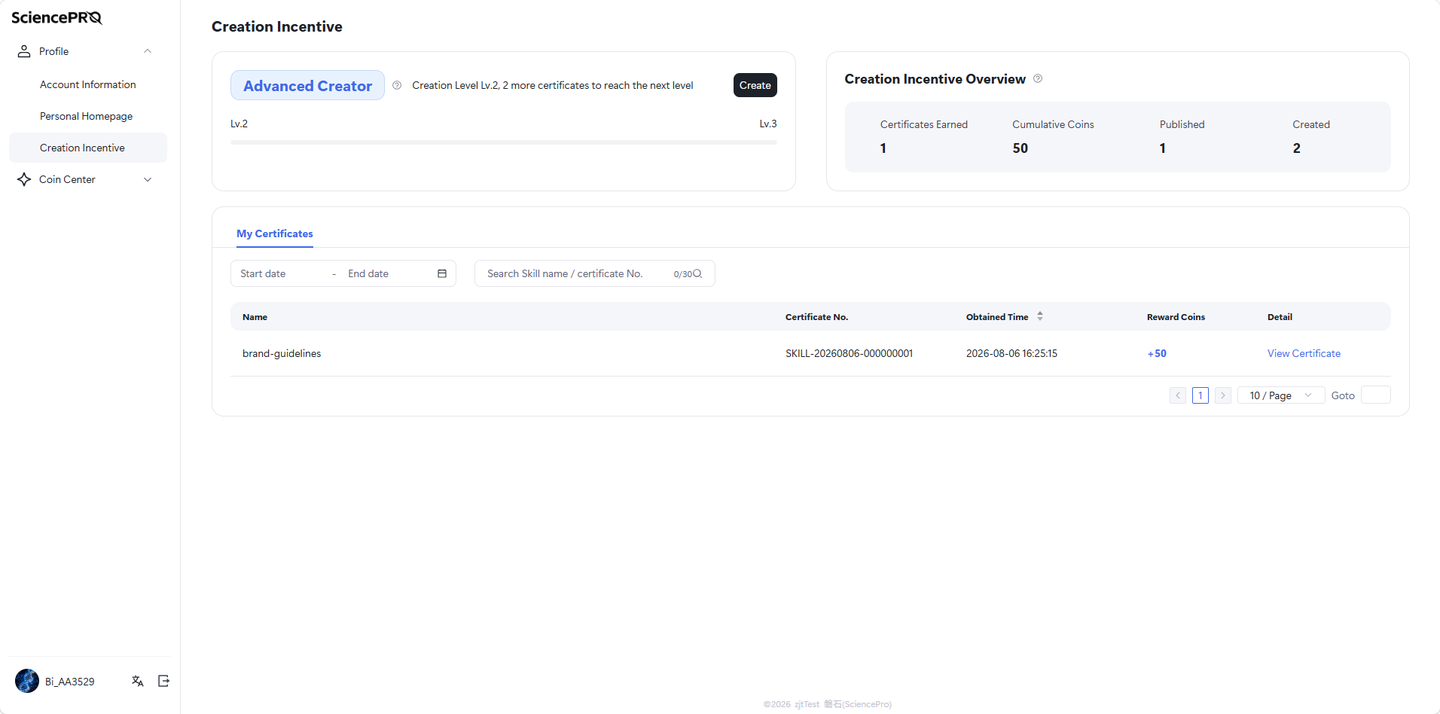
8.4 Channel Management
Connect communication platforms to get Feed subscriptions.
Click your username, select Channel Management in the pop-up menu, then choose the channel you want to connect.
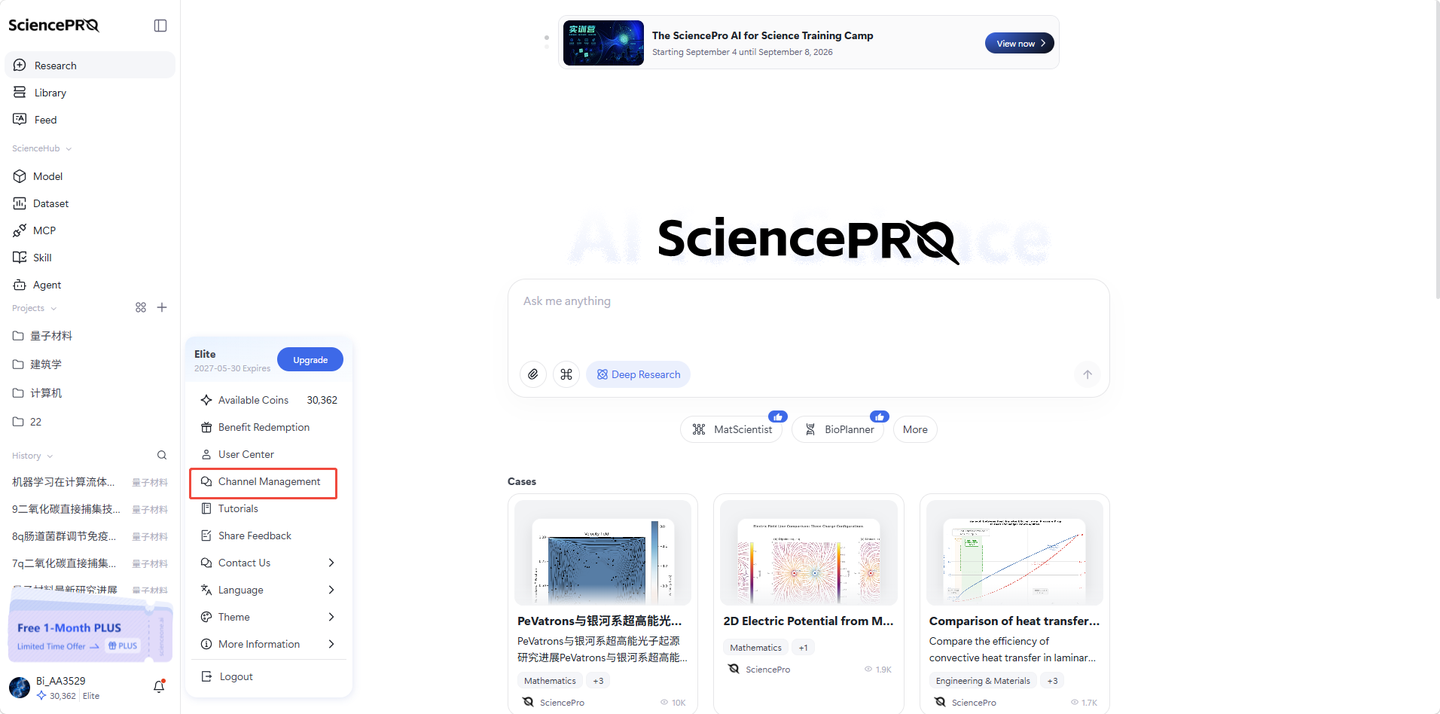
8.4.1 WeChat
Click the Connect WeChat button, then scan the QR code with WeChat to finish connecting.
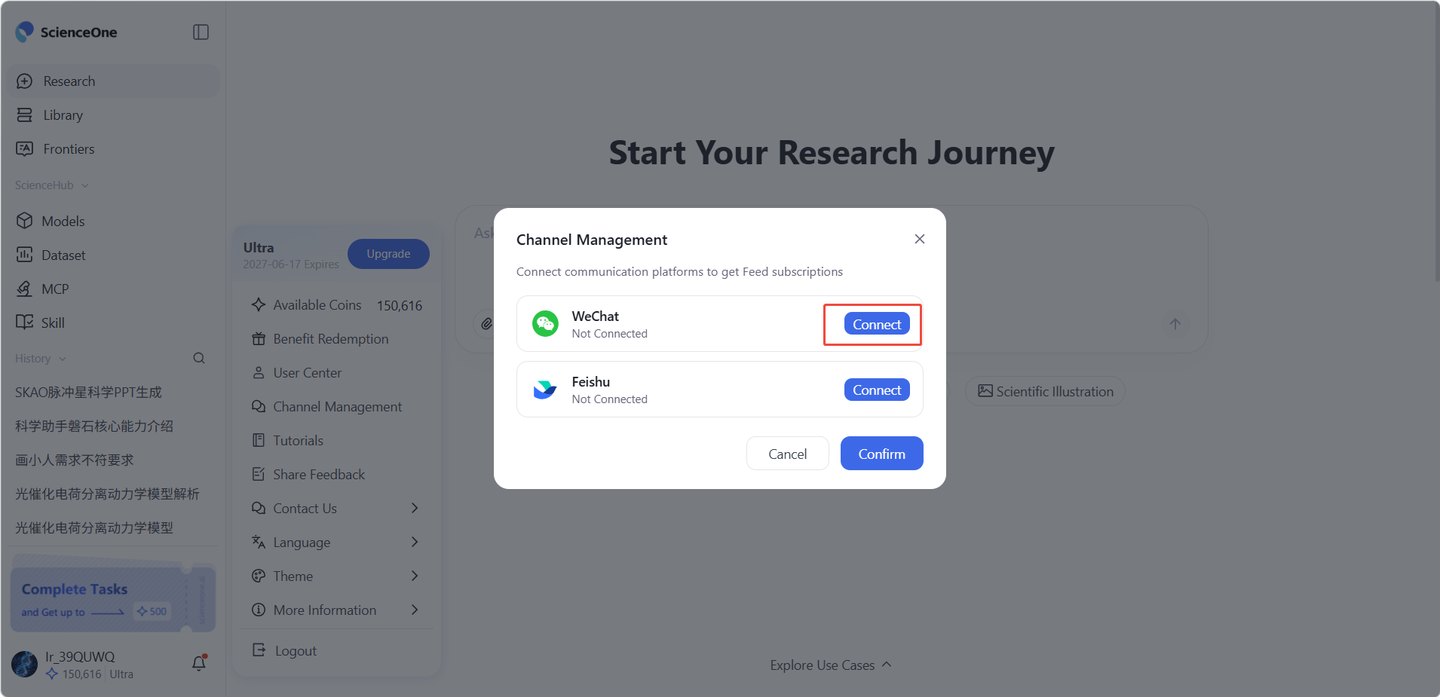
8.4.2 Feishu
Log in to the Developer Console - Feishu Open Platform with your Feishu account. After successful login, click [Create Custom App].
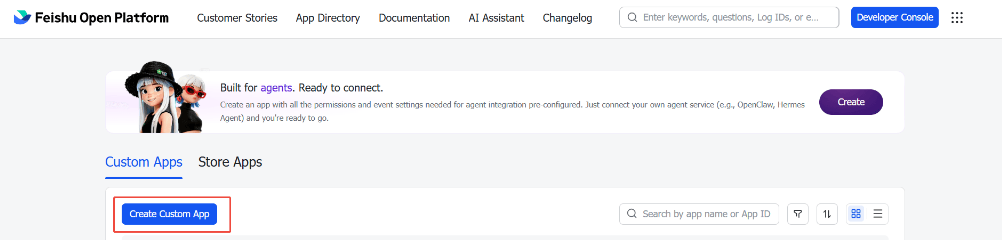
Fill in the app name and description, upload an app icon, then click [Create] to enter the app management page.
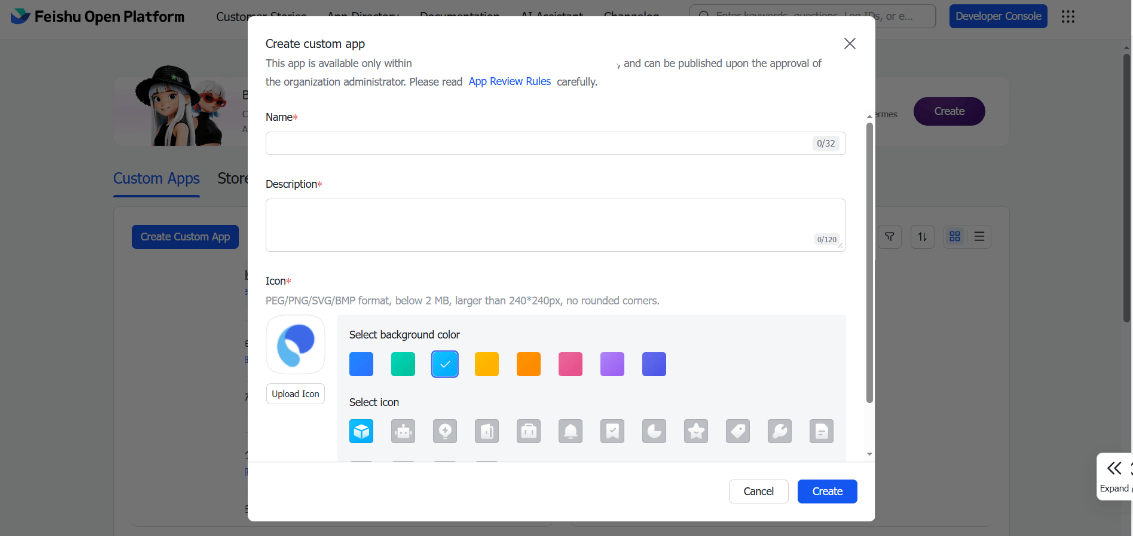
On the left sidebar of the app management page, locate and click [Add Features]. Select [Bot] and then click Add.
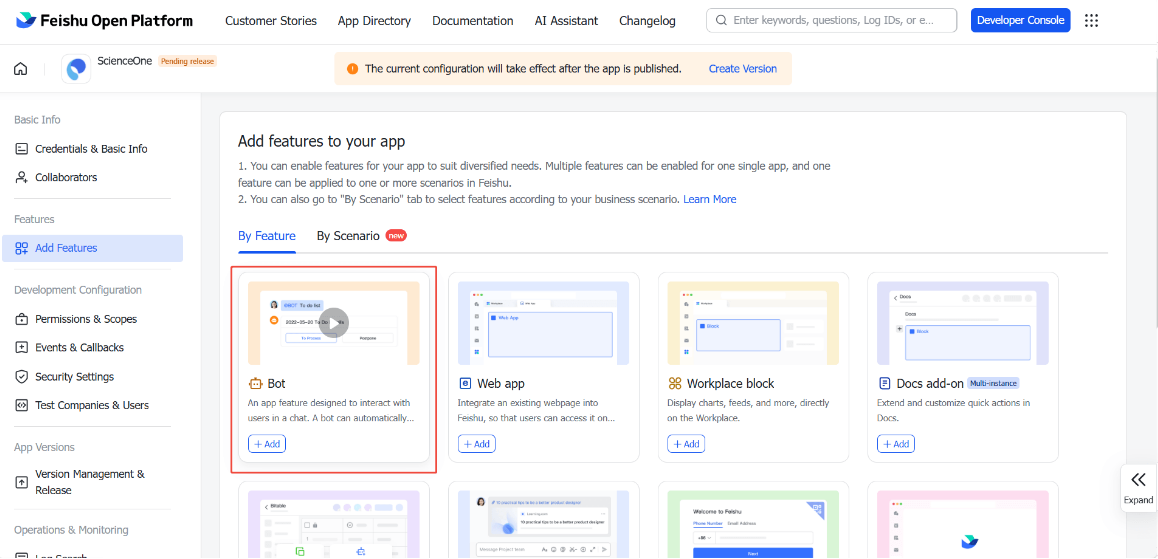
Click Credentials & Basic Info on the left sidebar. Locate the two parameters App ID and App Secret on the page, click the Copy button next to each value, and save them to your notes or memo.Please store these credentials securely and avoid leakage for data security purposes; they will be required in subsequent steps.
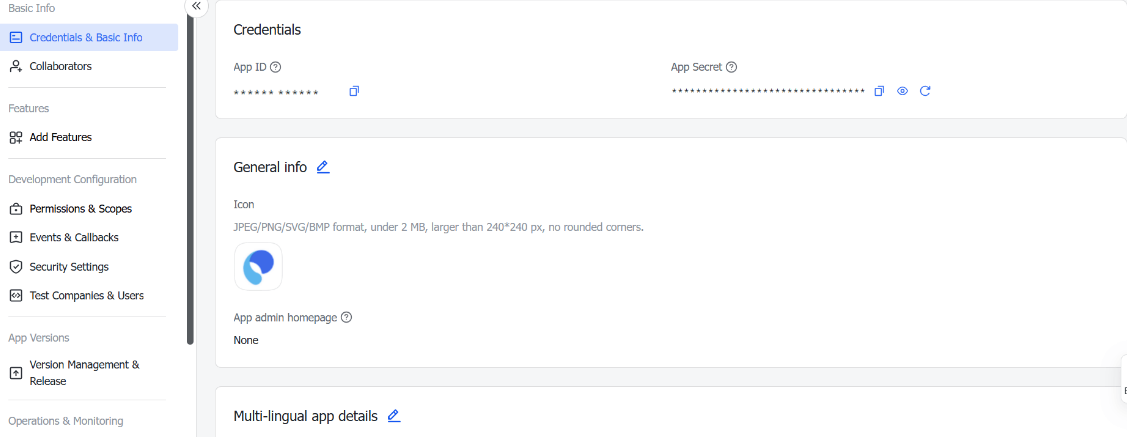
Click [Create Version] at the top to publish the application.
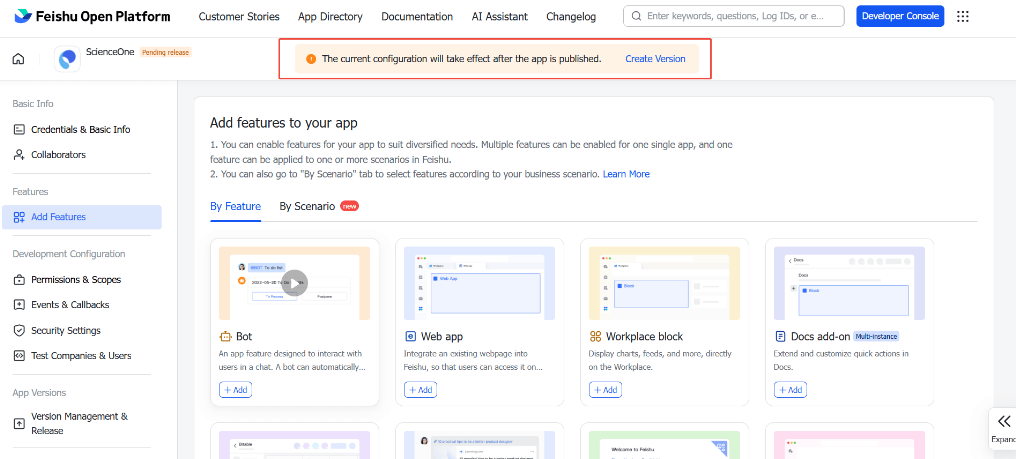
Open Feishu and enter the chat window of the newly created app. Click the Settings button, find the Chat ID parameter on the page, click the adjacent Copy button, and save the value to your notes or memo.Please store this ID securely and avoid leakage for data security purposes; it will be required in subsequent steps.
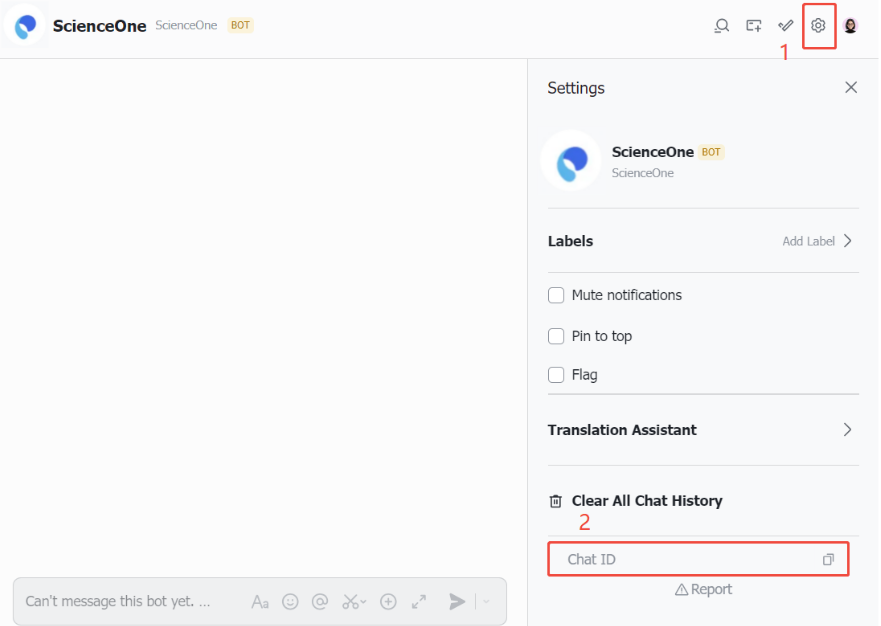
Access the SciencePro , click your username and select Channel Management in the pop-up menu. Click the Connect Feishu button, enter the Feishu Bot App ID, App Secret and Chat ID obtained in Step 4 above, then click Confirm Creation.
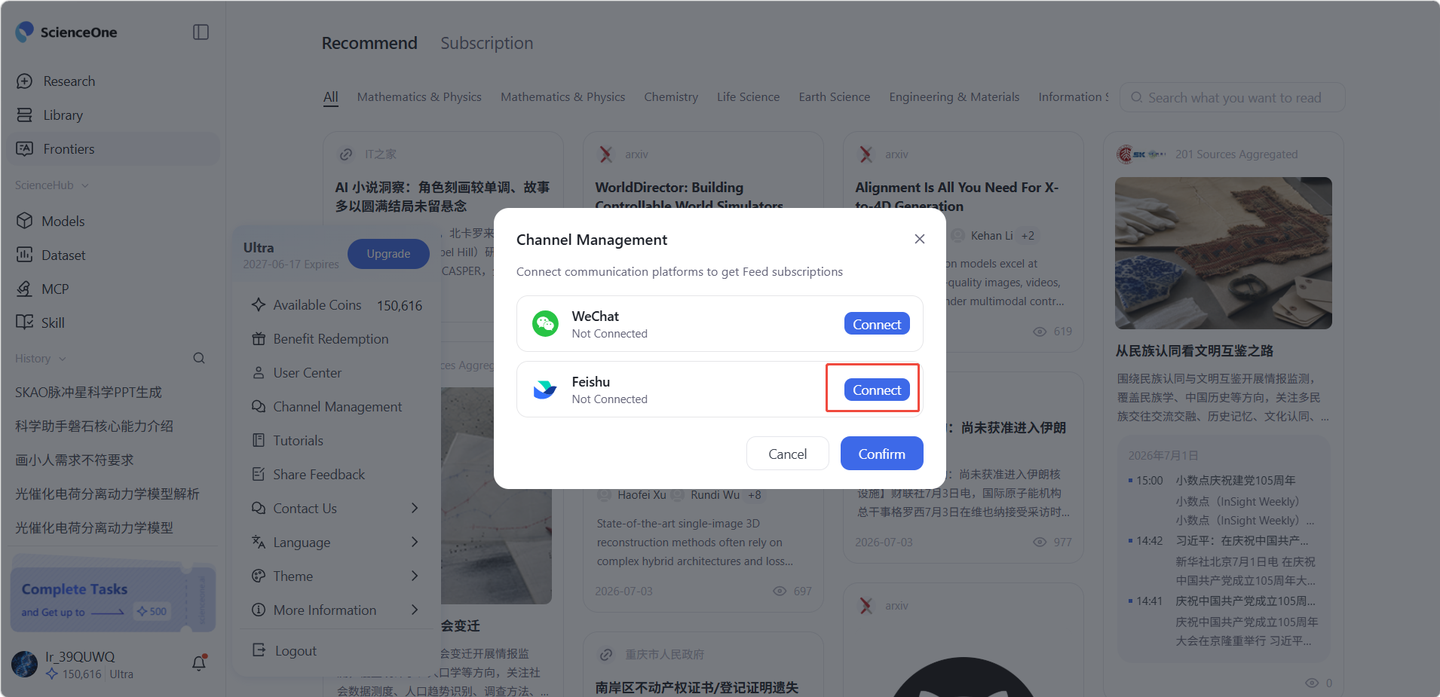
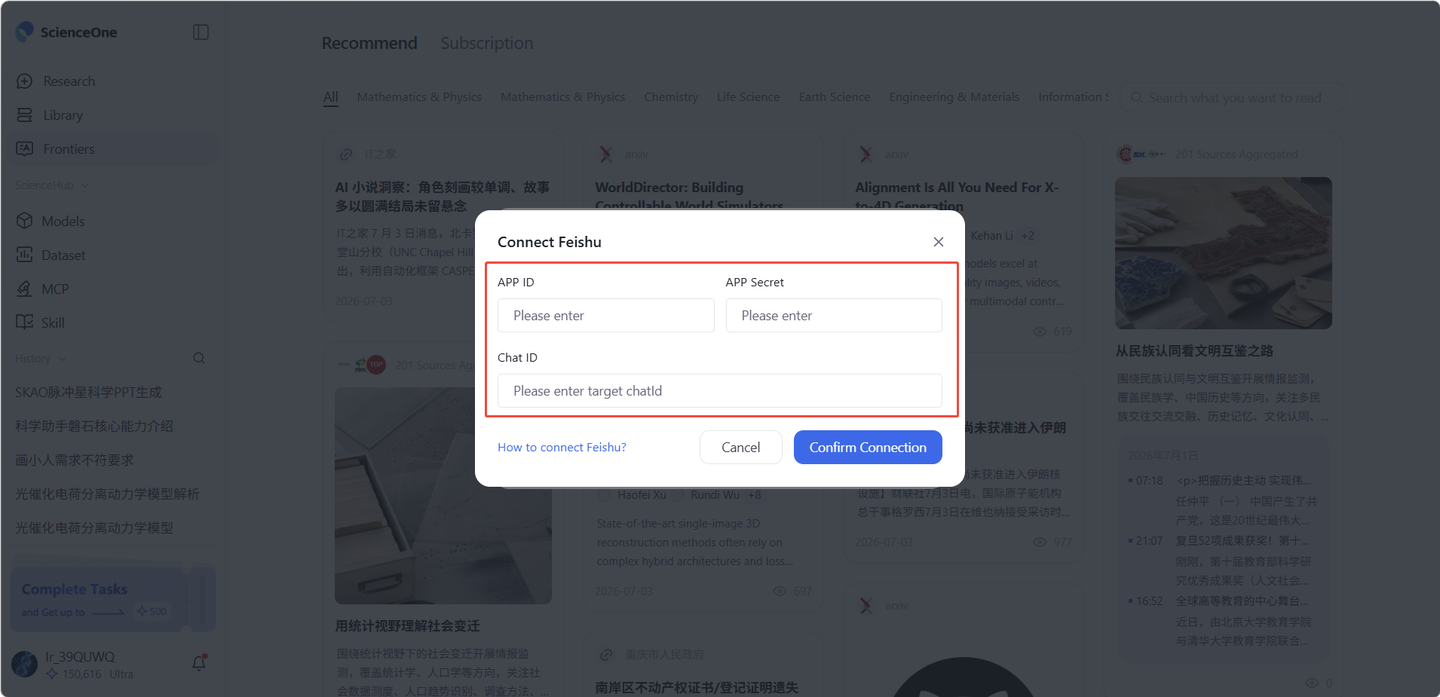
On the left sidebar of the Feishu app management page, click Events & Callbacks. On the Event Configuration tab, select Receive Events via Long Connection and click Save.
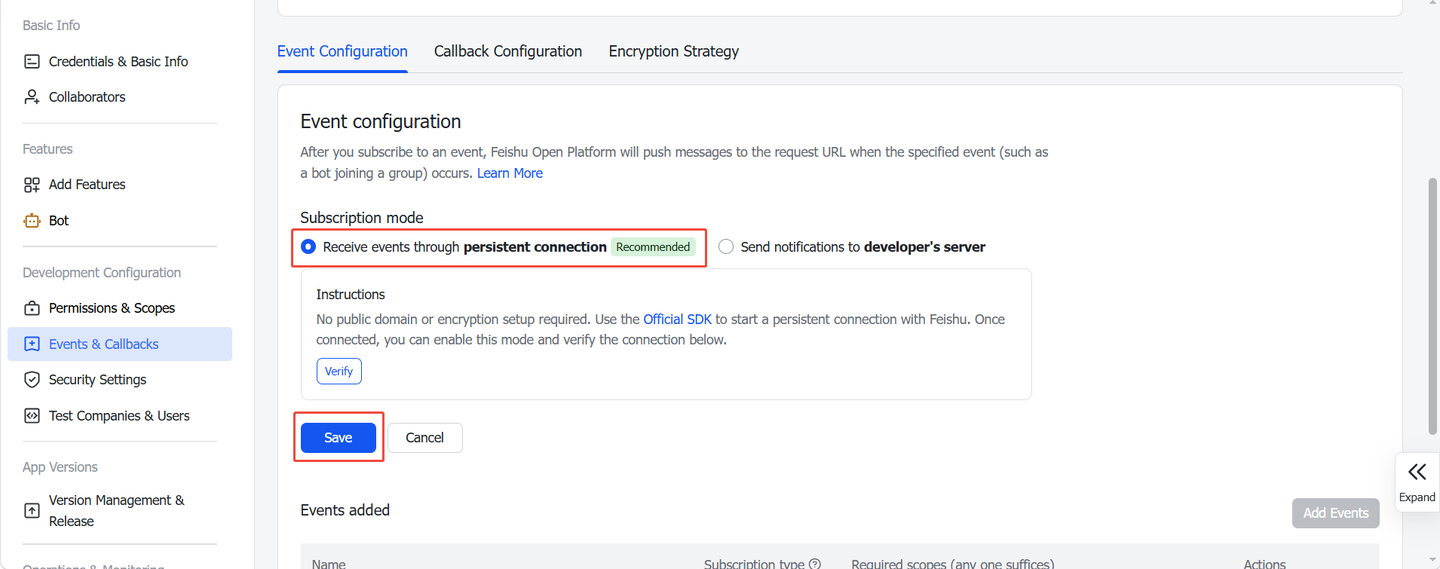
Click Add Event on the Event Configuration page. Search for and add the [Message received] event in the pop-up list, click Add, then follow the on-screen prompts to authorize required permissions.
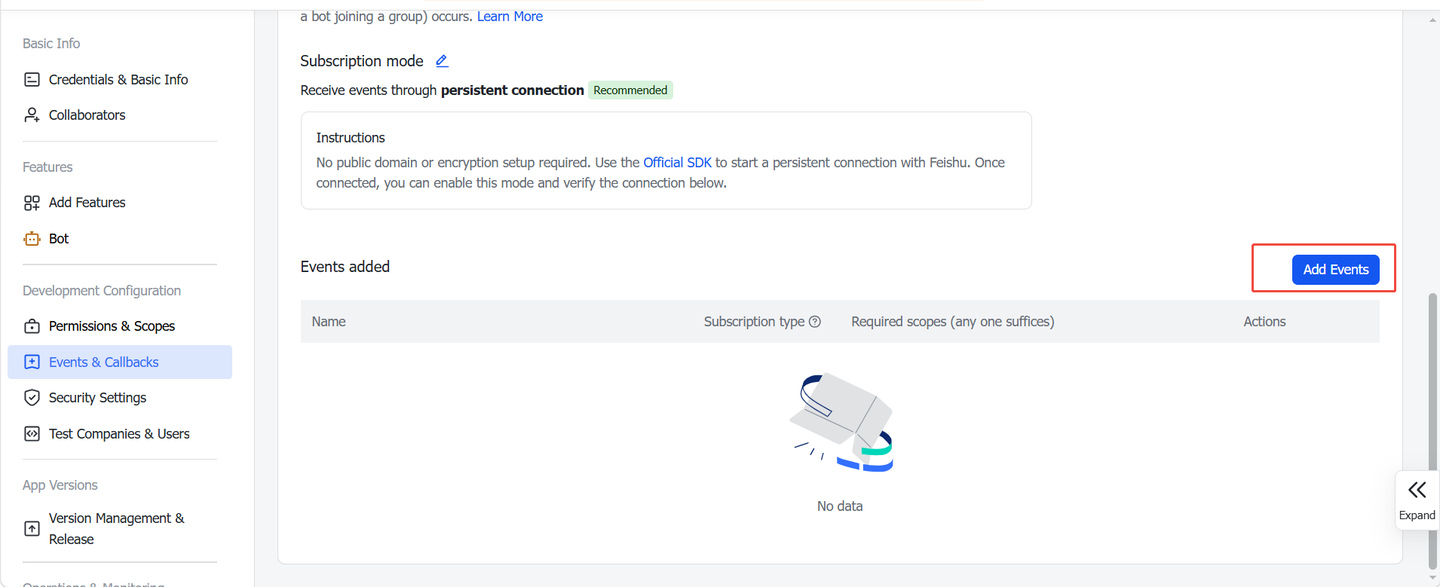
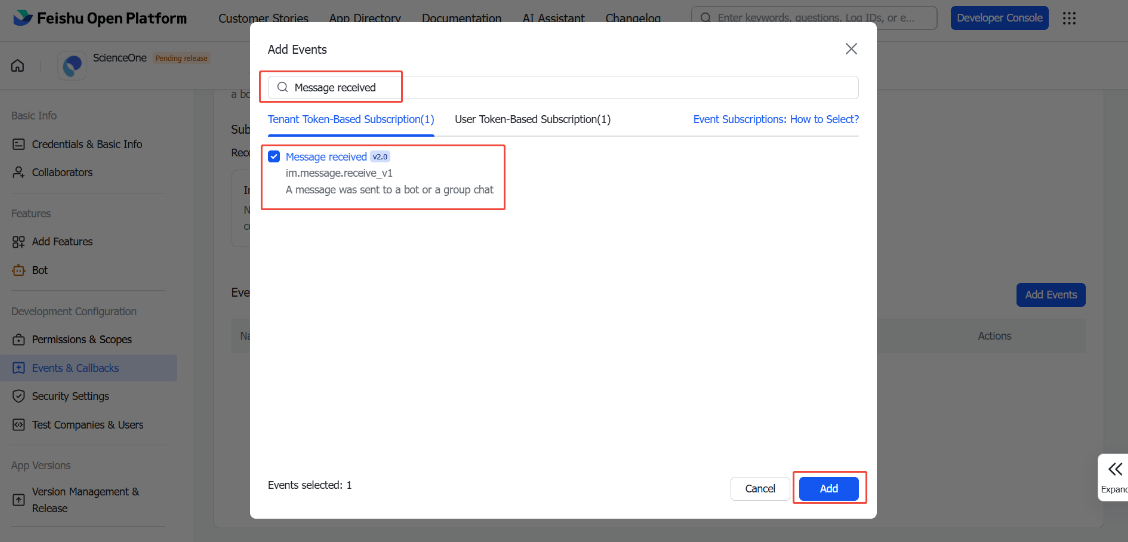
Enable recommendation permissions.
On the Callback Configuration page under Events & Callbacks, select [Receive callbacks through persistent connection] as the subscription mode and click Save. No additional address input is needed; the configuration will take effect automatically.
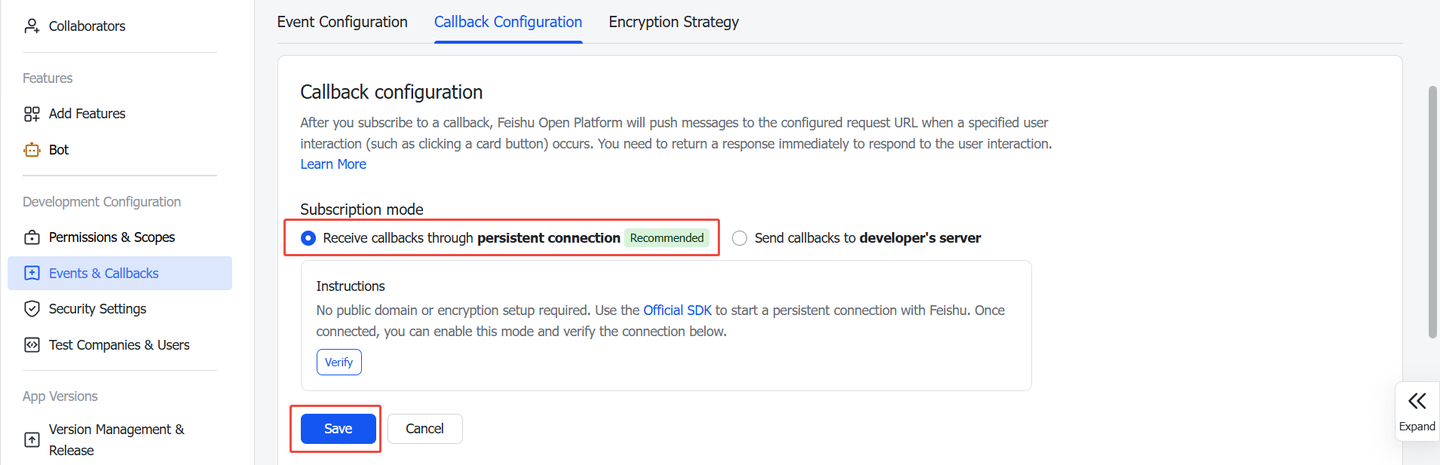
Click Permission & Scopes on the left sidebar, then click [Batch import/export scopes] on the page to open the permission import window.
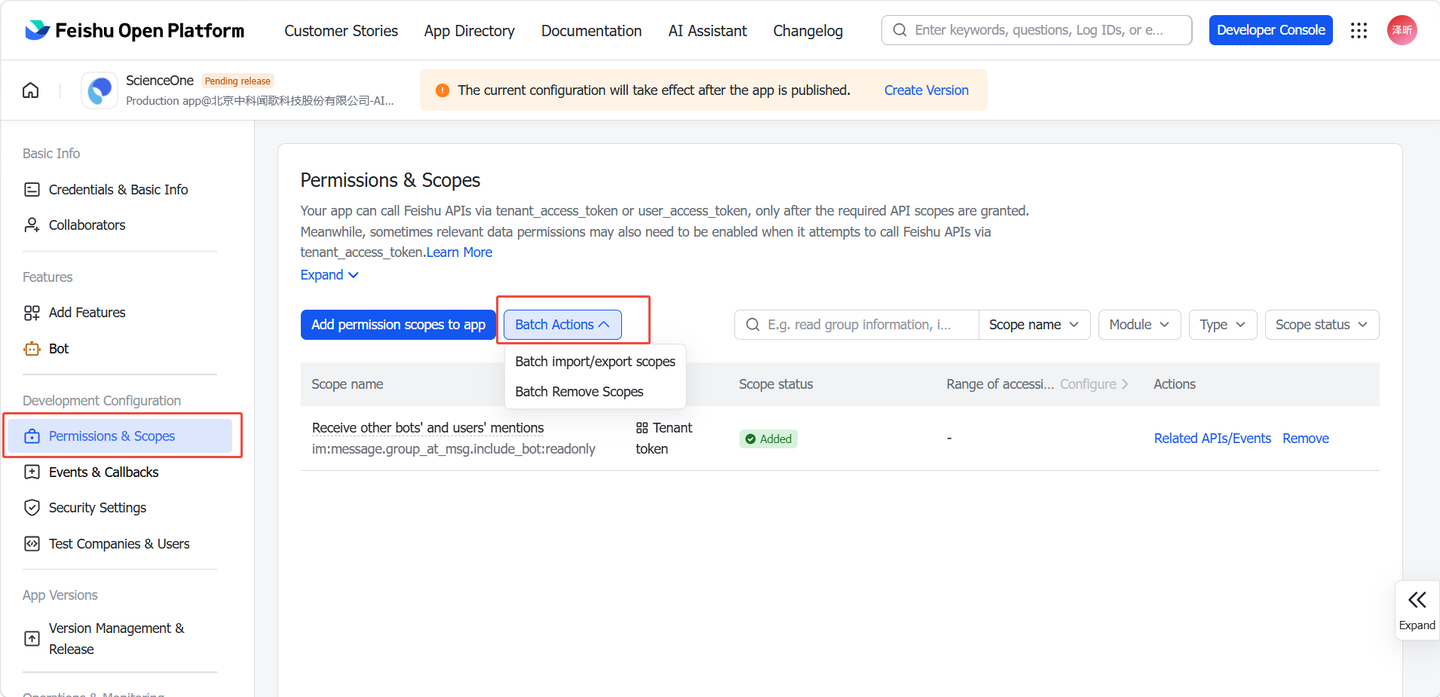
Copy the code block below, replace the original JSON content in the pop-up window, click [Next, Review New Scopes], then click Apply for Authorization. Wait for the permission import process to complete after confirmation.
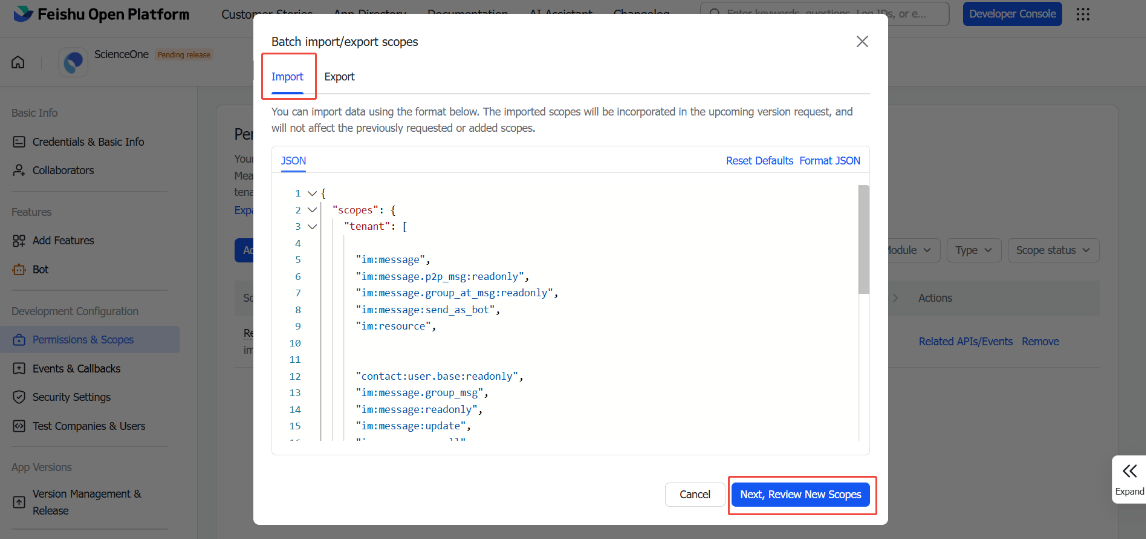
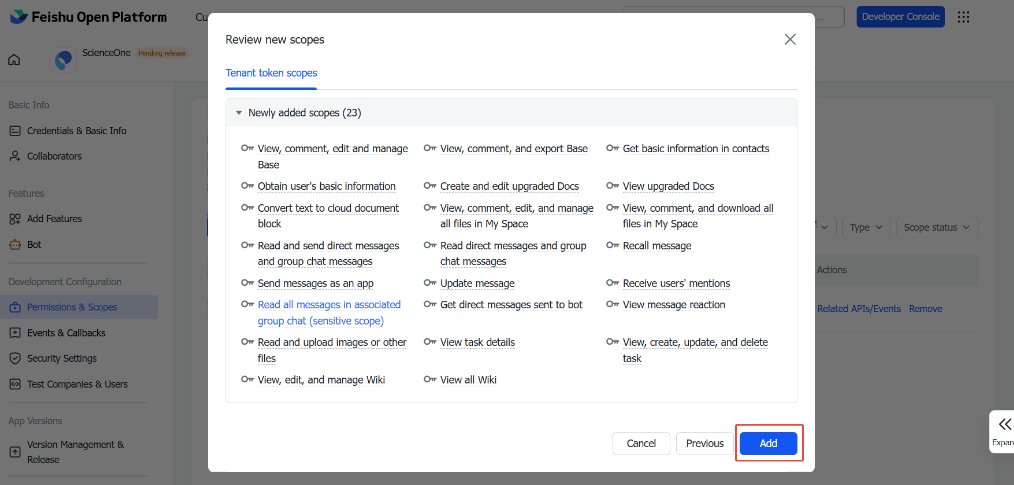
On the left sidebar of the Feishu app management page, click [Version Management & Release], then click Create Version in the upper right corner.
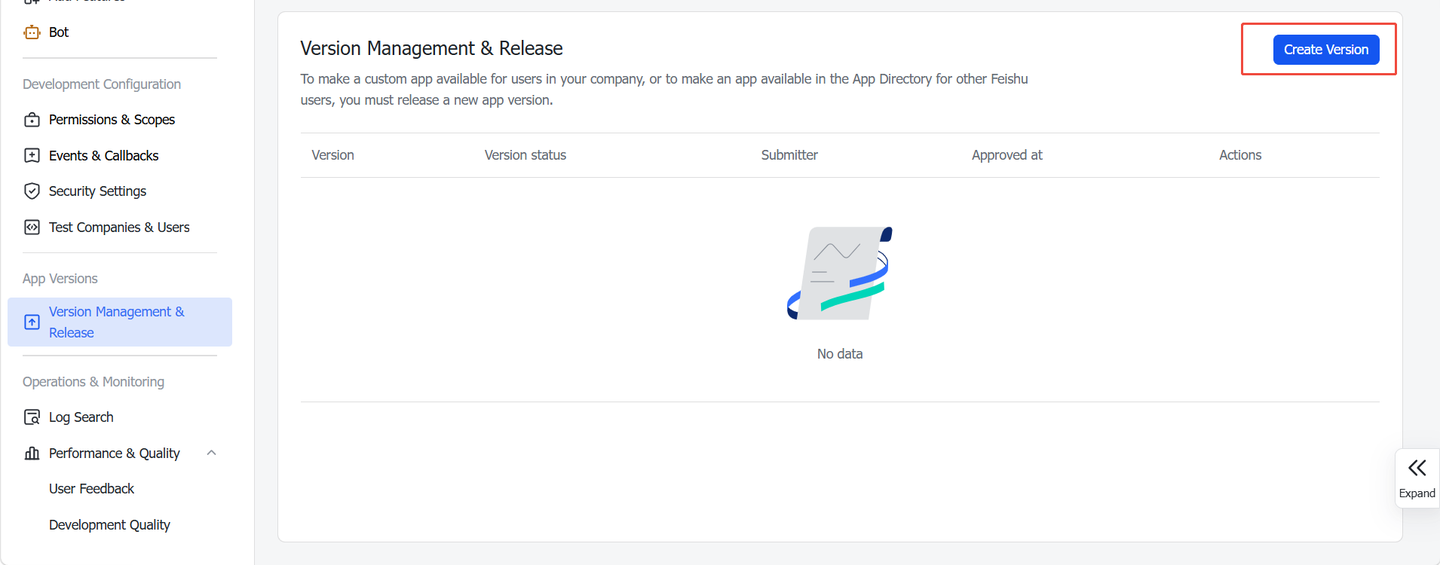
Enter an app version number (1.0.0 is used as an example here; you may customize your own version number) and release notes, then click [Save] and Confirm Release.
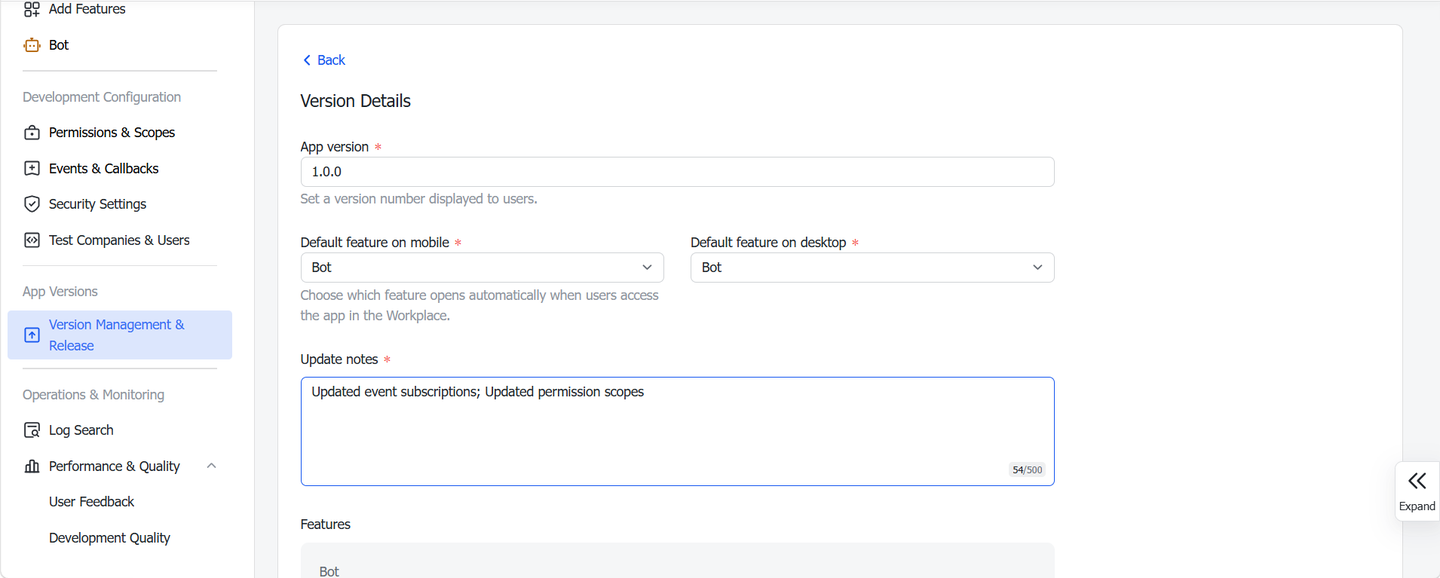
Wait for Feishu administrators to approve the release. Once published successfully, you can start private chats with the Feishu Bot.
8.5 Tutorials
Select the "tutorials" option to view the system's detailed user tutorials, understanding system functions and usage methods, with support for switching between Chinese and English bilingual viewing.
8.6 Send Feedback
Select the "Send Feedback" option to submit opinions and suggestions about the system, supporting online feedback within the platform.
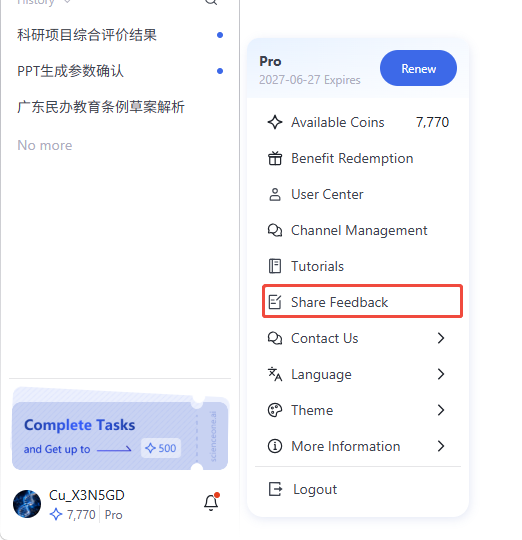
8.7 Language Settings
SciencePro supports switching between Chinese and English system languages. In the user settings menu, click Language, and select your desired language from the list. The interface will automatically switch to that language version.
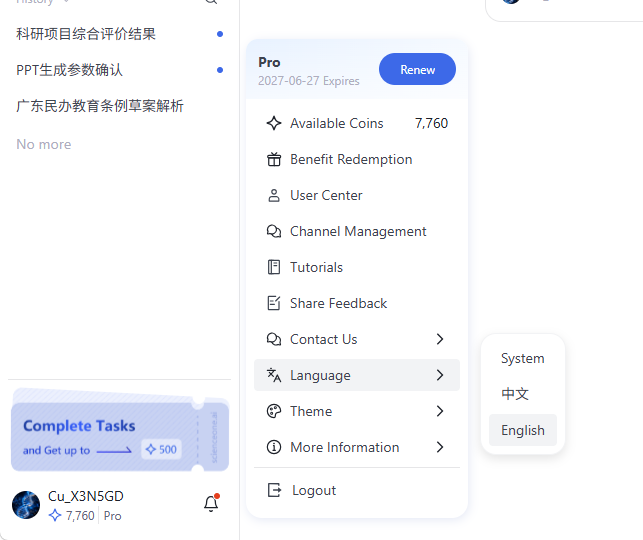
8.8 Theme Settings
After clicking the username, click "Theme" in the pop-up menu, then select theme options such as "Quantum White", "Dark Matter", or "System Theme" to switch the system's overall visual style. You can choose different themes based on personal preferences for a more comfortable user experience.
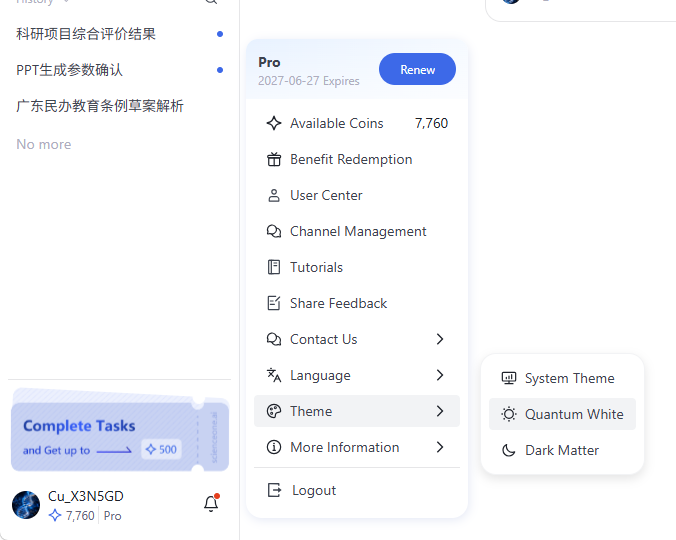
8.9 Contact Us
Select the "Contact Us" option to scan the code and join the official community for inquiries and assistance.
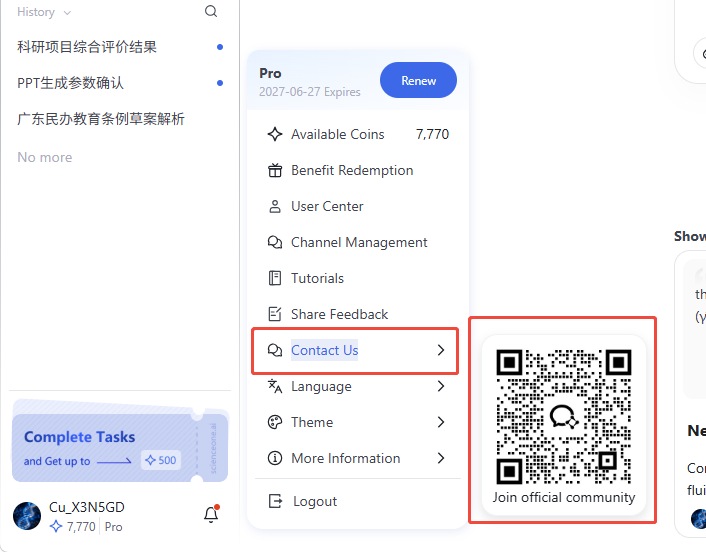
8.10 More Information
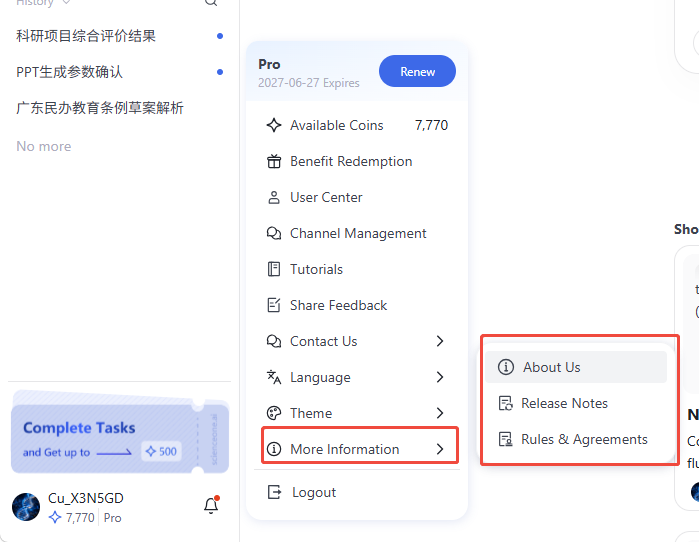
8.10.1 About US
Select the "About Us" option to view the system introduction, includingFeatures, WorkflowUse cases, For institutions, Foundation.
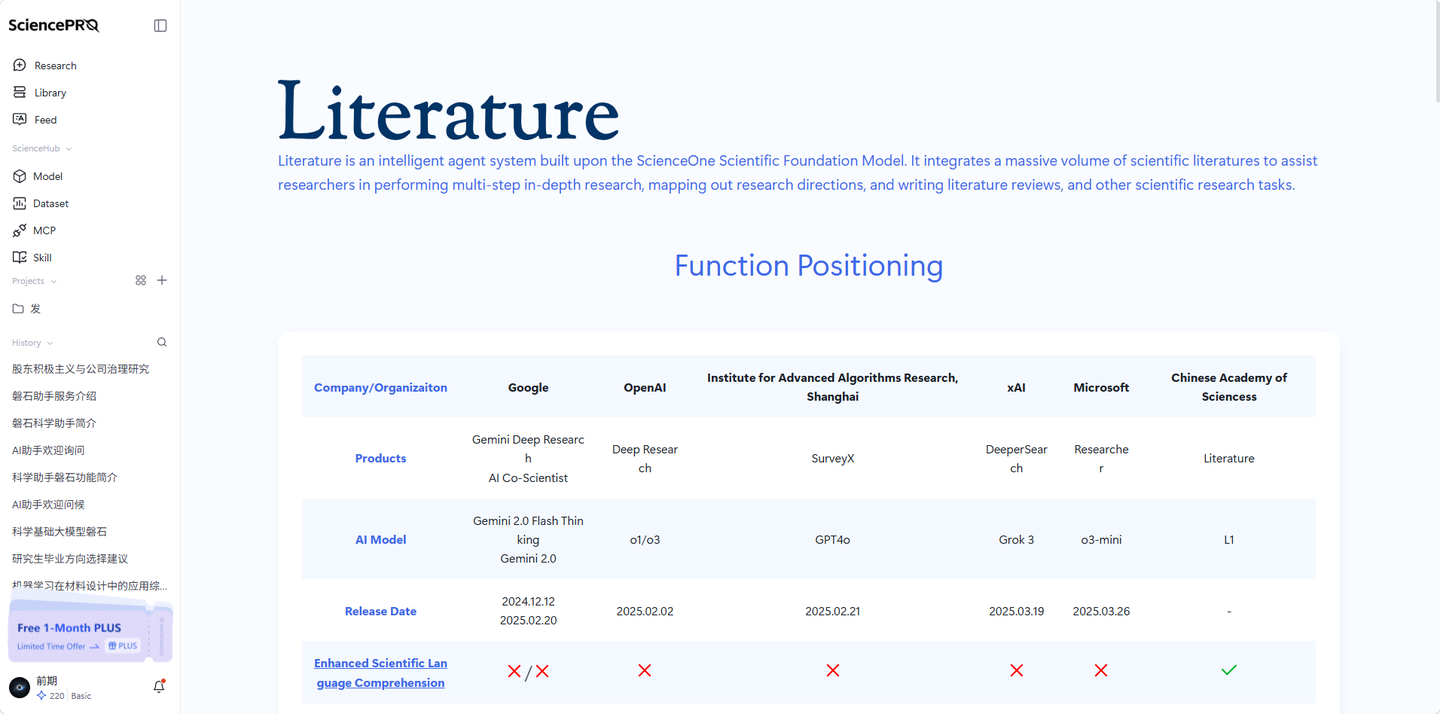
8.10.2 Release Notes
Select the "Release Notes" option to view system version update logs, with support for viewing main content updates for each version.
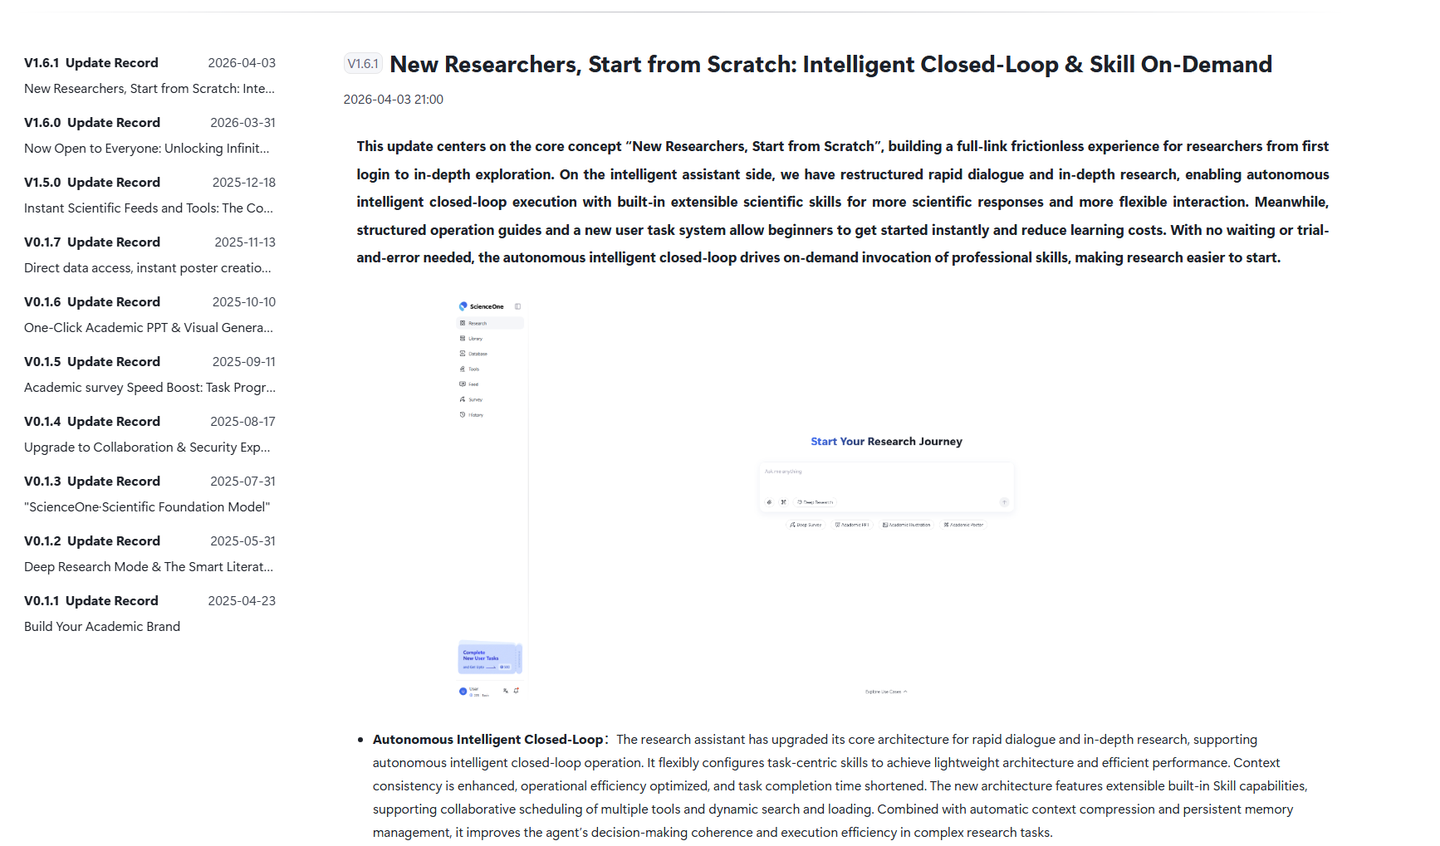
8.10.3 Rules & Agreements
Select the "Rules & Agreements" option to view various rules and agreements, including SciencePro's Terms of Services, Privacy Policy, Institutional Account Activation & Verification Agreement, and Coin Rules.
8.11 Logout
Click the "Logout" button at the bottom of the menu to securely exit your current account. The system returns to the login page. For account security, it is recommended to log out after completing operations.
Notification System
On the system's main page, click the bell button in the bottom-left corner to pop up the notification center menu. In this menu, you can view and handle messages, follow up on task reminders, and receive system notifications.
9.1 Notification Center
The notification center displays "All" messages by default. You can click the "Unread" tab to quickly filter all notifications that have not been viewed. If there are no unread messages, this view displays "No unread messages".
Each unread message has a red dot identifier on its right side. After you click the message and complete corresponding interaction (such as jumping to a page or viewing a popup), the red dot automatically disappears, indicating the message has been read.
At the top of the notification center, you can find the "Read All" button. After clicking, all unread messages are immediately marked with read dot, will (including those on entry icons) disappear.
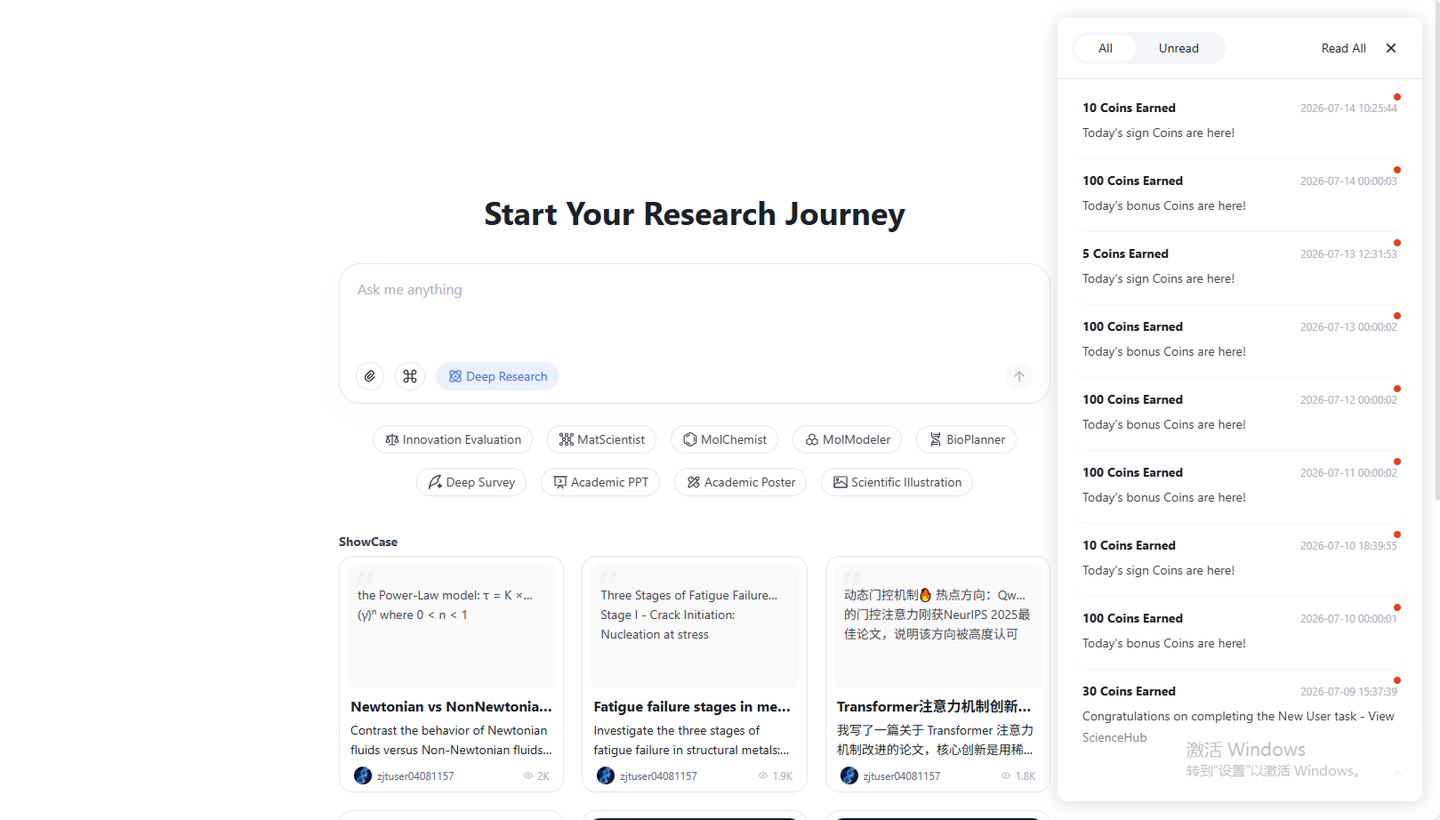
9.2 Instant Popups
To ensure you can promptly understand the latest progress of key tasks, the system sends reminders through instant popups in the upper-right corner of the interface. These reminders proactively inform you of task success, failure, or states requiring your confirmation, and guide you for subsequent operations.
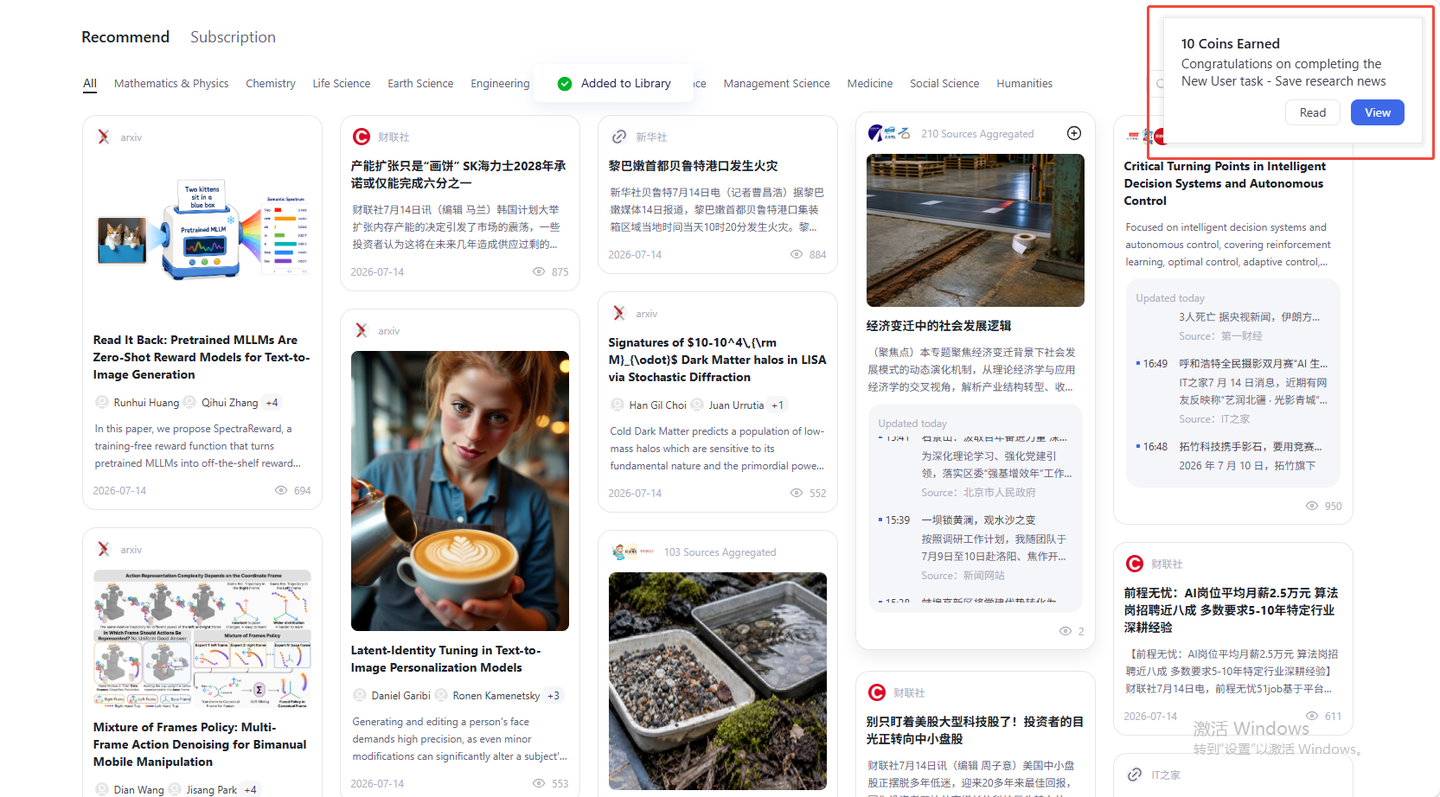
Popup Composition and Interaction:
Each popup consists of a status icon, message content, and two buttons in the bottom-right: "View" and "Read".
Status Icons: Divided into success, failure, and confirmation categories, helping you quickly identify message nature.
View: Clicking directly jumps to the task interface associated with the message.
Read: Clicking marks the message as read, closes the popup, and updates red dot reminders in the message center accordingly.
Popup Types and Duration:
Based on message importance, popups are divided into two types:
Notification Messages (Success/Failure):
These popups are for result notifications, remaining on screen for several seconds before automatically disappearing to minimize disruption to your current operations.
Confirmation Messages:
These popups involve key nodes requiring your decision, remaining persistently displayed on the interface until you actively click buttons to process them.
Coin System
10.1 Coin Center
Click the username in the bottom-left corner of the SciencePro platform, then click "User Center" in the pop-up menu to enter the "Coin Center".
The "Coin Center" includes "Coin Overview", "Activity Center" and "Plans & Top-Ups" modules.
"Coin" serves as the virtual currency system for experiencing the Panshi website, usable only within this site. Based on different validity durations, it is divided into three types:
Daily Coin: Valid on the day obtained, expires at 24:00 on acquisition day.
Time-Limited Coin: 30-day validity period, expires at 24:00 thirty days after acquisition.
Permanent Coin: Permanently valid during normal account usage.
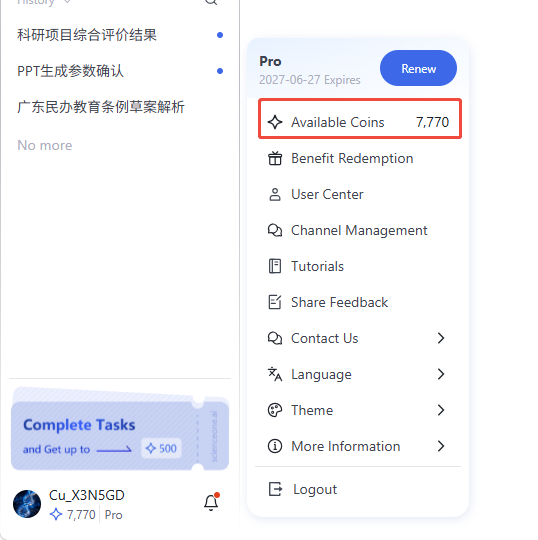
10.2 Coin Overview
"Coin Overview" allows you to obtain overall coin-related information on the SciencePro, including your membership information, current available research value, and historical research value details.
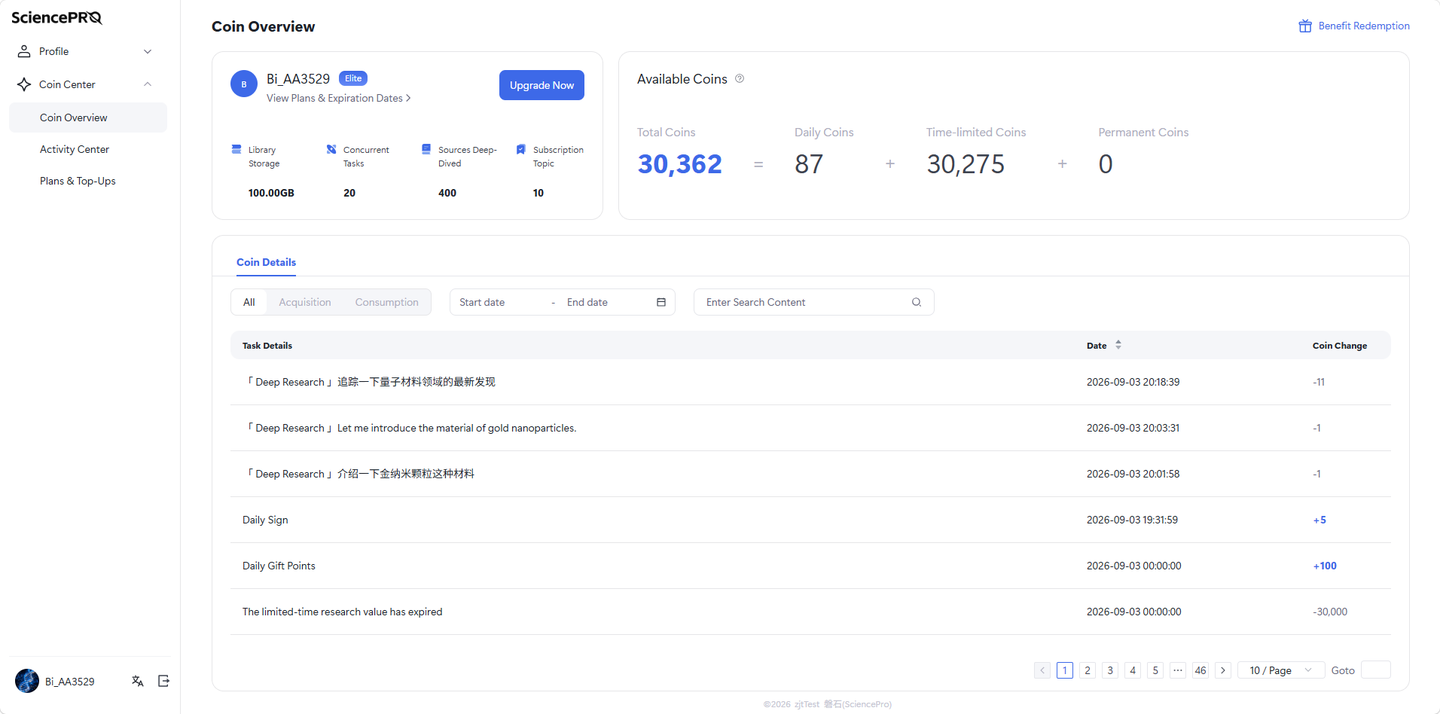
10.2.1 User
Personal information displays your membership information. You can understand all benefits under your current membership level here.
10.2.2 Available Coins
This displays your current available coins, including daily coins, time-limited coins, and permanent coins.
10.2.3 Coin Details
Coin details display all your historical records involving coin acquisition and consumption. You can choose to view detailed coin consumption or acquisition, and also support searching to view details within some time periods.
10.3 Activity Center
SciencePro provides a series of activities to acquire coins, including daily check-ins, inviting friends, newbie tasks, etc. You can participate in various activities to acquire coins and use various SciencePro functions.
10.3.1 Daily Login Activity
All users receive coins upon daily login.
10.3.2 Inviting Friends
Following guidelines to invite friends to register on SciencePro, both can receive certain research value rewards.
10.3.3 New User Tasks
Complete new user tasks to receive time-limited coin rewards.Click the new user task card in the bottom-left corner of the SciencePro platform to view the task list.
Click any task, follow the operation guide to complete the new user task and receive corresponding time-limited coin rewards.
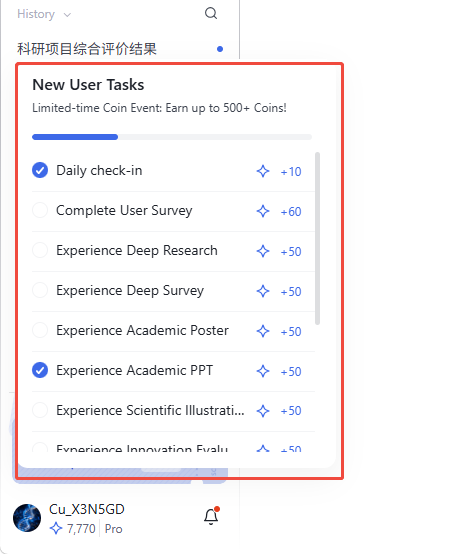
10.4 Plans & Top-Ups
This Plans & Top-Ups module opens recharge for different memberships and displays benefit comparisons. You can flexibly choose different membership based on actual needs.
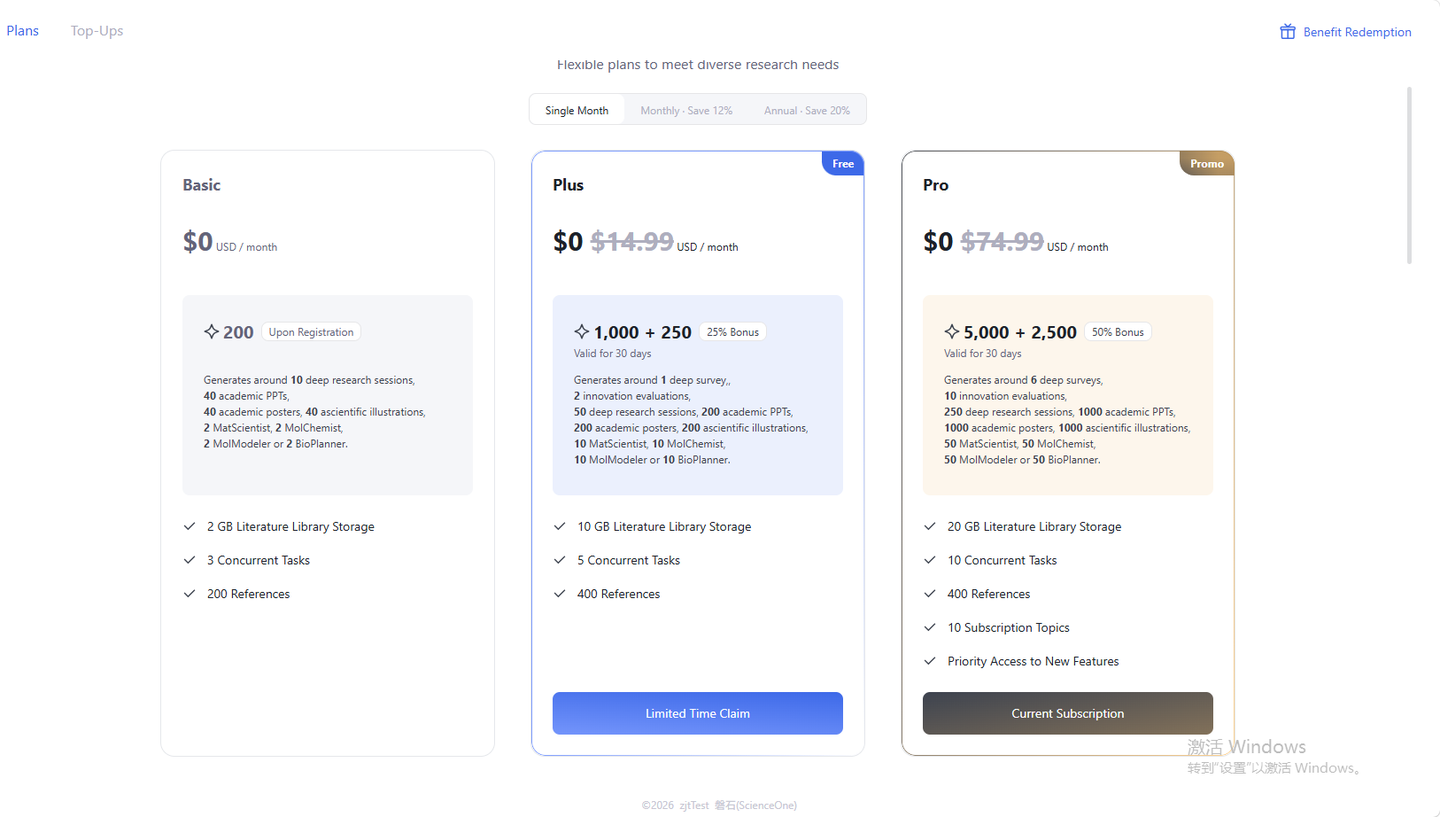
10.4.1 Basic Membership
SciencePro provides Basic Membership services for all users. The first month after registration comes with 200 free coins, plus 2GB literature library space and 200 reference papers.
10.4.2 Plus Membership
The Plus Membership provides richer quota packages based on the Basic Membership.
10.4.3 Pro Membership
The Pro Membership not only has the richest quota packages but also provides priority access to new features.
10.4.4 Enterprise Plan
Enterprise users can contact business for exclusive customized research solutions, including dedicated deployment, quota customization, and exclusive custom domain services.
