
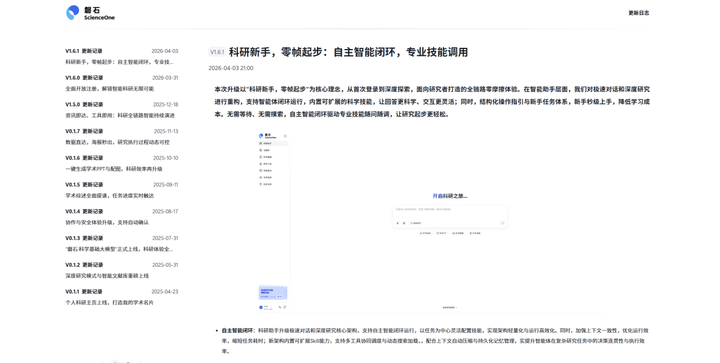
开始使用
探索面向科研人员的新一代智能工作流。
简介:化繁为简的科研全链路
传统的科研工作往往是割裂的:在不同数据库间检索、使用文献管理软件整理、切换到各类 AI 工具辅助阅读,最后还要打开排版软件制作报告。ScienceOne 将这些支离破碎的步骤整合为一个单一、无缝且深度智能的工作环境。
它不仅是一个对话助手,更是一个集文献调研、学术写作、数据检索和成果可视化于一体的科研工作站。借助 ScienceOne,您可以在此推进从"寻找灵感"到"成果展示"的整个学术价值链。
这种一站式的科研范式意味着您可以:
- 全景式文献调研:一键直连中科院文献情报中心、arXiv 及全球学术资源,或基于您的个人文献库,让智能体为您梳理研究脉络和引文图谱。
- 深度阅读与批注:告别泛泛而读,对单篇或多篇海量文献进行精读解析,自动提取核心观点、研究方法及局限性。
- 沉浸式推演研究:独创的深度深度研究,通过单智能体闭环架构(AgentLoop),实时透视 AI 拆解问题、收集信源到生成答案的完整思考过程。
- 学术级内容生成:仅需提供自然语言指令或上传源文件,即可自动生成数万字的文献综述、符合学术规范的 PPT 汇报、专业海报及配图。
- 全链路资产管理:您的每一次推演记录、过程文件及个人研值资产,都由系统安全、有序地统一归档。
ScienceOne 消除了在繁杂工具间切换的摩擦力,让您将核心精力重新聚焦于「研究」本身。
快速上手:开启您的第一次智能研究
使用 ScienceOne 开展研究是一个极其自然的过程。无论您是需要解答一个细微的学术疑问,还是要完成一篇宏大的综述,都可以遵循以下核心步骤快速启动。
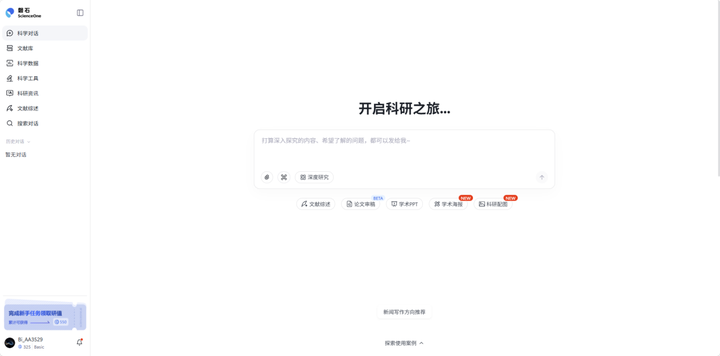
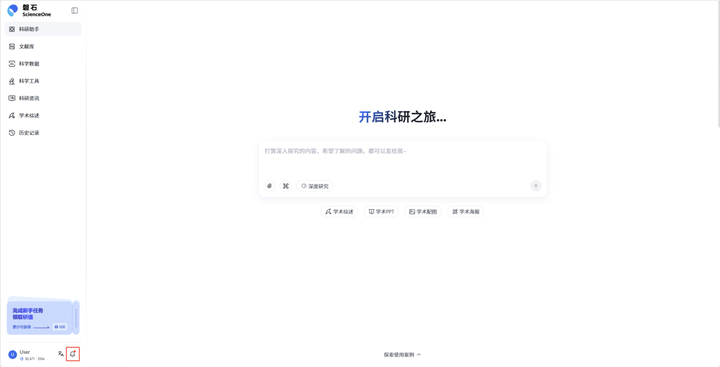
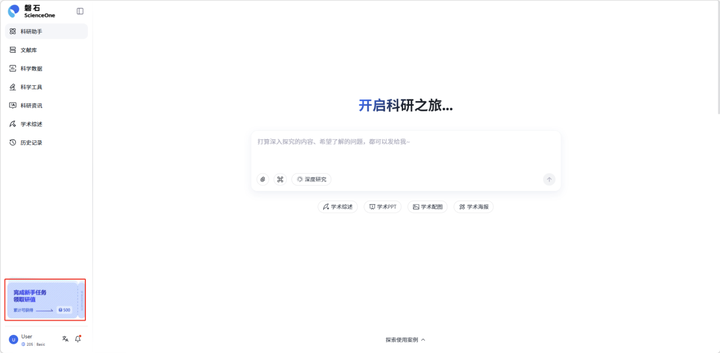
1. 确立研究意图并抛出问题
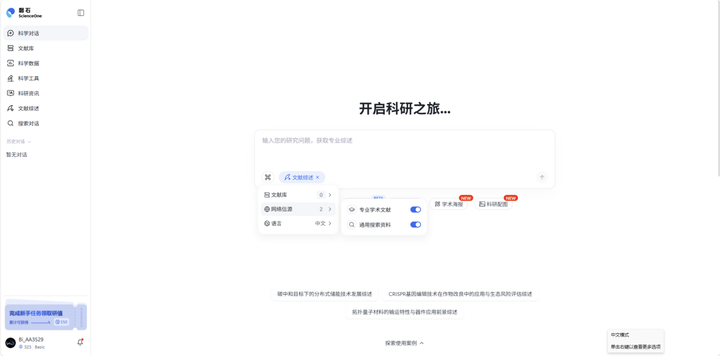
一切从首页的对话框开始。根据您的任务复杂度,选择最适合的模式,并用自然语言描述您的需求:
- 日常释疑:默认的「极速模式」可以瞬间解答您的学科疑问。
- 深度挖掘:切换至「深度研究」,告诉它:"帮我调研近三年关于固态电池能量密度提升的前沿方案,并对比各方法的优劣。" 描述越详细,智能体规划的路径越精准。
2. 构建或接入专属知识库
如果您已有特定的研究范围,在提问前可点击「设置」或进入「文献库」模块。您可以上传本地文献,构建您的专属知识库。您不仅可以限定智能体只在您的库中寻找答案,还能让它结合全网 1.7 亿篇科技论文交叉验证,确保结果的权威性。
3. 见证智能体的深度思考
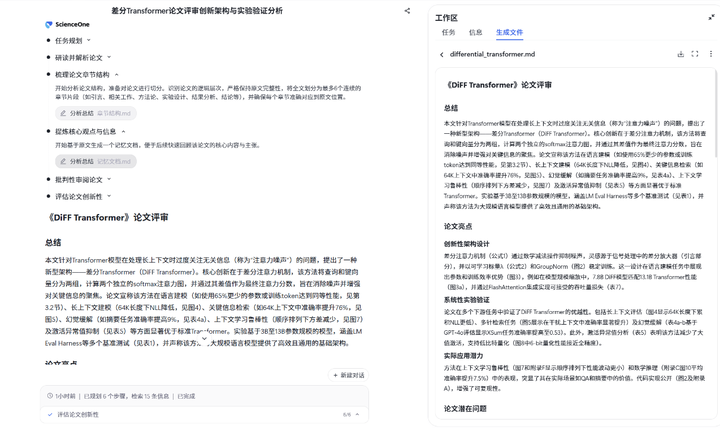
当您在「深度研究」下提交任务后,ScienceOne 将在左侧过程区向您展露它的「思考全过程」。您将实时看到它如何拆解任务、调用网络搜索或查阅文献库、提取信息。而在右侧的工作区,所有被引用的信息源、图表和阶段性文件都会清晰列出。每一个结论都真实可溯源。
4. 一键转化科研成果
研究有了结论,接下来是展示。您无需离开平台,直接在对话框底部切换至转化工具:
- 需要汇报?点击「学术 PPT」或「学术海报」,上传您的文档,系统将自动解析结构、生成大纲,并排版出符合学术审美的可视化文件(支持中英双语及主题色切换)。
- 需要插图?唤起「科研配图」,描述您需要的实验流程图或分子结构,系统即刻生成专业配图。
登入系统
首次使用 ScienceOne 需要注册并登入您的个人账号。
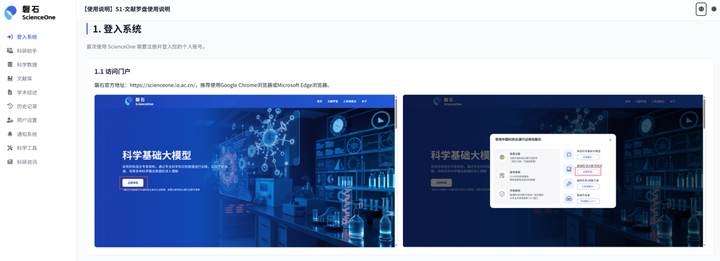
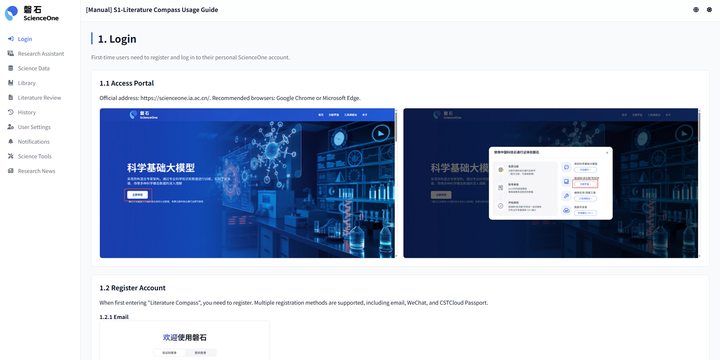
1.1 访问门户
ScienceOne官方地址:https://www.scienceone.ai,推荐使用Google Chrome浏览器或Microsoft Edge浏览器。
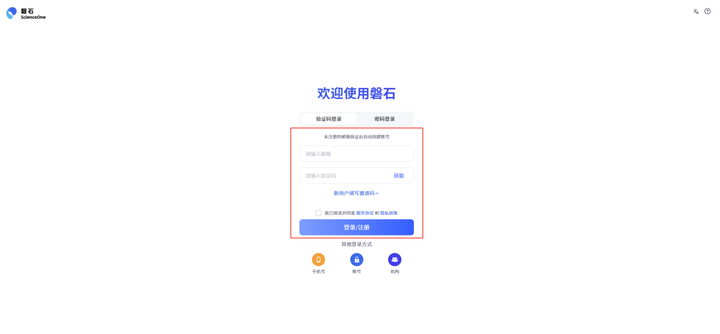
1.2 注册账号
首次进入“磐石”时,需要您注册账号。
系统为个人用户提供手机号、邮箱注册功能,在输入框输入手机号或邮箱地址,并点击"获取"按钮,即可获取验证码,输入正确匹配的验证码,即可完成注册,并自动创建账号。
1.3 登入账号
系统相应提供了账号密码登录、验证码登录、机构登录、谷歌登录等多种登录方式。
1.3.1 账号密码登录
如果您已有完成注册的账号及其密码,可点击账号和密码登录,正确输入账号密码后即可登入系统。
1.3.2 验证码登录
如果您有已注册成功的手机号或邮箱,可点击验证码登录,正确输入手机号/邮箱地址及验证码后即可登入系统。
1.3.3 机构登录
如果您所在机构已接入ScienceOne,点击机构登录,选择您所在的机构,通过机构登录成功后即可登入系统。
1.3.4 谷歌登录(即将上线)
如果您有谷歌账号,可点击谷歌登录,跳转并成功关联后即可登入系统。
科学对话
2.1 对话模式
科学对话面向文献调研、学科问题解答、研究报告撰写、可视化报告生成、文献综述等场景,提供多种使用模式。
极速模式:更快,适用于日常工作、问题解答等场景,高效解决科研疑问。深度研究:更全,适用于调研、报告、挖掘研究思路等场景,整合海量信息,全方位支撑科研决策。文献综述:更透,专用于超长文献综述场景,深度解析万篇文献,全面梳理研究脉络。
论文审稿:更优,适用于投稿前论文的自查和论文的辅助审稿,精准剖析论文的可优化之处,让论文精益求精。学术 PPT:更专,适用于开题报告、学术会议汇报、研究成果展示等场景,上传文献一键生成,图片图表真实可溯源。
科研配图:更精,适用于论文图表绘制、报告插图设计、学术汇报可视化素材制作等场景,精准匹配研究内容。学术海报:更直观,适用于学术交流、成果展示等场景,上传文献一键生成,视觉化展现研究亮点。
查重降重:更准,适用于论文初稿自查、投稿前检测等场景,一站式完成文献查重、AIGC 检测与智能降重。
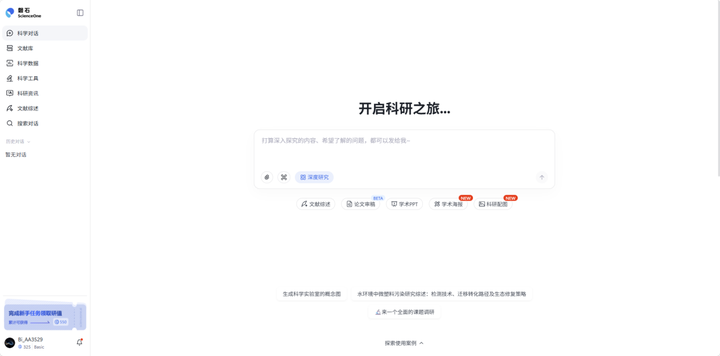
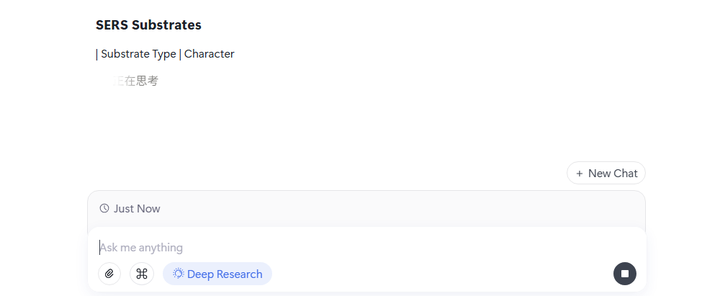
2.1.1 极速模式
目前对话默认为极速模式,在该模式下,您可以直接与模型对话,过程更加简洁高效。
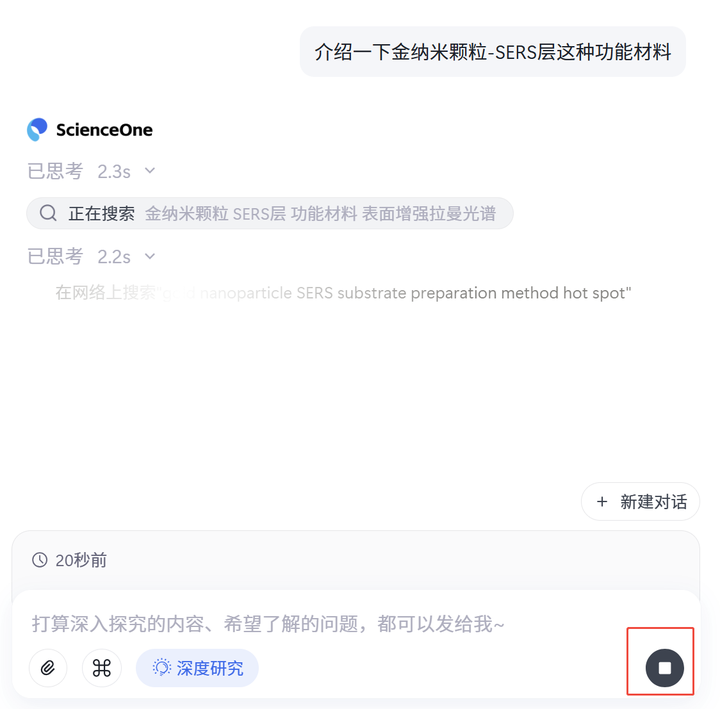
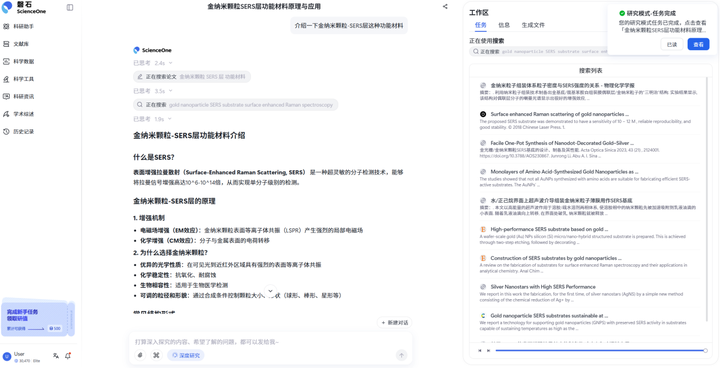
2.1.2 深度研究
在首页对话框底部选中“深度研究”按钮即可使用深度研究。
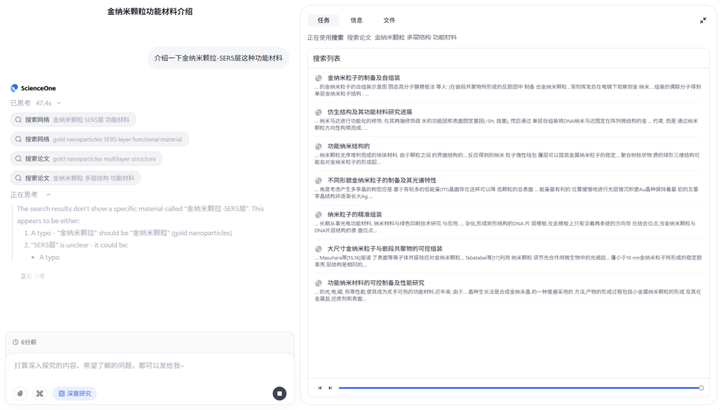
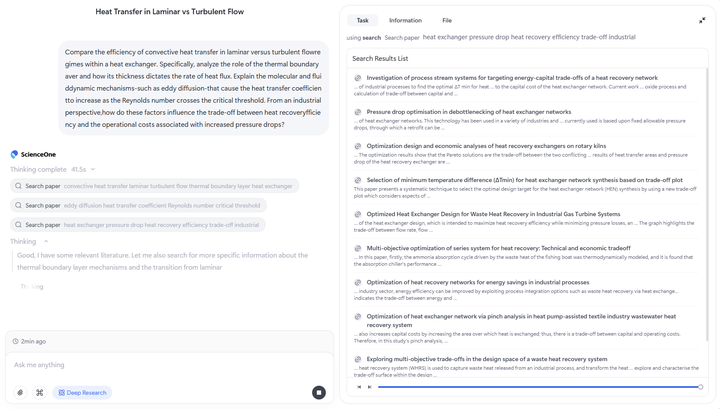
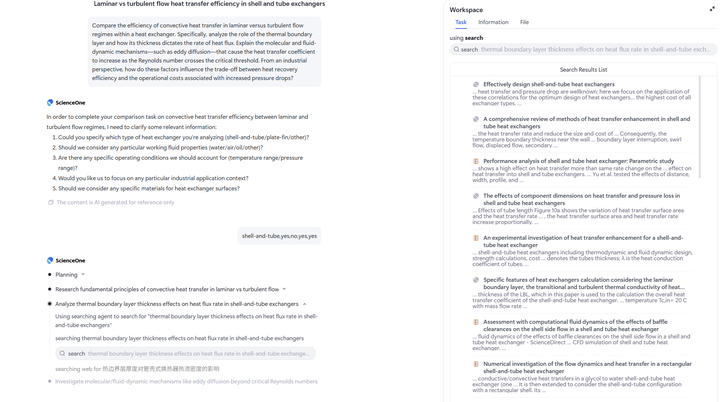
在该模式下,采用单智能体闭环运行(AgentLoop)架构,智能体会思考您的问题,并输出回答。
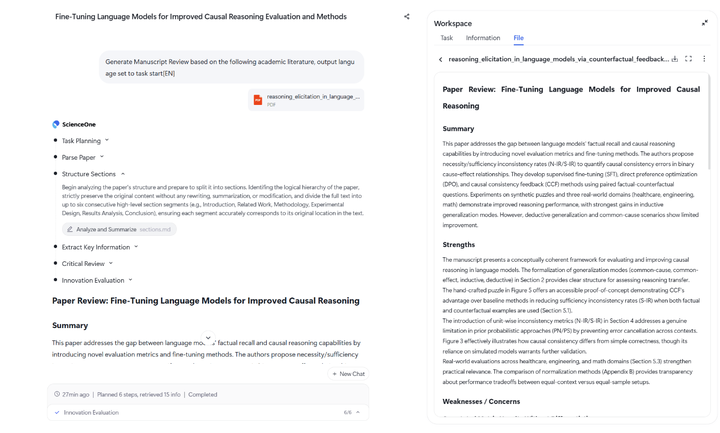
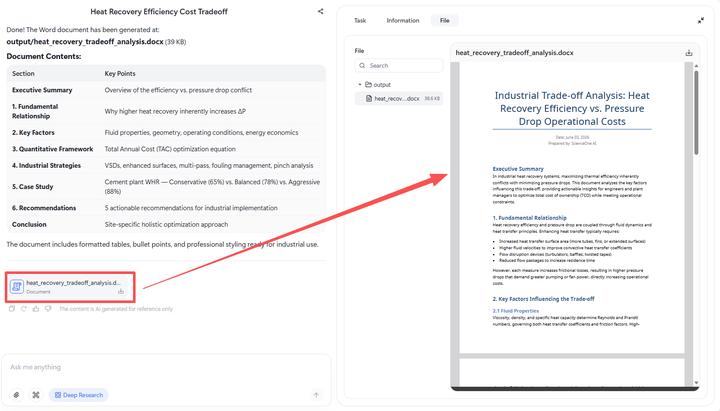
系统分为两部分:过程区(左侧)、工作区(右侧)。左侧过程区展示当前执行过程,包括思考过程、执行细节及最终生成的结果。右侧工作区包含三部分:"任务"部分展示智能体执行步骤的输出结果;"信息"部分汇总展示通过技能、网络信源、文献库收集的信息;"文件"部分展示当前任务生成的所有文件列表。
2.1.3 文献综述
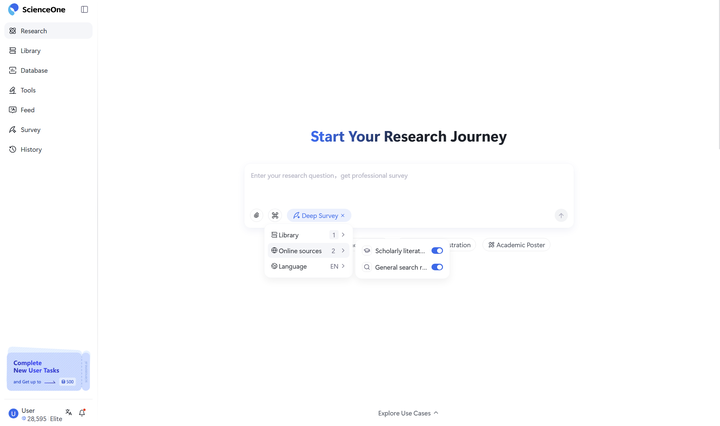
在首页对话框下方选中“文献综述”按钮即可使用文献综述模式。
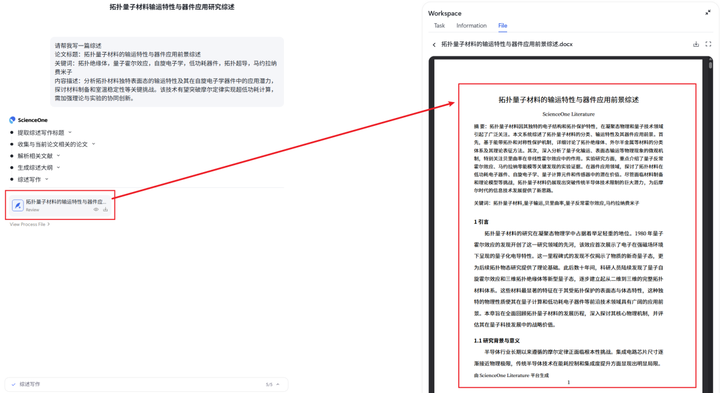
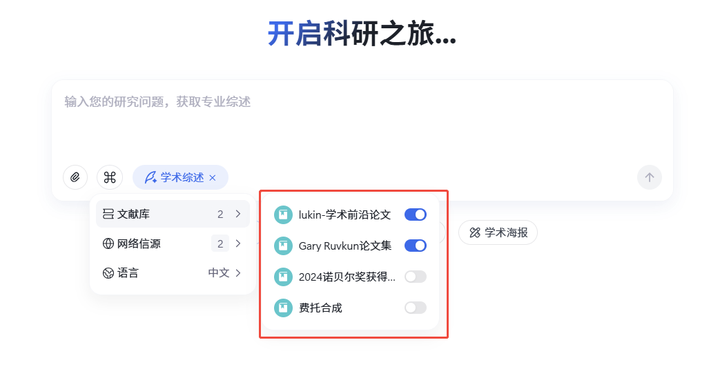
在综述模式下,支持输入您的研究问题,获取数万字专业综述,在任务开始前可以选择文献库、网络信源和目标语言。
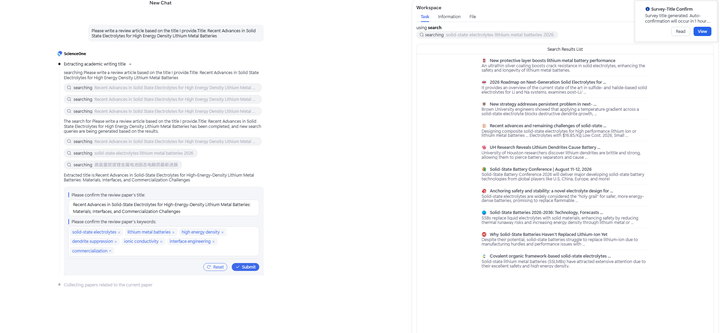
任务开始后,智能体对综述的标题、关键词等详细信息进行提取,并生成支持您修改的综述大纲,等待您的确认后再继续执行。
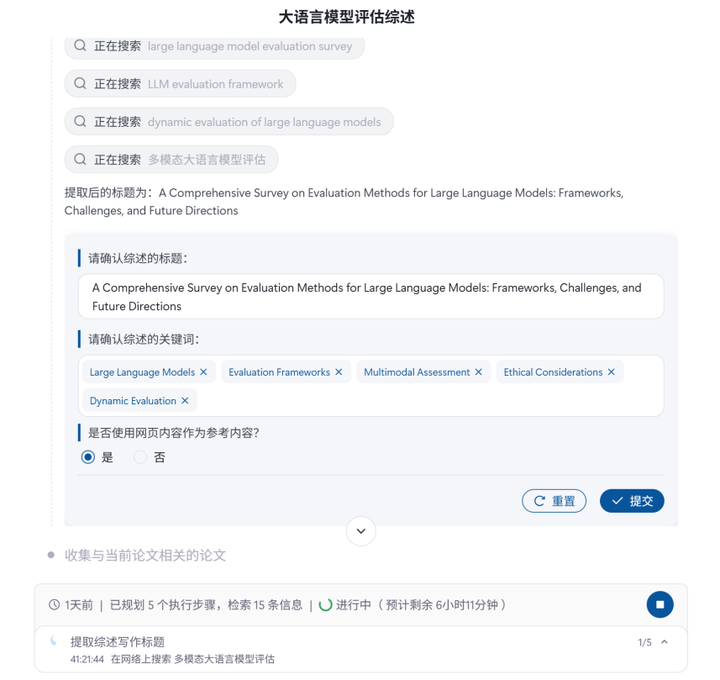
任务执行完毕后,系统会展示完整的综述报告,包括摘要、正文、参考文献等,点击【下载】即可下载pdf、word或md文件格式的报告全文。
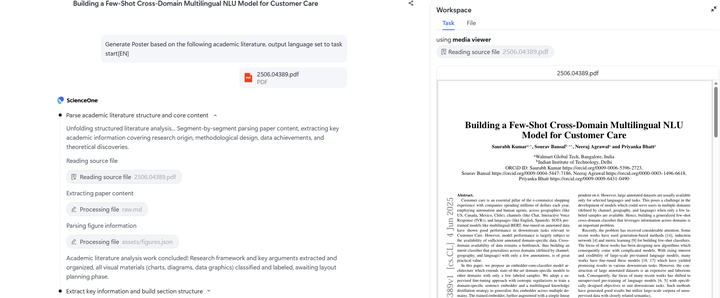
2.1.4 学术PPT
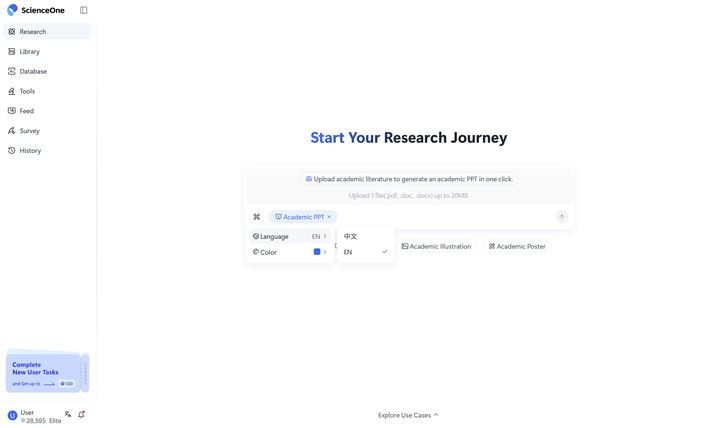
在首页对话框下方选中"学术PPT"按钮即可进入学术PPT生成模式。支持点击上传区域调起本地文件选择,或直接拖拽本地文件进行上传。系统支持上传1份PDF、DOC或DOCX格式的学术文献,文件大小需在20M以内。上传前可选择输出语言(中文/英文,默认为英文)和主题颜色,系统将基于您选择的语言生成相应的PPT内容。鼠标悬停至上传区域时会显示格式和大小要求提示,如遇文档不合规会弹出明确的异常提示。

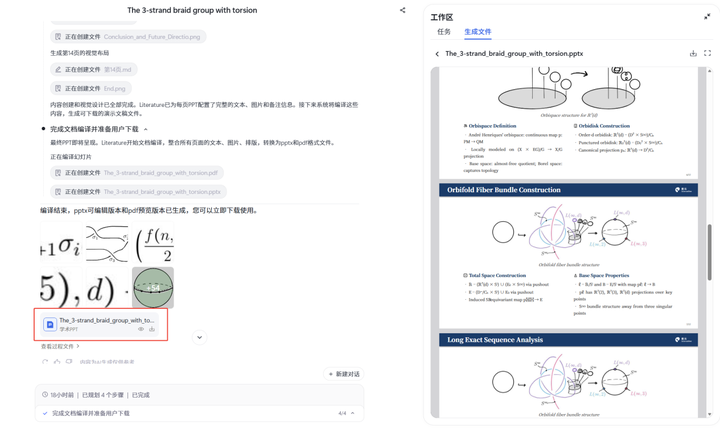
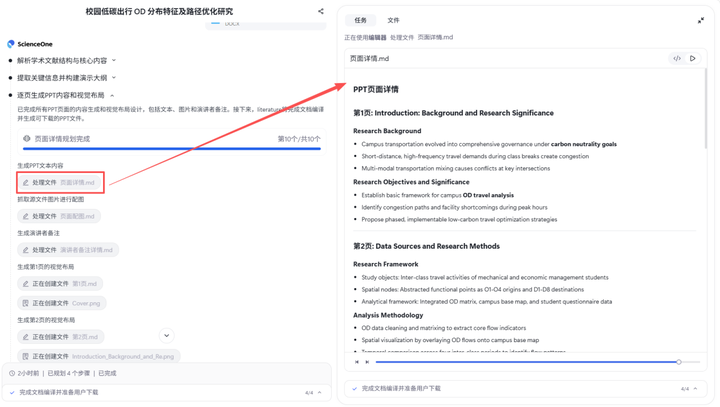
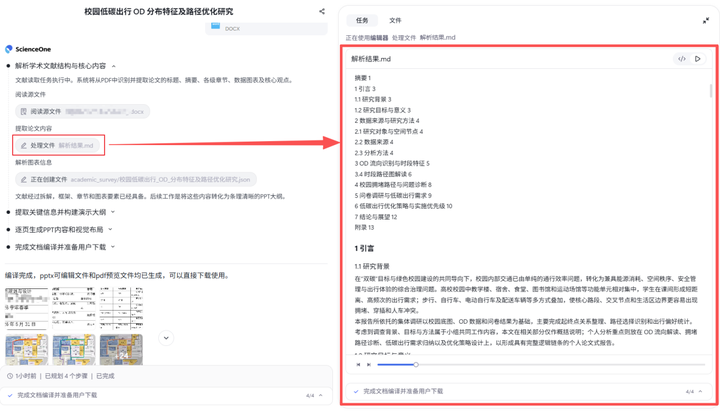
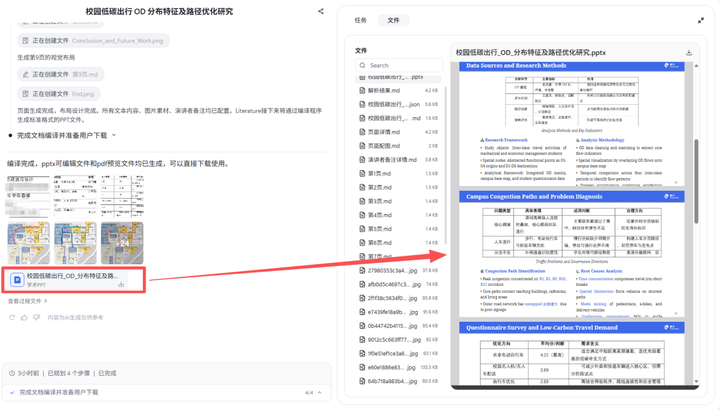
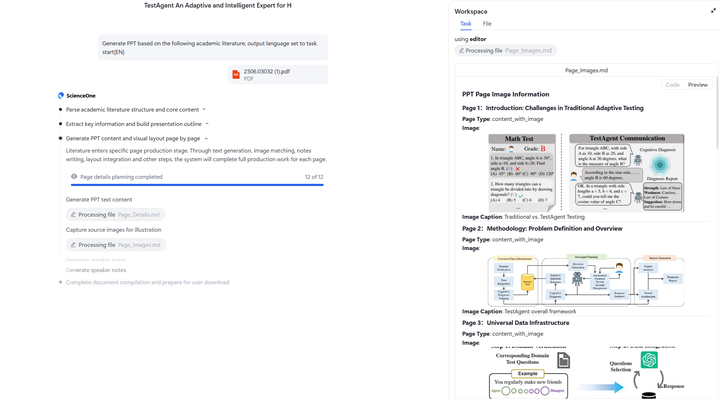
文件上传成功后,系统将自动执行四个阶段的智能处理。首先进行学术文献结构与核心内容解析,系统会阅读源文件并解析论文内容及图表信息,解析过程中会在工作区展示详细的处理日志。第二阶段提取关键信息并构建演示大纲,系统会生成完整的PPT大纲结构并以markdown格式展示,此时支持用户进行大纲的自定义编辑。第三阶段逐页生成PPT内容和视觉布局,通过进度条实时显示生成状态,并在工作区展示各页面的并行生成日志。最后阶段完成文档编译并准备下载,系统将处理最终的PPTX文件格式,确保符合学术演示标准。
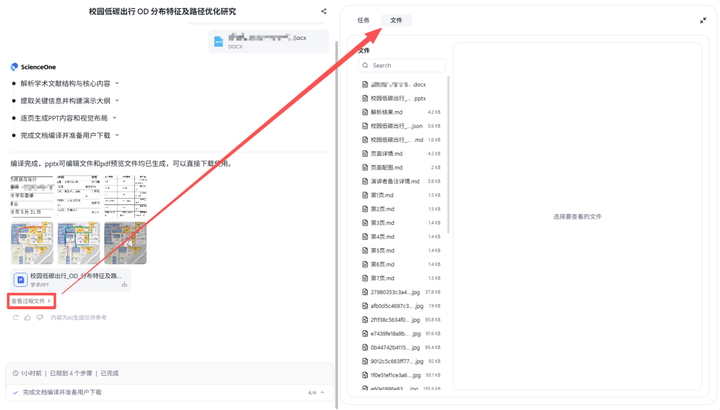
整个生成过程中,右侧工作区会实时展示三个主要内容模块。任务模块显示详细的处理日志,包括文件读取、内容解析、大纲生成和PPT制作的全过程记录。信息模块提供源文献预览和从文献中提取的图片图表列表展示,方便您随时查看处理进度和内容质量。生成文件模块按阶段展示产出内容,包括大纲markdown文件、PPTmarkdown文件等,最终完成后会直接弹出下载页面或展示完整的文件列表,并按最终结果文件和任务过程文件进行分类管理。
系统提供完善的任务控制功能,包括可收起展开的任务进度台,实时显示任务规划步骤、执行状态、开始时间和剩余时间等信息。支持用户手动暂停或中断任务,停止后可选择重新生成。所有任务进程会在左侧边栏实时显示,完成后会通过消息中心推送通知。
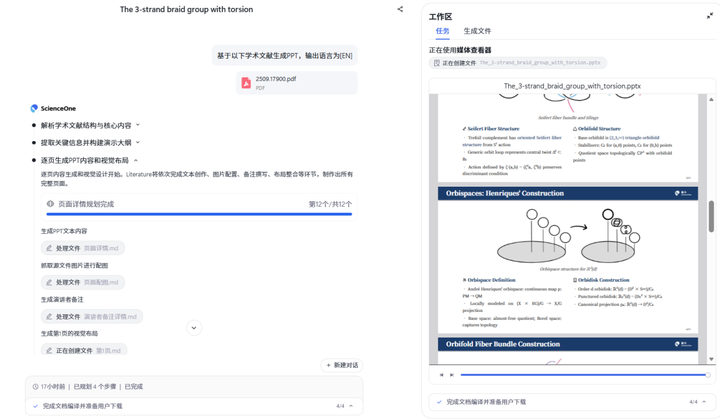
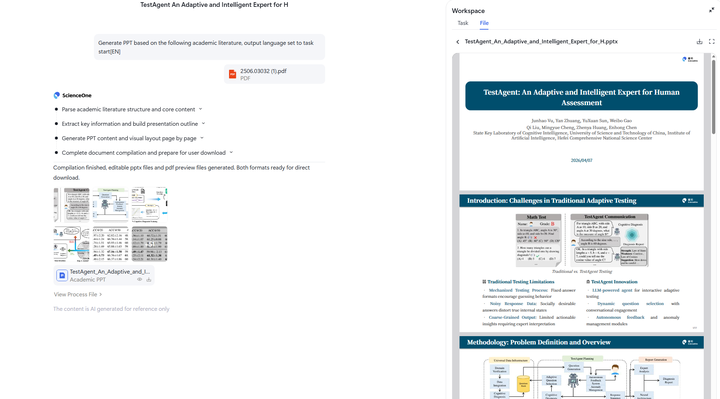
全部生成过程结束后,系统支持文件下载。您可以点击对应的文件,下载PDF/PPTX格式的文件。
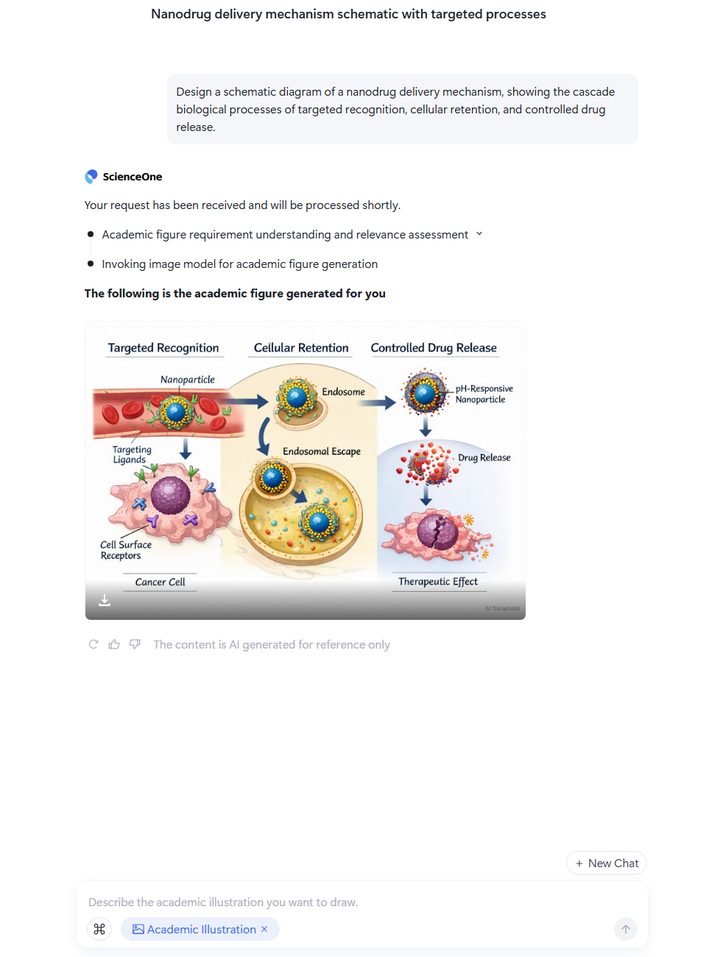
2.1.5 科研配图
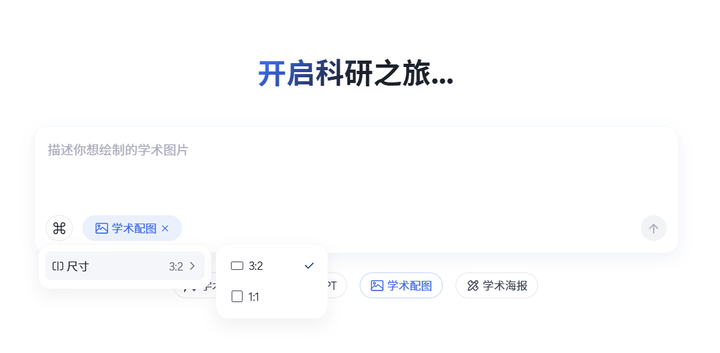
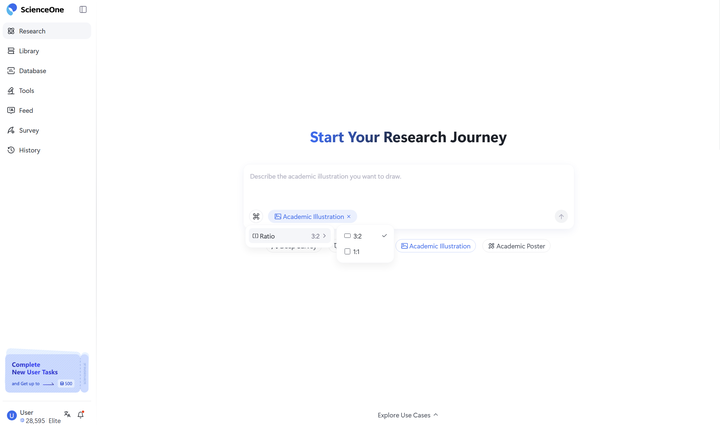
在首页对话框下方选中"科研配图"按钮即可进入科研配图模式。您可以用自然语言描述需要的科研配图内容,系统支持各类科研领域的专业配图需求,如分子结构图、实验流程图、数据可视化图表等。
提交配图需求后,系统将自动执行两个关键步骤完成配图生成。首先进行科研配图需求理解与相关性评估,系统会分析您的描述内容,判断是否符合科研配图要求,并评估内容的安全性和合规性。通过评估后,系统将调用图像模型进行科研配图绘制,基于您的需求生成专业的学术风格图片,并会添加AI生成水印以标识来源。配图生成完成后,系统将展示科研配图生成结果。支持使用点赞/点踩功能对生成结果进行反馈,帮助系统持续优化。
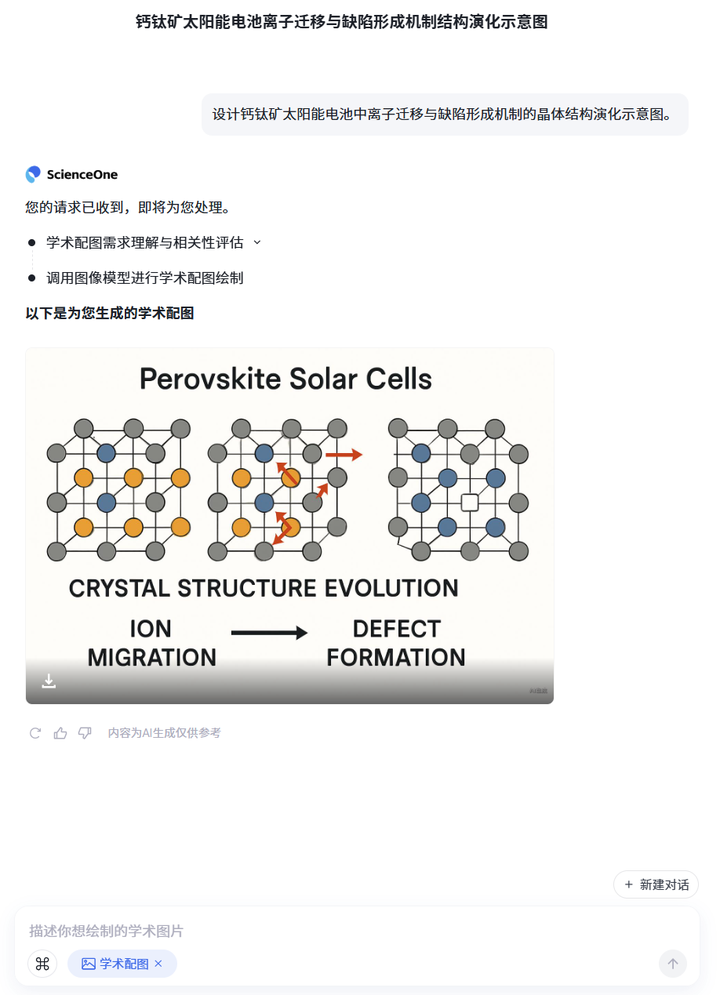
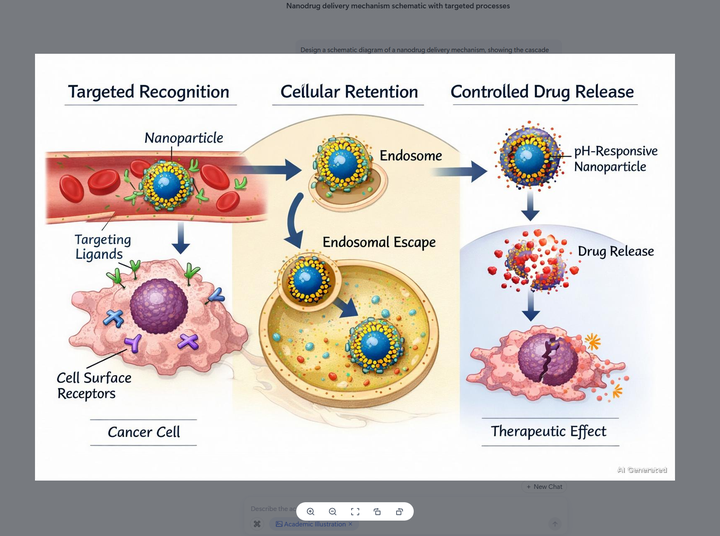
鼠标悬停在图片上会显示下载按钮,方便您保存配图到本地使用。单击图片可以放大查看细节内容。
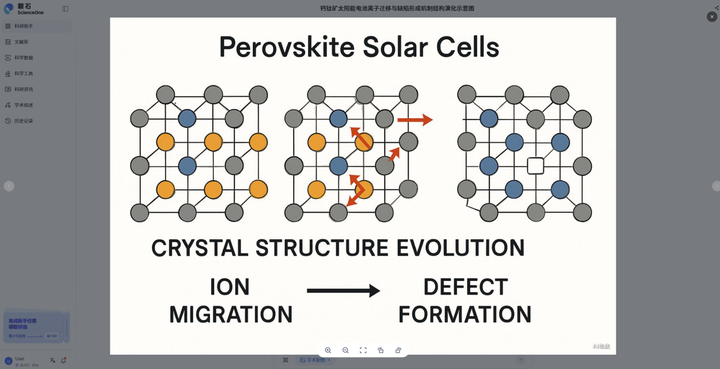
此外,系统支持多轮对话来完善配图效果,您还可以在当前对话中继续提出修改建议或新的配图要求,直到满足您的学术需求。
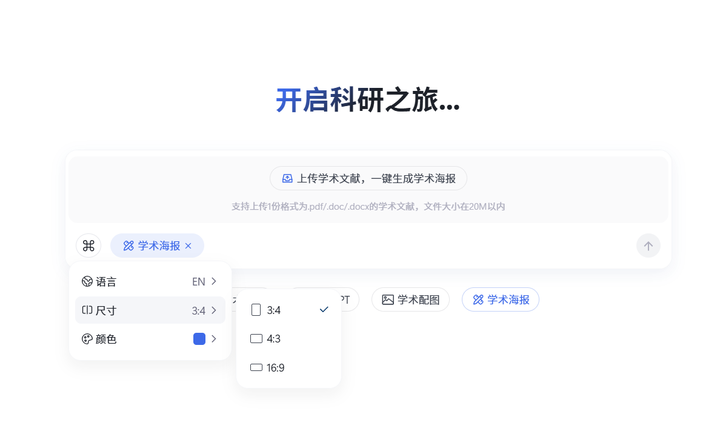
2.1.6 学术海报
在首页对话框下方选中"学术海报"按钮即可进入学术海报生成模式。支持点击上传区域调起本地文件选择,或直接拖拽本地文件进行上传。系统支持上传1份PDF、DOC或DOCX格式的学术文献,文件大小需在20M以内。
任务开始前,可配置输出语言(中文/英文,默认为英文)、尺寸和主题颜色,系统将基于您选择的语言生成相应的海报内容。鼠标悬停至上传区域时会显示格式和大小要求提示,如遇文档不合规会弹出明确的异常提示。
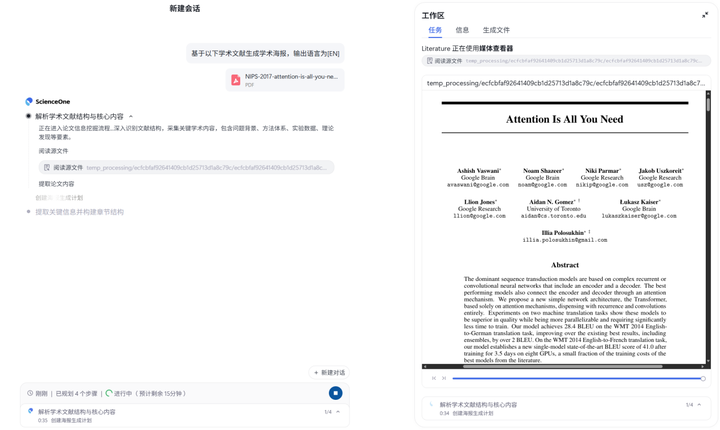
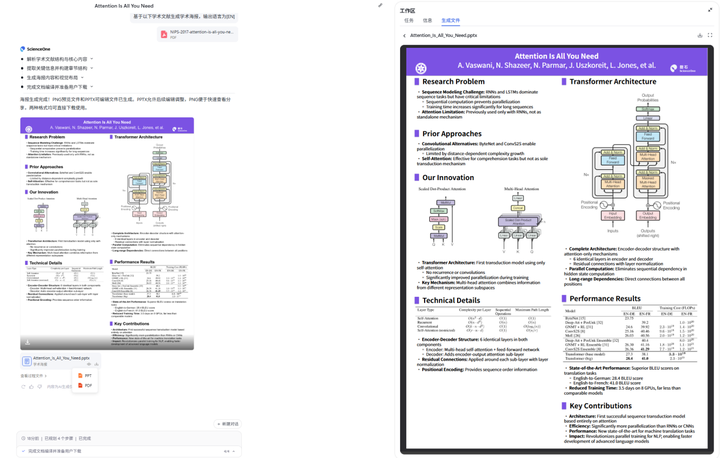
任务开始后,系统将自动执行四个阶段的智能处理。首先进行学术文献结构与核心内容解析,系统会阅读源文件并解析论文内容及图表信息,解析过程中会在工作区展示详细的处理日志。第二阶段提取关键信息并构建章节结构,系统会生成完整的海报大纲结构并以markdown格式展示。第三阶段生成海报内容和视觉布局,通过进度条实时显示生成状态,并在工作区展示各页面的并行生成日志。最后阶段完成文档编译并准备下载,系统将处理最终的PPTX和PNG文件格式,确保符合学术展示标准。
整个生成过程中,右侧工作区会实时展示三个主要内容模块。任务模块显示详细的处理日志,包括文件读取、内容解析、大纲生成和海报制作的全过程记录。信息模块提供源文献预览和从文献中提取的图片图表列表展示,方便您随时查看处理进度和内容质量。生成文件模块按阶段展示产出内容,包括大纲markdown文件、PPTmarkdown、PNG文件,最终完成后会直接展示海报及完整的文件列表,并按最终结果文件和任务过程文件进行分类管理。
系统提供完善的任务控制功能,包括可收起展开的任务进度台,实时显示任务规划步骤、执行状态、开始时间和剩余时间等信息。支持用户手动暂停或中断任务,停止后可选择重新生成。所有任务进程会在左侧边栏实时显示,完成后会通过消息中心推送通知。
全部生成过程结束后,系统支持文件下载。您可以点击对应的文件,下载PDF/PPTX/PNG格式的文件。
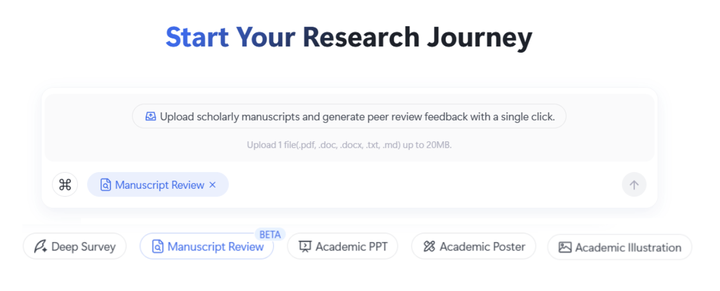
2.1.7 论文审稿
在首页对话框下方选中“论文审稿”即可使用论文审稿智能体。
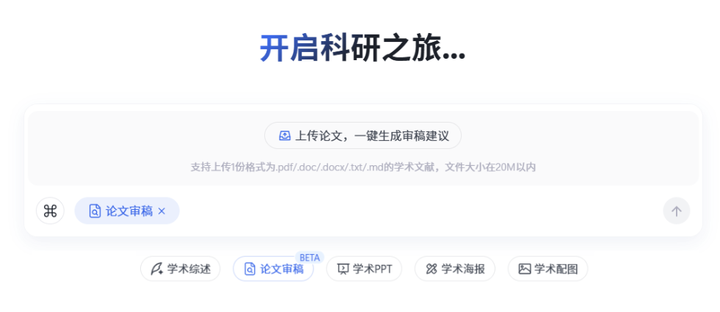
在论文审稿智能体中,可直接上传相关学术文献,支持.pdf/.doc/.docx/.md/.txt格式,限一篇论文,文件大小需在20M以内。在任务开始前可以选择产物语言,支持中英两种格式。
任务开始后,智能体将围绕以下几个维度,以客观的学术视角对论文展开审查:研读并解析论文内容,梳理论文章节结构,提炼核心观点与关键信息,批判性审阅论文的逻辑与表达,评估其创新性与学术贡献等。
智能体任务完成后,审稿结果以markdown格式展示,您可自由选择PDF,MARKDOWN或者DOC格式进行下载,获取最终的审稿建议。
2.1.8 查重降重
在首页对话框下方选中“查重降重”即可使用查重降重智能体,支持论文文献查重,AIGC检测及降重降AI率等功能。
在查重降重智能体中,您可以选择调用的技能,并用自然语言描述您的需求,智能体会根据您的需求描述自动选择将要执行的任务并开始。
附件支持上传相关学术论文,支持.pdf/.doc/.docx/.txt格式,限一篇论文,文件大小需在20M以内。
文献查重:
调用文献查重技能,智能体将执行学术论文查重任务,由万方数据能力支持,覆盖海量学术资源,精准定位文献相似文本,出具专业权威检测重复率报告,可预览或者下载查看。
AIGC检测:
调用AIGC检测技能,智能体将进行论文AIGC检测任务,由万方数据能力支持,依托最新AIGC检测技术,深度分析文本的语言模式与逻辑,精准识别AI生成内容,生成AIGC检测报告,可预览或者下载查看。
降重降AI率:
调用降重降AI技能,智能体会对您上传的文字或附件内容进行解析,并返回智能修改意见。
2.2 附件与设置
2.2.1 上传附件
支持上传附件以补充您的研究信息,最多支持一次上传10个文件,每个不超过20MB。
2.2.2 设置技能与信源
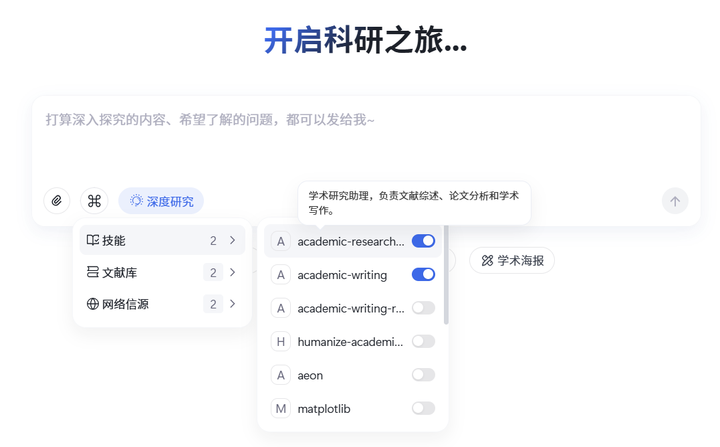
点击"设置"可选择智能体的技能、信息来源和输出配置要求,其中信息来源包括文献库、网络信源;输出配置根据模式不同,支持不同配置,如在文献综述中,支持配置目标语言;在学术PPT中,支持配置目标语言和主题颜色。
技能:技能处展示支持调用的技能,您可根据具体科研场景自主选择调用的技能。
文献库:文献库由您根据研究需要自行创建,用于存储精选论文。您可以选择允许智能体访问的文献库。
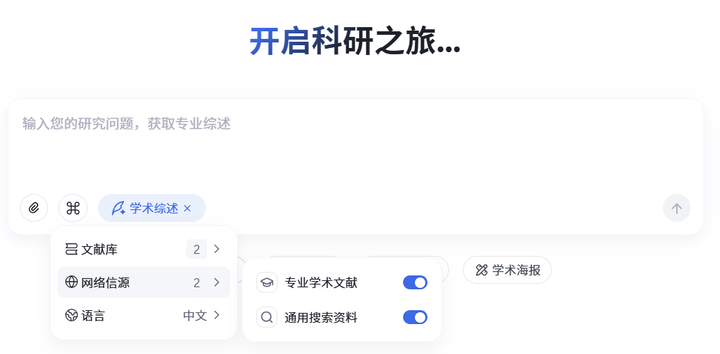
网络信源:网络信源包括专业学术文献和通用搜索资料。启用专业学术文献后,智能体将连接学术数据库,包括中科院文献情报中心1.7亿科技论文、arXiv 240万预印本论文,以及谷歌学术全球论文资源;智能体将主动连接互联网搜索相关资料。
2.3 对话终止与新建
2.3.1 对话终止
在任对话的进程中,点击终止按钮,进行中的对话将立即终止。
2.3.2 新建对话
当前对话的结束后,点击新建对话,用户将开启新的一轮对话,且新对话不受其他对话上下文影响。
2.4 进度查看
2.4.1 进度区任务查看
在深度研究中,任务会分为多步进行,点击展开可查看全部任务进度。
2.4.2 过程区任务查看
深度研究中,点击过程中每一步右侧的展开按钮,可查看每一步的详细过程。点击具体的执行动作,可在工作区查看该动作的结果。
2.5 工作区
2.5.1 进度跳转
完整的任务进度会以进度条的形式展示,用户可点击【左右】切换按钮切换上下步骤,也可以拖动进度条控制展示步骤。
2.5.2 搜索
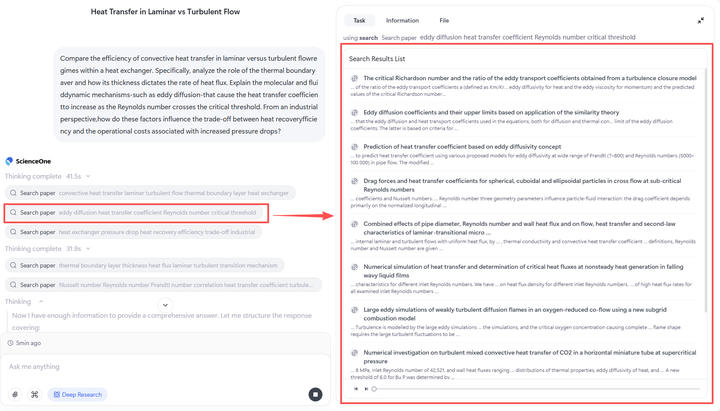
工作区-任务中会展示每一步的搜索结果,点击可查看原链接内容。
任务的全部的搜索结果可以在工作区中的【信息】中查看。
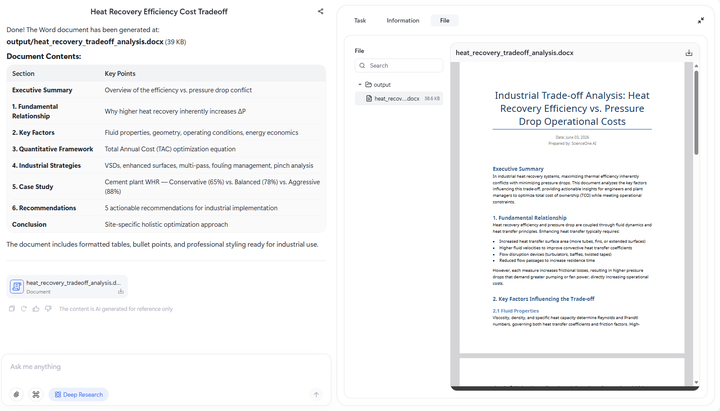
2.5.3 生成文件
在执行可能会生成分析结果等过程文件,点击执行动作在工作区可查看文件内容,并支持切换源码和预览查看效果。
所有任务的过程结果,可以点击【文件】查看。
所有任务的最终结果(如可视化报告、综述等),可以点击任务结束后的报告或在工作区中找到最终结果文件查看。
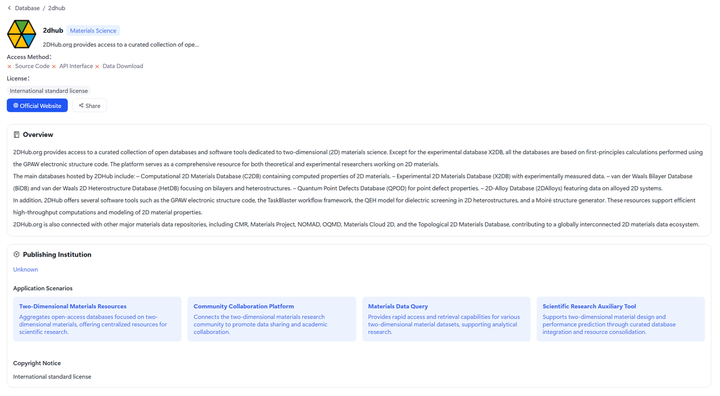
科学数据
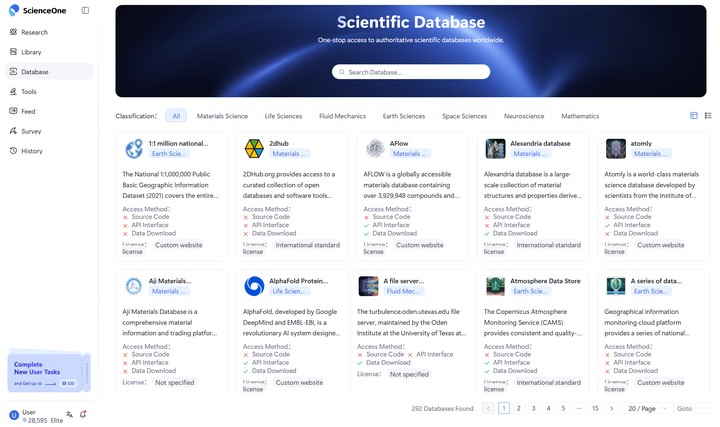
科学数据模块为科研人员提供一站式数据检索与获取服务,汇聚全球权威科学数据库,涵盖材料科学、生命科学、流体力学、地球科学、空间科学、神经科学、数学等各学科领域。
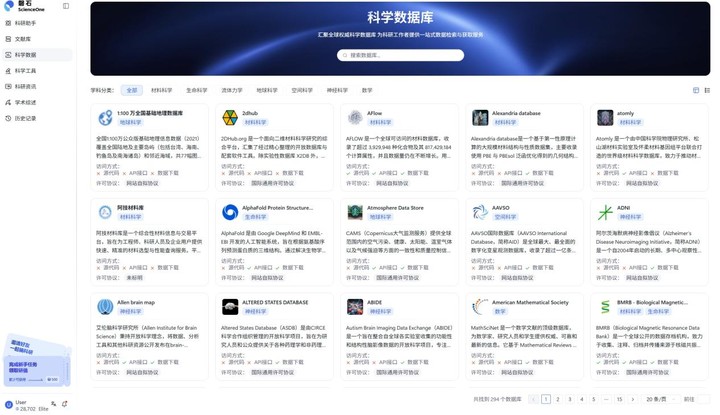
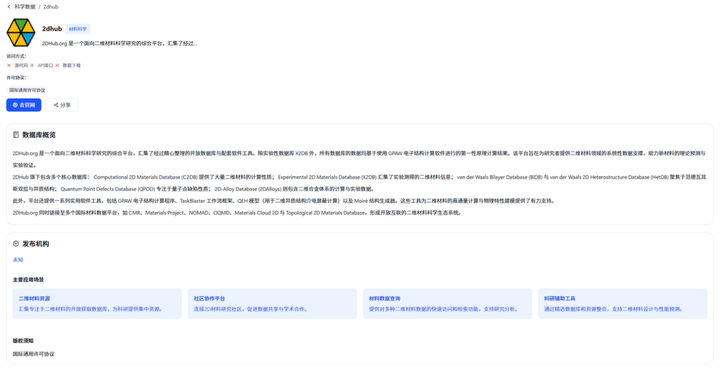
点击指定数据库,即可查看数据库详情,包括数据库名称、调用方式、访问地址、数据库概览等内容。可点击去官网,访问数据库的源地址;也可点击分享,将此数据库以链接的形式分享给其他人。
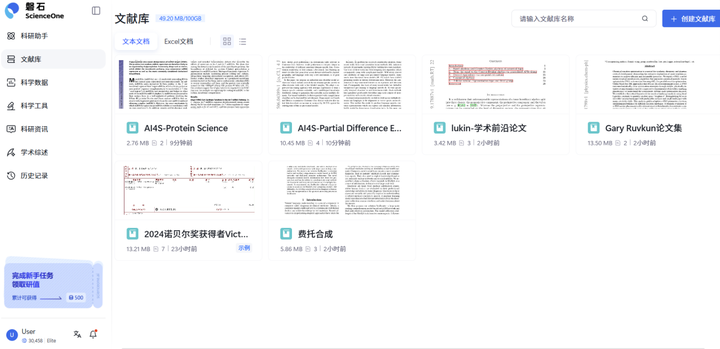
文献库
文献库模块为科研人员精心挑选的文献提供深度解读服务。将陆续集成Zotero等文献管理工具,进一步便利科研人员的日常研究工作。
3.1 创建文献库
创建文献库时,可根据文献类型选择对应的库类型。系统针对不同文献类型设计了专门的解读逻辑,选择合适的库类型能获得更好的使用效果。
3.2 上传文献
文件上传支持两种方式。
直接上传:在文献库管理页面直接批量上传文献文件,适合初次建库或集中整理文献时使用。
随时添加:在使用文献库进行研究时,可根据需要随时添加新的文献文件,便于及时补充相关资料。两种方式均支持主流文档格式,您可根据具体使用场景选择合适的上传方式。
3.3 查看文献库
您创建的所有文献库默认仅允许您自己查看,确保研究资料的私密性和安全性。
若要与合作伙伴共同研究,可通过"邀请成员"功能添加协作者,并为其设置访问权限。
其中,权限分为三个层级:"管理员"享有完全操作权限;"协作者"可创建目录和上传文献;"成员"仅可查看使用,不可修改内容。
作为文献库创建者,您可以随时调整成员角色或移除成员。确保文献库安全,团队成员管理权限仅限于创建者本人。
3.4 使用文献库
3.4.1 全库对话
您可以与文献库中的所有文献进行对话,也可以选择单篇文献进行精读。
3.4.2 单篇精读
在单篇精读界面中,您可以深度解读选定的文献,也可以随时切换到全库对话模式。
3.4.3 论文导读
论文导读提供单篇论文的核心内容解析,涵盖研究结论、研究目的、研究方法、合理性、局限性、核心观点、论据支持、应用前景和影响等方面。
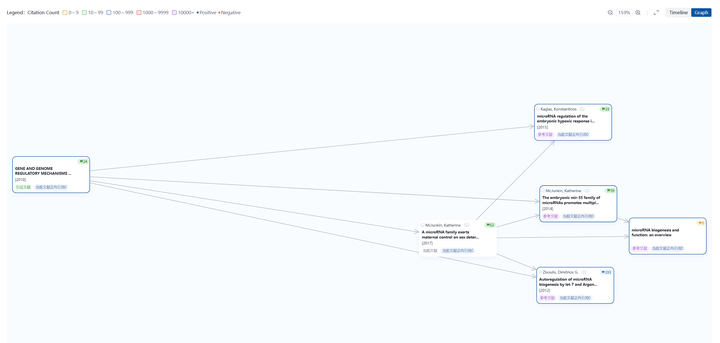
3.4.4 研究图谱
研究图谱提供引文回溯功能,以当前论文为中心,追溯其参考文献,同时探索该论文的被引情况,帮助您了解完整的学术脉络。
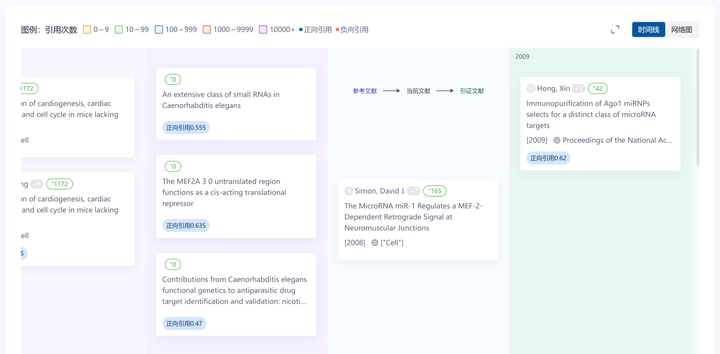
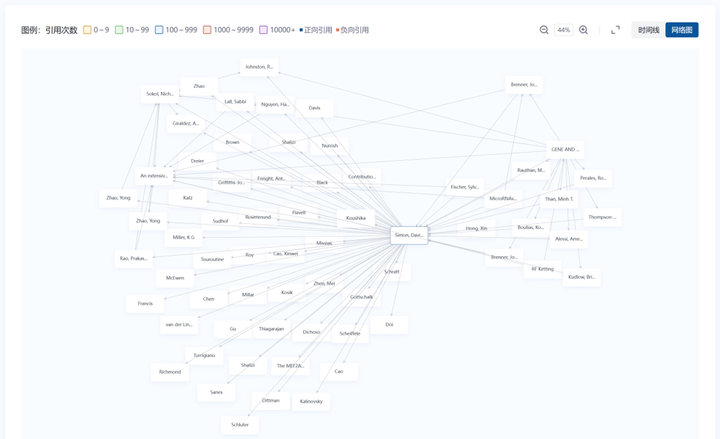
可视化网络视图可直观展示文献间的引用关系,帮助您清晰看到文献间的引用关系,便于快速识别关键研究节点。
3.4.5 文献对话
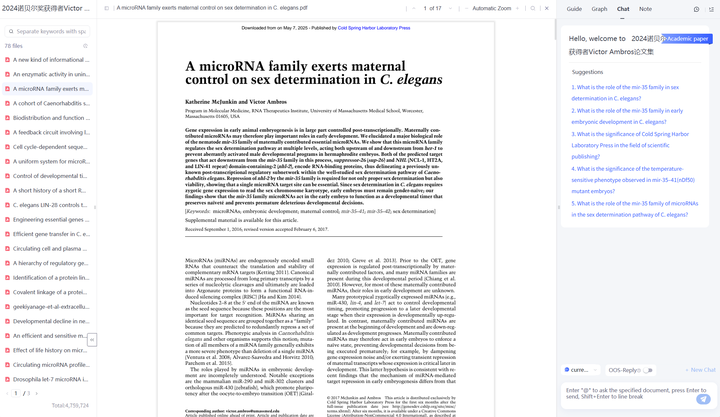
系统会预先解读每篇文献,生成常见问题并推送到界面,您可直接点击开启对话。
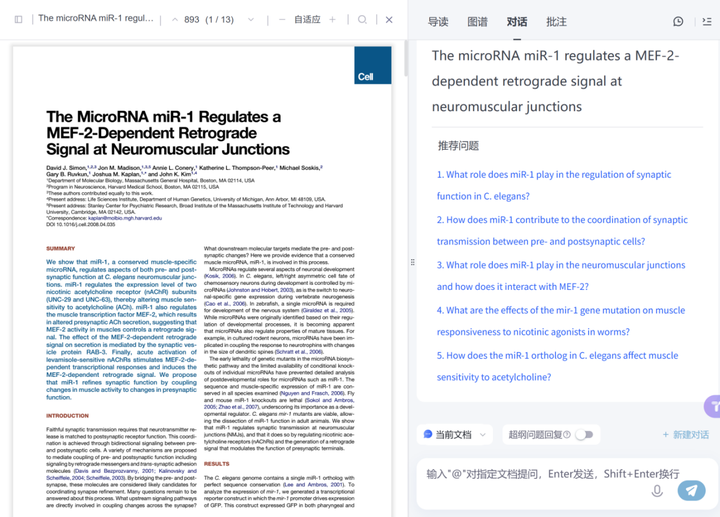
您也可以根据实际需要自主提问,系统将针对性地解读文献并提供参考来源。论文中的图片内容会直接展示在回答中。
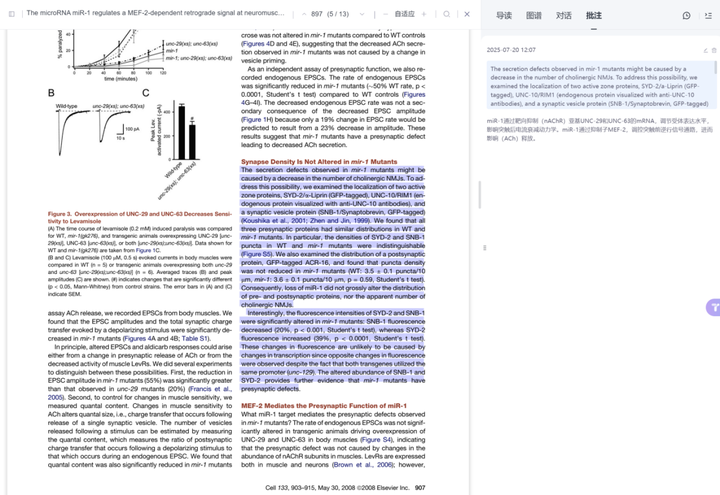
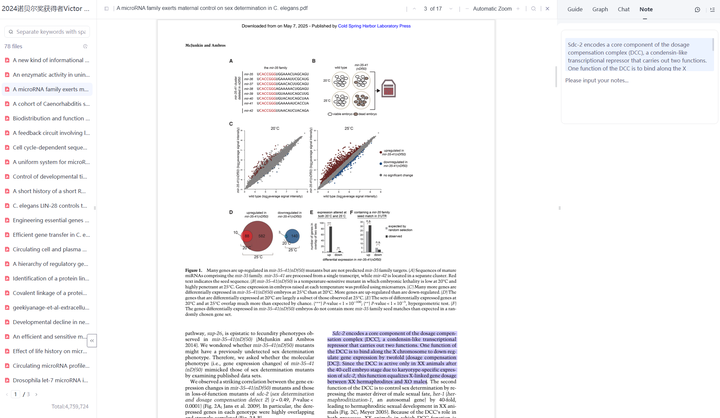
3.4.6 精读批注
文献库提供批注功能,便于记录阅读笔记。将右侧栏切换到"批注"模块后,在左侧选中文字即可自动创建批注,然后添加您的笔记内容。
文献综述
文献综述模块为科研人员提供从智能化综述创作到后续管理、深度阅读的全流程服务。
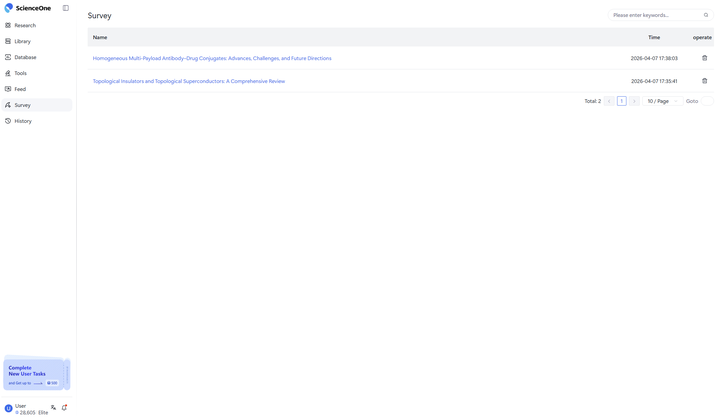
7.1 管理文献综述
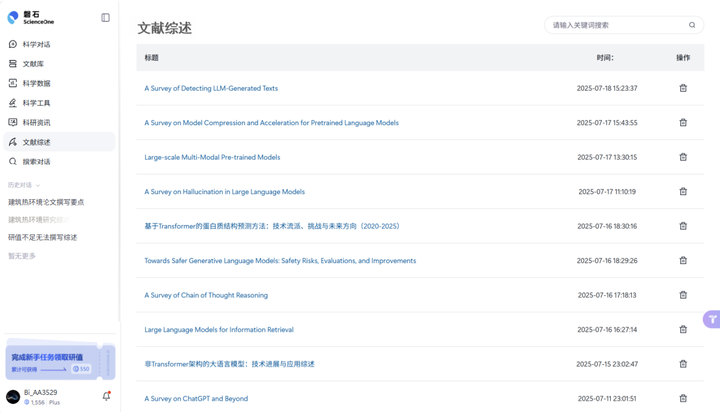
综述模式下生成的完整综述记录都汇总在这里,您可以在这里阅读和管理每一篇综述原文。
1)综述列表展示
所有生成的综述以列表形式清晰展示,包含综述标题、创建时间等关键信息。界面简洁明了,便于快速浏览和定位目标综述。
2)快速搜索
您可以通过搜索框输入关键词快速定位特定综述,提高查找效率。
7.2 查看文献综述
7.2.1 导读、对话及批注
点击综述进入详情页面,右侧栏展示导读、对话、批注等交互功能。
7.2.2 参考文献及图谱
综述内容后方显示全部参考文献,点击任一参考文献可查看详细信息,包括标题、作者、发表时间等。
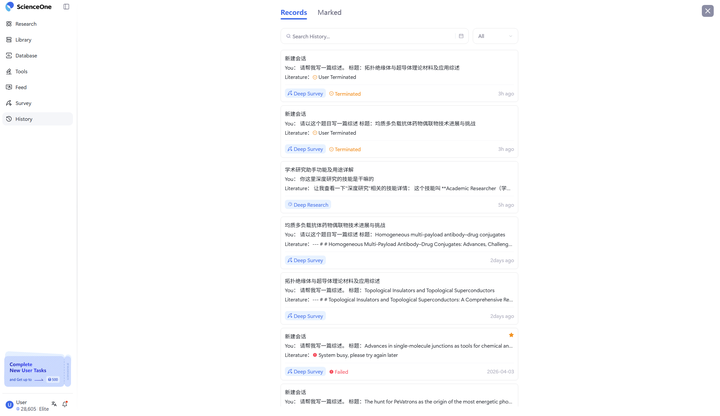
历史记录
历史记录模块记录您在科学对话中的所有研究任务,帮助高效管理和跟踪研究进度。点击任意任务可进入详细界面,查看完整信息和最新进展。支持实时监控任务进行状态,并可点击查看详情。
左侧直接展示近期历史对话记录,支持历史对话重命名、收藏和删除。
点击“历史记录”,将会展示您所有的历史对话记录。
8.1 对话
清晰显示所有已创建的研究任务,包括任务名称、创建时间、最后更新时间及简要描述。可以筛选不同模式的历史对话任务。
历史记录显示对话当前任务状态(进行中、手动中止、执行失败),可查看不同类型的历史任务。点击任一历史记录,即可进入该对话,查看该对话当前进度和相关数据。
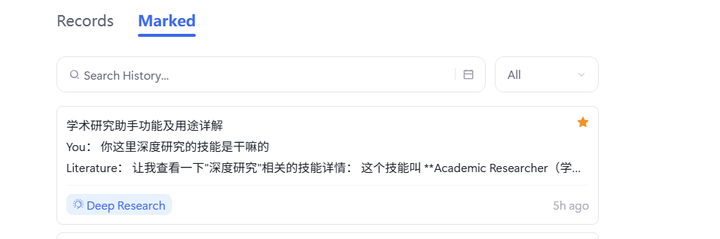
8.2 收藏
展示已标记为收藏的研究任务,通过特殊标识便于您快速识别和访问。
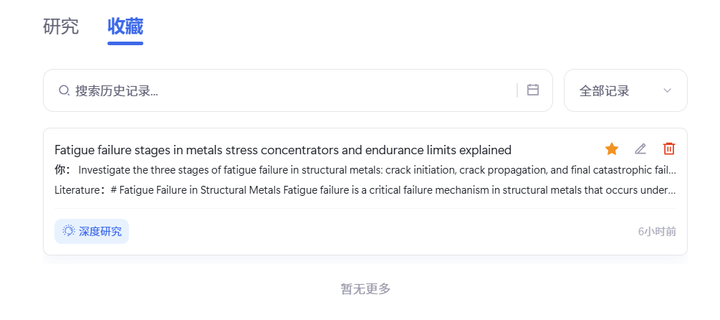
您可随时将任务添加到收藏列表或删除,方便您灵活管理收藏记录。
您可以按收藏时间、任务优先级或完成进度进行排序,并提供关键词搜索功能以快速定位收藏任务。
用户设置
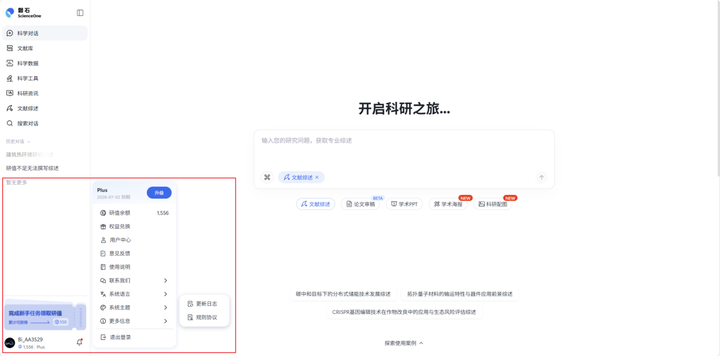
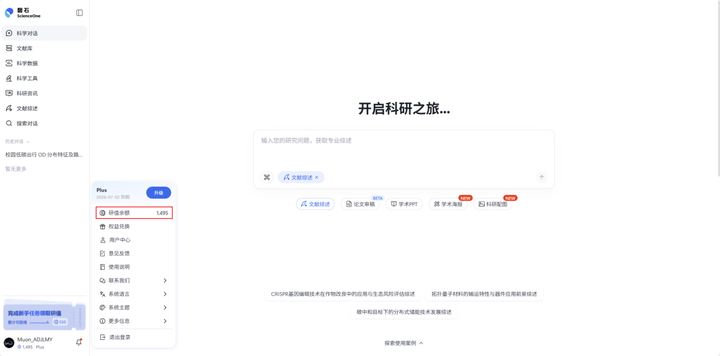
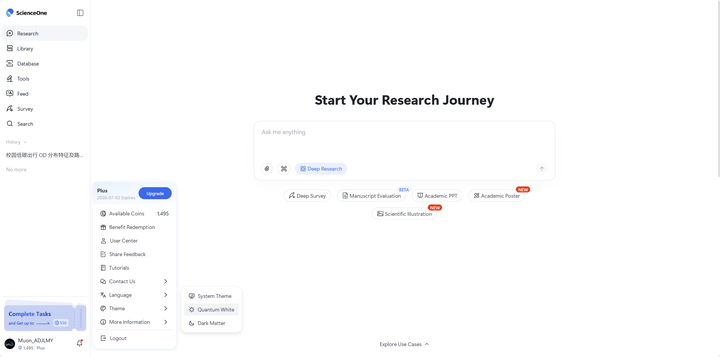
在 ScienceOne 平台的主界面左下角区域,支持查看用户信息以及查看系统通知。点击左下角的用户名,弹出用户设置菜单,可以查看研值余额和套餐,并可进行权益兑换、查看用户中心、查看使用说明、进行意见反馈、联系我们、变更系统语言、系统主题设置、退出登录操作,点击更多信息则可以进一步了解平台信息、查看更新日志和规则协议。
9.1 研值余额
点击用户名后,在弹出的菜单中会显示您当前的研值套餐和研值余额。点击研值余额将进入“研值中心”,您可在研值中心查看研值总览和订阅充值的相关信息。
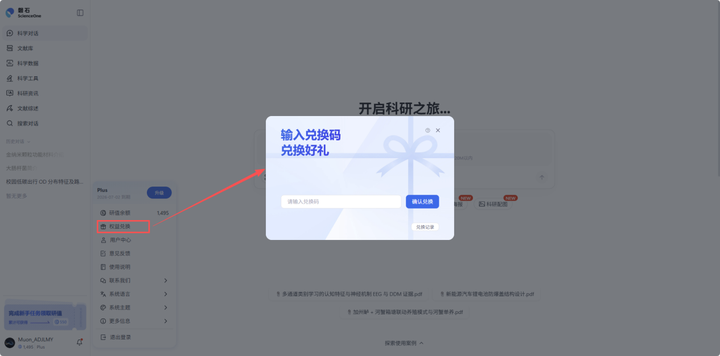
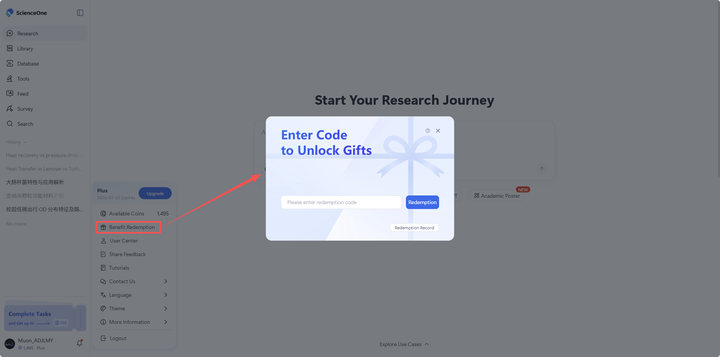
9.2 权益兑换
点击“权益兑换”选项,将会弹出兑换权益的界面,输入兑换码即可兑换好礼。在右下角还可查看您的兑换记录。
9.3 用户中心
点击“用户中心”选项,将进入个人中心页面。
“个人中心”包括“账户信息”和“个人主页”两个板块。
9.3.1 账户信息
您可以在此查看和管理您的基础信息。
信息展示:页面会清晰展示您的个人资料,包括头像、用户名、工作单位、账户ID、账号、绑定的手机号、电子邮箱以及注册时间。
信息编辑:对于用户名字段,您可以点击右侧的“编辑”按钮进行修改;对于手机号、电子邮箱字段。您可以点击右侧的“绑定”按钮进行对应联系方式的绑定;对于账号密码字段,则可以点击右侧的“重置”按钮以更新您的账号密码。
账户注销:页面底部提供“注销账户”按钮,用于永久删除您的账户。
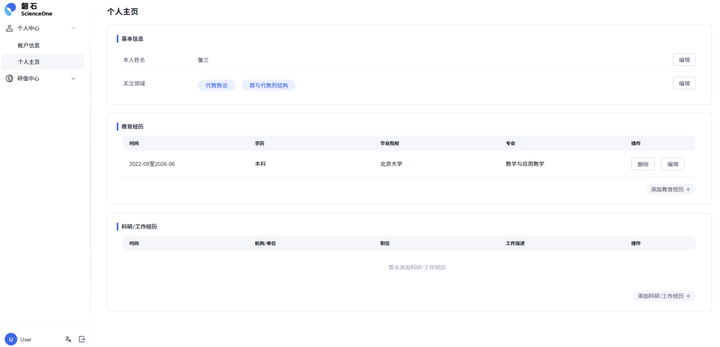
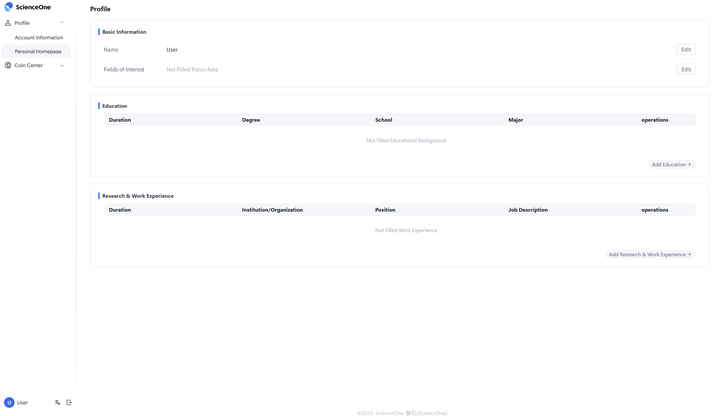
9.3.2 个人主页
您可以在此打造您的专属学术名片。
信息展示:页面会展示您的基本信息、教育经历和科研/工作经历。
信息编辑:在基本信息板块,您可以点击“编辑”按钮修改本人姓名和增加减少关注领域;在教育经历模块,您可以点击右下角的“添加教育经历”以添加教育经历;在科研/工作经历模块,您可以点击右下角的“添加科研/工作经历”以添加科研/工作经历,并支持每段经历的“删除”和“编辑”。
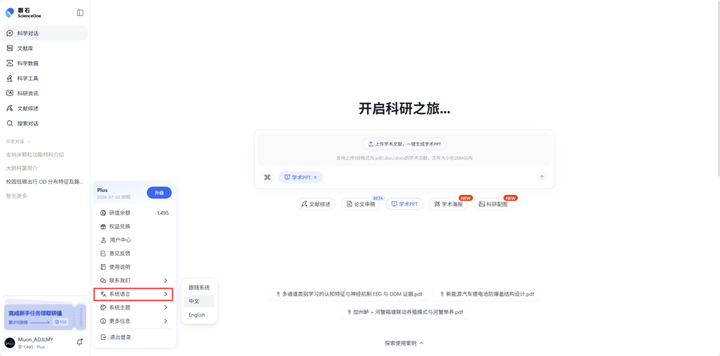
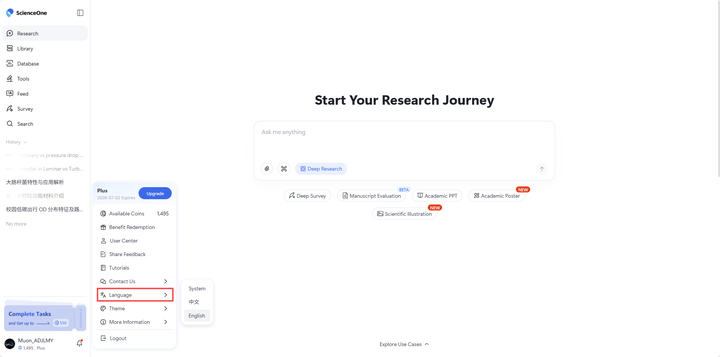
9.4 系统语言设置
ScienceOne支持切换中英双语系统。在用户设置菜单中,点击当前的语言选项(如“中文”),在列表中选择您希望使用的语言,界面将自动切换到该语言版本。
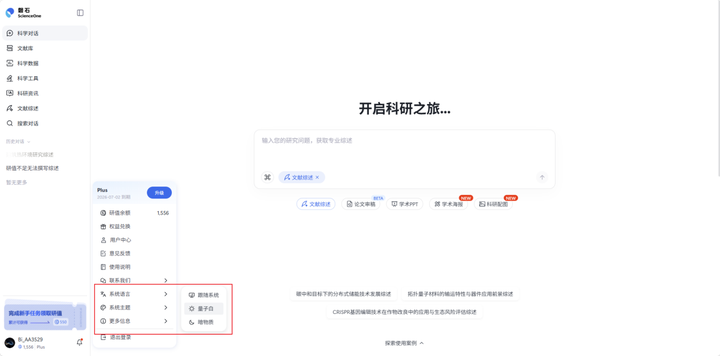
9.4 系统主题设置
点击用户名后,在弹出的菜单中点击“系统主题”,进一步选择“量子白”、“暗物质”、“跟随系统”等主题选项,即可切换系统的整体视觉风格。您可以根据个人偏好选择不同的主题,以获得更舒适的使用体验。
9.5 更多信息查看
9.5.1 使用说明
选择“使用说明”选项,即可查看系统的详细使用手册,了解系统功能及使用方式,支持切换中英文双语查看。
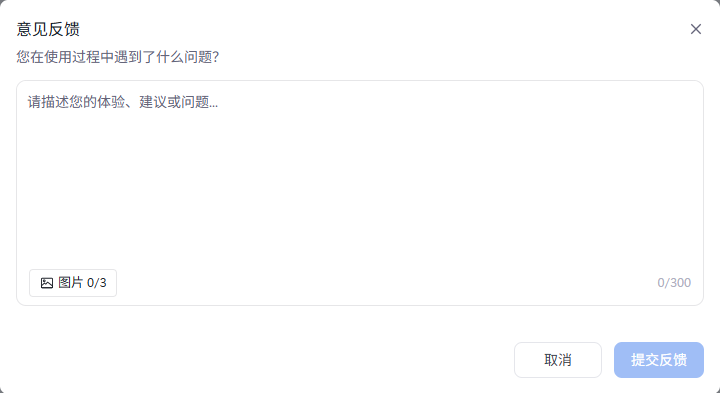
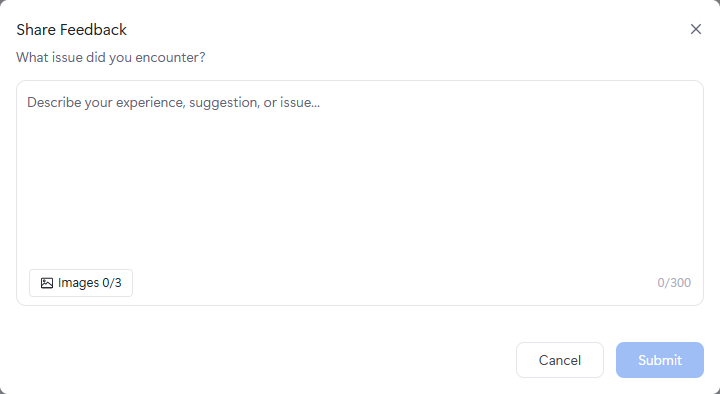
9.5.2 意见反馈
选择“意见反馈”选项,即可反馈关于系统的意见和建议,支持站内在线反馈。
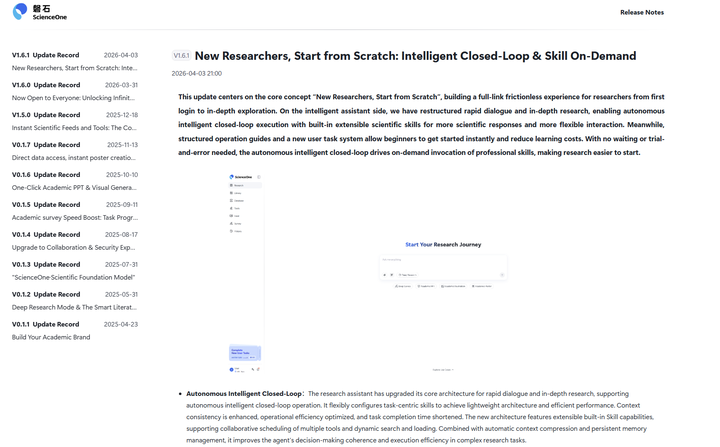
9.5.3 更新日志
选择“更新日志”选项,即可查看系统版本更新日志,支持查看各版本更新的主要内容。
9.5.4 规则协议
选择“规则协议”选项,即可查看各项规则协议,包括ScienceOne的服务协议、隐私政策、机构账号激活&认证协议和研值规则。
9.6 语言切换
ScienceOne 支持在中文和英文系统语言之间切换。在用户设置菜单中,点击“系统语言”,并从列表中选择所需语言,界面将自动切换至对应语言版本。
9.7 退出登录
点击菜单底部的“退出登录”按钮,您将安全退出当前账号,系统将返回至登录页面。为保障账户安全,建议您在完成操作后退出登录。
通知系统
在系统的主界面,点击左下方铃铛按钮,即可弹出通知中心菜单。在此菜单中,您可以查看和处理消息、跟进任务提醒及接收系统通知。
10.1 通知中心
通知中心默认显示“全部”消息。您可以点击“未读”标签,快速筛选出所有尚未查看的通知。若无未读消息,该视图下会提示“暂无未读消息”。
每条未读消息的右侧会有一个红点标识。当您点击该消息并完成相应交互(如跳转页面或查看弹窗)后,该红点将自动消失,表示消息已读。
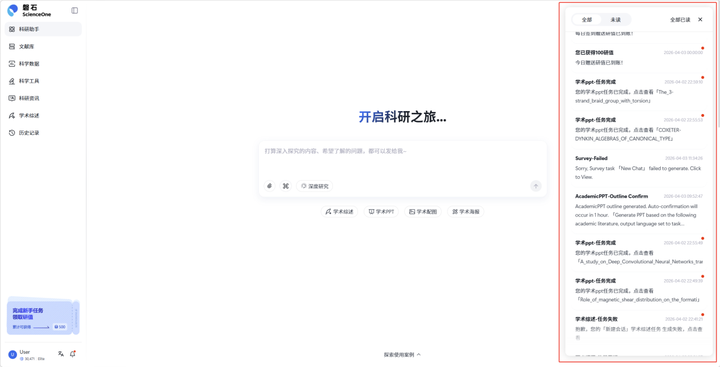
在通知中心顶部,您可以找到“全部已读”按钮。点击后,所有未读消息将立即被标记为已读状态,所有红点(包括入口图标上的红点)都将消失。
10.2 即时弹窗
为确保您能及时了解关键任务的最新进展,系统会在界面右上角通过即时弹窗发送提醒。这些提醒旨在主动告知您任务的成功、失败或需要您确认的状态,并引导您进行后续操作。
弹窗构成与交互
每个弹窗均由状态图标、消息内容及右下角的“查看”和“已读”两个按钮组成。
状态图标:分为成功、失败和确认三类,帮您快速识别消息性质。
查看按钮:点击后将直接跳转到该消息关联的任务界面。
已读按钮:点击后,该条消息将被标记为已读,弹窗关闭,消息中心的红点提醒也会相应更新。
弹窗类型与持续时间
根据消息的重要性,弹窗分为两种类型:
通知类消息 (成功/失败):此类弹窗用于结果告知,会在屏幕上停留数秒后自动消失,以尽量减少对您当前操作的打扰。
确认类消息:此类弹窗涉及需要您决策的关键节点,会持续显示在界面上,直到您主动点击按钮进行处理。
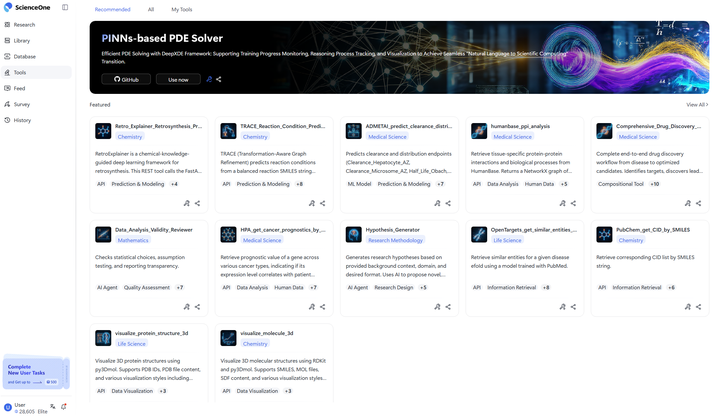
科学工具
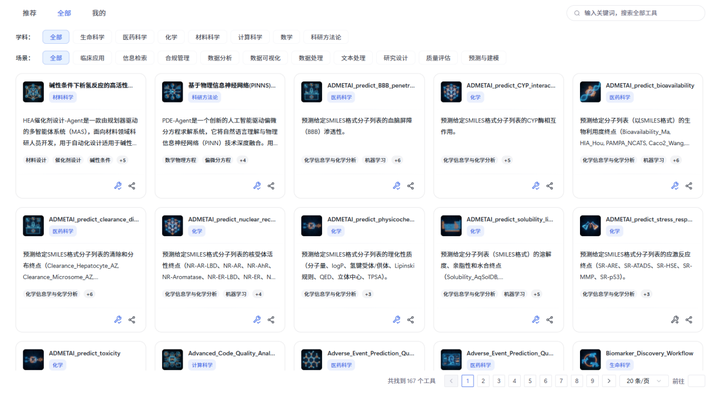
科学工具为科研工作者在专业的垂直领域内解决复杂的问题,提供了一批工具,涵盖多种学科类型,包括生命科学,医药科学,化学,材料科学,计算科学,科研方法论等等。
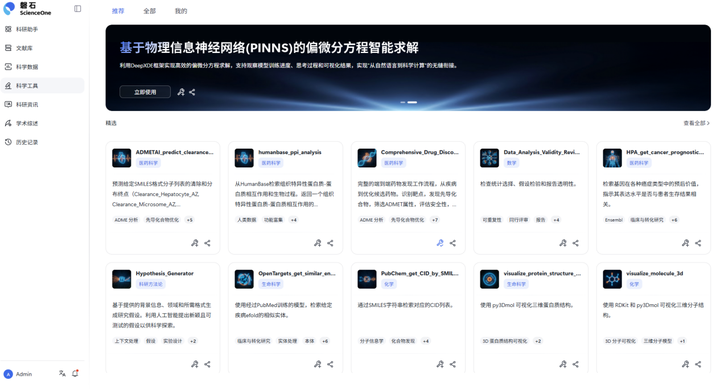
推荐:推荐页内包括了两大板块,其中,banner区域呈现最新的热门科研工具,并简单介绍该科研工具,您可以直接点击查看详情了解并体验该科学工具,点击“添加到我的工具”icon可将该工具直接添加到“我的”页面,点击“复制分享链接”icon可直接复制网址到粘贴板进行分享,同时对于自研工具提供GitHub和ArXiv的入口,促进开源共享。

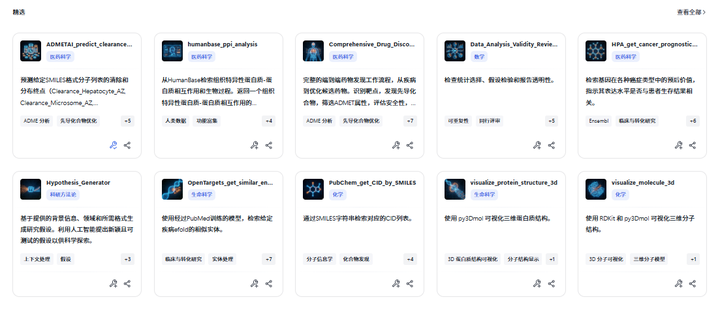
在精选区域中,推荐一批高质量的科研工具,每个科研工具卡片都展示了该科学工具的名称,学科标签,以及简单的介绍,您可以直接点击卡片进入使用页面,也可以点击右下角的icon添加到我的工具以及分享链接。
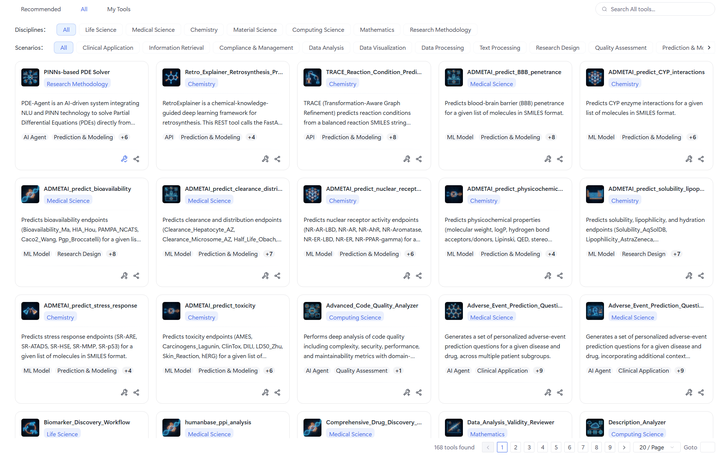
全部:全部页面中展示了科学工具现有的所有可用的工具,上部的筛选栏中可通过“学科”(Disciplines)和“场景”两个指标进行单指标筛选或者组合筛选,下部的展示栏会显示符合要求的所有科研工具卡片。右上角提供搜索入口,支持在全部工具中快速查询到所需工具。
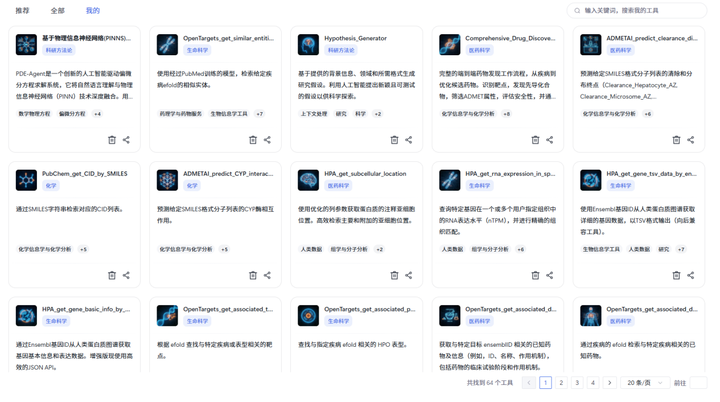
我的:“我的”页面中展示了用户收藏的所有科研工具,您可将常用的工具添加到“我的”,在需要使用时直接查询到目标工具。右上角提供搜索入口,支持在我的工具中快速查询到所需工具。
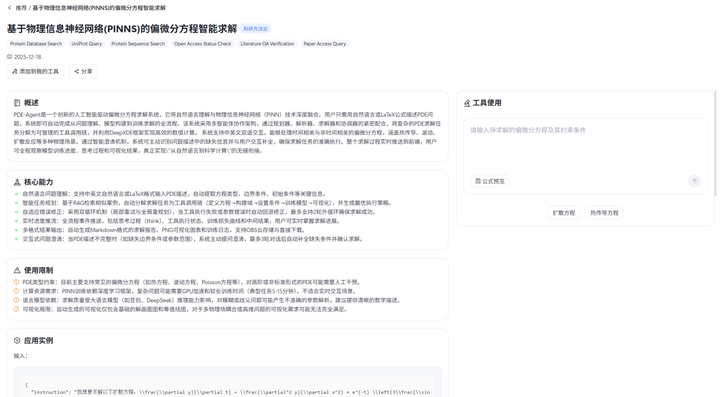
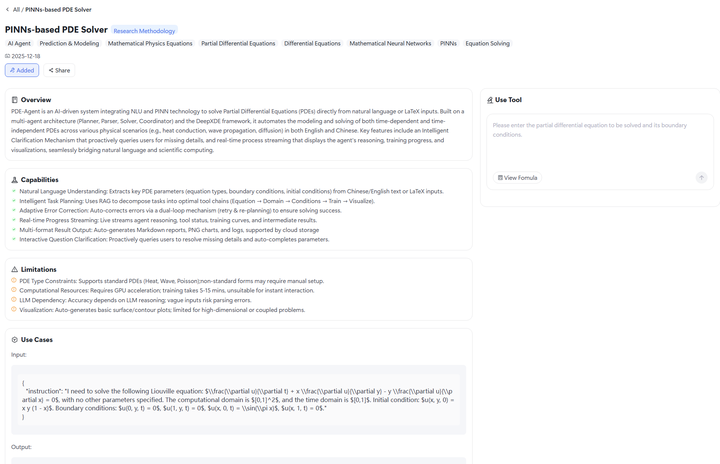
5.1 工具示例 - PDE-Agent
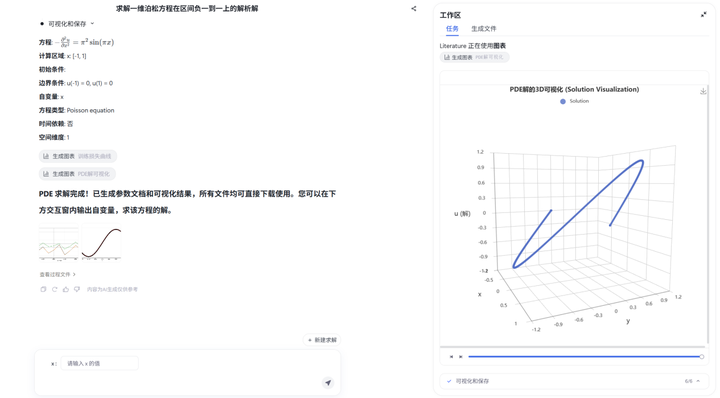
PDE-Agent 是一款为您打造的创新型偏微分方程求解系统,旨在让科学计算变得像日常对话一样简单。您无需编写任何代码,只需在“工具使用”中使用自然语言(中英文皆可)或 LaTeX 公式描述您的物理问题,系统内置的智能体协作架构与 DeepXDE 引擎就会自动为您完成从问题解析、模型构建到数值求解的全部工作,同时,您可以全程实时观看系统的思考过程与可视化结果,轻松体验从“想法”到“解法”的无缝衔接。
科研资讯
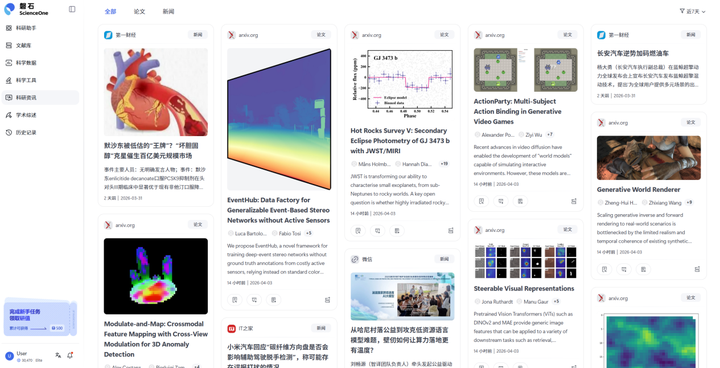
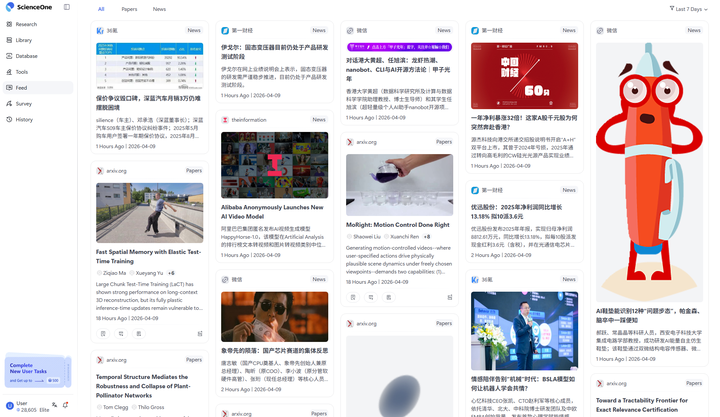
点击左侧导航栏「科研资讯」进入模块。科研资讯模块聚合了国内外100+家优质学术信息源,汇聚跨学科论文、新闻等前沿资讯,帮助您高效追踪研究领域的最新进展。
6.1 资讯浏览
科研资讯以卡片形式在主界面中瀑布流排列,每个卡片包含内容类型(论文/新闻)、来源渠道(如"科学网""arXiv")、标题、作者、摘要、发布时间及配图等关键信息。进入模块后,系统默认展示全部类型的最新资讯,向下滚动即可加载更多内容。点击感兴趣的卡片即可跳转至原网站查看完整内容。
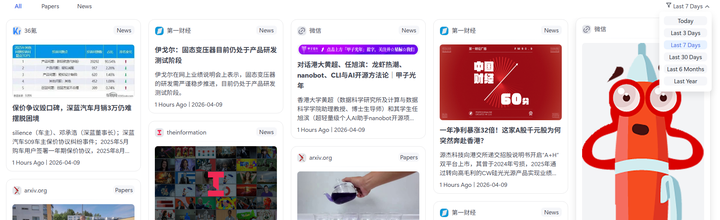
6.2 资讯筛选
系统提供了内容分类和时间范围两种筛选方式,帮助您快速定位所需信息:
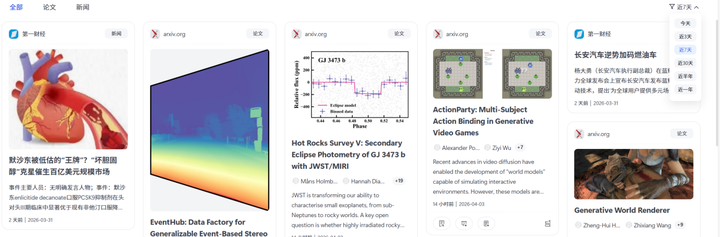
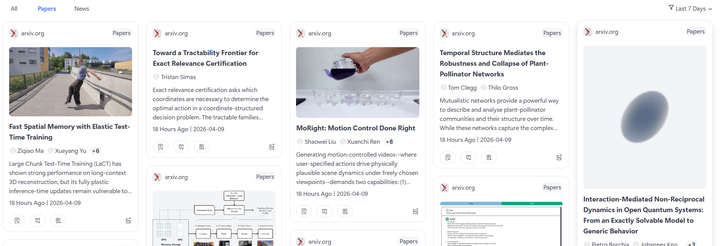
内容分类筛选:页面顶部提供了内容分类标签栏,点击「全部」可展示所有类型的资讯,点击「论文」仅展示来自arXiv、期刊官网等学术论文,点击「新闻」则仅展示科技新闻和行业报道,列表会自动更新为所选类型的内容。
时间筛选:点击页面右上角的筛选按钮,可在弹出的时间选择器中选择"近7天""近30天"等预设时间段,点击确认后列表将更新为指定时间段内的资讯,帮助您定期回顾特定时段的学术进展。
6.3 功能操作区
针对于论文类型的资讯,当您在资讯卡片中发现感兴趣的论文时,可通过论文卡片底部的操作按钮快速完成阅读、生成PPT/海报、收藏到文献库等操作:
查看PDF:点击左下角"查看PDF"按钮,直接在浏览器中打开论文的完整版PDF,支持在线阅读和下载
生成学术PPT:点击左下角"生成学术PPT"按钮,系统将自动调用科学对话的"学术PPT"功能,基于论文内容生成结构化的学术汇报PPT。
生成学术海报:点击左下角"生成学术海报"按钮,系统将自动调用科学对话的"学术海报"功能,将论文核心内容转化为可视化的学术海报。
收藏到文献库:点击右下角"收藏到文献库"按钮,将论文PDF保存至个人文献库,您可在左侧导航栏的"文献库"模块中统一查看和管理已收藏的文献

研值体系
11.1 研值中心
在 ScienceOne 平台的主界面左下角区域点击用户名,在弹出的菜单中点击研值余额将进入“研值中心”。
“研值中心”包括“研值总览”、“活动中心”与“订阅充值”模块。
“研值”作为体验ScienceOne网站的虚拟货币系统,仅可在本站范围内使用,根据有效时长的不同,分为三种不同的类型:
每日研值:当日获取当日有效,至获取当日的24:00失效。
限时研值:30天有效期,从获取当日算起,30天后的24:00失效。
永久研值:账号正常使用期间内永久有效。
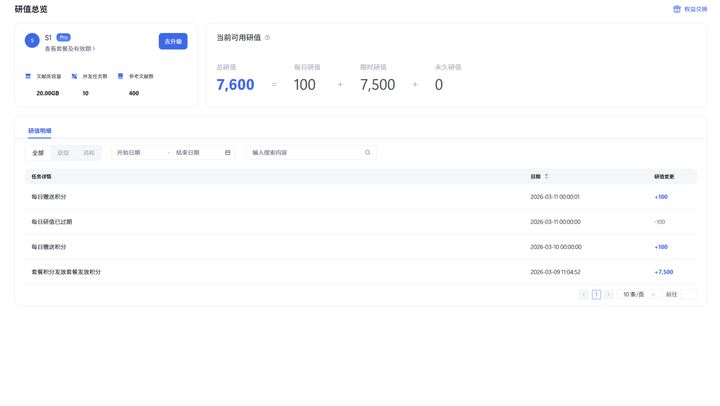
11.2 研值总览
“研值总览”可以获取您在ScienceOne网站中总体的研值相关信息,包括您的会员信息、当前可用研值与历史研值明细。
11.2.1 个人信息
个人信息展示了您的套餐信息,您可以在此了解当前会员等级下的所有权益,包括“文献库容量”,“并发任务数”,“参考文献数”等。
11.2.2 当前可用研值
这里展示您当前所有研值的数额情况,包括每日研值,限时研值,永久研值。
11.2.3 研值明细
研值明细展示了您历史所有涉及研值获取与消耗的明细记录,您可以选择查看研值的消耗或获取,同时也支持搜索查看固定时间段内研值的明细。
11.3 研值获取活动
除充值购买和会员权益外,ScienceOne提供一系列的研值活动获取研值,包括每日签到、邀请好友、新手任务等,您可以参与系列活动获取研值并使用ScienceOne的各类功能。
11.3.1 每日登录赠送
所有用户每日登录即赠送研值。
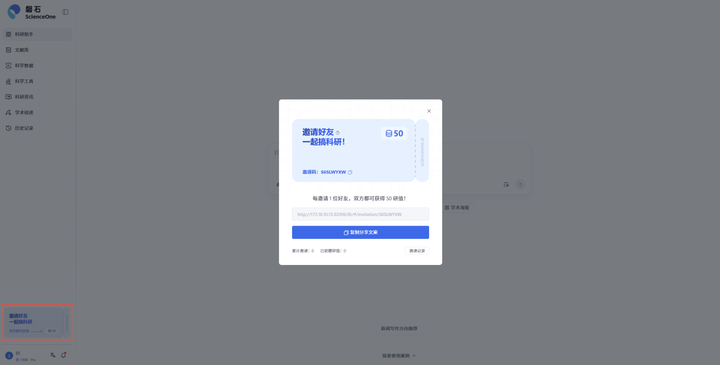
11.3.2 邀请好友
按照指引邀请好友注册ScienceOne,双方都可获得一定的研值奖励。
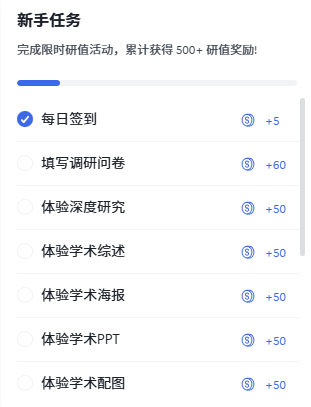
11.3.3 新手任务
完成新手任务即可获得限时研值奖励。
在 ScienceOne 平台的主界面左下角点击新手任务卡片,查看新手任务列表。
点击任一任务,跟随操作指引完成新手任务获得相应的限时研值奖励。
11.4 订阅充值
订阅充值模块开放了不同套餐的充值入口,并展示了不同套餐的权益对比,您可以根据实际需求灵活选择不同的套餐。

11.4.1 Basic版
ScienceOne为所有用户提供Basic基础套餐的服务,注册首月免费赠送200研值,并且拥有2GB的文献库空间和200篇参考文献。
11.4.2 Plus版
Plus套餐在Basic基础之上提供更丰富的配额礼包。
11.4.3 Pro版
Pro套餐不仅拥有最丰富的配额礼包,还可以优先体验新功能。
11.4.4 企业版
企业用户可以联系商务实现专属的定制化科研解决方案,包括专属部署,配额定制与专属定制域名等服务。
Login System
New users of ScienceOne need to register and log in to their personal account.
1.1 Access
Official ScienceOne website: https://www.scienceone.ai.
Google Chrome or Microsoft Edge browser is recommended.
1.2 Register
When accessing ScienceOne for the first time, you need to register an account. The system provides phone number and email registration options for individual users. Enter your phone number or email address in the input field and click the "Send" button to get a verification code. Enter the correct verification code to complete registration and automatically create your account.
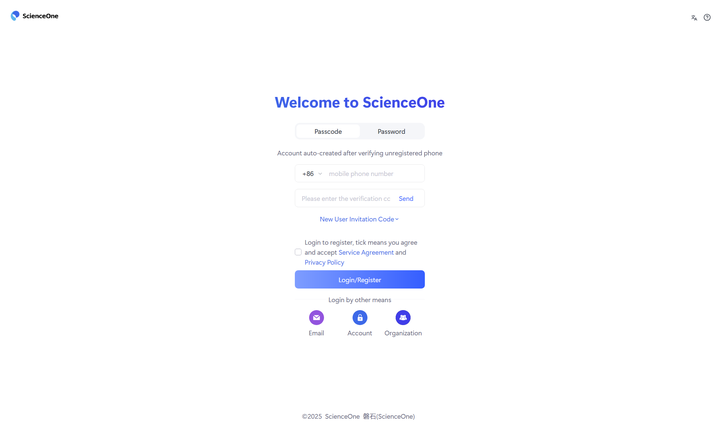
1.3 Login
The system provides multiple login methods including account/password login, passcode login, organization login and Google login.
1.3.1 Account/Password Login
If you already have a registered account and password, click "Account/Password", enter your account and password correctly to log into the system.
1.3.2 Passcode Login
If you have a registered phone number or email, click "Passcode", enter your phone number/email address and passcode correctly to log into the system.
1.3.3 Organization Login
If your organization has integrated with ScienceOne, click "Organization", select your organization, and log into the system after successful institutional authentication.
1.3.4 Google Login(Coming Soon)
You can use your Google account to log in to the system after successful authorization and binding.
Research
2.1 Conversation Modes
The Research provides multiple usage modes for scenarios including literature research, subject questions answering, research report writing, visualization report generation, and literature reviews.
Turbo Mode: Faster, suitable for daily work and question answering scenarios, efficiently resolving research queries.
Deep Research: More comprehensive, suitable for research, reports, mining research ideas scenarios, integrating massive information to fully support research decision-making.
Literature Review : More transparent, specialized for ultra-long literature review scenarios, deeply analyzing tens of thousands of papers, comprehensively organizing research contexts.
Academic PPT: More professional, suitable for proposal reports, academic conference presentations, research result display scenarios, upload papers to generate with traceable images and charts.
Scientific Illustration: More precise, suitable for paper chart drawing, report illustration design, academic presentation visualization material production scenarios, precisely matching research content.
Academic Poster: More intuitive, suitable for academic exchanges and result display scenarios, upload papers to generate with visualized research highlights.
Manuscript Evaluation:Enhanced, Ideal for pre-submission paper self-check and auxiliary review. It pinpoints areas for improvement and helps you polish your manuscript to perfection.
Similarity & Paraphrasing: More accurate. Suitable for draft self-inspection and pre-submission verification of papers. It provides one-stop services including literature plagiarism check, AIGC content detection and intelligent paraphrasing.
2.1.1 Turbo Mode
Turbo Mode is currently the default conversation. In this mode, you can directly converse with the model through a more concise and efficient process.

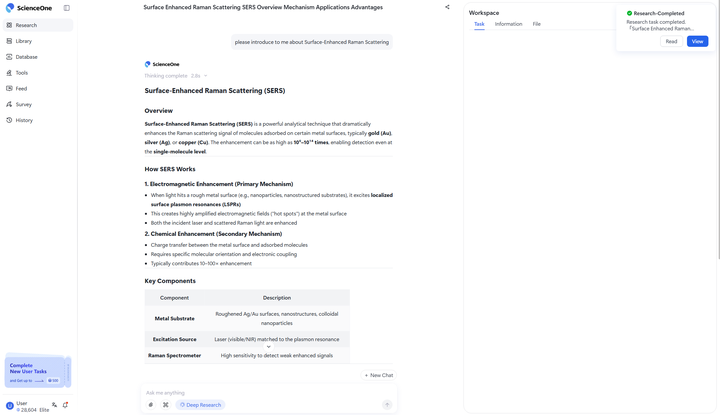
2.1.2 Deep Research
Select the "Deep Research" button at the bottom of the homepage dialog box to use Deep Research Mode.

In this mode, a single-agent closed-loop (AgentLoop) architecture is adopted. The agent thinks about your question and outputs an answer.
The system consists of two parts: Process (left) and Workspace (right). The left Process Area displays the current execution process, including thinking process, execution details, and final generated results. The right Workspace contains three sections: "Tasks" shows output results of agent execution steps; "Information" summarizes information collected through skills, web sources, and literature databases; "Files" displays all files generated for the current task.
2.1.3 Literature Review
Select the "Literature Review" button below the homepage dialog box to use Literature Review Mode.
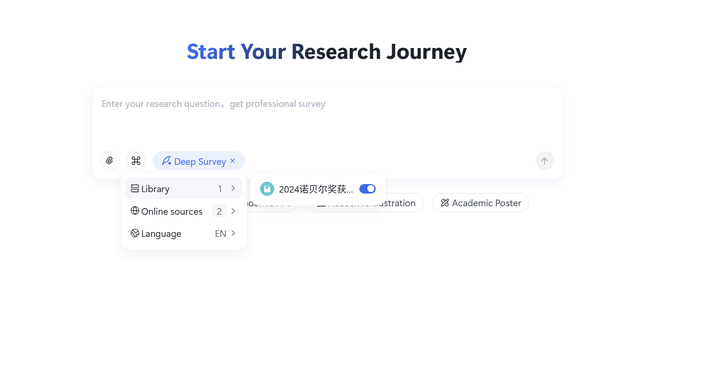
In this mode, you can input your research questions to obtain professional reviews of tens of thousands of words. Before starting the task, you can select literature libraries, online sources, and target language.
After the task starts, the agent extracts detailed information such as titles and keywords of the review, generates a modifiable review outline, and waits for your confirmation before continuing execution.
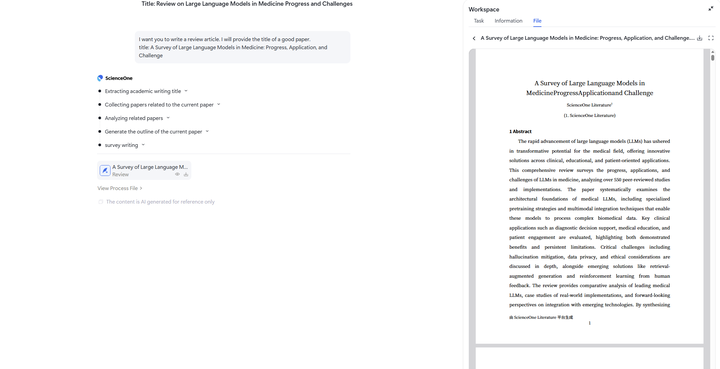
After task completion, the system displays the complete the literature review report including abstract, main text, and references. Click "Download" to download the full report in PDF, Word, or MD format.
2.1.4 Academic PPT
Select the "Academic PPT" button below the homepage dialog box to enter Academic PPT generation mode. Support clicking the upload area to open local file selection, or directly dragging and dropping local files for upload. The system supports uploading 1 PDF, DOC, or DOCX format academic paper, with file size within 20MB. Before uploading, you can select output language (Chinese/English, English by default) and theme color. The system will generate corresponding PPT content based on your selected language. Hovering over the upload area displays format and size requirement prompts. Clear error prompts will appear if documents do not comply with requirements.
After successful file upload, the system automatically executes four stages of intelligent processing. First, academic paper structure and core content analysis: the system reads the source file and analyzes paper content and chart information, displaying detailed processing logs in the workspace during analysis. Second, it extracts key information and builds presentation outline: the system generates a complete PPT outline structure displayed in markdown format, supporting user customization of the outline at this point. Third, it generates PPT content and visual layout page by page: real-time generation status is shown through progress bars, with parallel generation logs for each page displayed in the workspace. Final, it completes document compilation and prepares for download: the system processes the final PPTX file to ensure compliance with academic presentation standards.
Throughout the generation process, the workspace displays three main content modules in real-time. The Tasks module shows detailed processing logs including the complete process records of file reading, content analysis, outline generation, and PPT production. The Information module provides source paper preview and list display of images and charts extracted from the paper, allowing you to check processing progress and content quality at any time. The Files module displays output content by stage, including outline markdown files, PPT markdown files, etc. After final completion, a download page pops up directly or a complete file list is displayed, with classification management by final result files and task process files.
The system provides comprehensive task control functions, including collapsible task progress panels that display task planning steps, execution status, start time, and remaining time in real-time. Users can manually pause or interrupt tasks, and choose to regenerate after stopping. All task processes are displayed in real-time in the left sidebar, with notification center push notifications upon completion.
After the entire generation process is completed, the system supports file downloads. You can click corresponding files to download PDF/PPTX format files.
2.1.5 Scientific Illustration
Select the "Scientific Illustration" button below the homepage dialog box to enter Scientific Illustration mode. You can describe the required scientific illustration content in natural language. The system supports professional illustration needs across various research fields, such as molecular structure diagrams, experimental flowcharts, data visualization charts, etc.
After submitting illustration requirements, the system automatically executes two key steps to complete illustration generation. First, scientific illustration requirement understanding and relevance assessment: the system analyzes your description content, judges whether it meets scientific illustration requirements, and evaluates content safety and compliance. After passing assessment, the system calls the image model for scientific illustration drawing, generating professional academic-style images based on your requirements, and adds AI-generated watermarks to identify the source. After illustration generation is completed, the system displays scientific illustration generation results. Support using like/dislike functions to provide feedback on generated results, helping the system continuously optimize.
Hovering over the image displays a download button, allowing you to save the illustration locally for use. Clicking the image enlarges it to view details.
Additionally, the system supports multi-turn conversations to refine illustration effects. You can continue to propose modification suggestions or new illustration requirements in the current conversation until meeting your academic needs.
2.1.6 Academic Poster
Select the "Academic Poster" button below the homepage dialog box to enter Academic Poster generation mode. Support clicking the upload area to open local file selection, or directly dragging and dropping local files for upload. The system supports uploading 1 PDF, DOC, or DOCX format academic paper, with file size within 20MB.
Before task start, you can configure output language (Chinese/English, English by default), size, and theme color. The system will generate corresponding poster content based on your selected language. Hovering over the upload area displays format and size requirement prompts. Clear error prompts will appear if documents do not comply with requirements.

After task start, the system automatically executes four stages of intelligent processing. First, academic paper structure and core content analysis: the system reads the source file and analyzes paper content and chart information, displaying detailed processing logs in the workspace during analysis. Second, it extracts key information and builds chapter structure: the system generates a complete poster outline structure displayed in markdown format. Third, it generates poster content and visual layout: real-time generation status is shown through progress bars, with parallel generation logs for each page displayed in the workspace. Final, it completes document compilation and prepares for download: the system processes final PPTX and PNG file formats to ensure compliance with academic display standards.
Throughout the generation process, the workspace displays three main content modules in real-time. The Tasks module shows detailed processing logs including the complete process records of file reading, content analysis, outline generation, and poster production. The Information module provides source paper preview and list display of images and charts extracted from the paper, allowing you to check processing progress and content quality at any time. The File module displays output content by stage, including outline markdown files, PPT markdown, PNG files. After final completion, the poster and complete file list are displayed directly, with classification management by final result files and task process files.
The system provides comprehensive task control functions, including collapsible task progress panels that display task planning steps, execution status, start time, and remaining time in real-time. Users can manually pause or interrupt tasks, and choose to regenerate after stopping. All task processes are displayed in real-time in the left sidebar, with notification center push notifications upon completion.
After the entire generation process is completed, the system supports file downloads. You can click corresponding files to download PDF/PPTX/PNG format files.

2.1.7 Manuscript Evaluation
Select "Manuscript Evaluation" below the dialog box on the homepage to use the Manuscript Evaluation Agent.
In the Manuscript Evaluation Agent, you can directly upload relevant academic documents (.pdf/.doc/.docx/.md/.txt format supported, limited to one paper with a file size of no more than 20MB). Before starting the task, you can select the output language, which supports both Chinese and English formats.
After the task starts, the agent will conduct a review of the paper from an objective academic perspective across the following dimensions: reading and analyzing the paper's content, organizing its section structure, extracting core viewpoints and key information, critically reviewing the paper's logic and expression, and evaluating its innovation and academic contribution, among others.
After the agent task is completed, results are displayed in markdown format. You can freely choose to download them in PDF or DOC format to obtain the final manuscript evaluation suggestions.
2.1.8 Similarity & Paraphrasing
Select Similarity & Paraphrasing below the home page dialog box to access this agent. It supports paper plagiarism checking, AIGC detection, AI content reduction and paraphrasing.
In the Similarity & Paraphrasing agent, you may select available skills and describe your requirements in natural language. The agent will automatically match and start the corresponding task.
You can upload academic papers as attachments in .pdf/.doc/.docx/.txt format. Only one file is allowed per submission, with a maximum size of 20MB.
Plagiarism Check Enable the plagiarism check skill, and the agent will perform academic paper duplicate detection. Powered by Wanfang Data, it covers massive academic resources, accurately locates similar text segments, and generates an authoritative similarity report available for preview and download.
AIGC Detection Enable the AIGC detection skill, and the agent will conduct AI-generated content inspection for papers. Supported by Wanfang Data and cutting-edge AIGC detection technology, it deeply analyzes textual language patterns and logical structures to accurately identify AI-generated content and produce a downloadable AIGC detection report.
Paraphrasing & AI Rate Reduction Enable the paraphrasing and AI reduction skill. The agent will analyze your uploaded text or document content and provide intelligent revision suggestions.
2.2 Attachments and Settings
2.2.1 Upload Attachments
Supports uploading mainstream document formats: pdf/pptx/xls/xlsx/csv/docx/md/txt/epub/ofd/wps
More file formats are continuously being expanded. Supports uploading up to 10 files at once, each not exceeding 20MB.
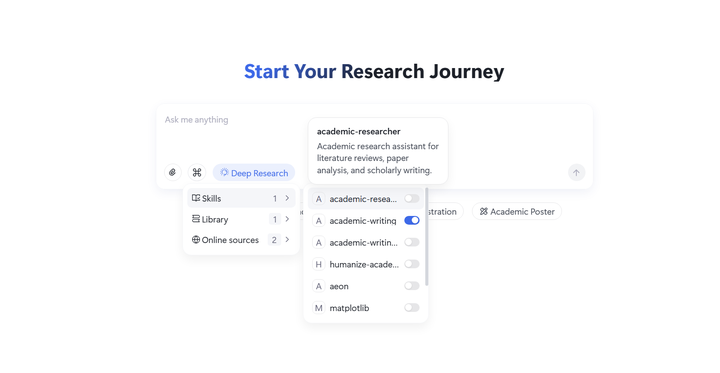
2.2.2 Set Skills and Sources
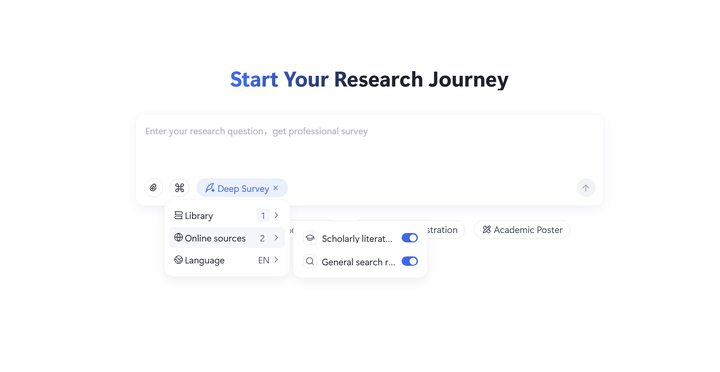
Click "Settings" to select agent skills, information sources, and output configuration requirements. Information sources include literature databases\libraries and online sources. Output configurations vary by mode: for example, Deep Survey supports configuring target language; Academic PPT supports configuring target language and theme color. Specifically:
Skills: Displays available skills for invocation. You can autonomously select skills to call based on specific research scenarios.
Library: Library databases are created by you according to research needs for storing selected papers. You can select which literature databases\libraries the agent is allowed to access.
Online Sources: Online sources include professional academic literature and general search materials. After enabling professional academic literature, the agent connects to academic databases including 170 million scientific papers from CAS Literature Information Center, 2.4 million arXiv preprints, and global paper resources from Google Scholar; the agent actively searches the internet for relevant materials.
2.3 Conversation
2.3.1 Conversation Termination
During any conversation process, click the terminate button to immediately stop the ongoing conversation.
2.3.2 New Conversation
After the current conversation ends, click "New Chat" to start a new round of conversation. The new conversation is not affected by other conversation contexts.
2.4 Progress Viewing
In Research Mode, tasks are divided into multiple steps. Click expand to view all task progress. Also, click the expand button on the right side of each step in the process to view detailed process of each step. Click specific execution actions to view results of that action in the workspace.
2.5 Workspace
2.5.1 Progress Navigation
Complete task progress is displayed as a progress bar. Users can click "Left/Right" switch buttons to navigate between steps, or drag the progress bar to control displayed steps.
2.5.2 Search
Search results for each step are displayed in Workspace. Click to view original link content.
All search results for the task can be viewed in Information in the workspace.
2.5.3 Generated Files
Process files such as analysis results may be generated during execution. Click specific actions to view file content in the workspace, with support for switching between source code and preview views.
All task process results can be viewed by clicking "File".
All task final results (such as visualization reports, reviews, etc.) can be viewed by clicking the "File" after task completion or finding the final result file in the workspace.
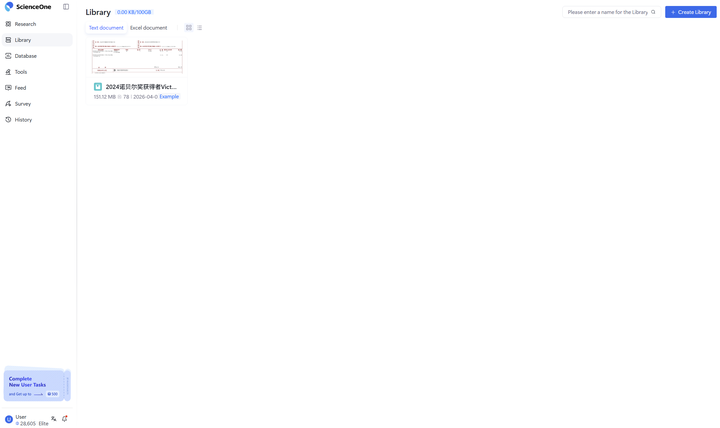
Library
Library provides in-depth interpretation services for carefully selected papers for researchers. Integration with literature management tools such as Zotero will be progressively implemented to further facilitate researchers' daily work.
3.1 Create A Library
When creating a literature library, select the corresponding library type based on literature type. The system has designed specialized interpretation logic for different literature types. Selecting the appropriate library type yields better usage results.
3.2 Upload Literature
File upload supports two methods.
Direct Upload: Batch upload literature files directly on the literature library management page, suitable for initial library creation or centralized literature organization.
Add Anytime: When using the literature library for research, you can add new literature files anytime as needed, facilitating timely supplementation of relevant materials. Both methods support mainstream document formats. Choose the appropriate upload method based on your specific usage scenario.
3.3 View Library
All literature libraries you create are visible only to you by default, ensuring privacy and security of research materials.
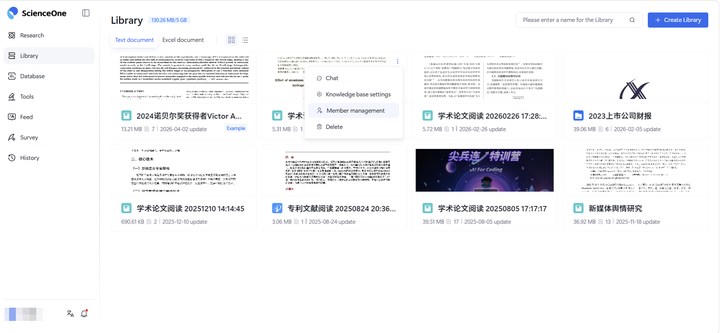
To collaborate with partners, you can add collaborators through the "Member Management" function and set access permissions for them.
Permissions are divided into three levels: "Administrator" has full operation permissions; "Collaborator" can create directories and upload literature; "Member" can only view, and cannot modify content. As the literature library creator, you can adjust member roles or remove members at any time. To ensure literature library security, team member management permissions are limited to the creator only.
3.4 Use Library
3.4.1 Conversation with Total Library
You can converse with all papers in the literature library, or select a single paper for intensive reading.
3.4.2 Conversation with One Paper
In a conversation with single paper, you can deeply interpret the selected paper, or switch to full library conversation mode at any time.
3.4.3 Guide for Paper
The Guide provides core content analysis of papers, covering research conclusions, research objectives, research methods, rationality, limitations, core viewpoints, evidence support, application prospects, and impact.
3.4.4 Research Graph for Paper
Research Graph provides citation tracing functionality, taking the current paper as the center to trace its references while exploring the paper's citation situation, helping you understand the complete academic context.
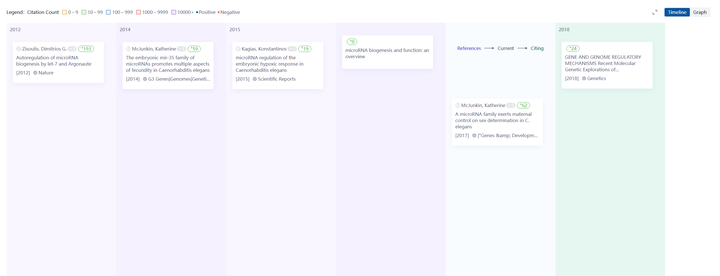
The visual network intuitively displays citation relationships between papers, helping you clearly see inter-paper citations for quick identification of key research gaps.
3.4.5 Chat for Paper
The system pre-interprets each paper, generates possible frequently-asked questions and pushes them to the interface. You can directly click to start a conversation.
You can also ask questions independently based on actual needs. The system provides targeted paper interpretation and reference sources. Image content from papers is displayed directly in answers.
3.4.6 Notes for Paper
The library provides note functionality for recording reading notes. After switching the right sidebar to the "Note" module, select text on the left to automatically create annotations, then add your note content.
Database
Database provides researchers with both data retrieval and acquisition services, aggregating authoritative global scientific databases covering Materials Science, Life Sciences, Fluid Mechanics, Earth Sciences, Space Sciences, Neuroscience, Mathematics, and other disciplinary fields.
Click a specific database to view database details, including database name, access method, access URL, overview, etc. Click "Official Website" to access the database's source URL, or click "Share" to share this database with others as a link.
Tools
Tools provides researchers with a batch of tools for solving complex problems in professional fields, covering multiple discipline types including Life Sciences, Medical Sciences, Chemistry, Materials Science, Computational Sciences, Research Methodology and more.
Recommended: The Recommended page includes two major sections. The banner area presents the latest popular scientific tools with brief introductions. You can directly click to view details and experience the tool, click the "Add" icon to add the tool directly to the "My Tools" page, or click the "Share" icon to copy the URL to clipboard for sharing. Self-developed tools also provide GitHub and ArXiv entry points to promote open-source sharing. In the Featured area, a batch of high-quality scientific tools is recommended. Each scientific tool card displays the tool's name, discipline tags, and brief introduction. You can directly click the card to enter the usage page, or click the icon in the bottom-right to add to my tools and share the tool.
All: The All page displays all currently available scientific tools. The filter bar at the top allows single-criterion or combined filtering by "Disciplines" and "Scenarios". The display area below shows all scientific tools meeting the requirements. A search entry is provided in the top-right corner, supporting quick queries for needed tools among all tools.
My: The My page displays all scientific tools favorited by the user. You can add commonly used tools to "My" for direct access when needed. A search entry is provided in the top-right corner, supporting quick queries for needed tools among my tools.
5.1 PDE Agent
PDE Agent is an innovative partial differential equation solving system designed for you, aiming to make scientific computing as simple as daily conversation. You don't need to write any code. Simply describe your physical problem in natural language (Chinese or English) or LaTeX formulas in "Use Tool". The built-in agent collaboration architecture and DeepXDE engine automatically complete all work from problem analysis, model construction to numerical solution. Meanwhile, you can watch the system's thinking process and visualization results in real-time throughout, easily experiencing seamless transition from "idea" to "solution".
Feed
Click "Feed" in the left navigation bar to enter. The Feed aggregates 100+ high-quality academic information sources domestically and internationally, cross-disciplinary papers, news and other frontier information, helping you efficiently track the latest developments in your research field.
6.1 News Browsing
Research news is arranged in a waterfall flow as cards on the main page. Each card contains key information including content type (paper/news), source channel (e.g., "ScienceNet", "arXiv"), title, author, abstract, publication date, and accompanying images. The system defaults to showing the latest news of all types. Scroll down to load more content. Click interested cards to jump to the original website to view complete content.
6.2 News Filtering
The system provides two filtering methods: content category and time range, helping you quickly locate needed information:
Content Category Filtering: The top of the page provides content category tabs. Click "All" to display all types of news, click "Papers" to show only academic papers from arXiv, journal official websites, etc., click "News" to show only technology news and industry reports. The list automatically updates the content of the selected type.
Time Filtering: Click the filter button in the top-right corner to select preset time periods such as "Last 7 Days" or "Last 30 Days" in the pop-up time selector. After clicking confirm, the list updates to news within the specified time period, helping you periodically review academic progress for specific periods.
6.3 Functions for Papers
For paper-type news, when you discover interesting papers in news cards, you can quickly complete reading, generate PPT/posters, favorite to literature library and other operations through operation buttons at the bottom of paper cards:
View PDF: Click the "View" button in the bottom-left to open the complete paper PDF directly in the browser, supporting online reading and download.
Generate Academic PPT: Click the "Generate Academic PPT" button in the bottom-left. The system automatically calls our "Academic PPT" to generate structured academic presentation PPT based on paper content.
Generate Academic Poster: Click the "Generate Academic Poster" button in the bottom-left. The system automatically calls our "Academic Poster" to transform core paper content into visualized academic posters.
Favorite to Library: Click the "Favorite to Library" button in the bottom-right to save the paper PDF to your personal literature library. You can uniformly view and manage favorited literature in the "Library" module in the left navigation bar.
Survey
The Survey module provides researchers with full-process services from intelligent review creation to subsequent management and in-depth reading.
7.1 Manage Literature Review
Complete review records generated in "Literature Review" are aggregated here. You can read and manage each review's original text here.
1) Review List Display
All generated reviews are clearly displayed in list format, including review titles, creation times, and other key information. The interface is concise and clear for quick browsing and locating target reviews.
2) Quick Search
You can quickly locate specific reviews by entering keywords in the search box, improving search efficiency.
7.2 View Literature Review
7.2.1 Guide, Chat, and Note
Click a review to enter the detail page. The right sidebar displays interactive functions including guide, chat, and note.
7.2.2 References and Research Graph
All references are displayed after the review content. Click any reference to view detailed information including title, author, publication time, etc.
History
The History module records all your research tasks in the Research, helping efficiently manage and track research progress. Click any task to enter the detailed interface and view complete information and latest progress. Support real-time monitoring of task progress status, and click to view details.
8.1 Records
Clearly displays all created research tasks, including task names, creation times, last update times, and brief descriptions. You can filter historical conversation tasks by different modes.
History records display current conversation task status (in progress, manually stopped, execution failed). You can view different types of historical tasks. Click any history record to enter that conversation and view current progress and related data.
8.2 Marked
It displays research tasks marked as favorites, with special identifiers for easy recognition and access.
You can add tasks to or remove tasks from the favorites list at any time, allowing flexible management of favorite records.
You can sort by favorite time, task priority, or completion progress, and keyword search functionality is provided to quickly locate favorite tasks.
User Settings
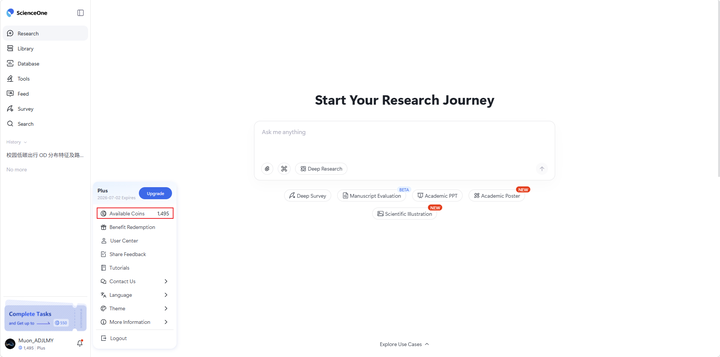
In the bottom-left corner of the ScienceOne platform main page, you can view user information, and view system notifications. Click the username in the bottom-left corner to pop up the user settings menu, where you can view available coins balance and packages, perform benefit redemption, view user center, view usage instructions, submit feedback, contact us, change system language,set system themes, and log out. Click "More Information" to further understand our platform information, view update logs, and review rules and agreements.
4:42 PM

9.1 Available Coins
After clicking the username, your current available coins are displayed in the pop-up menu. Click "Available Coins" to enter the "Coin Center", where you can view coin overview and subscription information.
9.2 Benefit Redemption
Click the "Benefit Redemption" option to pop up the benefit redemption interface. Enter redemption codes to redeem gifts. Your redemption records can be viewed in the bottom-right corner.
9.3 User Center
Click the "User Center" option to enter the personal user center page.
The "Profile" includes two sections: "Account Information" and "Personal Homepage".
9.3.1 Account Information
You can view and manage your basic information here.
Information Display: The page clearly displays your profile including avatar, username, work, account ID, account, phone number, email address, and registration time.
Information Editing: For the username field, you can click the "Edit" button on the right to modify; for phone number and email fields, you can click the "bind" button on the right to bind corresponding contact methods; for account password fields, you can click the "reset" button on the right to update your account password.
Account Cancellation: The bottom of the page provides an "Delete Account" button for permanently deleting your account.
9.3.2 Personal Homepage
You can create your exclusive academic card here.
Information Display: The page displays your basic information, educational background, and research/work experience.
Information Editing: In the basic information section, you can click the "Edit" button to modify your name and add/remove research areas; in the education section, you can click "Add Education" in the bottom-right to add educational experiences; in the research/work experience section, you can click "Add Research&Work Experience" in the bottom-right to add experiences, with support for "Delete" and "Edit" for each experience.
9.4 Theme Settings
After clicking the username, click "Theme" in the pop-up menu, then select theme options such as "Quantum White", "Dark Matter", or "System Theme" to switch the system's overall visual style. You can choose different themes based on personal preferences for a more comfortable user experience.
9.5 More Information
9.5.1 Tutorials
Select the "tutorials" option to view the system's detailed user tutorials, understanding system functions and usage methods, with support for switching between Chinese and English bilingual viewing.
9.5.2 Send Feedback
Select the "Send Feedback" option to submit opinions and suggestions about the system, supporting online feedback within the platform.
9.5.3 Release Notes
Select the "Release Notes" option to view system version update logs, with support for viewing main content updates for each version.
9.5.4 Rules & Agreements
Select the "Rules & Agreements" option to view various rules and agreements, including ScienceOne's Terms of Services, Privacy Policy, Institutional Account Activation & Verification Agreement, and Coin Rules.

9.6 Language Switch
ScienceOne supports switching between Chinese and English system languages. In the user settings menu, click Language, and select your desired language from the list. The interface will automatically switch to that language version.
9.7 Logout
Click the "Logout" button at the bottom of the menu to securely exit your current account. The system returns to the login page. For account security, it is recommended to log out after completing operations.
Notification System
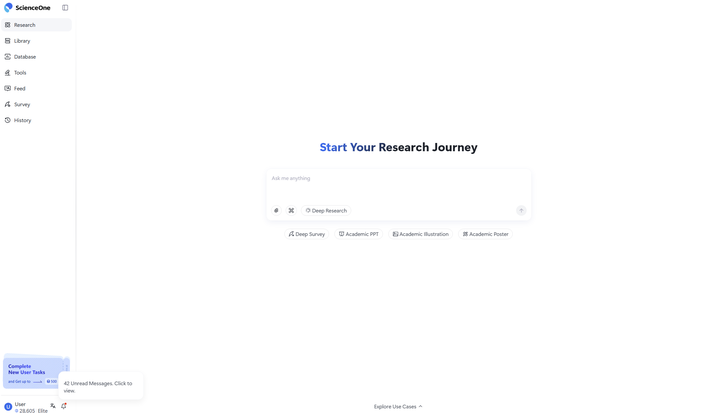
On the system's main page, click the bell button in the bottom-left corner to pop up the notification center menu. In this menu, you can view and handle messages, follow up on task reminders, and receive system notifications.
10.1 Notification Center
The notification center displays "All" messages by default. You can click the "Unread" tab to quickly filter all notifications that have not been viewed. If there are no unread messages, this view displays "No unread messages".
Each unread message has a red dot identifier on its right side. After you click the message and complete corresponding interaction (such as jumping to a page or viewing a popup), the red dot automatically disappears, indicating the message has been read.
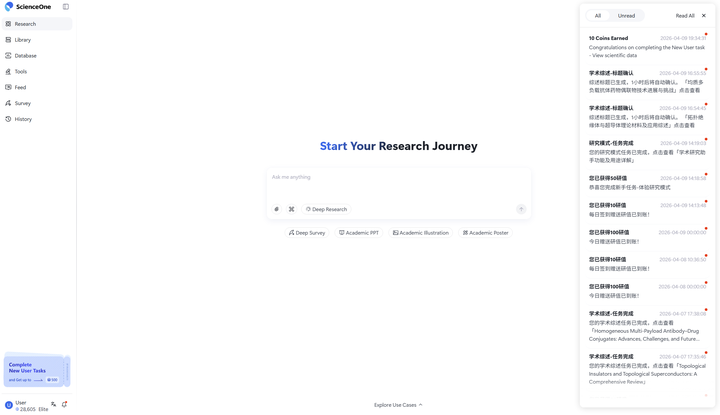
At the top of the notification center, you can find the "Read All" button. After clicking, all unread messages are immediately marked with read dot, will (including those on entry icons) disappear.
10.2 Instant Popups
To ensure you can promptly understand the latest progress of key tasks, the system sends reminders through instant popups in the upper-right corner of the interface. These reminders proactively inform you of task success, failure, or states requiring your confirmation, and guide you for subsequent operations.
Popup Composition and Interaction:
Each popup consists of a status icon, message content, and two buttons in the bottom-right: "View" and "Read".
Status Icons: Divided into success, failure, and confirmation categories, helping you quickly identify message nature.
View: Clicking directly jumps to the task interface associated with the message.
Read: Clicking marks the message as read, closes the popup, and updates red dot reminders in the message center accordingly.
Popup Types and Duration:
Based on message importance, popups are divided into two types:
Notification Messages (Success/Failure):
These popups are for result notifications, remaining on screen for several seconds before automatically disappearing to minimize disruption to your current operations.
Confirmation Messages:
These popups involve key nodes requiring your decision, remaining persistently displayed on the interface until you actively click buttons to process them.
Coin System
11.1 Coin Center
Click the username in the bottom-left corner of the ScienceOne platform, then click "User Center" in the pop-up menu to enter the "Coin Center".
The "Coin Center" includes "Coin Overview", "Activity Center" and "Plans & Top-Ups" modules.
"Coin" serves as the virtual currency system for experiencing the Panshi website, usable only within this site. Based on different validity durations, it is divided into three types:
Daily Coin: Valid on the day obtained, expires at 24:00 on acquisition day.
Time-Limited Coin: 30-day validity period, expires at 24:00 thirty days after acquisition.
Permanent Coin: Permanently valid during normal account usage.
11.2 Coin Overview
"Coin Overview" allows you to obtain overall coin-related information on the ScienceOne, including your membership information, current available research value, and historical research value details.
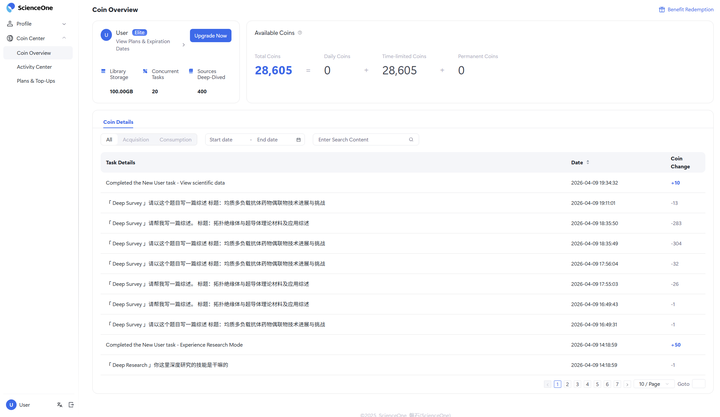
11.2.1 User
Personal information displays your membership information. You can understand all benefits under your current membership level here.
11.2.2 Available Coins
This displays your current available coins, including daily coins, time-limited coins, and permanent coins.
11.2.3 Coin Details
Coin details display all your historical records involving coin acquisition and consumption. You can choose to view detailed coin consumption or acquisition, and also support searching to view details within some time periods.
11.3 Activity Center
ScienceOne provides a series of activities to acquire coins, including daily check-ins, inviting friends, newbie tasks, etc. You can participate in various activities to acquire coins and use various ScienceOne functions.
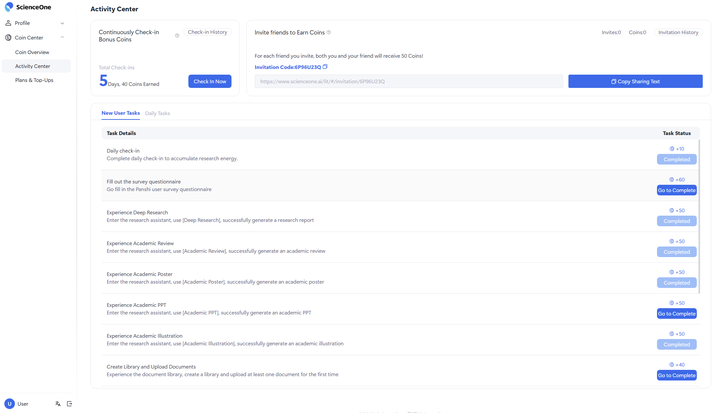
11.3.1 Daily Login Activity
All users receive coins upon daily login.
11.3.2 Inviting Friends
Following guidelines to invite friends to register on ScienceOne, both can receive certain research value rewards.
11.3.3 New User Tasks
Complete new user tasks to receive time-limited coin rewards.Click the new user task card in the bottom-left corner of the ScienceOne platform to view the task list.

Click any task, follow the operation guide to complete the new user task and receive corresponding time-limited coin rewards.
11.4 Plans & Top-Ups
This Plans & Top-Ups module opens recharge for different memberships and displays benefit comparisons. You can flexibly choose different membership based on actual needs.

11.4.1 Basic Membership
ScienceOne provides Basic Membership services for all users. The first month after registration comes with 200 free coins, plus 2GB literature library space and 200 reference papers.
11.4.2 Plus Membership
The Plus Membership provides richer quota packages based on the Basic Membership.
11.4.3 Pro Membership
The Pro Membership not only has the richest quota packages but also provides priority access to new features.
11.4.4 Enterprise Plan
Enterprise users can contact business for exclusive customized research solutions, including dedicated deployment, quota customization, and exclusive custom domain services.